

This three-tier holder stores spare toilet rolls in three lace baskets that hang one above the other on a wall ring. Each basket has a solid cream base, a lavender wall of open fans and a cream rim edged with small picots.
The palette is just two colors, soft lavender and cream. The style is vintage doily lace, but sturdy enough for daily use. All instructions use US crochet terms.
Each basket measures 5 in (12.7 cm) across and 3.25 in (8.3 cm) tall, which fits a standard roll 4.25–4.5 in (10.8–11.4 cm) wide. The straps are 22 in (55.9 cm) long. Once 1.5 in (3.8 cm) of each strap is folded over the ring, the holder hangs about 20.5 in (52.1 cm) below it.
Construction: for each basket you crochet a flat base circle and a flat lace wall panel. You seam the panel into a tube, join it to the base with a round of single crochet, then work the picot rim in the round. Two straps worked in rows are sewn to opposite sides of all three baskets.
Finished Size and Construction
- Basket size: 5 in (12.7 cm) diameter × 3.25 in (8.3 cm) tall
- Skill level: Intermediate
- Terminology: US
- Yarn weight: DK / light (#3) cotton
- Hook: 4 mm (G-6)
- Number of pieces: 8 (3 bases, 3 wall panels, 2 straps)
- Layout: 3 baskets stacked in one vertical column
- Flat wall panel: 16 in (40.6 cm) wide × 2.5 in (6.4 cm) tall
- Basket height before rim: 2.7 in (6.9 cm)
- Rim (border) depth: 0.55 in (1.4 cm) including picots
- Strap size: 1.1 in (2.8 cm) × 22 in (55.9 cm)
Materials
Use a smooth mercerized or combed cotton. It holds the fan shapes crisply and stays firm in a humid bathroom. Avoid acrylic, which makes the lace floppy.
- Lavender (walls and straps): 60 g / 135 m
- Cream (bases, bands and rims): 50 g / 112 m
These quantities include a margin of about 20% for swatching and seaming.
Tools:
– 4 mm (G-6) crochet hook
– Tapestry needle
– 8 locking stitch markers
– Rust-proof pins
– Measuring tape
– Wall ring with round mounting plate, 2 screws and 2 wall anchors (a standard towel ring)
– Spray bottle and blocking mat
Abbreviations (US Terms)
- ch – chain
- sl st – slip stitch
- sc – single crochet
- dc – double crochet
- BLO – back loop only
- sp – space
- st(s) – stitch(es)
- rep – repeat
- RS / WS – right side / wrong side
Special stitches:
– V-st: (dc, ch 3, dc) in the same stitch.
– Picot: ch 3, sl st in 3rd ch from hook.
Gauge and Checkpoints
Gauge: 18 sc × 20 rows = 4 in (10.2 cm) in sc worked flat. Each sc is about 0.22 in wide and each sc row is 0.2 in (0.5 cm) tall.
Make one complete basket before starting the other two. Check it against these points:
- Base after Rnd 6: 2.5 in (6.4 cm) across
- Base after Rnd 12: 5 in (12.7 cm) across
- Wall panel after Row 3: 16 in (40.6 cm) wide
- Wall panel after Row 7: 16 in × 2.5 in (40.6 × 6.4 cm)
- Basket before rim: 2.7 in (6.9 cm) tall
- Finished basket: 3.25 in (8.3 cm) tall
If your base is larger than 5 in (12.7 cm), go down to a 3.75 mm hook. If it is smaller, go up to 4.5 mm. Base and wall must have the same count (72 sts), so change the hook for both pieces, never for just one.
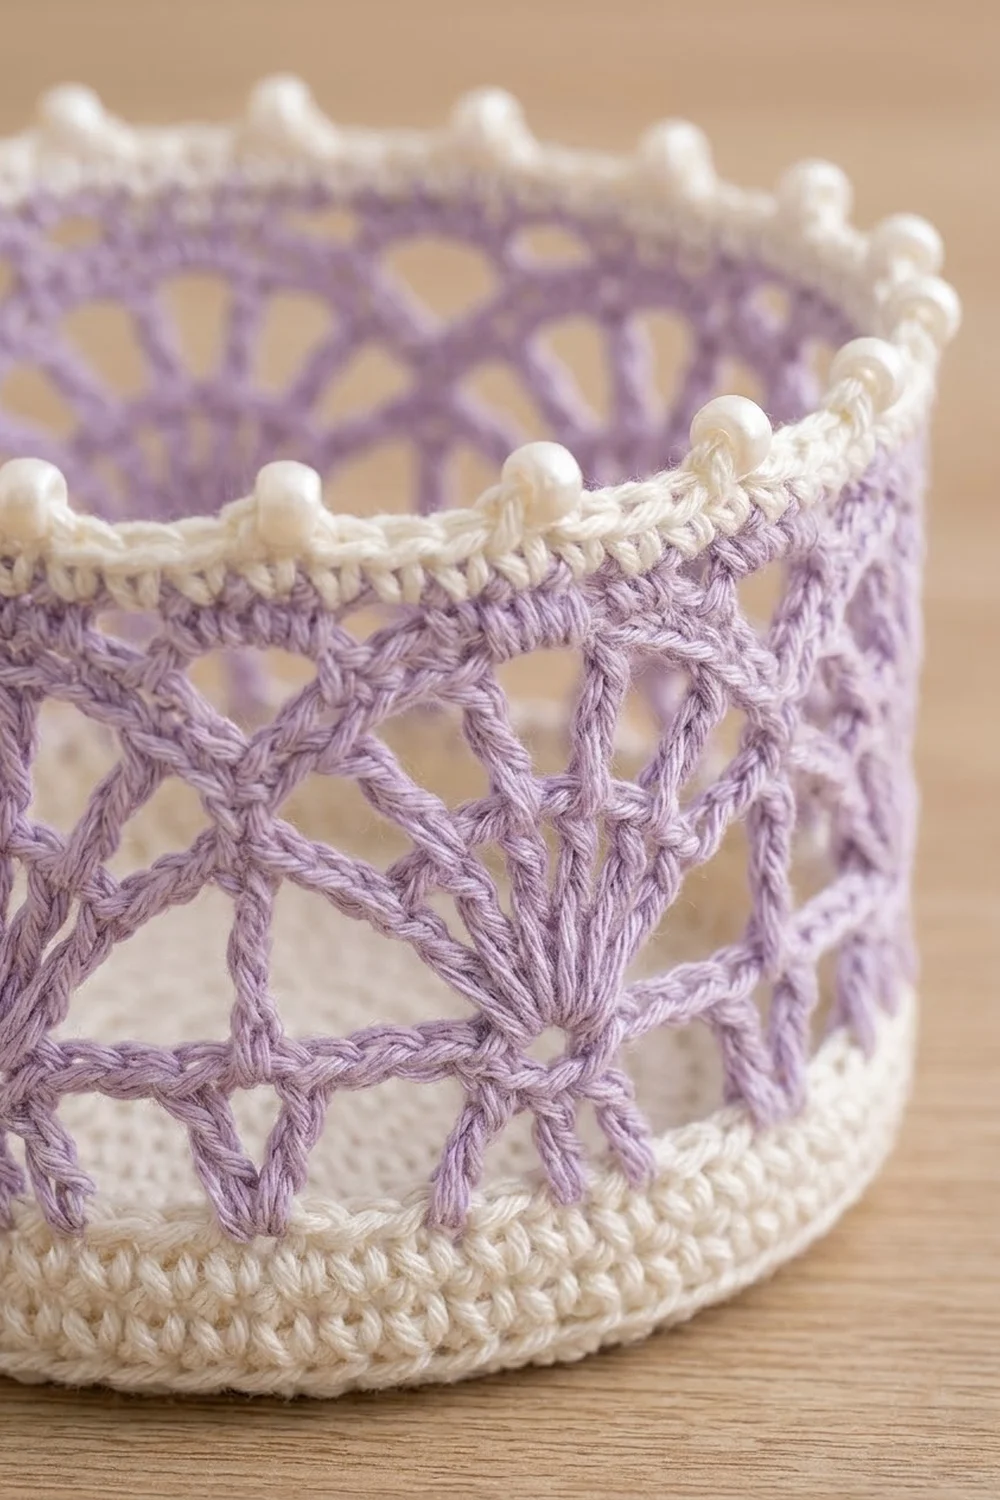
Base (Make 3, Cream)
Work in continuous rounds, joining each round with a sl st. The beginning ch 1 never counts as a stitch.
Rnd 1: Magic ring, ch 1, 6 sc in ring, sl st to first sc. (6 sts)
Rnd 2: Ch 1, 2 sc in each st. (12 sts)
Rnd 3: Ch 1, sc in next st, 2 sc in next st; rep from * around. (18 sts)
Rnd 4: Ch 1, sc in next 2 sts, 2 sc in next st; rep from * around. (24 sts)
Rnd 5: Ch 1, sc in next 3 sts, 2 sc in next st; rep from * around. (30 sts)
Rnd 6: Ch 1, sc in next 4 sts, 2 sc in next st; rep from * around. (36 sts)
Checkpoint: 2.5 in (6.4 cm).
Rnds 7–12: Continue the same way, adding 1 more plain sc before each increase in every round.
- Rnd 7: 42 sts
- Rnd 8: 48 sts
- Rnd 9: 54 sts
- Rnd 10: 60 sts
- Rnd 11: 66 sts
- Rnd 12: 72 sts
Fasten off, weave in the ends and check that the base measures 5 in (12.7 cm) across.
The 72 edge stitches give a circumference of 16 in (40.6 cm). That is exactly the width of the wall panel.
Wall Panel (Make 3)
The panel is worked flat in rows and has eight 9-stitch lace repeats (8 × 9 = 72).
Cream Band
Foundation: With cream, ch 73.
Row 1 (RS): Sc in 2nd ch from hook and in each ch across, turn. (72 sts)
Rows 2–3: Ch 1, sc in each st across, turn. (72 sts)
Fasten off cream, leaving a 12 in (30.5 cm) tail for seaming. Checkpoint: 16 in (40.6 cm) wide, 0.6 in (1.5 cm) tall.
Lavender Lace
Row 4 (RS): Join lavender in the first st. Ch 1, *sc in next st, ch 3, skip 3 sts, V-st in next st, ch 3, skip 3 sts, sc in next st; rep from * 7 more times, turn.
Each repeat uses exactly 9 sts (1 + 3 + 1 + 3 + 1). Count: 16 sc, 8 V-sts, 16 ch-3 sps.
Where two repeats meet, two sc sit side by side. These pairs are the “valleys” between fans.
Row 5 (WS): Ch 1, *sc in next sc, ch 2, skip ch-3 sp, 7 dc in next V-st sp, ch 2, skip ch-3 sp, sc in next sc; rep from * 7 more times, turn.
Count: 16 sc, 8 fans (56 dc), 16 ch-2 sps.
Row 6 (RS): Ch 1, *sc in next sc, ch 2, (dc in next dc, ch 1) 6 times, dc in next dc, ch 2, sc in next sc; rep from * 7 more times, turn.
Count: 16 sc, 56 dc, 48 ch-1 sps, 16 ch-2 sps.
Row 7 (WS): Ch 1, *sc in next sc, ch 2, skip ch-2 sp, sc in next ch-1 sp, (ch 3, sc in next ch-1 sp) 5 times, ch 2, skip ch-2 sp, sc in next sc; rep from * 7 more times.
Count: 64 sc, 40 ch-3 loops, 16 ch-2 sps. The ch-3 loops form a scalloped top edge, five arches over each fan.
Fasten off, leaving a 12 in (30.5 cm) lavender tail.
Checkpoint: Pin the panel flat. It should measure 16 in × 2.5 in (40.6 × 6.4 cm).
Assemble the Basket
- Seam: Bring the short ends of the panel together with the RS facing out. Whipstitch the cream band with the cream tail and the lace edge with the lavender tail. The seam now sits in a valley, so the lace pattern runs on without a break.
- Joining round (cream): Hold the base against the foundation-chain edge of the wall, WS together. Join cream through both layers at the seam. Ch 1 and sc through 1 base stitch and 1 foundation chain each time, all the way around. Sl st to the first sc. (72 sts)
The counts match one-to-one, so the wall goes on without puckers or gathers. Checkpoint: the basket stands 2.7 in (6.9 cm) tall.
Make All Pieces
Totals by color:
– Cream: 3 bases, 3 cream bands, 3 joining rounds, 3 rims
– Lavender: 3 lace sections, 2 straps
Layout grid (one column, measured up from the bottom end of the strap):
        [ RING ]
       /        \     hanging section 7.5 in (19.1 cm)
  [ BASKET 3 - top    ]  11.25-14.5 in (28.6-36.8 cm)
        gap 2 in (5.1 cm)
  [ BASKET 2 - middle ]  6-9.25 in (15.2-23.5 cm)
        gap 2 in (5.1 cm)
  [ BASKET 1 - bottom ]  0.75-4 in (1.9-10.2 cm)
     tab 0.75 in (1.9 cm)
Straps (Make 2, Lavender)
Foundation: Ch 6.
Row 1: Sc in 2nd ch from hook and in each ch across, turn. (5 sts)
Row 2: Ch 1, sc in each st, turn. (5 sts)
Row 3 (eyelet): Ch 1, sc in next 2 sts, ch 1, skip 1 st, sc in next 2 sts, turn. (4 sc + 1 ch-1 sp)
Row 4: Ch 1, sc in next 2 sts, sc in ch-1 sp, sc in next 2 sts, turn. (5 sts)
Rows 5–106: Ch 1, sc in each st, turn. (5 sts)
Rows 107–108: Repeat Rows 3–4 to make the second eyelet.
Rows 109–110: Ch 1, sc in each st, turn. (5 sts)
Fasten off. Each strap has 110 rows × 0.2 in = 22 in (55.9 cm) and is 1.1 in (2.8 cm) wide.
Joining
Method: Whipstitch the straps to the outside of each basket with lavender yarn.
Stitch-to-stitch logic:
– Place the first strap centered over the seam valley (between stitches 72 and 1).
– Place the second strap centered over the opposite valley (between stitches 36 and 37).
– That puts the straps exactly 36 sts apart, so they hang directly opposite each other. The first strap also hides the seam.
– Each strap is 5 sts wide and covers 2.5 sts on either side of its valley.
Positions: Pin all three baskets using the layout grid. The bottom of each basket’s joining round lines up with the lower measurement shown.
Sewing: For each basket, sew across two zones per strap.
– Bottom zone: the joining round and cream band, 5 stitches across.
– Top zone: the rim (its first round, the 72-sc round).
– Edges: also whipstitch the strap edges down the cream band, about 0.6 in (1.5 cm) on each side.
Tension: Use one stitch per strap row and one per basket stitch. Snug each one just enough to close the gap. If you pull hard, the round basket flattens behind the strap.
Size checkpoint: Keep the strap flat and measure between baskets. Each gap should be 2 in (5.1 cm).
Border (Picot Rim, Cream)
Border gauge: 18 sc = 4 in (10.2 cm), so 72 sc = 16 in (40.6 cm), the same as the base and the cream band.
Work with the RS facing, into the Row 7 scalloped edge.
Rnd 1 (conversion): Join cream in the first sc of a valley at the seam. Ch 1, then work each repeat as follows:
– sc in each of the 2 valley sc
– sc in each of the 2 ch-2 sps
– sc in each of the 5 ch-3 loops
That is 9 sc per repeat. Skip the 6 sc that sit between the loops. Sl st to the first sc.
Total = 16 sts worked 1-per-existing-stitch + 56 sts worked into spaces (16 ch-2 sps + 40 ch-3 loops) = 72 sts.
Rnd 2 (picot): Ch 1, *sc in next 2 sts, sc in next st, picot; rep from * 23 more times. Sl st to the first sc.
Count: 72 sc + 24 picots, with one picot every 3 sts. Fasten off.
Why the math works: Each 9-stitch repeat takes in exactly 9 sc. That gives 3 picots per repeat, spaced evenly around all 8 fans. Because the rim has 72 sts, the same as the base, the top opening matches the bottom. Sewn to the straps, each basket holds its cylinder shape. Rim depth is 0.55 in (1.4 cm), which brings the basket to 3.25 in (8.3 cm).
Sew the straps to Rim Rnd 1 now, if you haven’t already.
Final Blocking
- Weave in all ends along stitches of the same color.
- Spray the baskets until they are damp but not dripping.
- Slide each basket over a 5 in (12.7 cm) wide can or jar to block it round.
- Open the fans with your fingers and pin each ch-3 arch upward so the scallops stand evenly.
- Pinch each picot into a round bead.
- Lay the straps flat and pin them to 22 in (55.9 cm).
- Leave everything to dry completely, about 24 hours.
Final Quality-Control Checklist
- [ ] Each base measures 5 in (12.7 cm) and has 72 sts.
- [ ] Each panel measured 16 in × 2.5 in (40.6 × 6.4 cm) before seaming.
- [ ] Each basket has 8 complete fans.
- [ ] Each rim has 24 picots.
- [ ] Every basket is 3.25 in (8.3 cm) tall.
- [ ] The straps are directly opposite each other, and one strap covers the seam.
- [ ] Both gaps between baskets are 2 in (5.1 cm).
- [ ] The two straps are the same length, so the holder hangs level.
Troubleshooting
- Base cups or ruffles: Your tension changed. Re-check gauge and change hook size for both base and wall.
- Wall wider than base: The chains are loose. Use a smaller hook for the foundation chain only.
- Fans lean sideways: You skipped the wrong number of stitches in Row 4. Mark every 9th stitch before you start.
- Rim ruffles: You worked into the 6 sc between loops in Rim Rnd 1. Rework it with exactly 9 sc per repeat.
- Holder tilts: The straps are different lengths. Re-pin the top fold until both sides match.
- Basket sags behind the straps: The sewing is too tight or only the top zone is attached. Sew both zones loosely.
Care
Hand wash in cool water, roll in a towel and dry flat over a round form. Mount the ring well away from a running shower so the cotton doesn’t stay damp.
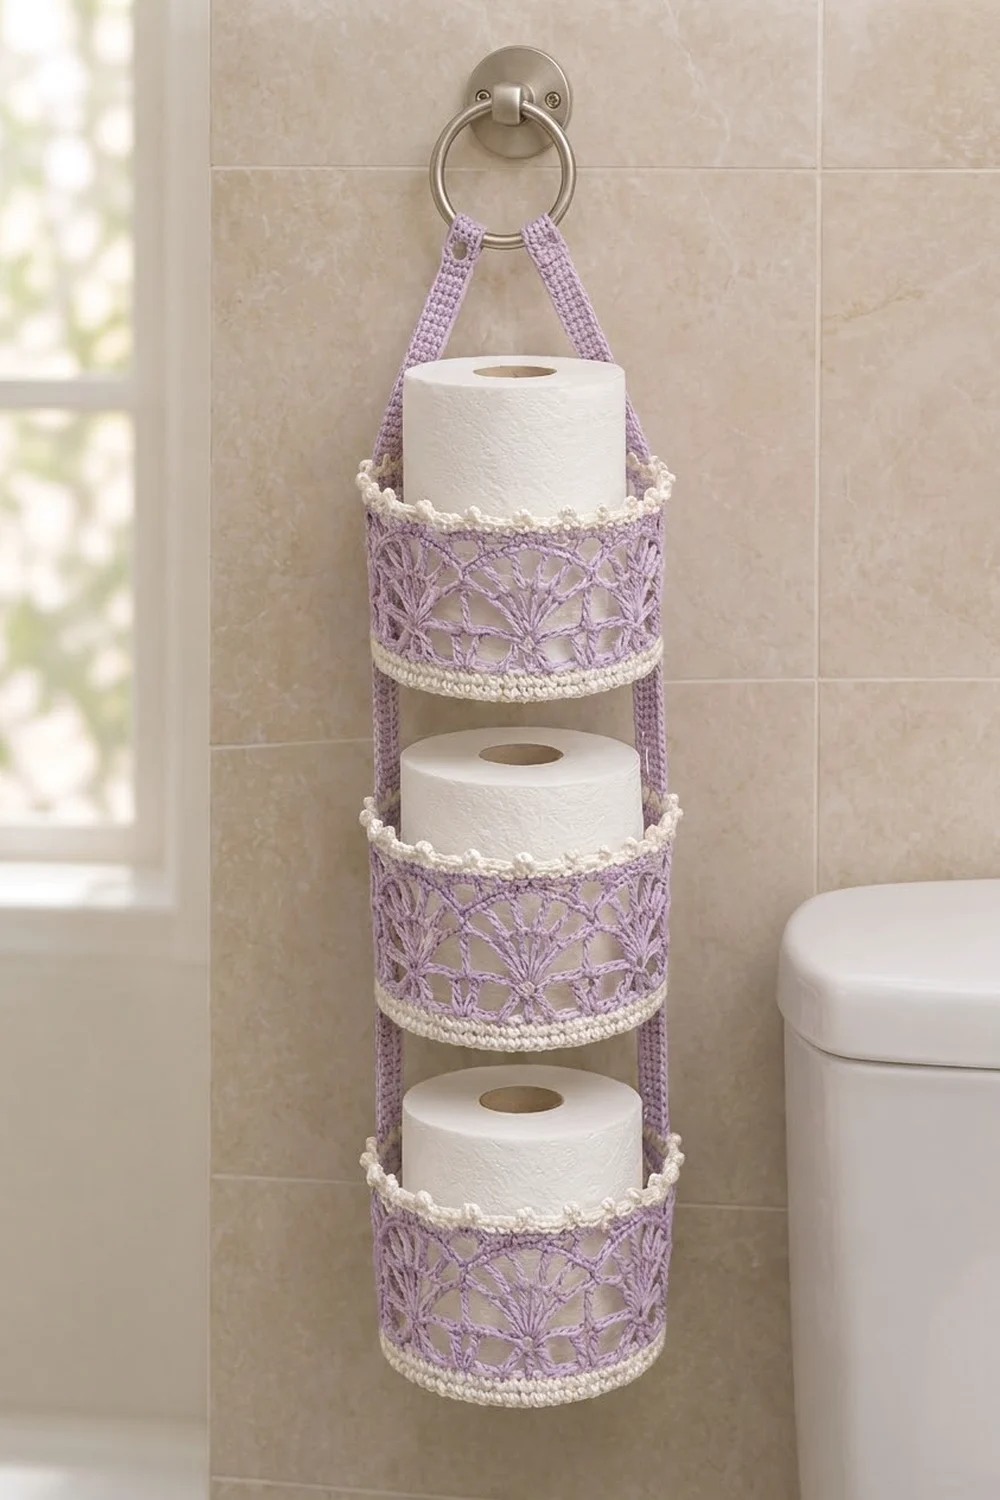
Final Notes
Here is the measurement chain:
– The 72-stitch base measures 5 in (12.7 cm) and has a 16 in (40.6 cm) circumference.
– The 72-stitch wall panel is 16 in (40.6 cm) wide.
– The 72-stitch rim keeps that circumference and brings each basket to 3.25 in (8.3 cm) tall.
– The 22 in (55.9 cm) straps hold three baskets with 2 in (5.1 cm) gaps.
Get the first basket right and the other two will follow the same numbers.
Happy crocheting!