

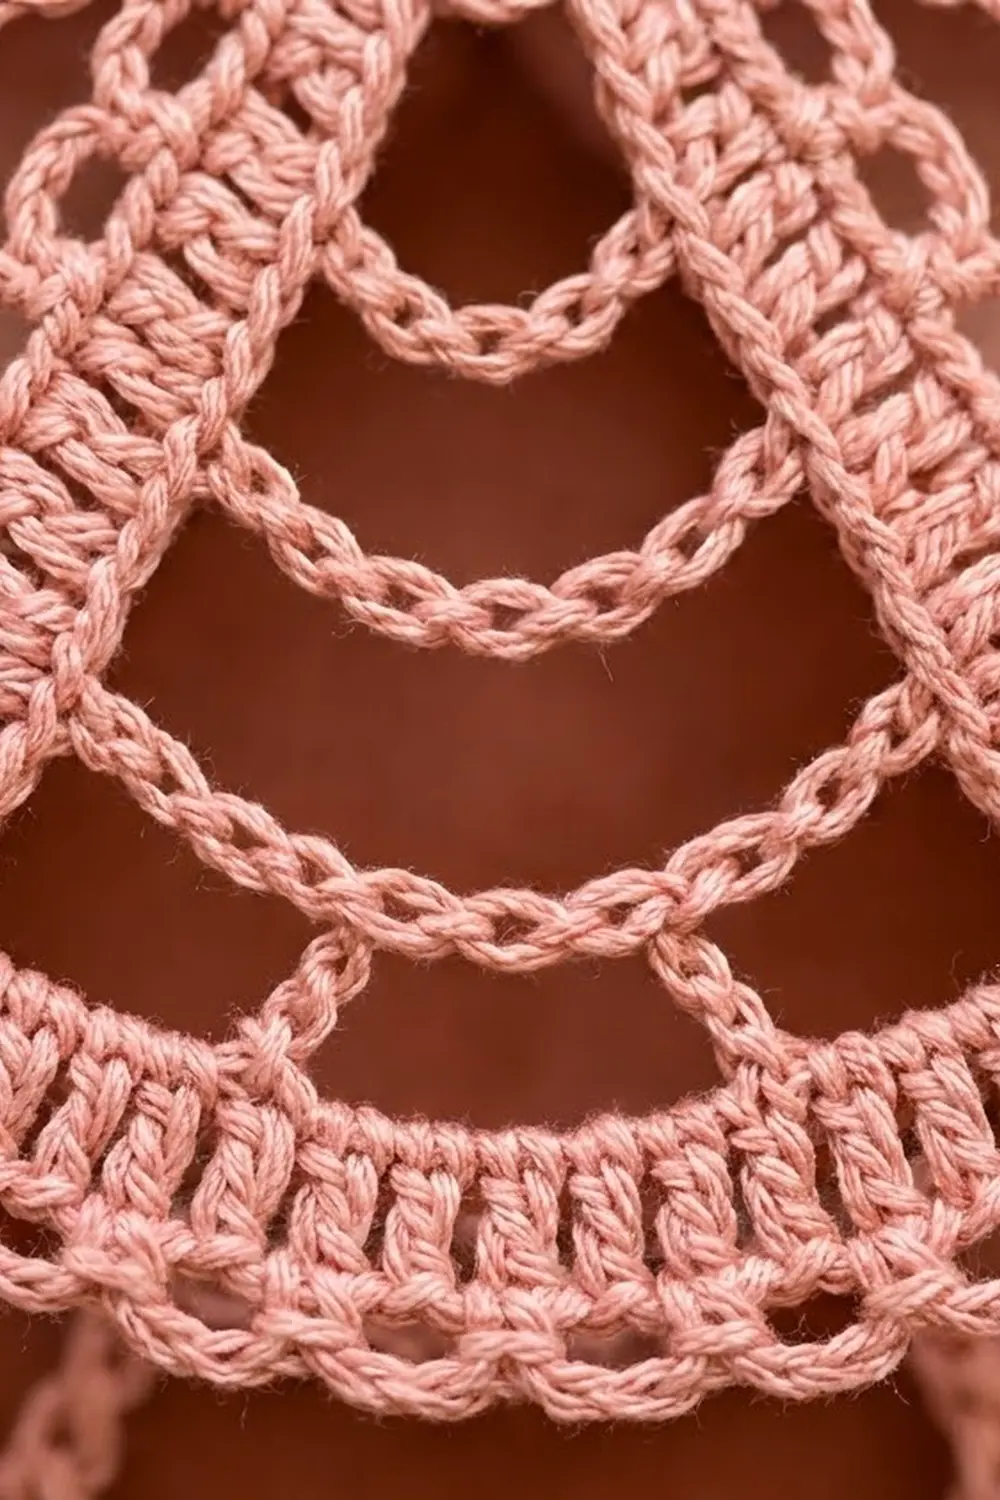
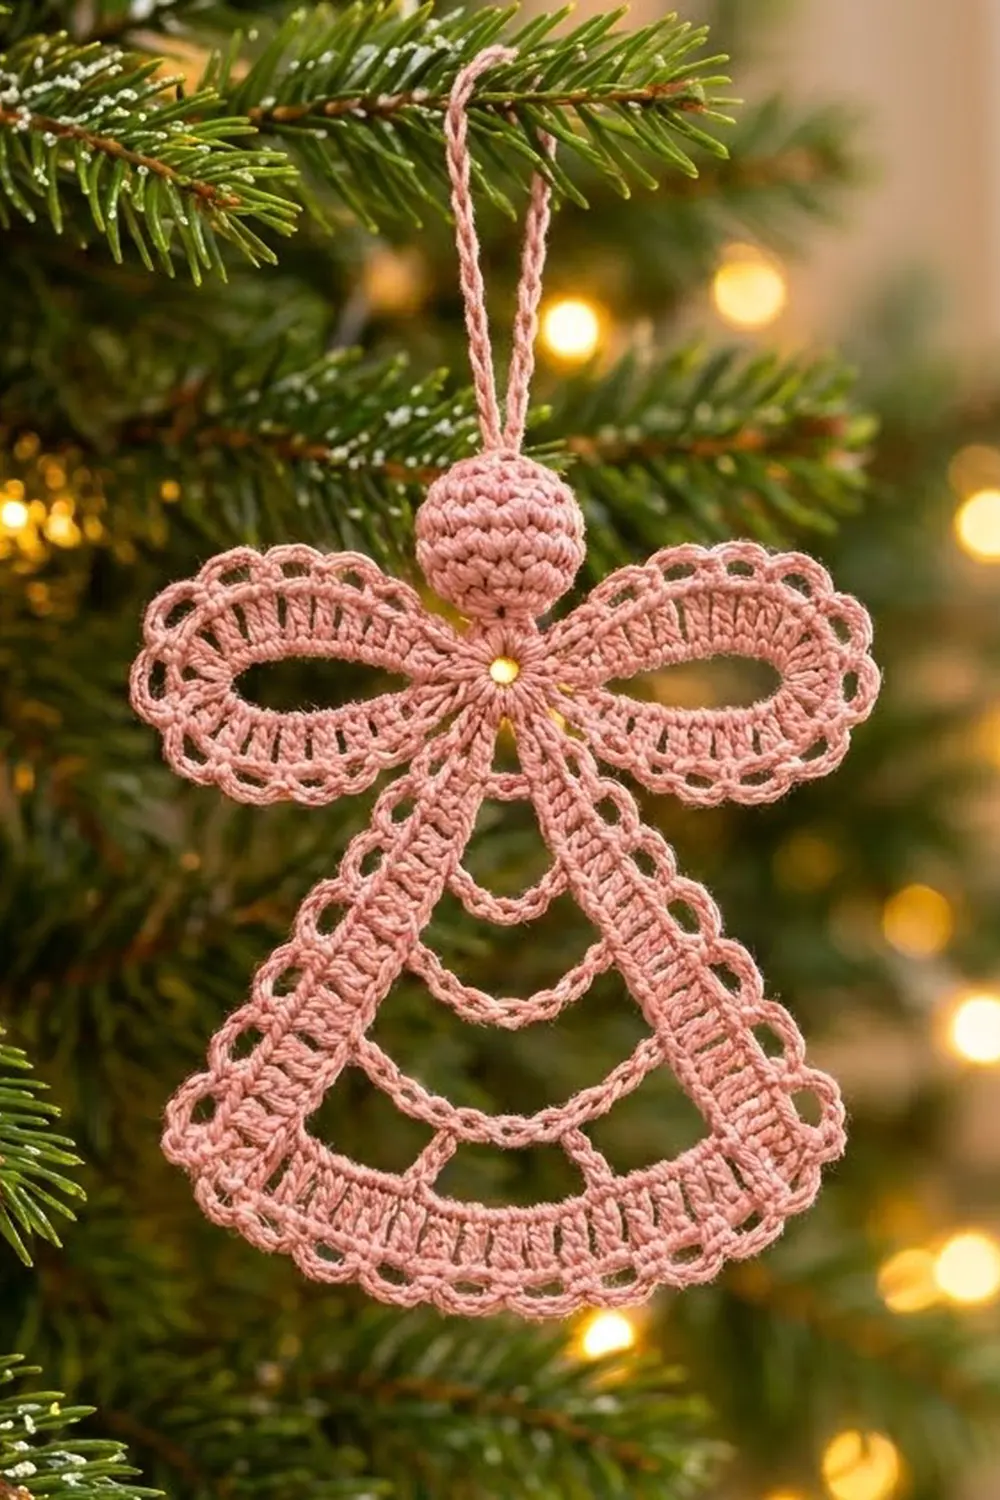
The Blush Lace Angel is a flat, airy Christmas ornament. It has a small stuffed head, two looped wings, and an open A-line skirt with three drooping chain swags. Tiny chain loops edge the whole outline, and the angel hangs from a slim chain loop.
The sample uses a single dusty rose cotton thread. With only one color, the lace structure stands out, especially the ladder-like double crochet bands and the scalloped edge. The look is soft and vintage, and the angel also makes a pretty gift topper.
This pattern uses US crochet terms. The finished angel is 4 in (10.2 cm) wide across the wings and 4.25 in (10.8 cm) tall from the top of the head to the hem edging, not counting the hanging loop.
The angel is made in one piece, so there’s no sewing. You crochet the head in the round, then carry straight on into a small neck ring. The wings, skirt legs, swags and hem band are all built off that ring. To finish, you work one continuous edging pass around the outline and add the hanging loop.
Finished Size and Construction
- Finished size: 4 in (10.2 cm) wide x 4.25 in (10.8 cm) tall
- Skill level: Intermediate (working into chain loops, joining across open spaces)
- Terminology: US
- Yarn weight: Size 3 cotton crochet thread (Super Fine / 1)
- Hook: 2.25 mm (B-1)
- Number of pieces: 1, worked continuously with no sewing
- Layout: Single ornament with a head, neck ring, 2 wings, 2 skirt legs, 3 swags and a hem band
- Piece size: 4 in x 4.25 in (10.2 cm x 10.8 cm)
- Size before border: 3.7 in (9.4 cm) wide x 4.1 in (10.4 cm) tall
- Border depth: about 0.15 in (0.4 cm) of ch-3 loops
Materials
Choose a mercerized cotton thread. It gives crisp stitch definition, holds starch well and won’t stretch on the tree. Size 3 thread is easy to handle and still looks delicate. Pick a smooth, tightly plied thread, since fuzzy yarn blurs the open spaces.
- Dusty rose (main color): 6 g, about 22 yd (20 m)
This amount already includes about 30% extra for your gauge swatch, joins and weaving in ends.
Tools:
– 2.25 mm (B-1) crochet hook
– Small pinch of polyester fiberfill for the head
– Tapestry needle
– 2 locking stitch markers
– Foam blocking mat and rustproof pins
– Spray starch, or a 1:1 mix of white glue and water (optional)
– Scissors and a ruler
Abbreviations (US Terms)
- ch: chain
- sl st: slip stitch
- sc: single crochet
- hdc: half double crochet
- dc: double crochet
- inc: 2 sc in the same stitch
- dec: sc2tog (single crochet 2 together)
- sk: skip
- st(s): stitch(es)
- rep: repeat
Special stitch: ch-3 loop edging. Sc in the first st, *ch 3, sk 1 st, sc in the next st; rep from * as directed. When you work this over an odd number of stitches, it always ends in the last stitch and makes (stitches − 1) ÷ 2 loops.
Gauge and Checkpoints
Gauge: 9 dc worked into a foundation chain = 1 in (2.5 cm). For chains, 10 ch = 1 in (2.5 cm).
Test first: Ch 20, then dc in the 4th ch from the hook and in each ch across (18 dc). The row should measure 2 in (5.1 cm), and the posts should be about 0.25 in (0.6 cm) tall.
Checkpoints:
– Head after Round 8: about 0.75 in (1.9 cm) across
– Neck ring: about 0.5 in (1.3 cm) across
– Each wing: about 1.6 in (4.1 cm) long from the ring and 1 in (2.5 cm) high
– Each leg: 3 in (7.6 cm) long
– Hem band: about 3.3 in (8.4 cm) wide
– Before edging: 3.7 in (9.4 cm) x 4.1 in (10.4 cm)
If it’s too big, switch to a 2.0 mm hook or chain a little more firmly. If it’s too small, switch to a 2.5 mm hook. Change the hook rather than the stitch counts, because the swag and hem lengths are matched to the leg length.
Head
Work in continuous rounds without joining. Mark the first stitch of each round.
Round 1: Make a magic ring and work 6 sc into it. Pull the ring closed. (6 sts)
Round 2: Inc in each st around. (12 sts)
Round 3: *Sc in next st, inc in next st; rep from * 5 more times. (18 sts)
Rounds 4–6: Sc in each st around. (18 sts in each round)
Round 7: *Sc in next st, dec; rep from * 5 more times. (12 sts)
Stuff the head firmly with a small pinch of fiberfill, keeping it smooth and round.
Round 8: Dec 6 times. (6 sts)
Checkpoint: You should have a firm ball about 0.75 in (1.9 cm) across. Don’t fasten off.
Neck Ring
Foundation: Ch 6, then sl st in the first ch to form a ring. The ring sits directly below the head.
Round 1: Ch 3 (counts as a dc), work 15 dc into the ring, then sl st in the top of the ch-3. (16 dc)
Fasten off. The ring should lie flat and measure about 0.5 in (1.3 cm) across.
Numbering the ring: Hold the angel with the head at the top and the right side facing you. The ch-3 just under the head is dc 1. Count clockwise from there: dc 5 is at 3 o’clock, dc 9 is at the bottom center and dc 13 is at 9 o’clock. Every other part is placed using these numbers.
Wings (Make 2 on the Ring)
Right wing: Join the thread in dc 4. Ch 20, then sl st in dc 6 to form a long chain loop.
Wing round: Ch 1. Working into the chain loop itself rather than into the individual chains, work 2 sc, 2 hdc, 27 dc, 2 hdc, 2 sc. Sl st in dc 4. (35 sts)
The stitches fan out around the loop. This makes the open oval in the middle of the wing and the ribbed band around it. Fasten off.
Left wing: Join in dc 12. Ch 20 and sl st in dc 14, then repeat the wing round, ending with a sl st in dc 12. (35 sts) Fasten off.
Checkpoint: Each wing should reach about 1.6 in (4.1 cm) out from the ring. Measured wingtip to wingtip, the angel should be 3.7 in (9.4 cm).
Skirt Legs (Make 2 on the Ring)
The legs are the two ladder bands that form the A-line skirt. Each dc post runs across the width of its band, like a rung on a ladder.
Right leg: Join in dc 8.
Row 1: Ch 29. Dc in the 4th ch from the hook (the skipped chains count as the first dc), then dc in each remaining ch, working back toward the ring. Sl st in dc 7. (27 dc)
Before the sl st, twist the leg if needed so the dc tops face outward, away from the center. That leaves the foundation-chain edge facing inward. The lace looks the same on both sides, so this doesn’t affect the front. Fasten off.
Left leg: Join in dc 10. Repeat Row 1, ending with a sl st in dc 11. (27 dc) Again, the dc tops should face outward. Fasten off. Dc 9 stays unworked between the legs.
Leg numbering: On each leg, dc 1 is the stitch nearest the ring and dc 27 is at the free tip.
Checkpoint: Each leg should be 3 in (7.6 cm) long. Lay the angel flat and set the leg tips 3.3 in (8.4 cm) apart.
Swags
Each swag is a single chain worked across between the inner, foundation-chain edges of the legs, at the base of the dc given. Keep the leg tips 3.3 in (8.4 cm) apart while you work.
Swag 1: Join at the base of dc 8 on the right leg. Ch 17, then sl st at the base of dc 8 on the left leg. Fasten off.
Swag 2: Join at the base of dc 15 on the right leg. Ch 26, then sl st at the base of dc 15 on the left leg. Fasten off.
Swag 3: Join at the base of dc 22 on the right leg. Ch 35, then sl st at the base of dc 22 on the left leg. Fasten off.
Each chain is 5 to 8 ch longer than the straight gap it spans, so it sags into a soft arc. The arcs end up about 0.7 in (1.8 cm) apart, and none of them should pull the legs inward.
Hem Band
Turn the angel upside down so the leg tips point up.
Row 1: Join at the right leg tip, in the top of dc 27. Ch 33, then sl st in the left leg tip (dc 27). The chain should be straight but not stretched.
Row 2: Ch 3 (counts as the first dc). Sk the first ch, then dc in each of the remaining 32 ch, working back toward the right leg. Sl st in the right leg tip. (33 dc)
Hold the work so the dc tops point down, away from the swags. The posts will stand upright and form the ladder-style hem. Fasten off.
Checkpoint: The hem should be about 3.3 in (8.4 cm) wide and 0.25 in (0.6 cm) deep. Before edging, the whole angel should measure 3.7 in (9.4 cm) x 4.1 in (10.4 cm).
Border: Ch-3 Loop Edging
Border gauge: Each ch-3 loop covers 2 stitches, about 0.22 in (0.6 cm), and sticks out about 0.15 in (0.4 cm).
The edging is worked in one continuous pass around the outer outline: over the right wing, down the right leg, across the hem, up the left leg and over the left wing.
Right wing: Join in dc 4. Working across all 35 wing sts, sc in the first st, *ch 3, sk 1, sc in next st; rep from * 16 more times. That gives 17 loops, with the last sc in the final wing st. Sl st in dc 6, then sl st in dc 7.
Right leg: Work along the dc tops from dc 1 to dc 27. Sc in dc 1, *ch 3, sk 1, sc in next st; rep from * 12 more times. (13 loops, with the last sc in dc 27)
Corner: Ch 3, then sc in the first hem st. (1 loop)
Hem: *Ch 3, sk 1, sc in next st; rep from * 15 more times. (16 loops, with the last sc in hem st 33)
Corner: Ch 3, then sc in dc 27 of the left leg. (1 loop)
Left leg: *Ch 3, sk 1, sc in next st; rep from * 12 more times. (13 loops, with the last sc in dc 1) Sl st in dc 11, then sl st in dc 12.
Left wing: Sc in the first wing st, *ch 3, sk 1, sc in next st; rep from * 16 more times. (17 loops) Sl st in dc 14 and then in dc 15. Fasten off.
Total: 17 + 13 + 1 + 16 + 1 + 13 + 17 = 78 loops.
Why the math works: Every edged section has an odd stitch count, so (stitches − 1) ÷ 2 always comes out to a whole number: (35 − 1) ÷ 2 = 17, (27 − 1) ÷ 2 = 13 and (33 − 1) ÷ 2 = 16. Each section starts and ends in a real stitch, so you never need a fudge stitch and the corners stay neat. The edging adds 0.15 in (0.4 cm) to each side. That brings the width from 3.7 in (9.4 cm) to 4 in (10.2 cm). Adding it along the bottom brings the height from 4.1 in (10.4 cm) to 4.25 in (10.8 cm).
Hanging Loop
Join at the top center of the head, at the magic ring. Ch 30, then sl st in the same spot and fasten off. The loop stands about 1.5 in (3.8 cm) above the head.
Final Blocking
- Weave in all ends along the dc bands.
- Dampen the angel in cool water, then press it in a towel. Don’t wring it.
- Pin it flat with the head at the top, placing the wingtips 4 in (10.2 cm) apart.
- Pin the leg tips so the hem is about 3.3 in (8.4 cm) wide and the total height is 4.25 in (10.8 cm).
- Pin each swag into an even, centered arc.
- Put a pin through every ch-3 loop so the edging opens into neat scallops.
- Use a pin to shape the center of each wing into a smooth oval.
- Starch it and let it dry completely, at least 6 hours.
- Unpin it and gently plump the head with your fingers.
Final Quality-Control Checklist
- The head is round, firm and centered over the neck ring
- The neck ring has 16 dc, and dc 9 is free between the legs
- Each wing has 35 sts, 17 edging loops and an open oval center
- Each leg has 27 dc, with the dc tops facing outward
- The swags (17, 26 and 35 ch) droop evenly
- The hem band has 33 dc, with the tops facing down
- The edging has 78 loops in total
- The finished size is 4 in (10.2 cm) x 4.25 in (10.8 cm)
- The angel hangs straight
Troubleshooting
Wings ruffle: Your dc tension is too loose. Tighten up, or use a smaller hook for the wing round only.
Wing center closes up: You worked into the individual chains. Rework the round with all 35 sts going into the loop space.
Legs cross or splay unevenly: Make sure each leg starts with exactly 29 ch, and check the swag lengths.
Swags hang straight or sag too low: Check your chain gauge, and add or remove 2 ch as needed.
Hem puckers: The Row 1 chain is too tight. Rework it with a looser chain.
Edging loops lean: Somewhere you skipped 2 sts instead of 1. Count each section again against its total.
Angel hangs crooked: Move the hanging loop so it sits exactly over the magic ring.
Care
Hand wash in cool water with mild soap, then reshape and re-starch if needed. Store the angel flat between sheets of tissue paper.
Final Notes
All the measurements build on one gauge: 9 dc = 1 in (2.5 cm). At that gauge, the 27-dc legs come out at 3 in (7.6 cm) and the 33-dc hem spans 3.3 in (8.4 cm). The wings bring the width to 3.7 in (9.4 cm) before edging. The edging then adds 0.15 in (0.4 cm) per side, for a finished size of 4 in (10.2 cm) x 4.25 in (10.8 cm). If your swatch matches, every swag and hem chain will fit without any adjustment.
Happy crocheting!