
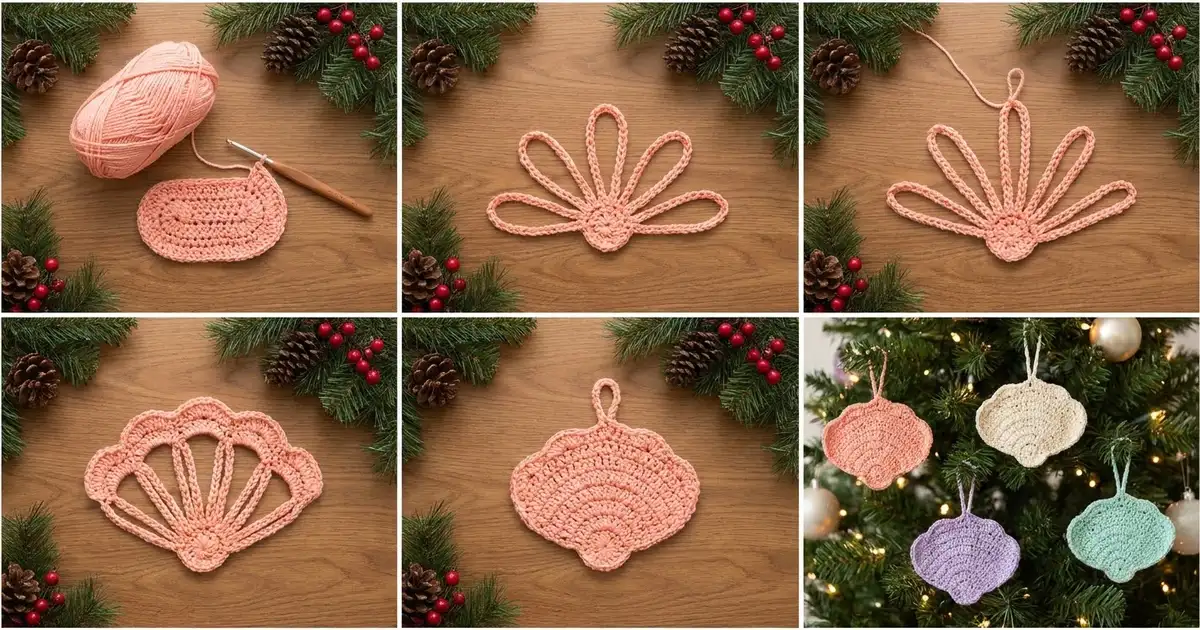
This little fan shell is a quick, lacy ornament. Five slim chain petals spread out from a small solid base, and a scalloped band of double crochet caps each petal. The open spaces between the spokes let the tree lights shine through, which makes it a nice holiday decoration.
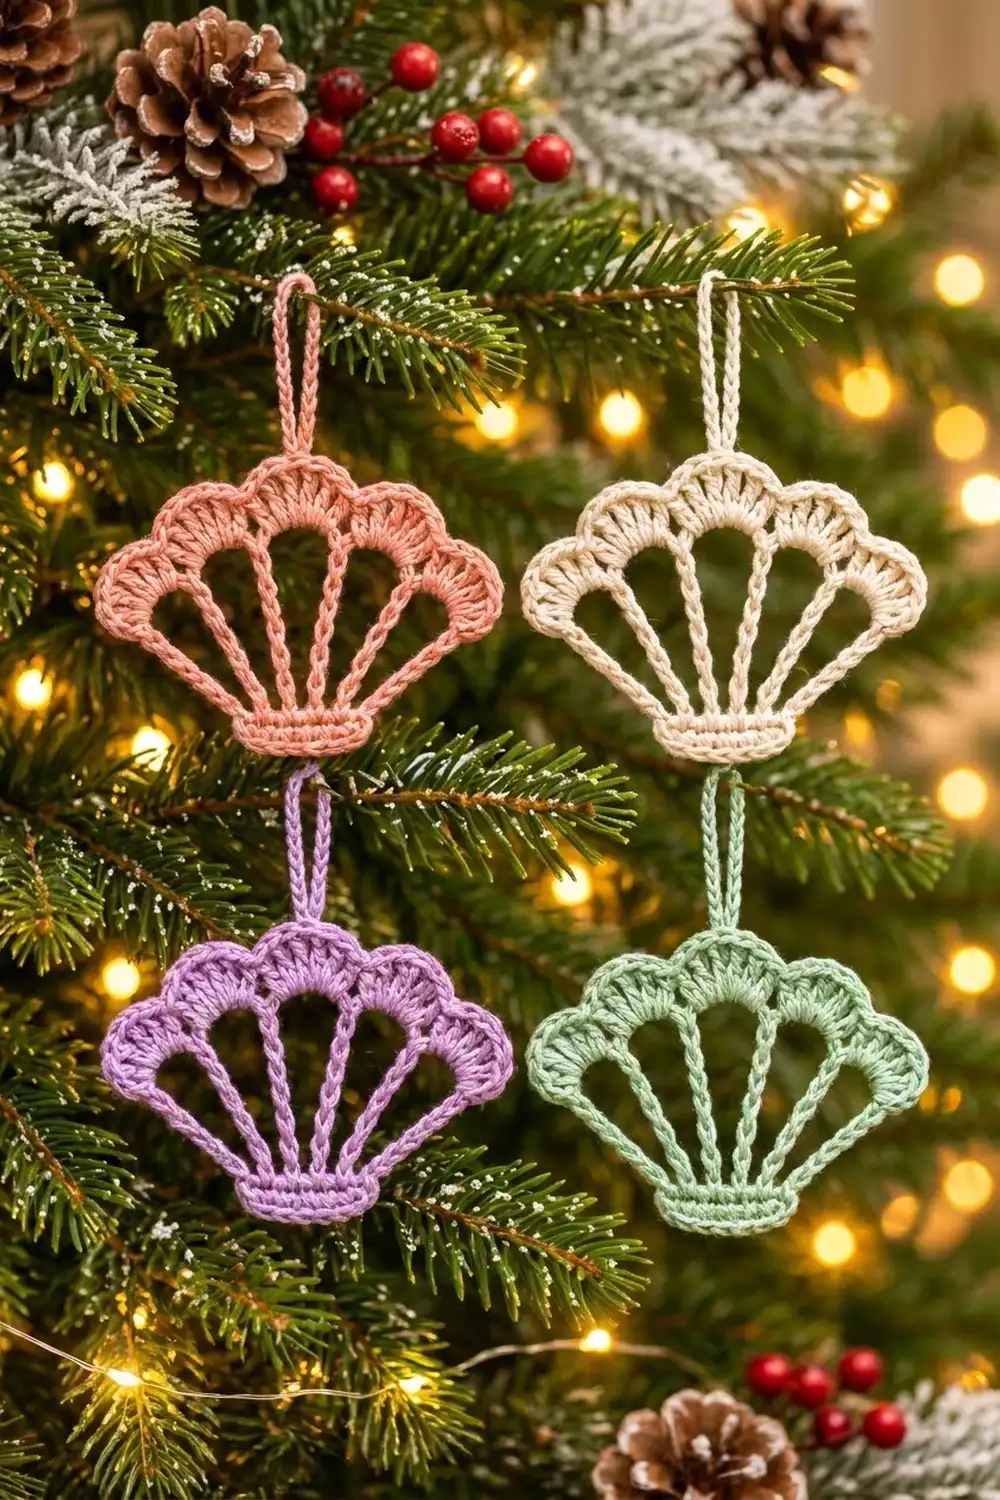
The sample is a soft peach-pink, a warm color that suits natural wood, pine and red berries. It also works well in cream, lavender or mint. Make one of each and you have a pastel set that looks like little shells from the sea.
The pattern uses US crochet terms. The finished ornament is about 4 in (10.2 cm) wide and 3 in (7.6 cm) tall without the hanging loop. The loop adds about 1.5 in (3.8 cm).
Construction is simple. You crochet a 6-stitch single crochet base, then work five chain loops from it in one row. One scallop row adds double crochet arcs across the loop tops and joins them together, and a chain hanger finishes the piece. It is all one piece and needs no sewing.
Finished Size and Construction
- Finished size: 4 in (10.2 cm) wide × 3 in (7.6 cm) tall, plus a 1.5 in (3.8 cm) hanging loop
- Skill level: Easy
- Terminology: US crochet terms
- Yarn weight: Sport weight (#2) cotton
- Hook: 3.0 mm
- Number of pieces: 1
- Layout: Single fan-shaped motif with five petals
- Base size: about 1.25 in (3.2 cm) wide × 0.4 in (1.0 cm) tall
- Size before scallop edging: about 3.5 in (8.9 cm) wide × 2.5 in (6.4 cm) tall
- Scallop edging depth: about 0.5 in (1.3 cm) at the top center and about 0.25 in (0.6 cm) at the outer sides
Materials
Yarn. Use a smooth mercerized or combed cotton in sport weight. Cotton gives crisp stitch definition, and the petals keep their shape after blocking. Avoid fuzzy or very stretchy yarns because the chain spokes will look blurry and can sag.
- Peach-pink (main sample): 8 g, about 25 m
- Optional colorways: cream, lavender or mint, 8 g (about 25 m) each per ornament
An ornament uses about 6 g. The quantities above include a margin for your gauge swatch and tails.
Tools:
– 3.0 mm crochet hook
– Tapestry needle
– Scissors
– Stitch marker
– Ruler or tape measure
– Blocking mat and rust-proof pins
– Spray bottle with water
– Optional: diluted fabric stiffener
Abbreviations (US Terms)
- ch – chain
- sl st – slip stitch
- sc – single crochet
- dc – double crochet
- sc2tog – single crochet 2 together
- st(s) – stitch(es)
- RS – right side
Special stitch: sc2tog across two loops. Insert the hook in the stated chain of the loop you are working, yarn over and pull up a loop. Then insert the hook in the stated chain of the next loop, yarn over and pull up a loop. Yarn over and pull through all 3 loops on the hook. This stitch joins neighboring petals at the top and turns the separate arcs into one continuous scalloped edge.
Gauge and Checkpoints
Gauge is not critical for an ornament, but it controls the size and how the petals sit. Make one test ornament before you make a set.
- Chain gauge: 7 ch = 1 in (2.5 cm)
- Single crochet gauge: 5 sc = 1 in (2.5 cm)
Checkpoint 1, after the base (Row 2): about 1.25 in (3.2 cm) wide × 0.4 in (1.0 cm) tall.
Checkpoint 2, after the loops (Row 3): a single loop stretched flat should measure about 3.1 in (7.9 cm) from end to end. Fanned out, the frame measures about 3.5 in (8.9 cm) × 2.5 in (6.4 cm).
Checkpoint 3, after the scallops (Row 4): about 4 in (10.2 cm) × 3 in (7.6 cm).
Too big? Go down to a 2.75 mm hook, or keep your chains tighter. Too small? Go up to a 3.25 mm hook. Change the hook rather than the stitch counts, because the scallop math depends on the exact chain counts.
Pattern
Base
Leave a 6 in (15.2 cm) tail.
Row 1 (RS): Ch 7, sc in the 2nd ch from the hook and in each ch across. (6 sc)
Row 2: Ch 1, turn, sc in each st across. (6 sc)
The base is a firm little rectangle. It anchors all five petals, so keep the tension even.
Petal Loops
Row 3: Ch 1, turn. Sc in the first st, ch 22, sc in the next st; repeat from * 4 more times. (6 sc, 5 ch-22 loops)*
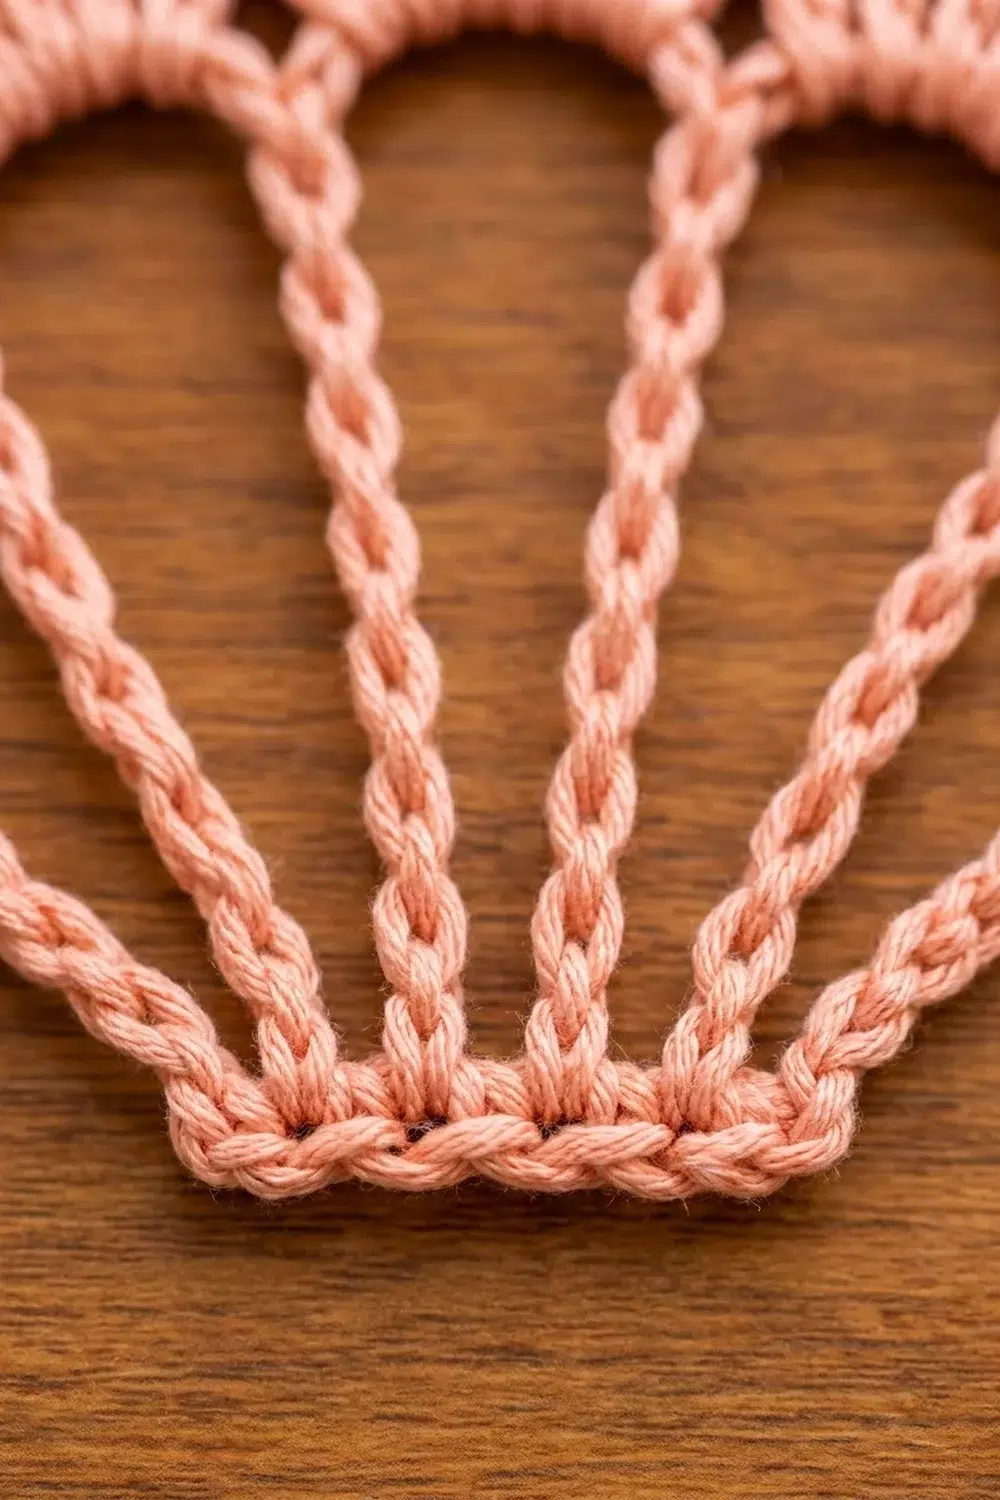
Number the loops in the order you made them: Loop 1 to Loop 5. Each loop is anchored between two neighboring sc, so neighboring loops share an anchor point. This is why their sides lie side by side and form the double-chain spokes.
Each 22-ch loop has three parts:
– Chains 1–8: the side nearest your hook (8 ch)
– Chains 9–14: the top (6 ch)
– Chains 15–22: the far side (8 ch)
Always count the chains from the end where you enter the loop. All the loops are symmetrical, so the count works the same in either direction.
Do not fasten off. Your hook is at the last sc, right next to Loop 5.
Checkpoint: Fan the loops out on the table with Loop 3 pointing straight up and Loops 1 and 5 pointing out to the sides. The frame should measure about 3.5 in (8.9 cm) × 2.5 in (6.4 cm).
Scallop Row
You work this row back across the loops from Loop 5 to Loop 1, without turning. This row builds the scalloped top. Because all of it sits outside the plain chain frame, the next section treats it as the border.
Hanging Loop
You add this after blocking (see below).
Border (Scallop Edging)
Border gauge: 2 dc in each chain gives about 8 dc per 0.75 in (1.9 cm) of arc. The dc are packed tightly, which makes the edge curl into a rounded scallop.
Row 4: Do not turn.
Loop 5 (outer side): Sl st in ch 1–8 of Loop 5. Sc in ch 9, 2 dc in each of ch 10–13. Then sc2tog across ch 14 of Loop 5 and ch 9 of Loop 4.
Loop 4: 2 dc in each of ch 10–13, then sc2tog across ch 14 of Loop 4 and ch 9 of Loop 3.
Loop 3 (center): 2 dc in each of ch 10–13, then sc2tog across ch 14 of Loop 3 and ch 9 of Loop 2.
Loop 2: 2 dc in each of ch 10–13, then sc2tog across ch 14 of Loop 2 and ch 9 of Loop 1.
Loop 1 (outer side): 2 dc in each of ch 10–13, sc in ch 14, then sl st in ch 15–22. Sl st in the first sc of Row 3.
Fasten off and leave a 6 in (15.2 cm) tail.
Row 4 stitch counts:
– Per petal: 8 dc
– Whole row: 40 dc + 4 sc2tog + 2 sc + 16 sl st on the outer sides + 1 closing sl st = 63 sts
Why the math works: Each loop’s top has exactly 6 ch. In every petal, one chain goes to the sc (or half of an sc2tog) at each end, and 4 chains carry 2 dc each:
1 + 4 + 1 = 6 ch used per top.
That means no chain is skipped or used twice. Doubling into the middle 4 ch packs 8 dc into a short space, which bends the arc into a full scallop.
The two shared sides between neighbors are 8 ch each. The sc2tog joins the tops at matching points (ch 14 of one loop and ch 9 of the next), so each spoke has two equal 8-ch sides lying flat together. On Loops 5 and 1 the outer sides are also 8 ch, now covered in 8 sl st each, so the two edges of the ornament match.
Checkpoint: about 4 in (10.2 cm) wide × 3 in (7.6 cm) tall. The center scallop should sit highest and the outer scallops lowest.
Final Blocking
- Weave in both tails along the back of the base and the outer sl st edges. Do not trim them yet.
- Lightly mist the ornament with water until it is damp but not dripping.
- Lay it RS up on the blocking mat. Point Loop 3 straight up and spread the other loops evenly in a half circle.
- Pin the base flat so it measures 1.25 in (3.2 cm) wide.
- Pin the outer petals so the full width is 4 in (10.2 cm).
- Pin the top of the center scallop so the height is 3 in (7.6 cm).
- Straighten each spoke so its two chains lie side by side, and set a pin at the middle of each spoke.
- Shape each scallop into a smooth, even curve with your fingertips.
- Optional: brush on diluted fabric stiffener for a firmer ornament.
- Let it dry completely, then remove the pins and trim the tails.
Hanging Loop
Join the yarn with a sl st between the 4th and 5th dc of the center scallop. Ch 22, then sl st in the same space. Fasten off and weave in the ends on the back. Folded, the loop stands about 1.5 in (3.8 cm) tall.
Final Quality-Control Checklist
- The base has 6 sc in each of its 2 rows.
- There are 5 loops, each with exactly 22 ch.
- Each scallop has 8 dc.
- Four sc2tog joins connect the scallops into one continuous edge.
- The outer sides have 8 sl st each.
- The ornament measures 4 in (10.2 cm) × 3 in (7.6 cm).
- The spokes lie flat in pairs without twisting.
- The center scallop is the highest point.
- The hanging loop is centered and about 1.5 in (3.8 cm) tall.
- All tails are woven in and trimmed.
Troubleshooting
The petals are twisted. The chain twisted while you made it. Before Row 3, keep the chain flat with the front bumps all facing the same way. Untwist and pin during blocking.
The scallops look flat or wavy. Your dc are too loose or too tight. Ruffling means too many stitches for your tension, so try a smaller hook for Row 4 only. Flat, pulled scallops mean you should go up a hook size.
The spokes have gaps between the two chains. The sc2tog was worked into the wrong chain. Check that it uses ch 14 of one loop and ch 9 of the next.
The ornament leans to one side. One loop has a different chain count. Recount all five loops; each must be 22 ch.
The outer edges look thicker than the spokes. This is normal from the sl st. Keep the sl st loose so the edges match the look of the chain.
The base curls. Pin it firmly while blocking, or add a little stiffener.
Care
Hand wash in cool water with mild soap, press out the water gently, and reshape and dry flat. Store the ornament flat between tissue paper so the scallops keep their shape.
Final Notes
The measurement chain is short and easy to check. The 6-sc base gives 1.25 in (3.2 cm). The five 22-ch loops fan out to a 3.5 in (8.9 cm) × 2.5 in (6.4 cm) frame. The scallop row, 8 dc per petal and 63 sts in total, brings the ornament to 4 in (10.2 cm) × 3 in (7.6 cm). The hanger adds 1.5 in (3.8 cm). If each checkpoint matches, every shell in your set will come out the same size, whatever color you choose.
Happy crocheting!