

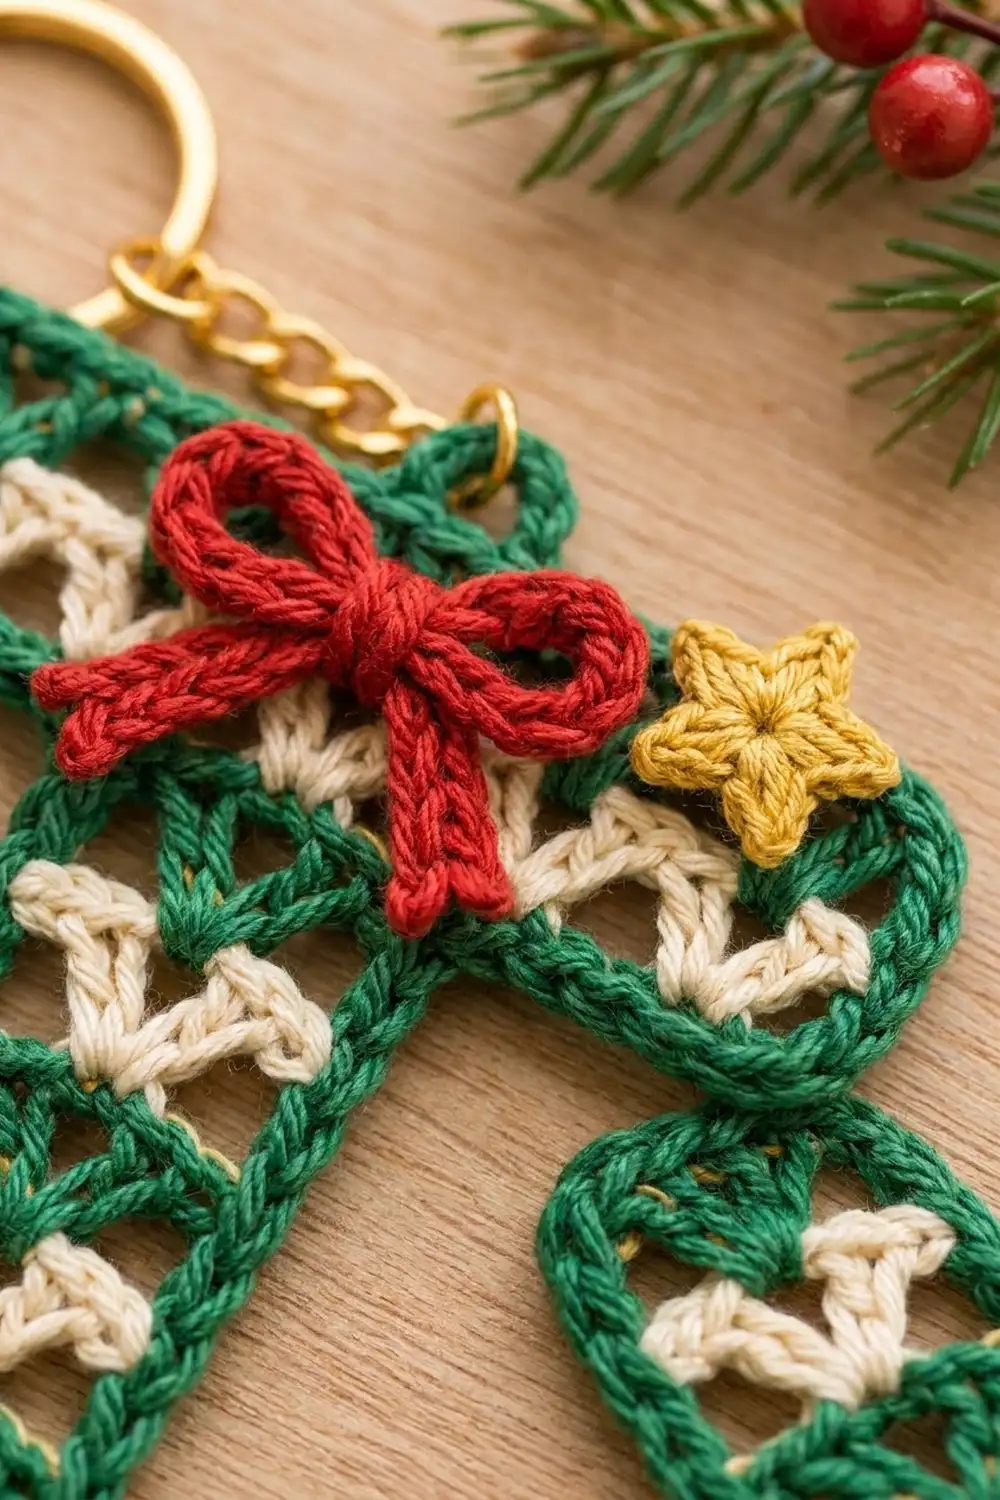
This little letter T keychain makes a quick holiday gift. It is a single flat monogram, filled with neat V-stitch rows in forest green and cream. A twisted green crab-stitch edge outlines the letter, and a red bow and a tiny gold star are sewn on top.
The look is classic Christmas: green and cream rows with a bright red and gold accent. It clips onto a tote, backpack or set of keys, and it works as a gift-tag topper too.
The pattern uses US crochet terms. The finished T measures 3 in (7.6 cm) wide by 3.5 in (8.9 cm) tall. The stem is 1.3 in (3.3 cm) wide.
You start the stem at the bottom and work it upward in rows. At the top of the stem, you extend the row out to both sides to start the bar, then work two more rows. Next, a two-round border goes around the whole letter. Last, you make a cord bow and a small star, sew them on, and add the hanging loop and hardware.
Finished Size and Construction
- Finished size: 3 in (7.6 cm) wide x 3.5 in (8.9 cm) tall
- Skill level: Advanced beginner
- Terminology: US crochet terms
- Yarn weight: Sport (#2) cotton
- Hook: 2.5 mm
- Number of pieces: 1 letter, plus 2 small appliqués (bow and star)
- Layout: Single T-shaped motif, no assembly
- Piece size before border: 2.5 in (6.4 cm) wide x 3 in (7.6 cm) tall
- Bar before border: 2.5 in x 0.8 in (6.4 cm x 2.0 cm)
- Stem before border: 0.8 in (2.0 cm) wide x 2.2 in (5.6 cm) long
- Border depth: 0.25 in (0.6 cm) on every edge
Materials
Use a smooth, mercerized sport-weight cotton, at about 3.1 m per gram (155 m per 50 g). Cotton gives crisp V-stitches and holds its shape on a keychain that gets handled a lot.
- Forest green: 6 g (19 m)
- Cream: 2 g (6 m)
- Red: 1 g (3 m)
- Gold/yellow: 1 g (3 m)
These quantities include a margin for swatching and weaving in ends.
Tools:
– 2.5 mm crochet hook
– Tapestry needle
– 2 stitch markers
– Scissors
– Rust-proof pins and a small blocking mat
– 1 in (2.5 cm) split key ring with a short chain
– 2 jump rings, 8 mm
– Flat-nose pliers
– Optional: fabric stiffener
Abbreviations (US Terms)
- ch – chain
- sl st – slip stitch
- sc – single crochet
- hdc – half double crochet
- dc – double crochet
- sc2tog – single crochet 2 together
- fsc – foundation single crochet
- rsc – reverse single crochet (crab stitch)
- sp – space
- st(s) – stitch(es)
- tch – turning chain
Special stitches:
- V-st (V-stitch): (dc, ch 1, dc) in the same stitch or space.
- fsc (foundation single crochet): Insert your hook in the base chain of the last stitch made. Yarn over and pull up a loop. Yarn over and pull through 1 loop (this makes the new base chain). Yarn over and pull through both loops.
- rsc (reverse single crochet): Work from left to right (right-handed). Insert the hook in the next stitch to the right, pull up a loop, then yarn over and pull through both loops.
Gauge and Checkpoints
Gauge: 24 sc and 12 dc rows = 4 in (10.2 cm). That works out to 6 sts and 3 dc rows per 1 in (2.5 cm).
Because this is a single small piece, the letter itself is your swatch. Check it at each stage:
- After Row 7: The stem is 0.8 in (2.0 cm) wide and 2.2 in (5.6 cm) tall.
- After Row 8: The row measures 2.5 in (6.4 cm) across its 15 sts.
- After Row 10: The piece is 3 in (7.6 cm) tall.
- After the border: The piece is 3 in x 3.5 in (7.6 cm x 8.9 cm).
If your stem is wider than 0.8 in (2.0 cm), go down to a 2.25 mm hook. If it is narrower, go up to a 2.75 mm hook. Small errors grow quickly on the bar, so check at Row 7 before continuing.
Main Pattern: The Letter T
Color changes: Change color on the last yarn over of the previous row. Carry the unused color loosely up the side edge. The border will cover it.
Stem
Row 1 (green): Ch 6. Sc in the 2nd ch from the hook and in each ch across, turn. (5 sc)
Row 2 (cream): Ch 3 (counts as dc). Skip the next sc, V-st in the next sc, skip the next sc, dc in the last sc. Turn. (4 dc and 1 ch-1 sp)
Row 3 (green): Ch 3. V-st in the ch-1 sp, dc in the top of the tch, turn. (4 dc and 1 ch-1 sp)
Rows 4–7: Repeat Row 3, alternating colors: cream, green, cream, green. (4 dc and 1 ch-1 sp per row)
Each V-st sits directly on top of the one below it. This makes the stacked column of V shapes in the stem: three cream and three green, with green at the top.
Stem checkpoint: 0.8 in (2.0 cm) wide x 2.2 in (5.6 cm) tall.
Bar
Row 8 (green, extension row): Ch 6.
– Sc in the 2nd ch from the hook and in the next 4 ch. (5 sc, left extension)
– Working across Row 7: sc in the edge dc, sc in the first dc of the V-st, sc in the ch-1 sp, sc in the second dc of the V-st, and sc in the top of the tch. (5 sc over the stem)
– Work 5 fsc, starting the first fsc in the base of the last sc made. (5 fsc, right extension)
– Turn. (15 sts)
Checkpoint: Row 8 measures 2.5 in (6.4 cm) across. The stem should be exactly centered, with 5 sts on each side.
Row 9 (cream): Ch 3 (counts as dc). Skip the next st, V-st in the next st; repeat from * 5 more times. Skip the next st, dc in the last st. Turn. (14 dc and 6 ch-1 sps)
The V-sts land in stitches 3, 5, 7, 9, 11 and 13, so the row is symmetrical.
Row 10 (green): Ch 3. V-st in each ch-1 sp across, dc in the top of the tch. (14 dc and 6 ch-1 sps) Do not fasten off.
Checkpoint: The piece is 3 in (7.6 cm) tall. The bar is 0.8 in (2.0 cm) deep.
Border
Border gauge: 6 sc per 1 in (2.5 cm) on every edge. This matches the body gauge:
– Along stitch tops: 1 sc per stitch.
– Along dc row ends: 2 sc per row (each row is 1/3 in).
– Along sc row ends: 1 sc per row (each row is 1/6 in).
Corners:
– Outer corner: 3 sc in one stitch or row end. The middle sc is the corner stitch.
– Inner corner (where the bar meets the stem): sc2tog with one leg on each edge. It counts as 1 st.
Work with the neater side facing you as the RS.
Round 1 (green)
Continuing from Row 10, ch 1. Work clockwise around the letter, starting at the top-left corner:
- Top-left corner: 3 sc in the corner st of Row 10.
- Top edge: Sc in the gap before the first V-st, then sc in the ch-1 sp, sc in the gap after the V-st; repeat from * across. (13 sc) Place a marker in the 7th sc, which is the center gap.
- Top-right corner: 3 sc in the last dc.
- Right end of bar: 2 sc in the side of Row 10 and 2 sc in the side of Row 9. (4 sc)
- Bar corner: 3 sc in the end of Row 8.
- Bar underside: Sc in the next 3 fsc bases. (3 sc)
- Inner corner: Sc2tog, with the first leg in the last fsc base and the second leg in the side of Row 7.
- Stem side: 1 sc more in the side of Row 7, then 2 sc in the side of each of Rows 6–2. (11 sc)
- Bottom corner: 3 sc in the corner of Row 1.
- Stem bottom: Sc in each of the 3 middle foundation-ch loops. (3 sc)
- Bottom corner: 3 sc in the corner of Row 1.
- Stem side: Mirror step 8. (11 sc)
- Inner corner: Sc2tog.
- Bar underside: Sc in the 3 ch loops. (3 sc)
- Bar corner: 3 sc.
- Left end of bar: (4 sc)
Sl st to the first sc. Round 1 total: 72 sts.
How the 72 sts add up:
– Edge stitches between the corner groups: 13 + 4 + 3 + 11 + 3 + 11 + 3 + 4 = 52
– Outer corners: 6 corners x 3 sc = 18
– Inner corners: 2 sc2tog = 2
– Total: 52 + 18 + 2 = 72
Round 2 (green)
Ch 1. Rsc in each st around. Sl st to the first rsc and fasten off. (72 rsc)
Why the math works
Each edge, measured from one corner stitch to the next, has the same number of border stitches as the body had stitches along that edge:
– Top: 1 + 13 + 1 = 15, matching Row 8’s 15 sts.
– Stem bottom: 1 + 3 + 1 = 5, matching Row 1’s 5 sc.
– Bar underside: 1 corner + 3 + 1 sc2tog leg = 5, matching each 5-st extension.
Because the border has the same gauge as the body, it lies flat. The 3-sc outer corners turn without cupping, and the sc2tog inner corners keep the notches from ruffling.
The two rounds add 0.25 in (0.6 cm) on every edge:
– Width: 2.5 in + 0.5 in = 3 in (7.6 cm)
– Height: 3 in + 0.5 in = 3.5 in (8.9 cm)
– Stem: 0.8 in + 0.5 in = 1.3 in (3.3 cm)
Hanging Loop
- Join green with a sl st in the rsc above the marker (top center).
- Ch 7 and sl st in the same st.
- Work 10 sc into the ch-7 loop and sl st in the base.
- Fasten off.
Appliqués
Red Bow (red)
- Ch 36. Sc in the 2nd ch from the hook and in each ch across. (35 sc, about 5.8 in / 14.7 cm long)
- Fasten off, leaving a 6 in (15.2 cm) tail.
- Tie the cord into a bow with two loops of about 0.4 in (1.0 cm).
- Trim the tails at an angle so the bow is 1.3 in (3.3 cm) wide.
Gold Star (gold)
Round 1: Magic ring, 10 sc in the ring. Sl st to the first sc. (10 sc)
Round 2: Ch 3, sl st in the 2nd ch from the hook, hdc in the next ch, skip 1 sc, sl st in the next sc; repeat from * 4 more times. (5 points)
Fasten off and leave a 6 in (15.2 cm) tail. The star measures about 0.8 in (2.0 cm) across.
Placement
Use the tails to sew the bow just left of center on the bar, over the V-stitch rows. Sew the star near the top-right end of the bar. Stitch through the green and cream stitches only, so your sewing does not show on the back.
Hardware
- Open a jump ring and pass it through the hanging loop.
- Hook on the chain and close the ring with pliers.
- Use the second jump ring to attach the split key ring.
Final Blocking
- Weave in all ends along the back of the border.
- Spray the letter until it is damp. Do not soak the appliqués.
- Pin it on the mat to 3 in x 3.5 in (7.6 cm x 8.9 cm). Square the 6 outer corners and the 2 inner corners.
- Check that the stem is 1.3 in (3.3 cm) wide all the way down.
- Optional: brush a thin coat of diluted stiffener on the back.
- Let it dry completely before attaching the hardware.
Final Quality-Control Checklist
- [ ] The stem has 3 cream and 3 green V-st rows, with cream at the bottom.
- [ ] Row 8 has 15 sts, with 5 sts on each side of the stem.
- [ ] Rows 9 and 10 each have 6 V-sts.
- [ ] Border Round 1 has 72 sts, and Round 2 has 72 rsc.
- [ ] Finished size is 3 in x 3.5 in (7.6 cm x 8.9 cm).
- [ ] The hanging loop is at the exact top center.
- [ ] The bow and star are firmly sewn on.
- [ ] All jump rings are fully closed.
Troubleshooting
- The stem leans to one side: Make sure the tch counts as the first dc and that the final dc goes into the top of the tch.
- The bar ruffles: Your V-sts are too loose. Go down a hook size for Rows 9–10 only.
- The inner corners gap: Work the sc2tog tighter, or catch the row end lower in the stitch.
- The border ripples: You worked more than 2 sc per dc row. Recount against 72.
- The border pulls in: Use a looser tension for the rsc round. Don’t skip any stitches.
- The carried yarn shows: Work the Round 1 sc over the carried strand to hide it.
Care
Hand wash in cool water, press out the water in a towel, and dry flat. Remove the metal hardware first if you plan to re-block.

Final Notes
Here is the measurement chain:
1. The 5-st stem is 0.8 in (2.0 cm) wide.
2. Row 8 grows to 15 sts, or 2.5 in (6.4 cm).
3. After Row 10, the piece is 3 in (7.6 cm) tall.
4. Border Round 1 has 72 sts, worked at the same gauge as the body.
5. Round 2 completes the 3 in x 3.5 in (7.6 cm x 8.9 cm) letter.
If each checkpoint matches, your monogram will lie flat and keep its crisp shape.
Happy crocheting!