
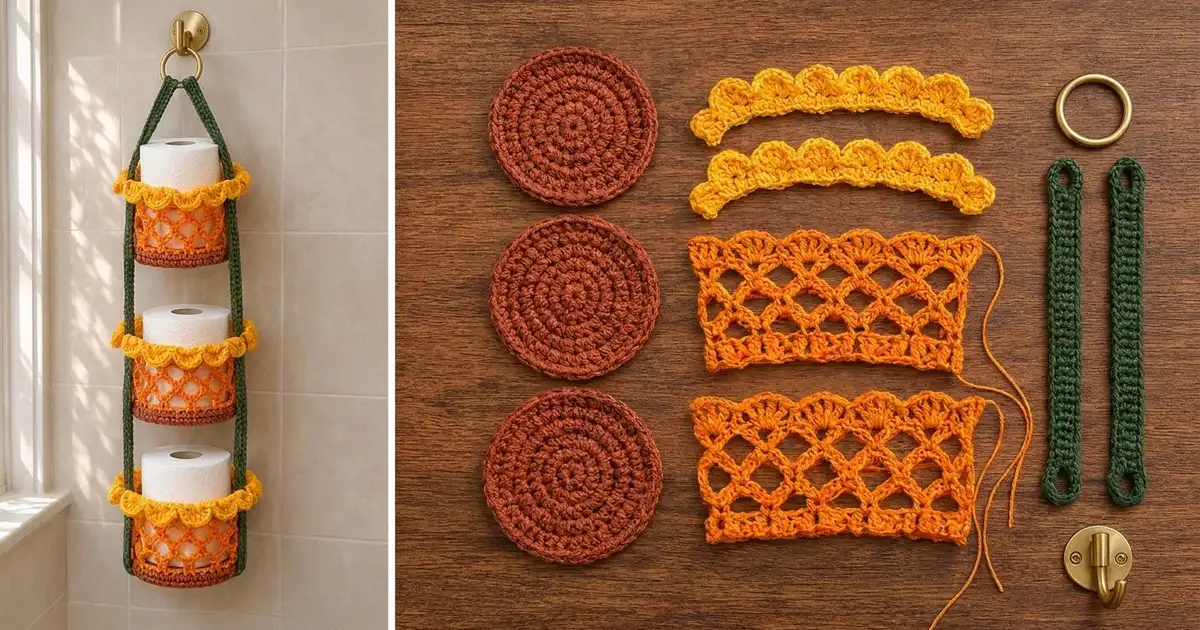
The Marigold Tier is a three-basket hanging organizer that holds one toilet roll in each tier. Every basket has a solid rust base, an open orange lattice wall, and a flared yellow scallop collar that looks like marigold petals. Two forest green straps hold the baskets in a column and meet at a brass ring at the top.
The color mix of rust, orange, yellow and green feels warm and a bit retro, and it brightens up a plain tiled bathroom. The mesh lets you see how many rolls are left, and the solid base keeps each roll from slipping through.
This pattern uses US crochet terms. Each basket is about 5.5 in (14.0 cm) across and 4.5 in (11.4 cm) tall. The holder is about 27.5 in (69.9 cm) long from the top of the ring to the bottom of the straps.
You make every part separately: a base worked in rounds, a mesh wall worked flat and then seamed into a tube, a scallop collar worked flat and then seamed into a ring, and two straps. A rust single crochet round joins each wall to its base, the collar is slip-stitched to the top of the wall, and the straps are sewn to the outside of all three baskets.
Finished Size and Construction
- Finished size: each basket is 5.5 in (14.0 cm) across and 4.5 in (11.4 cm) tall; about 7.5 in (19.1 cm) across the flared collar
- Overall length: about 27.5 in (69.9 cm)
- Skill level: Easy–Intermediate
- Terminology: US
- Yarn weight: worsted (#4) cotton
- Hook: 5.0 mm (H-8)
- Number of pieces: 14 (3 bases, 3 walls, 3 collars, 2 straps, plus 1 ring and 1 hook)
- Layout: 3 baskets stacked vertically, 1 column
- Wall piece size (flat): 17.4 in (44.2 cm) wide × 4 in (10.2 cm) tall
- Size before collar: 5.5 in (14.0 cm) across × 4.25 in (10.8 cm) tall
- Collar (“border”) depth: 1.25 in (3.2 cm)
- Fits: standard rolls up to 4.5 in (11.4 cm) across and 4 in (10.2 cm) tall
Materials
Use 100% cotton or a cotton blend. Cotton holds its shape in a humid room and doesn’t stretch much under the weight of the rolls. The yardage below assumes about 1.54 m per gram, which is typical for worsted kitchen cotton.
- Rust (bases): 50 g / 77 m
- Orange (walls): 60 g / 92 m
- Yellow (collars): 50 g / 77 m
- Forest green (straps): 50 g / 77 m
These amounts include a margin of about 30–40% for your gauge sample, seaming and sewing.
Tools:
– 5.0 mm (H-8) crochet hook
– Tapestry needle
– 4 locking stitch markers
– 1.5 in (3.8 cm) brass split ring
– Wall hook with screws and anchors
– Measuring tape, pins, scissors
Abbreviations (US Terms)
- ch – chain
- sc – single crochet
- dc – double crochet
- sl st – slip stitch
- sk – skip
- inc – 2 sc in the same stitch
- sp – space
- st(s) – stitch(es)
- RS – right side
Special stitch – Scallop: 7 dc worked into the same stitch.
Gauge and Checkpoints
Gauge: 14 sc and 16 rows = 4 in (10.2 cm) in sc. This gives 3.5 sc and 4 rows per 1 in (2.5 cm).
Mesh gauge: 2 mesh rows = 1 in (2.5 cm) in height.
Make one base and one wall first, and check them before you make the other two baskets.
Checkpoints:
– Base Rnd 4: 2.2 in (5.6 cm) across
– Base Rnd 7: 3.8 in (9.7 cm) across
– Base Rnd 10: 5.5 in (14.0 cm) across
– Wall after Row 4: 1.75 in (4.4 cm) tall
– Finished flat wall: 17.4 in (44.2 cm) × 4 in (10.2 cm)
If your pieces are too big, go down to a 4.5 mm hook. If they are too small, go up to a 5.5 mm hook. The base and wall have to match, so always re-check both after you change hooks.

Base (Make 3, Rust)
Work in joined rounds with the RS facing you. At the end of each round, sl st to the first sc and ch 1. The ch 1 does not count as a stitch.
Rnd 1: Make a magic ring and work 6 sc into it. (6 sts)
Rnd 2: Inc in each st around. (12 sts)
Rnd 3: Sc 1, inc 6 times. (18 sts)
Rnd 4: Sc 2, inc 6 times. (24 sts) – Checkpoint: 2.2 in (5.6 cm)
Rnd 5: Sc 3, inc 6 times. (30 sts)
Rnd 6: Sc 4, inc 6 times. (36 sts)
Rnd 7: Sc 5, inc 6 times. (42 sts) – Checkpoint: 3.8 in (9.7 cm)
Rnd 8: Sc 6, inc 6 times. (48 sts)
Rnd 9: Sc 7, inc 6 times. (54 sts)
Rnd 10: Sc 8, inc 6 times. (60 sts) – Checkpoint: 5.5 in (14.0 cm)
Fasten off and leave a 6 in (15.2 cm) tail. The disc should lie flat. If it ruffles, your stitches are loose, so go down a hook size. If it cups, your stitches are tight, so go up a hook size.
Mesh Wall (Make 3, Orange)
The wall is worked flat in rows and has two alternating mesh rows. A-rows have 16 sc and 15 ch-5 loops. B-rows have 15 sc, 14 full loops and a half loop at each end.
Foundation: Ch 62.
Row 1: Sc in the 2nd ch from the hook and in each ch across. Turn. (61 sc)
Row 2 (A): Ch 1, sc in the first sc, ch 5, sk 3 sc, sc in the next sc 15 times. Turn. (16 sc, 15 ch-5 loops)
Row 3 (B): Ch 5 (counts as dc + ch 2), sc in the first ch-5 loop, ch 5, sc in the next ch-5 loop 14 times, ch 2, dc in the last sc. Turn. (15 sc, 14 full loops, 2 half loops)
Row 4 (A): Ch 1, sc in the first dc, ch 5, sc in the next full ch-5 loop 14 times, ch 5, sc in the 3rd ch of the turning ch. Turn. (16 sc, 15 ch-5 loops) – Checkpoint: 1.75 in (4.4 cm) tall
Rows 5–8: Repeat Rows 3–4 twice, ending with an A-row.
Row 9 (trim): Ch 1, sc in the first sc, 3 sc in the next ch-5 loop, sc in the next sc 15 times. This gives 16 sc worked into the existing sc plus 45 sc worked into the loops. (61 sc)
Don’t fasten off. Leave an 18 in (45.7 cm) tail for seaming.
Wall checkpoint: 17.4 in (44.2 cm) wide × 4 in (10.2 cm) tall. That height comes from Row 1 at 0.25 in (0.6 cm), plus seven mesh rows at 3.5 in (8.9 cm), plus Row 9 at 0.25 in (0.6 cm).
Seam the tube: Fold the wall with RS together. Lay the last sc of Row 1 directly on top of the first sc of Row 1, and do the same for Row 9. Whipstitch the side edges together, one stitch per row end. Turn the tube RS out. Because the first and last stitches overlap, Row 1 and Row 9 now have 60 working stitches around, which matches Base Rnd 10.
Scallop Collar (Make 3, Yellow)
The collar is worked flat and then seamed into a ring. The flare comes from Row 2.
Foundation: Ch 62.
Row 1: Sc in the 2nd ch from the hook and in each ch across. Turn. (61 sc)
Row 2 (flare, conversion row): Ch 1, sc in the first sc, inc, sc in the next sc 30 times. This gives 61 sts worked one-per-stitch plus 30 added stitches. Turn. (91 sc)
Row 3 (scallops): Ch 1, sc in the first sc, sk 2, Scallop in the next st, sk 2, sc in the next st 15 times. (15 scallops, 16 sc)
Fasten off and leave a 12 in (30.5 cm) tail.
Seam the ring: Overlap the last stitch of each row on top of the first stitch and whipstitch the short ends together. Row 1 now has 60 working stitches, Row 2 has 90, and the 15 scallops are evenly spaced with a single sc between each pair.
Strap (Make 2, Green)
Foundation: Ch 5.
Row 1: Sc in the 2nd ch from the hook and in each ch across. Turn. (4 sc)
Row 2 (eyelet): Ch 1, sc in the first sc, ch 2, sk 2, sc in the last sc. Turn. (2 sc, 1 ch-2 sp)
Row 3: Ch 1, sc in the first sc, 2 sc in the ch-2 sp, sc in the last sc. Turn. (4 sc)
Rows 4–101: Ch 1, sc in each st across. Turn. (4 sc)
Row 102: Repeat Row 2.
Row 103: Repeat Row 3.
Row 104: Ch 1, sc across. (4 sc)
Fasten off.
Strap checkpoint: 26 in (66.0 cm) long (104 rows ÷ 4 rows per inch) and 1.1 in (2.8 cm) wide. The Row 1 end is the bottom of the strap and the Row 104 end is the top.
Make All Pieces
You need these pieces in total:
- Rust: 3 bases
- Orange: 3 walls
- Yellow: 3 collars
- Green: 2 straps
Layout, top to bottom:
            [ RING ]
           /        \
     strap A        strap B   (7 in / 17.8 cm)
   [  BASKET 1  ]  4.25 in / 10.8 cm
   |    gap     |  2.5 in / 6.4 cm
   [  BASKET 2  ]  4.25 in / 10.8 cm
   |    gap     |  2.5 in / 6.4 cm
   [  BASKET 3  ]  4.25 in / 10.8 cm
     tail + eyelet  1.25 in / 3.2 cm
Check the strap math: 7 + 4.25 + 2.5 + 4.25 + 2.5 + 4.25 + 1.25 = 26 in (66.0 cm). In rows, that’s 28 + 17 + 10 + 17 + 10 + 17 + 5 = 104 rows.
Joining
Wall to base (rust joining round): Place the wall tube on top of the base with the RS facing out. Line up the wall seam with the slip stitch join on the base. Join rust yarn through both layers. Then sc through one Row 1 stitch of the wall and one Rnd 10 stitch of the base together, all the way around. (60 sc) Sl st to the first sc and fasten off.
This joins the pieces stitch for stitch: 60 wall stitches meet 60 base stitches, so you don’t add or skip any. The round also forms the rust band at the bottom of each basket.
Collar to wall: Slide the collar over the wall with its RS facing out and the scallops pointing up. Line up the collar seam with the wall seam. With yellow yarn, sl st through one Row 1 stitch of the collar and one Row 9 stitch of the wall together, all the way around. (60 sl st) Fold the collar outward and down so the scallops flare over the rim.
Straps: Place a marker on the wall at the seam (stitch 1) and another at stitch 31, which is directly opposite. Lay the two straps side by side and count rows from the top (Row 104) end:
- Rows 104–77 (28 rows): free section up to the ring
- Rows 76–60 (17 rows): Basket 1
- Rows 59–50 (10 rows): gap
- Rows 49–33 (17 rows): Basket 2
- Rows 32–23 (10 rows): gap
- Rows 22–6 (17 rows): Basket 3
- Rows 5–1 (5 rows): bottom tail with eyelet
Pin each strap down the outside of each basket at a marker, running over the collar fold and down to the rust round. With green yarn, whipstitch both long edges of the strap through the wall stitches. Sew through the collar’s base too, so the collar sits flat against the strap.
Tension advice: Sew with even, medium tension. Pulling too hard will pucker the mesh and make the baskets lean. Twist each basket a little as you go to check that the straps hang straight and parallel.
Ring: Thread both top eyelets onto the split ring.
Size checkpoint: Hold the holder up by the ring. The baskets should be level with a 2.5 in (6.4 cm) gap between them, and the full length should be about 27.5 in (69.9 cm).
Border
The yellow scallop collar is the border for this project. It adds 1.25 in (3.2 cm) of depth and brings the outer width at the rim to about 7.5 in (19.1 cm).
Border gauge: 3.5 sc per 1 in (2.5 cm). Each scallop takes up 6 stitches of Row 2, which is about 1.1 in (2.8 cm) along the flared edge. Each scallop stands 0.75 in (1.9 cm) tall.
Collar counts, row by row:
– Row 1: 61 sc flat, 60 after seaming. This matches wall Row 9 exactly (60 working stitches).
– Row 2: 61 + 30 = 91 sc flat, 90 after seaming.
– Row 3: 15 scallops + 16 sc flat. Once seamed, the first and last sc overlap and become 1, so 15 scallops are separated by 15 sc.
Why the math works: Every flat piece starts with 1 extra stitch (61 instead of 60) to allow for the overlap at the seam. That’s why the 60-stitch wall, the 60-stitch collar and the 60-stitch base all meet stitch for stitch. A 6-stitch scallop repeat needs a multiple of 6 plus 1 when worked flat: 91 = 15 × 6 + 1. Increasing 50% in Row 2 creates the ruffle-like flare without making the edge wavy.
Final Blocking
- Fill each basket with a toilet roll or a rolled towel so it keeps its round shape.
- Mist the whole holder lightly with water until it’s damp, not soaked.
- Shape each collar so the scallops fan out evenly and fold down over the rim.
- Pull the mesh gently so the diamond openings are even.
- Press each base flat and check that it measures 5.5 in (14.0 cm) across.
- Hang the holder by the ring so the straps dry straight under the light weight of the rolls.
- Let it dry completely, usually 24 hours.
Final Quality-Control Checklist
- Each base has 60 sts and measures 5.5 in (14.0 cm) across
- Each wall has 15 loops per row and is 4 in (10.2 cm) tall
- Each joining round has 60 sc and nothing is twisted
- Each collar has 15 scallops with even spacing
- Both straps have 104 rows and measure 26 in (66.0 cm)
- Strap positions match on both sides of every basket
- The baskets hang level with 2.5 in (6.4 cm) gaps
- All tails are woven in securely
Troubleshooting
The base ruffles: Your tension is too loose. Go down a hook size, or take out one round of increases.
The base cups: Your tension is too tight. Go up a hook size.
The wall doesn’t fit the base: Recount Row 1. You need 61 sc flat, which becomes 60 once seamed.
The mesh slants: Make sure every B-row starts with ch 5 and ends with a dc. Missing the half loops pulls the edge in.
The collar stands straight up: Check that Row 2 has 91 sts, then steam-block the collar outward.
The basket tilts: One strap may be sewn a row or two off. Re-pin it using the row counts and sew it again.
The roll doesn’t fit: Rolls larger than 4.5 in (11.4 cm) across need a larger basket. Add one round to the base (66 sts) and add 6 sts to each foundation chain.
Care
Hand wash in cool water with mild soap, press out the water, and dry flat or hanging. Reshape the collars while the holder is damp.

Final Notes
The measurements build on each other in this order:
- Your gauge of 3.5 sc per inch gives a 60-stitch base that is 5.5 in (14.0 cm) across.
- A 61-stitch wall, seamed to 60 stitches, makes a 17.1 in (43.4 cm) tube that fits the base exactly.
- Seven mesh rows plus two sc rows bring the wall to 4 in (10.2 cm).
- The 60-stitch collar flares to 90 stitches and finishes with 15 scallops.
- Two 104-row straps, 26 in (66.0 cm) long, place the three baskets 2.5 in (6.4 cm) apart.
If you check each stage before moving on, the holder will hang straight. Happy crocheting!