
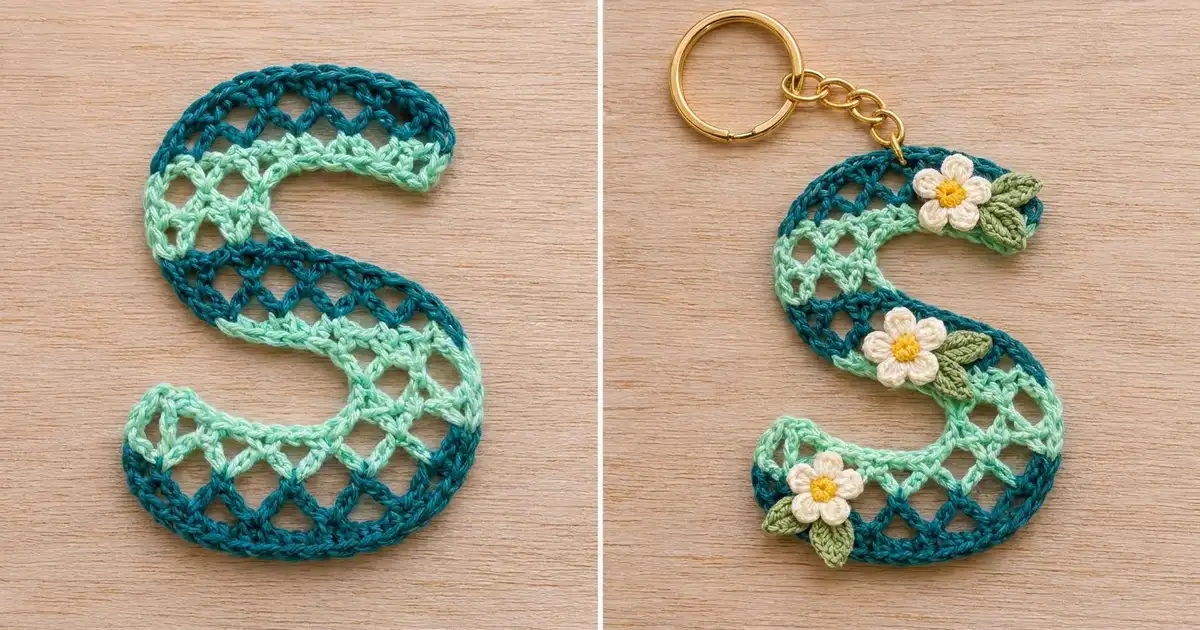
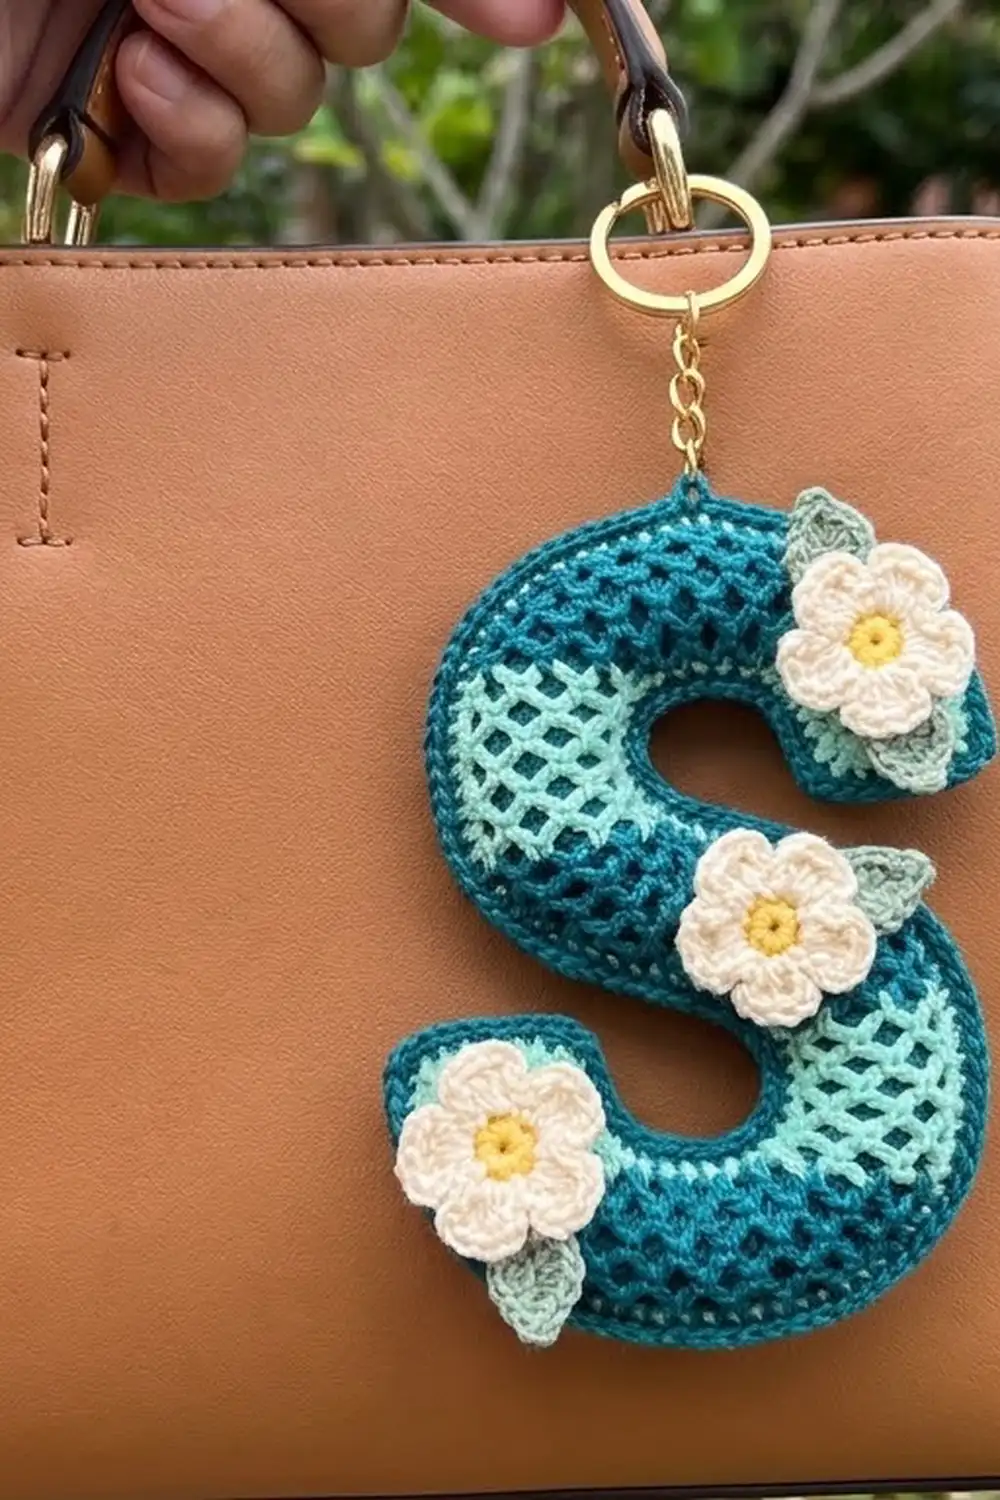
This Letter S keychain is a light, lacy initial worked in an open diamond mesh. Bands of deep teal and fresh mint run across the letter, and a firm single-crochet outline holds the curves in place. Three tiny cream flowers with yellow centers and sage leaves finish it off. A gold split ring and a short chain turn it into a bag charm or key fob.
The style is airy and modern, with a little cottage-garden charm. The mesh is open enough to show what’s behind it but sturdy enough to swing from a handbag handle every day.
The pattern uses US crochet terms. The finished letter measures 3.5 in (8.9 cm) wide by 4.25 in (10.8 cm) tall after blocking.
The S is one flat piece, worked in rows from the bottom up. To shape the two bowls of the letter, you work only part of a row, then add a short chain extension to start the next full-width section. A one-round outline, three flower appliqués with six leaves, and the hardware complete the piece.
Finished Size and Construction
- Finished size: 3.5 in (8.9 cm) wide x 4.25 in (10.8 cm) tall
- Skill level: Intermediate (partial rows and chain extensions)
- Terminology: US crochet terms
- Yarn weight: Sport-weight (#2) mercerized cotton
- Hook: 2.5 mm (US B/1 or C/2)
- Number of pieces: 1 letter, plus 3 flowers and 6 leaves sewn on
- Layout: Single letter, no joining
- Mesh size before border: 3.25 in (8.3 cm) wide x 4 in (10.2 cm) tall
- Border depth: 1 round of sc, about 0.125 in (0.3 cm) on every edge
Materials
Choose a smooth, mercerized cotton. It shows the mesh crisply, holds its shape when blocked, and wears well on a keychain. Avoid fuzzy or very stretchy yarns, because the diamonds will blur and the letter will sag.
- Dark teal (A): 5 g, about 15 m
- Mint green (B): 4 g, about 12 m
- Cream (C): 2 g, about 6 m (flower petals)
- Yellow (D): 1 g, about 3 m (flower centers)
- Sage green (E): 1 g, about 3 m (leaves)
These quantities include a comfortable margin for a gauge swatch and weaving in ends.
Tools:
- 2.5 mm crochet hook
- Tapestry needle
- Scissors
- Stitch markers
- 1 in (2.5 cm) gold split key ring with a 1.25 in (3.2 cm) chain and jump ring
- Two pairs of flat-nose pliers
- Blocking mat, rustproof pins, spray bottle
- Paper template of an S, 3.5 in (8.9 cm) x 4.25 in (10.8 cm)
Abbreviations (US Terms)
- ch – chain
- sc – single crochet
- hdc – half double crochet
- dc – double crochet
- sl st – slip stitch
- sp(s) – space(s)
- sk – skip
Special stitches:
- Mesh loop: ch 3, sc in next ch-3 sp. The turning ch 3 at the start of every mesh row counts as the first loop of that row.
- Mesh inc: work (sc, ch 3, sc) in one ch-3 sp instead of a single sc. This adds 1 loop.
Each new row places its sc into the centers of the loops below. This shifts every row by half a loop, which forms the diamond lattice.
Gauge and Checkpoints
Mesh gauge: 8 loops = 3.25 in (8.3 cm) wide; 13 rows = 4 in (10.2 cm) tall.
Check this before you start. With A, ch 26. Work Row 1 as written below, but repeat the part in parentheses 8 times (8 loops). Then work 12 rows of “ch 3, turn, sc in first ch-3 sp, (ch 3, sc in next ch-3 sp) across” (8 loops each). Pin it flat. The rectangle should measure 3.25 in (8.3 cm) x 4 in (10.2 cm). That is exactly the outer box of the S, so it’s the most useful swatch you can make.
Checkpoints in the letter:
- After Row 3: about 0.9 in (2.3 cm) tall and 3.25 in (8.3 cm) at the widest point.
- After Row 8: about 2.5 in (6.4 cm) tall.
- After Row 13: 4 in (10.2 cm) tall, 3.25 in (8.3 cm) wide.
- After the border and blocking: 3.5 in (8.9 cm) x 4.25 in (10.8 cm).
If your swatch is too big, go down to a 2.25 mm hook or make your chains tighter. If it’s too small, go up to a 2.75 mm hook. Change the hook size, not the chain counts. The shaping only works if the loop counts stay exactly as written.
The Letter S
Rows alternate direction. Row 1 is worked right to left, so odd rows end at the left edge and even rows end at the right edge. Where you can, carry the unused color loosely up the edge. The border will cover it.
Bottom Arc
Row 1 (A): Ch 20. Sc in 2nd ch from hook, (ch 3, sk 2 ch, sc in next ch) 6 times. (7 sc, 6 loops)
Row 2 (A): Ch 3, turn. Mesh inc in first ch-3 sp, (ch 3, sc in next ch-3 sp) 4 times, ch 3, mesh inc in last ch-3 sp. Change to B in the last sc. (8 sc, 8 loops)
The increases at both ends round out the bottom curve of the S.
Row 3 (B): Ch 3, turn. Sc in first ch-3 sp, (ch 3, sc in next ch-3 sp) 7 times. (8 sc, 8 loops)
Lower Bowl Side
Row 4 (B): Turn. (Sl st in each of next 3 ch, sl st in next sc) 5 times. You’ve now crossed the first 5 loops. Ch 3, sc in next ch-3 sp, (ch 3, sc in next ch-3 sp) twice. (3 sc, 3 loops)
The 5 skipped loops on the left stay open below the slip stitches. This open area is the lower counter (the enclosed gap) of the S.
Row 5 (B): Ch 3, turn. Sc in first ch-3 sp, (ch 3, sc in next ch-3 sp) twice. (3 sc, 3 loops) Don’t fasten off. Ch 17 for the extension, which runs to the left over the open counter. Change to A in the last ch.
Middle Spine
Row 6 (A): Turn. Sc in 2nd ch from hook, (ch 3, sk 2 ch, sc in next ch) 5 times; the last sc lands in the ch next to Row 5. (Ch 3, sc in next ch-3 sp of Row 5) 3 times. (9 sc, 8 loops: 5 on the extension + 3 on Row 5)
Row 7 (A): Ch 3, turn. Sc in first ch-3 sp, (ch 3, sc in next ch-3 sp) 7 times. (8 sc, 8 loops)
Row 8 (A): Repeat Row 7. Change to B in the last sc. (8 sc, 8 loops)
Upper Bowl Side
Row 9 (B): Turn. (Sl st in each of next 3 ch, sl st in next sc) 5 times. Ch 3, sc in next ch-3 sp, (ch 3, sc in next ch-3 sp) twice. (3 sc, 3 loops)
This row starts at the right edge, so the 3 worked loops sit on the left. The 5 skipped loops on the right form the upper counter, a mirror image of the lower one.
Row 10 (B): Ch 3, turn. Sc in first ch-3 sp, (ch 3, sc in next ch-3 sp) twice. (3 sc, 3 loops) Ch 17 for the extension, which runs to the right over the upper counter.
Top Arc
Row 11 (B): Turn. Sc in 2nd ch from hook, (ch 3, sk 2 ch, sc in next ch) 5 times. (Ch 3, sc in next ch-3 sp of Row 10) 3 times. Change to A in the last sc. (9 sc, 8 loops)
Row 12 (A): Ch 3, turn. Sc in first ch-3 sp, (ch 3, sc in next ch-3 sp) 7 times. (8 sc, 8 loops)
Row 13 (A): Turn. Sl st in each of next 2 ch. Ch 3, sc in next ch-3 sp, (ch 3, sc in next ch-3 sp) 5 times. Leave the last ch-3 sp unworked. (6 sc, 6 loops)
The decreases at both ends round the top curve, mirroring Rows 1–2. Don’t fasten off; go straight into the border.
Color bands, bottom to top: A (Rows 1–2), B (Rows 3–5), A (Rows 6–8), B (Rows 9–11), A (Rows 12–13). The mesh should now look like a blocky S with five stripes, measuring 3.25 in (8.3 cm) x 4 in (10.2 cm).
Border
Border gauge: about 7 sc per inch (2.5 cm) along the edge.
The border is one round of sc in A worked around the whole outline, including both counters. It follows two simple rules:
- 3 sc in each ch-3 sp along the tops and bottoms of rows (one loop is about 0.4 in / 1.0 cm).
- 2 sc in each row end along the sides (one row is about 0.3 in / 0.8 cm).
Round 1 (A): With the last loop of Row 13 on your hook, ch 1. Work counterclockwise around the letter as follows, then sl st to the first sc.
- Left side, Rows 13–9 (top-left of the S): 2 sc in each row end. (10 sc)
- Left side, Rows 8–6 (spine): 2 sc in each row end. (6 sc)
- Lower counter, underside of the Row 6 extension: 3 sc in each of the 5 ch-3 sps along the foundation side. (15 sc)
- Inner edge of the lower bowl side, Rows 5–4: 2 sc in each row end. (4 sc)
- Top of Row 3 inside the counter: 3 sc in each of the 5 ch-3 sps with slip stitches on top. (15 sc)
- Left side, Rows 3–1 (lower-left tip): 2 sc in each row end. (6 sc)
- Bottom, foundation of Row 1: 3 sc in each of the 6 ch-3 sps. (18 sc)
- Right side, Rows 1–5: 2 sc in each row end. (10 sc)
- Right side, Rows 6–8: 2 sc in each row end. (6 sc)
- Upper counter, top of Row 8: 3 sc in each of the 5 ch-3 sps with slip stitches on top. (15 sc)
- Inner edge of the upper bowl side, Rows 9–10: 2 sc in each row end. (4 sc)
- Underside of the Row 11 extension: 3 sc in each of the 5 ch-3 sps. (15 sc)
- Right side, Rows 11–13 (upper-right tip): 2 sc in each row end. (6 sc)
- Top, Row 13: 3 sc in each of the 6 ch-3 sps. (18 sc)
Total: 148 sc. Fasten off and weave in all ends.
Why the math works: Each half of the letter uses the same numbers: 18 + 10 + 6 + 15 + 4 + 15 + 6 = 74 sc, and 74 x 2 = 148. The S looks the same when turned upside down (180° symmetry), so the two halves match and the outline pulls evenly. The two edge rates, 3 sc per 0.4 in loop and 2 sc per 0.3 in row, both come out close to 7 sc per inch, so the edge neither ruffles nor puckers. The round adds 0.125 in (0.3 cm) on each side: 3.25 + 0.25 = 3.5 in (8.9 cm) wide, and 4 + 0.25 = 4.25 in (10.8 cm) tall.
At the four outer tips and around the curves, keep the sc slightly relaxed. Blocking will round the corners into smooth S curves.
Flowers and Leaves
Flower (make 3):
Round 1 (D): Make a magic ring, work 5 sc in the ring, and sl st to the first sc. Pull the ring tight. Fasten off D. (5 sc)
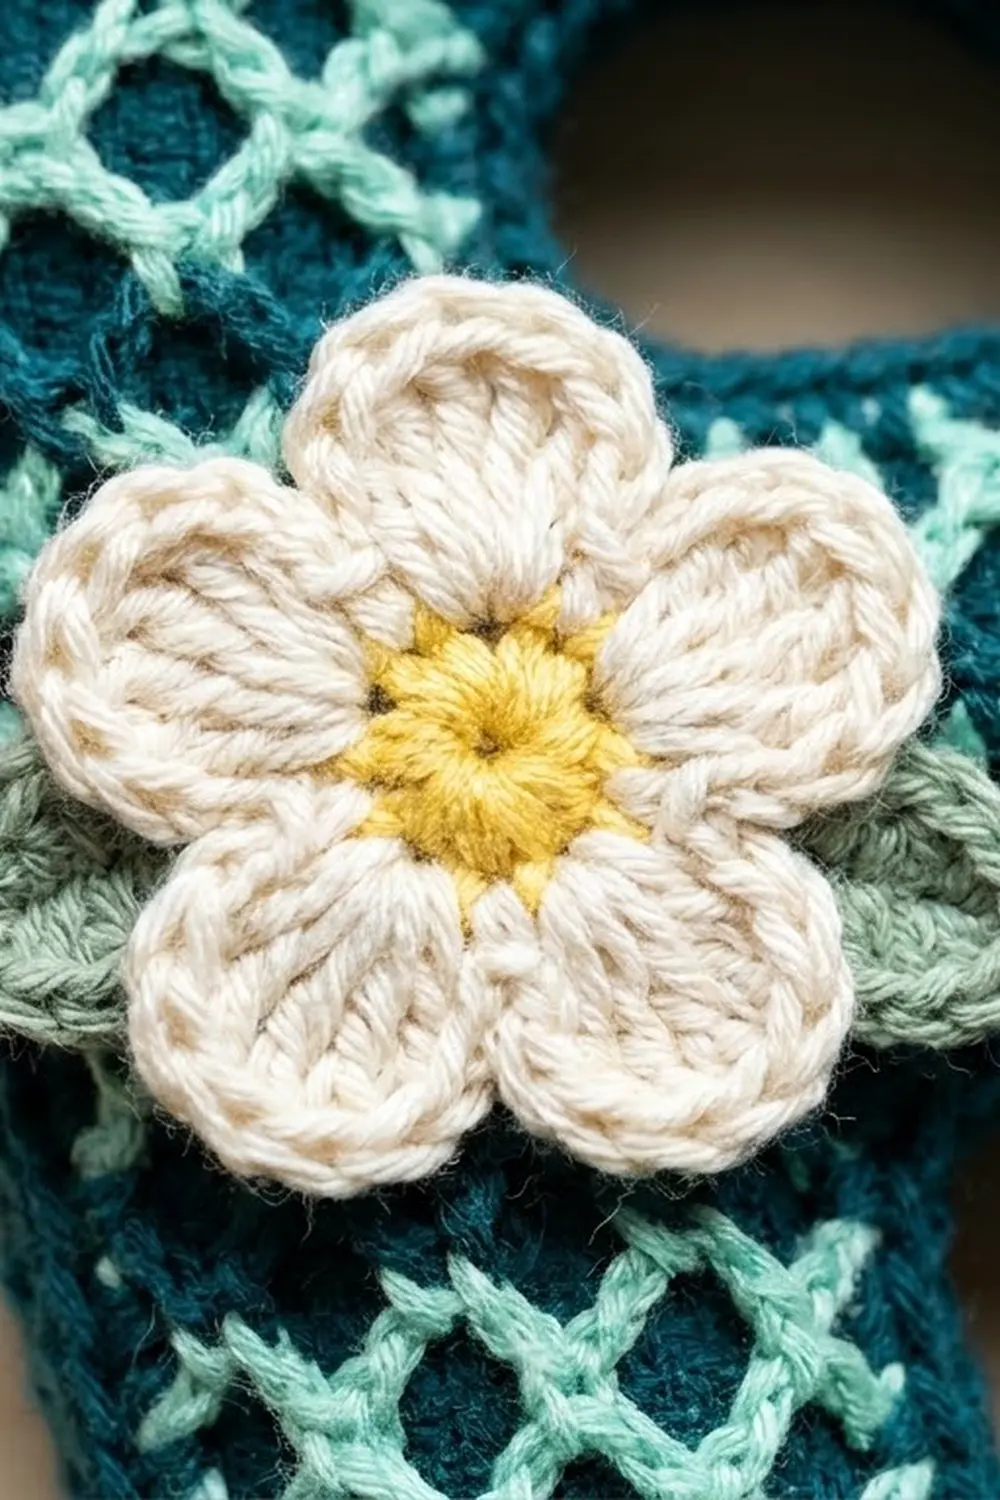
Round 2 (C): Join C in any sc. Work (ch 2, 2 dc, ch 2, sl st) in the same sc and in each remaining sc. (5 petals) Fasten off, leaving a 6 in (15.2 cm) tail.
Each flower measures about 0.75 in (1.9 cm) across.
Leaf (make 6): With E, ch 6. Sl st in 2nd ch from hook, sc in next ch, hdc in next ch, sc in next ch, sl st in last ch. Fasten off, leaving a 6 in (15.2 cm) tail. Each leaf is about 0.5 in (1.3 cm) long.
Placement: Sew one flower, with two leaves tucked beside it, to the right tip of the top arc. Sew the second to the center of the spine and the third to the lower-left tip. Stitch through the sc of the mesh, not just the chains, so the flowers stay flat.
Final Blocking
- Pin your paper template to the blocking mat.
- Lay the S face down over the template and mist it until damp, not soaked.
- Pin the four outer tips first, matching the 3.5 in (8.9 cm) x 4.25 in (10.8 cm) outline.
- Pin around both counters, easing the border into smooth curves.
- Gently open each diamond with your fingertips so the lattice looks even.
- Let it dry completely, at least 4 hours.
- Remove the pins, then sew on the flowers if you haven’t already.
- Attach the jump ring through the border at the right end of Row 13 and close it with the two pliers. Add the chain and split ring.
Final Quality-Control Checklist
- The letter measures 3.5 in (8.9 cm) x 4.25 in (10.8 cm).
- Five clear color bands: A, B, A, B, A.
- Both counters are open and the same size.
- The border totals 148 sc, with no gaps at the extensions.
- Diamonds are even, with no twisted loops.
- Flowers and leaves are secure and lie flat.
- All ends are woven in, especially at color changes.
- The jump ring is fully closed and passes through solid sc.
Troubleshooting
The letter is wider than 3.25 in (8.3 cm) before the border. Your ch-3 loops are loose. Go down a hook size.
Loop counts change from row to row. Make sure the turning ch 3 counts as the first loop, and put exactly one sc in each ch-3 sp.
The extension chain twists. Lay the chain flat before Row 6 or Row 11, with the front of the chain facing you.
The border ruffles. You’re adding extra sc at the tips. Stick to 2 sc per row end and 3 sc per loop.
The border puckers in the counters. Your sc are too tight. Loosen your tension there, or re-block with firmer pinning.
The flowers curl. Steam them lightly and press flat before sewing.
Care
Hand wash in cool water with mild soap, roll in a towel, and dry flat. Reshape the curves while damp, and keep the metal hardware as dry as you can.
Final Notes
The measurements build on each other. A mesh gauge of 8 loops = 3.25 in (8.3 cm) and 13 rows = 4 in (10.2 cm) sets the outer box of the letter. The two partial-row bowl sides and the 17-chain extensions shape the S inside that box. One 148-sc border adds 0.125 in (0.3 cm) on every edge, bringing the finished keychain to 3.5 in (8.9 cm) x 4.25 in (10.8 cm). Check each stage, and the letter will come out right every time.
Happy crocheting!