

The Golden Bloom Bauble is a flat lace Christmas ornament shaped like a classic round tree bauble. A cream center ring holds eight pale-yellow fan petals. Two rounds of cream lace loops surround the petals, and a smooth yellow edge frames the circle. A small ribbed gold cap and a yellow cord loop finish the top.
The colors are soft and warm: buttery yellow, creamy white and metallic gold. They look vintage and elegant on a green tree, especially under warm white lights. Because the ornament is open lace, light shines through it.
This pattern uses US crochet terms. The finished ornament measures 4.75 in (12.1 cm) across, not counting the cap and loop. With the loop added, it hangs about 7.5 in (19.1 cm) tall.
The ornament is worked in the round from the center out: a ring, three petal rounds, two lace rounds and a two-round border. Then you make a small ribbed cap in rows, seam it into a tube, and add a twisted chain cord as the hanging loop.
Finished Size and Construction
- Finished size: 4.75 in (12.1 cm) diameter
- Skill level: Easy–Intermediate
- Terminology: US crochet terms
- Yarn weight: Sport (#2) cotton; light metallic yarn for the cap
- Hook: 2.75 mm (US C-2)
- Number of pieces: 1 round motif, plus 1 cap and 1 hanging loop
- Layout: Single circle, no joining
- Motif size before border: 4.25 in (10.8 cm) after Round 6
- Border depth: 0.25 in (0.6 cm) per side (Rounds 7–8)
- Cap size (flattened): 0.75 in wide × 0.5 in tall (1.9 × 1.3 cm)
Materials
Mercerized cotton or a cotton blend works best. It gives crisp stitch definition, holds its shape after blocking and won’t fuzz. Choose a sport-weight cotton with roughly 100 m per 50 g. For the cap, use any light metallic yarn, or hold a fine gold thread together with a gold-brown cotton.
- Color A, Cream: 6 g, about 12 m (Rounds 1, 5 and 6)
- Color B, Pale Yellow: 10 g, about 20 m (Rounds 2–4, Rounds 7–8 and the hanging loop)
- Color C, Metallic Gold: 2 g, about 6 m (cap)
These amounts include a margin of roughly 25% for swatching and weaving in ends.
Tools:
– 2.75 mm (US C-2) crochet hook
– Tapestry needle
– Scissors
– Stitch marker
– Blocking mat and rust-proof pins
– Spray bottle with water
– Optional: liquid fabric stiffener or starch
Abbreviations (US Terms)
- ch – chain
- sl st – slip stitch
- sc – single crochet
- dc – double crochet
- sp – space
- BLO – back loop only
- st(s) – stitch(es)
- rep – repeat
- *…* – repeat the instructions between asterisks as directed
Special stitch: Standing join. Make a slipknot on your hook, insert the hook into the stitch or space, yarn over, pull up a loop and continue as written. This attaches the new color neatly with no knot.
The ch 3 at the start of a dc round counts as 1 dc throughout.
Gauge and Checkpoints
There is only one motif, so treat Rounds 1–4 as your gauge swatch. If they measure correctly, carry on. If not, change hook size and start again. Getting this right early is what gives you a flat finished circle.
Checkpoints (measure flat, without stretching):
– After Round 1: 1.25 in (3.2 cm) across
– After Round 4: 3.5 in (8.9 cm) across
– After Round 6: 4.25 in (10.8 cm) across
– After Round 8: 4.75 in (12.1 cm) across
Border gauge: about 7 sc = 1 in (2.5 cm), measured along the outer edge.
If your motif is too big, or the lace rounds ruffle, go down to a 2.5 mm hook. If it is too small, or the edge cups upward, go up to a 3.0 mm hook. Being off by 0.25 in (0.6 cm) at Round 4 usually means about 0.5 in (1.3 cm) of difference in the finished size.
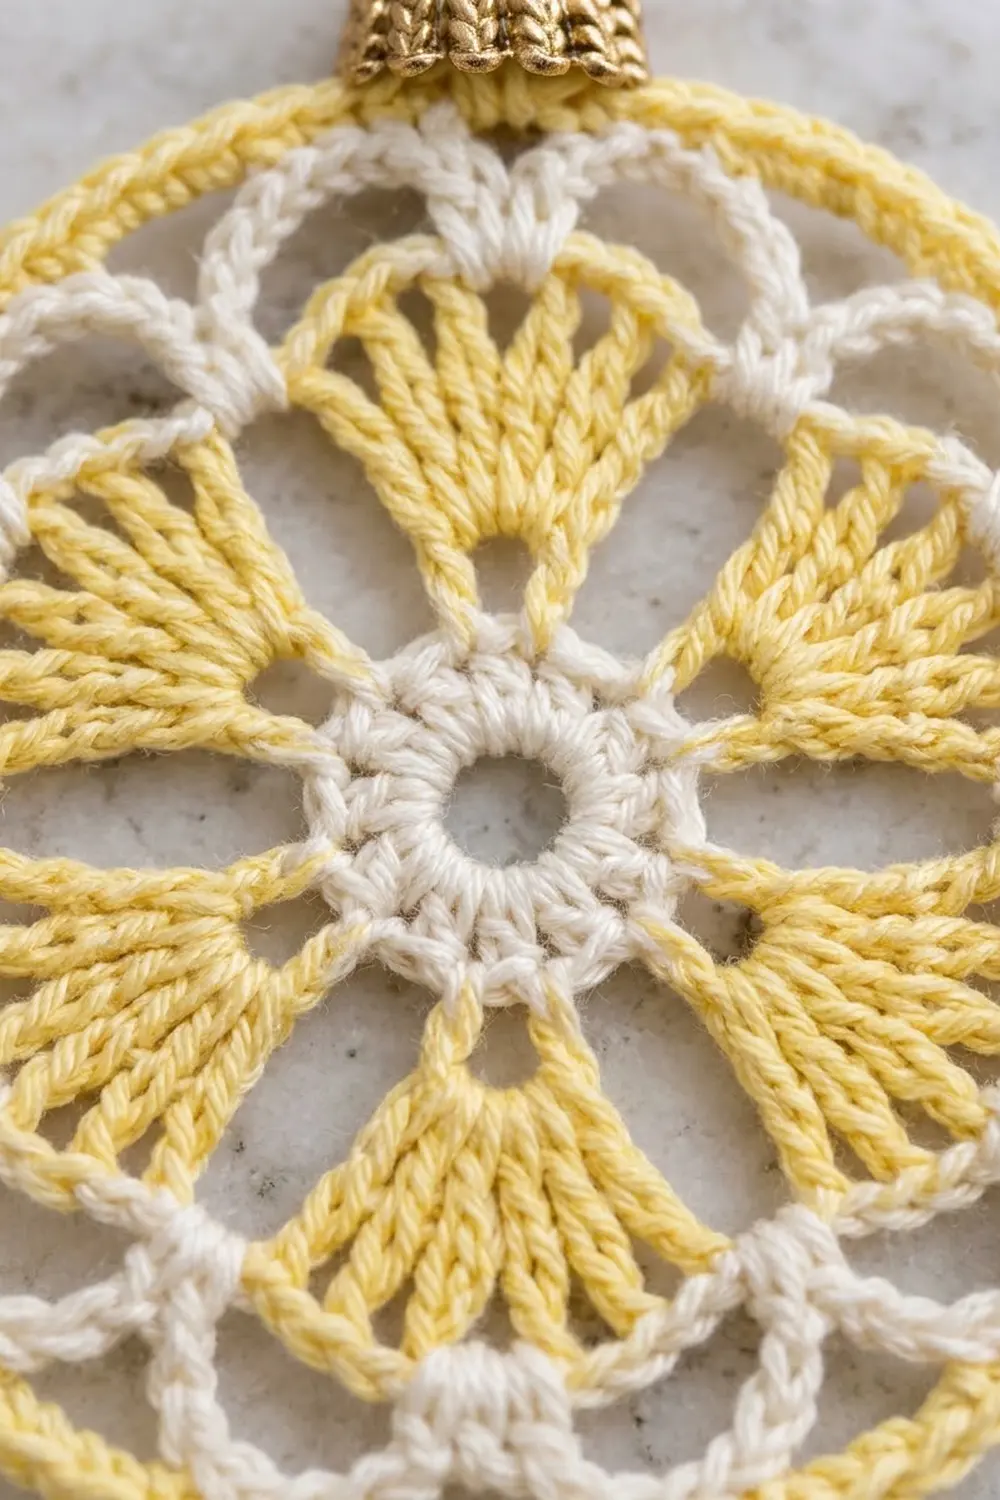
Ornament Motif
Round 1 – Center Ring (Color A)
With A, ch 6 and sl st to the first ch to form a ring.
Round 1: Ch 3 (counts as dc), work 15 dc into the ring, then sl st to the top of the beginning ch-3. (16 dc)
Fasten off A. The center hole should stay open, about 0.5 in (1.3 cm) wide. Don’t pull the ring tight.
Checkpoint: 1.25 in (3.2 cm) across.
Rounds 2–4 – Fan Petals (Color B)
Each petal starts as 4 dc worked over 2 stitches of Round 1. It then grows by 2 stitches in each of the next two rounds, which gives the fan its wedge shape. The chain spaces between the petals stay open, and those are the gaps you see in the finished piece.
Round 2: Standing join B with a dc into any dc of Round 1. Work 1 more dc in the same st, then 2 dc in the next st and ch 2. *[2 dc in the next st] twice, ch 2*. Rep from * to * 6 more times. Sl st to the first dc. (32 dc in 8 fans of 4 dc; 8 ch-2 sps)
Check: 8 fans × 2 stitches of Round 1 per fan = 16 stitches, so every stitch of Round 1 is used exactly once.
Round 3: Ch 3 (counts as dc). Dc in the same st, dc in the next 2 dc, 2 dc in the last dc of the fan, then ch 3 and skip the ch-2 sp. *2 dc in the first dc of the next fan, dc in the next 2 dc, 2 dc in the last dc, ch 3, skip the ch-2 sp*. Rep from * to * 6 more times. Sl st to the top of the ch-3. (48 dc in 8 fans of 6 dc; 8 ch-3 sps)
Round 4: Ch 3 (counts as dc). Dc in the same st, dc in the next 4 dc, 2 dc in the last dc of the fan, then ch 4 and skip the ch-3 sp. *2 dc in the first dc of the next fan, dc in the next 4 dc, 2 dc in the last dc, ch 4, skip the ch-3 sp*. Rep from * to * 6 more times. Sl st to the top of the ch-3. (64 dc in 8 fans of 8 dc; 8 ch-4 sps)
Fasten off B.
Checkpoint: 3.5 in (8.9 cm) across. The petals should lie flat, and the gaps should be open V shapes.
Rounds 5–6 – Cream Lace (Color A)
Round 5 connects the tip of each petal to the gap after it, so a cream chain arcs over each gap. Round 6 is worked into the middle of each Round 5 loop, which makes the offset scalloped band.
Round 5: Standing join A with a sc between the 4th and 5th dc of any fan (the center of the fan). Ch 6, sc in the next ch-4 sp, ch 6. *Sc between the 4th and 5th dc of the next fan, ch 6, sc in the next ch-4 sp, ch 6*. Rep from * to * 6 more times. Sl st to the first sc. (16 sc; 16 ch-6 loops)
Round 6: Sl st in each of the next 3 ch to reach the middle of the first loop. Ch 1, then sc around that ch-6 loop. *Ch 7, sc around the next ch-6 loop*. Rep from * to * 14 more times. Ch 7 and sl st to the first sc. (16 sc; 16 ch-7 loops)
Fasten off A.
Checkpoint: 4.25 in (10.8 cm) across. This is the motif size before the border. The ch-7 loops should curve gently without pulling the petals.
Border
The yellow border is two rounds of sc. It closes the lace into a smooth, solid frame that looks like the rim of a glass bauble.
Border gauge: about 7 sc = 1 in (2.5 cm) along the edge.
Round 7 (Color B): Standing join B with a sc around any ch-7 loop. Work 5 more sc around the same loop. *Work 6 sc around the next ch-7 loop*. Rep from * to * 14 more times. Sl st to the first sc. Don’t work into the sc stitches of Round 6; they are covered by the new stitches.
Count: 16 loops × 6 sc = 96 sc. This is a conversion round: 0 stitches worked 1-per-stitch, plus 96 stitches worked into the loops.
Checkpoint: 4.5 in (11.4 cm) across.
Round 8 (Color B): Ch 1. *Sc in each of the next 11 sc, 2 sc in the next sc*. Rep from * to * 7 more times. Sl st to the first sc. (104 sc)
This is a trim round with increases: 96 sc worked 1-per-stitch plus 8 increases = 104 sc.
Fasten off B, leaving a 6 in (15.2 cm) tail for attaching the cap.
Why the math works: At 4.5 in (11.4 cm) across, Round 7 has a circumference of about 14.1 in (35.9 cm). Spreading 96 sc over that gives about 6.8 sc per inch, which is right on gauge. Round 8 adds 0.125 in (0.3 cm) on each side, so the diameter grows to 4.75 in (12.1 cm). The circumference grows to about 14.9 in (37.9 cm) and needs about 104 sc, so the 8 increases do exactly that. Fewer increases would make the edge cup. More would make it wave.
Final checkpoint: 4.75 in (12.1 cm) across.
Gold Cap (Color C)
The cap is worked flat in sc rows through the back loops. This creates the vertical ribs. You then seam it into a short tube.
With C, ch 5.
Row 1: Sc in the 2nd ch from the hook and in each ch across. Turn. (4 sc)
Rows 2–12: Ch 1, sc BLO in each st across. Turn. (4 sc in each row)
You should have 12 rows that measure about 1.5 in (3.8 cm) long and 0.5 in (1.3 cm) wide. Fasten off, leaving an 8 in (20.3 cm) tail.
Seam: Fold the strip so Row 1 meets Row 12. With the tail, whipstitch them together to form a tube. Then weave the tail up to one open end and run it in and out around that edge. Pull gently to close that end about halfway, leaving a small opening for the hanging loop. Don’t fasten off yet.
Flattened, the cap measures 0.75 in wide × 0.5 in tall (1.9 × 1.3 cm).
Hanging Loop (Color B)
Cord: With B, ch 41. Starting in the 2nd ch from the hook, sl st into the back bump of each ch across. (40 sl st)
Fasten off, leaving a 6 in (15.2 cm) tail. The cord should measure about 5 in (12.7 cm) and feel firm, not stretchy.
Assembly
- Fold the cord in half. Push both ends down through the gathered top opening of the cap, so a loop about 2.25 in (5.7 cm) tall sticks out above it.
- Pull the cap’s gathering tail snug around the cord and knot it inside the cap.
- Find the top center of the ornament. This is any point on Round 8 directly above the center of a fan, if you want a petal pointing straight up, as in the photos.
- Slide the open lower end of the cap over the border, so the cap straddles the edge with half in front and half behind.
- Sew both cord ends securely into the stitches of Rounds 7–8 inside the cap. Then sew the lower edge of the cap to Round 8 on the front and back.
- Weave in all remaining ends through same-color stitches.
Final Blocking
- Mist the ornament lightly with water until it is damp but not dripping. If you want a stiffer ornament, dip it in diluted fabric stiffener instead, then squeeze out the extra.
- Lay it face up on the blocking mat.
- Pin the outer edge into a perfect circle 4.75 in (12.1 cm) across. A circle drawn on paper under the mat helps.
- Pin the center hole open, about 0.5 in (1.3 cm) wide.
- Ease each of the 16 ch-7 loops into an even curve. Pin the tip of each fan so the eight petals sit evenly spaced, 45° apart.
- Shape the cap round and stand the hanging loop upright.
- Leave it to dry completely, usually 6–12 hours, before you unpin it.
Final Quality-Control Checklist
- [ ] Round 1 has 16 dc and an open center
- [ ] There are 8 fans of exactly 8 dc each in Round 4
- [ ] Round 5 has 16 ch-6 loops, anchored alternately to fan centers and gaps
- [ ] Round 6 has 16 ch-7 loops
- [ ] Round 7 has 96 sc and Round 8 has 104 sc
- [ ] The ornament measures 4.75 in (12.1 cm) across and lies flat
- [ ] The cap is centered above a petal and sewn on both faces
- [ ] The loop is about 2.25 in (5.7 cm) tall and firmly secured
- [ ] All ends are woven into matching colors
Troubleshooting
The petals curl or cup. Your tension is tight in Rounds 2–4. Go up a hook size for those rounds only.
The lace rounds ruffle. Your chains are too loose. Chain more snugly, or work Round 6 with ch 6 instead of ch 7. If you do, still work 6 sc per loop in Round 7.
The border waves. Round 7 is too loose. Work it with a hook 0.25 mm smaller, or replace the 2 sc increases in Round 8 with single sc. That gives 96 sc.
The border cups up. Work Round 7 with a slightly larger hook, or check that you made all 8 increases in Round 8.
The cap slides around. Add a few extra stitches through the cap and border on both faces.
The center hole closed up. Rework Round 1 with a looser ch-6 ring, or pin the hole open firmly when blocking.
Care
Hand wash in cool water with mild soap, press out the water in a towel, and reshape it flat to dry. If you used stiffener, re-stiffen after washing. Store the ornament flat between tissue sheets.

Final Notes
The measurements build on each other. Round 1 measures 1.25 in (3.2 cm), the petals bring it to 3.5 in (8.9 cm), and the lace brings it to 4.25 in (10.8 cm). The 96-stitch Round 7 measures 4.5 in (11.4 cm), and the 104-stitch Round 8 finishes the circle at 4.75 in (12.1 cm). Check each step as you go and you’ll end up with a flat, evenly scalloped bauble.
Happy crocheting!