

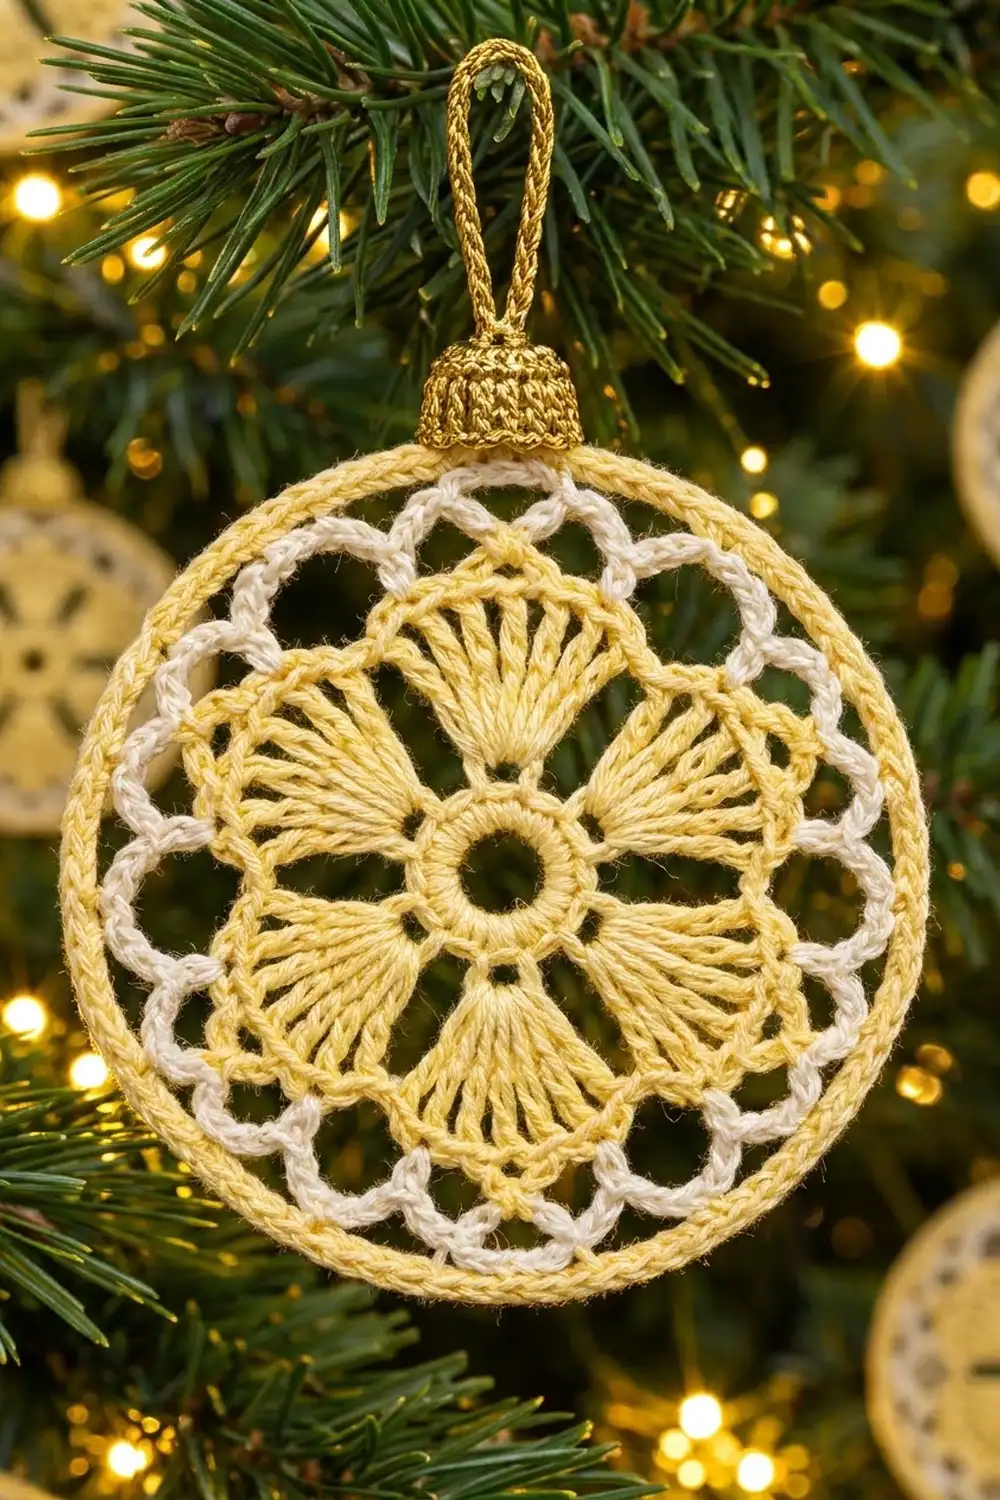
The Buttercup Bauble is a flat, lacy Christmas ornament shaped like a classic glass bauble. Its soft butter-yellow center holds six fan-shaped petals. A ring of cream chain loops forms a delicate lace band, and a crisp yellow rim frames the whole circle. A small metallic gold cap and a twisted gold hanging loop finish the top.
The style is vintage and light, closer to a doily than a stuffed ornament. It looks lovely on a tree, against a frosty window, or tied to a gift as a keepsake tag. Because it is flat and starched, it is easy to mail inside a holiday card. The three colors are pale butter yellow, cream, and metallic gold.
This pattern uses US crochet terms. The finished ornament is a single piece with a circle 4.5 in (11.4 cm) across. With the cap and hanging loop, it is about 6.7 in (17.0 cm) tall.
The construction is simple. You work in the round from a chain ring and add six treble fans. Then you switch to cream for two rounds of chain loops and back to yellow for a two-round rim. The gold cap is worked in short rows directly onto the top of the rim, and the hanging loop is chained and slip-stitched off the cap.
Finished Size and Construction
- Finished size: 4.5 in (11.4 cm) diameter circle; 6.7 in (17.0 cm) tall including the cap and loop
- Skill level: Easy-intermediate
- Terminology: US crochet terms
- Yarn weight: Fine (#2) mercerized cotton, plus fine metallic thread for the cap
- Hook: 2.5 mm (US B/1 or C/2, depending on the brand)
- Number of pieces: 1 (a single round motif with an attached cap)
- Layout: Single ornament, no assembly
- Piece size: 4.5 in (11.4 cm) diameter
- Size before border: 4.0 in (10.2 cm) diameter after Round 5
- Border depth: 0.25 in (0.6 cm) on each side, adding 0.5 in (1.3 cm) to the diameter
Materials
Choose a smooth, mercerized cotton in fine (#2) weight, about 170 m per 50 g. Mercerized cotton shows the fan stitches clearly and holds its shape after starching. Avoid fuzzy or very stretchy yarns, because they blur the lace.
- Color A, pale butter yellow: 12 g, about 40 m (44 yd)
- Color B, cream: 5 g, about 17 m (19 yd)
- Color C, metallic gold thread: 2 g, about 10 m (11 yd), the same thickness as Color A or slightly finer
For the gold, look for a soft, plied metallic crochet thread rather than a stiff tinsel cord. A soft thread forms neat single crochet and twists nicely in the hanging loop. If your metallic thread is much thinner than Color A, hold it double.
These quantities include a margin of about 20 percent for swatching and weaving in ends.
Tools:
- 2.5 mm crochet hook
- Tapestry needle
- Scissors
- Stitch markers
- Rust-proof pins and a foam blocking board
- Spray starch or fabric stiffener
- Ruler or tape measure
Abbreviations (US Terms)
- ch – chain
- sl st – slip stitch
- sc – single crochet
- tr – treble crochet
- sc2tog – single crochet 2 together
- BL – back loop only
- sp – space
- st(s) – stitch(es)
- rep – repeat
Special stitch – Fan: Work 9 tr into the same chain space. For the first fan of Round 3, the beginning ch 4 counts as the first tr, so you work ch 4 plus 8 tr.
Gauge and Checkpoints
Gauge: 6 sc and 6 rows = 1 in (2.5 cm) in sc with Color A and a 2.5 mm hook.
Since this is a single ornament, the ornament itself is your test piece. Work through Round 3, then measure before you go on. Lay it flat and measure across the center without stretching. A small sc swatch is still useful if you’re unsure about the metallic thread, because it often works up at a different tension.
Checkpoints:
- After Round 1: center ring about 1.0 in (2.5 cm) across
- After Round 3: fans about 2.75 in (7.0 cm) across, tip to tip
- After Round 4: about 3.25 in (8.3 cm) across
- After Round 5: about 4.0 in (10.2 cm) across
- After Round 7: 4.5 in (11.4 cm) across
If your piece is too big: go down a hook size (2.25 mm) and keep your chains snug. Loose chains in Rounds 4 and 5 are the most common reason for an oversized ornament.
If your piece is too small: go up a hook size (2.75 mm). If only the cream band is tight, keep the same hook and relax your tension on the chains.
Lace often looks slightly ruffled or cupped before blocking. That’s fine, as long as each measurement is within 0.25 in (0.6 cm) of its checkpoint.
Ornament Pattern
Center Ring (Color A)
Ch 8, then sl st to the first ch to form a ring.
Round 1: Ch 1, work 18 sc into the ring, sl st to the first sc. (18 sc)
The center should be a firm, round ring with a clear hole in the middle, about 0.4 in (1.0 cm) wide.
Round 2: Ch 1, sc in the same st, ch 4, skip 2 sts, *sc in next st, ch 4, skip 2 sts; rep from * 4 more times, sl st to the first sc. (6 sc and 6 ch-4 sps)
Each sc anchors the narrow gap between two petals, and each ch-4 space will hold one fan.
Fans (Color A)
Round 3: Sl st into the first ch-4 sp, ch 4 (counts as tr), 8 tr in the same sp (first fan made), *sc in next sc, Fan in next ch-4 sp; rep from * 4 more times, sc in the last sc, sl st to the top of the beginning ch 4. (6 fans of 9 tr = 54 tr, plus 6 sc = 60 sts)
Fasten off Color A, leaving a 4 in (10.2 cm) tail. Work over this tail in Round 4 to save weaving time later.
Each fan is narrow at the center and opens wide at the top, which makes six petal shapes. The sc between the fans pulls the petals together at their bases and leaves small open gaps between them. Number the tr in each fan 1 to 9, in the order you work them.
Lace Band (Color B)
Round 4: Join Color B with a sc in tr 2 of any fan, ch 5, skip tr 3 to tr 6, sc in tr 7, ch 5, *skip tr 8, tr 9, the sc, and tr 1 of the next fan, sc in tr 2, ch 5, skip tr 3 to tr 6, sc in tr 7, ch 5; rep from * 4 more times, sl st to the first sc. (12 sc and 12 ch-5 loops)
Each loop skips exactly 4 sts, so the loops are evenly spaced. Six loops sit over the fan tops, and six bridge the gaps between fans.
Round 5: Sl st in the next 2 ch, ch 1, sc in the same ch-5 loop, ch 6, *sc in next ch-5 loop, ch 6; rep from * 10 more times, sl st to the first sc. (12 sc and 12 ch-6 loops)
Fasten off Color B. The cream band should now have two layers of open loops, with the outer loops larger and rounder than the inner ones. Keep all chains the same size. If one loop looks short, rework it now, because the rim will make any difference more visible.
Border
The yellow rim is the border. It is two rounds deep and turns the scalloped lace into a smooth circle.
Border gauge: 84 sts around a 4.5 in (11.4 cm) circle. The circumference is 3.1416 × 4.5 in = 14.1 in (35.8 cm), so the rim holds about 6 sts per inch. That matches the main gauge.
Round 6 (Color A): Join Color A with a sc in any ch-6 loop, 6 more sc in the same loop, *7 sc in next ch-6 loop; rep from * 10 more times, sl st to the first sc. (12 loops × 7 sc = 84 sc)
Work the sc over the chain and pack them evenly so each loop is fully covered. The Round 5 sc between the loops are hidden underneath.
Round 7: Ch 1, loosely sl st in each st around, sl st to the first sl st. (84 sl sts)
Keep these slip stitches relaxed and even. They sit on top of Round 6 like a fine braided cord and keep the edge from flaring. Fasten off and weave in the end.
Why the math works: Round 5 has 12 loops, and 7 sc per loop gives 84. At 6 sts per inch, 84 sts make a circumference of 14 in (35.6 cm), which is a diameter of 4.46 in, or about 4.5 in (11.4 cm). Round 7 keeps exactly 84 sts, so the rim lies flat instead of ruffling or cupping.
Gold Cap (Color C)
Lay the ornament flat with one fan pointing straight up. The top center of the rim is directly above the middle of that fan. Mark the 3 sts on each side of the top center, for 6 sts in total.
Row 1: With the right side facing, join Color C with a sc in the BL of the first marked st, then sc in the BL of the next 5 sts, turn. (6 sc)
Working in the back loops leaves the yellow front loops visible, so the rim’s braided line continues unbroken under the cap.
Row 2: Ch 1, sc in each st across, turn. (6 sc)
Row 3: Ch 1, sc in each st across, turn. (6 sc)
Row 4: Ch 1, sc2tog, sc in next 2 sts, sc2tog, turn. (4 sts)
The cap should be about 1.0 in (2.5 cm) wide at the base and 0.7 in (1.8 cm) tall. It narrows slightly at the top, like the neck of a glass bauble.
Hanging Loop (Color C)
Row 5: Ch 1, sl st in the first st, ch 20, sl st in the 4th st (the last st of Row 4), turn, sl st in each of the 20 ch, sl st in the first st of Row 4. (20 sl sts on the loop)
The second pass of slip stitches twists and firms the chain into a cord. The finished loop stands about 1.5 in (3.8 cm) above the cap. Fasten off and weave in all ends on the wrong side.
Final Blocking
- Weave in all ends inside the solid yellow areas, where they won’t show.
- Soak the ornament in cool water for 5 minutes. Press the water out in a towel, without wringing.
- Lay it on the blocking board and pin the center ring flat, keeping the hole round.
- Pin the rim into a 4.5 in (11.4 cm) circle with at least 12 pins, one above each ch-6 loop.
- Open each fan evenly. Pin the tips of the cream loops so that all 12 inner loops match each other and all 12 outer loops match each other.
- Straighten the gold cap so it sits square at the top center, and pin the loop upright.
- Spray with starch or brush on fabric stiffener. Let it dry completely, usually 6 to 12 hours.
- Unpin and measure the diameter again. Starch again if the rim feels soft.
Final Quality-Control Checklist
- The circle measures 4.5 in (11.4 cm) in every direction.
- There are 6 fans with 9 tr each, all the same size.
- The center ring is round, with an open hole.
- Round 4 has 12 ch-5 loops, and Round 5 has 12 ch-6 loops.
- The rim has 84 sts and lies flat with no ruffles.
- The gold cap is centered above one fan and is 6 sts wide at the base.
- The hanging loop is firm and holds the ornament level.
- All ends are woven in and trimmed.
Troubleshooting
The ornament cups or curls into a bowl. Your chains are too tight. Rework Rounds 4 and 5 with looser chains, or go up half a hook size for those rounds only.
The rim ruffles. Round 7 is too loose, or you have extra stitches. Recount to 84 and work the slip stitches a little firmer.
The fans look uneven. Check that each ch-4 space holds exactly 9 tr and that you skipped 2 sts between every sc in Round 2.
The cream loops lean to one side. Make sure you placed a sc in tr 2 and tr 7 of every fan, so that each loop skips exactly 4 sts.
The center hole closes up. Your starting chain was too tight. Restart with a looser ch 8, or use ch 9 and keep 18 sc.
Cream loops show gaps under the rim. Push the Round 6 sc together along each loop so the chain is fully covered.
The cap tilts. Recount the 6 marked sts and check that the cap is centered over the middle of a fan.
The metallic thread splits. Use a slightly smaller hook for the cap and work slowly with a smooth wrist motion.
Care
Hand wash in cool water with mild soap, press dry in a towel, and reshape flat. Starch again after washing, and store the ornament flat between sheets of tissue paper.

Final Notes
The whole ornament depends on one simple measurement chain. Start with a 1.0 in (2.5 cm) center ring. Six treble fans take it to 2.75 in (7.0 cm), and two rounds of cream loops open it up to 4.0 in (10.2 cm). The 84-stitch rim adds 0.25 in (0.6 cm) on each side, for a final 4.5 in (11.4 cm) circle. The 6-stitch gold cap and 20-chain loop bring the total height to 6.7 in (17.0 cm).
If every checkpoint matches, the finished bauble will block flat and hang straight. Make one in butter yellow first, then try other soft shades and swap the gold for silver to build a matching set for your tree.
Happy crocheting!