

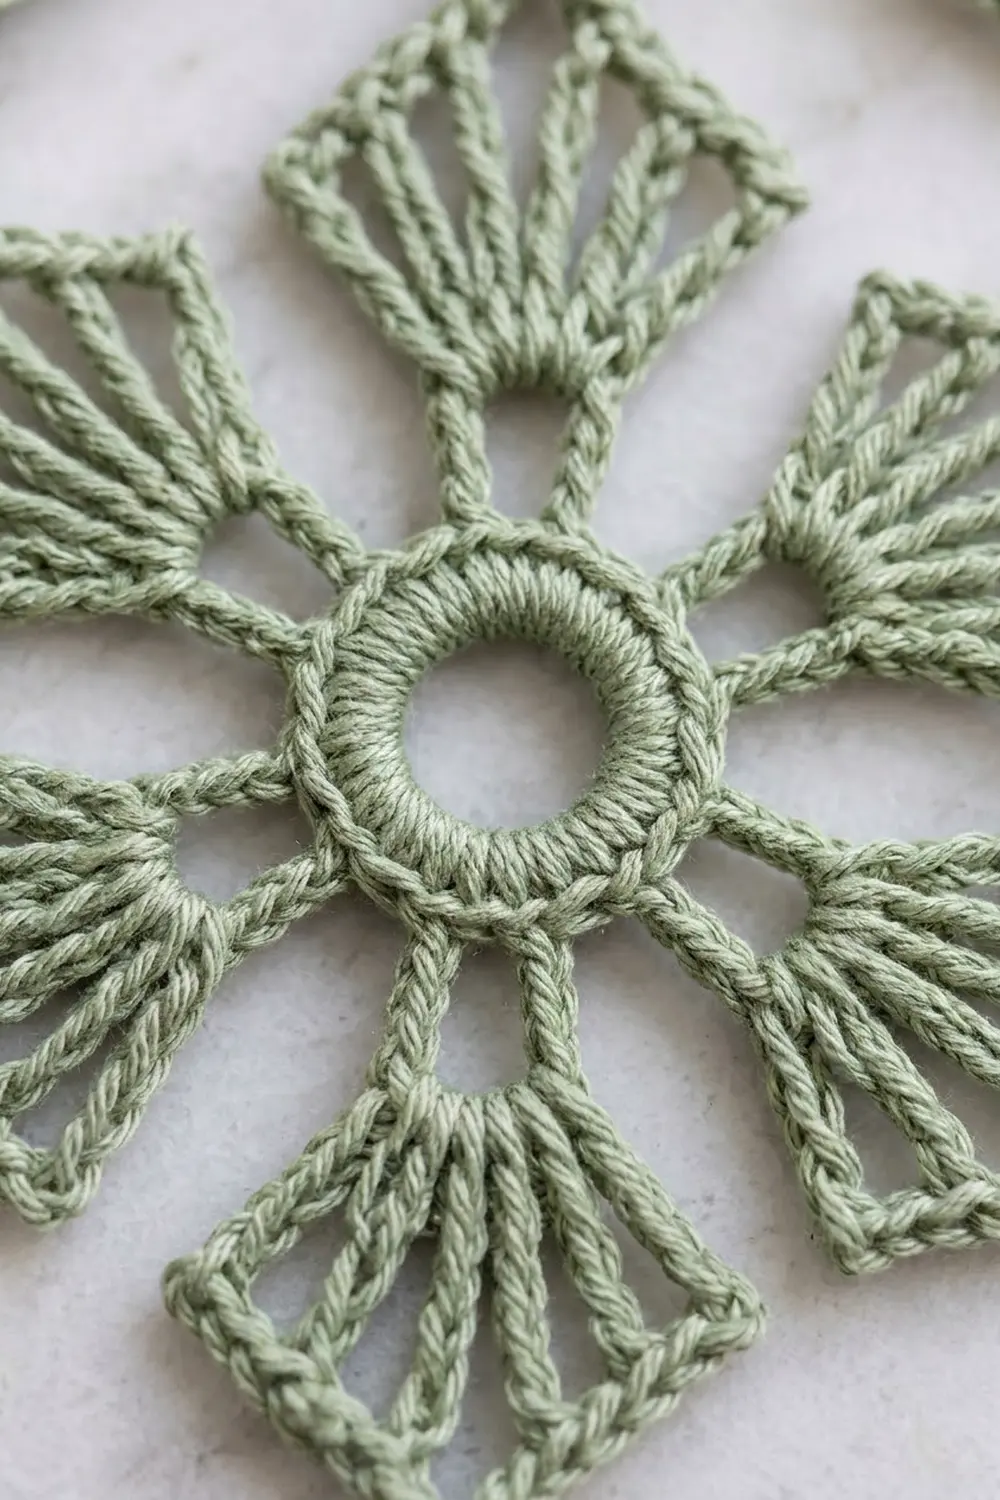
This ornament is a flat, lacy bauble. In the middle, six diamond-shaped petals radiate from a padded ring. A scalloped cream chain round links the petal tips to a thin corded outer ring, and a small ribbed gold cap and corded hanging loop finish the top.
The palette is soft and wintry: sage green for the flower and outer ring, cream for the scallops, and metallic gold for the cap. The ornament looks like lace but is firm enough to hang flat on a tree branch.
The pattern uses US crochet terms. The finished bauble is 3.5 in (8.9 cm) across. With the cap and hanging loop it is 4.7 in (11.9 cm) tall.
You make it in the round from the center out: a padded ring, six shells, six cluster points, a cream loop round, then a three-round green outer ring. The gold cap and loop are made separately and sewn on.
Finished Size and Construction
- Finished size: 3.5 in (8.9 cm) diameter; 4.7 in (11.9 cm) tall including cap and loop
- Skill level: Intermediate
- Terminology: US
- Yarn weight: Size 3 cotton crochet thread (fingering-weight range)
- Hook: 2.25 mm (US B-1)
- Number of pieces: 1 ornament body, plus 1 small cap and 1 hanging loop sewn on
- Layout: Single round motif; no grid or joining
- Body size before border: 3.2 in (8.1 cm) across the cream loops
- Border depth: 0.15 in (0.4 cm) on each side (Rnds 5–7)
- Cap size: 0.6 in (1.5 cm) wide × 0.4 in (1.0 cm) tall
Materials
Use a smooth, mercerized cotton thread. It shows the tall stitches clearly and blocks flat. Avoid fuzzy or very stretchy fibers, because the petal points will lose their crisp shape.
- Sage green, size 3 cotton thread: 8 g, about 22 m
- Cream, size 3 cotton thread: 3 g, about 8 m
- Gold metallic, size 3 thread: 2 g, about 6 m
Tools:
– 2.25 mm (US B-1) crochet hook
– Tapestry needle
– Scissors
– Stitch marker
– Blocking mat and rustproof pins
– Spray bottle with water (optional: light spray starch)
Quantities include a margin of about 30% for your gauge swatch and weaving in ends.
Abbreviations (US Terms)
- ch – chain
- sl st – slip stitch
- sc – single crochet
- tr – treble crochet
- rev sc – reverse single crochet (crab stitch)
- blo – back loop only
- st(s) – stitch(es)
- sp – space
- rep – repeat
Special stitch – tr6tog: *Yo twice, insert hook in next st, yo and pull up a loop, (yo, draw through 2 loops) twice; rep from * 5 more times (7 loops on hook), yo and draw through all 7 loops.
Petal cluster: The beginning ch-4 plus a tr6tog together form one 7-leg cluster that closes a shell into a point.
Gauge and Checkpoints
Gauge: 7 sc = 1 in (2.5 cm) worked in a chain row with size 3 thread and a 2.25 mm hook.
Make one full ornament body as your test piece. Check these measurements, laid flat and unstretched:
- After Rnd 1: ring is 0.75 in (1.9 cm) across, with a 0.3 in (0.8 cm) center hole
- After Rnd 2: 1.5 in (3.8 cm) across the shells
- After Rnd 3: 2.6 in (6.6 cm) from one petal tip to the opposite tip
- After Rnd 4: 3.2 in (8.1 cm) across the cream loops
- After Rnd 7: 3.5 in (8.9 cm) across the outer ring
If your piece is too big (over 3.6 in / 9.1 cm at the end), go down to a 2.0 mm hook. If it is too small (under 3.4 in / 8.6 cm), go up to a 2.5 mm hook. Change hooks rather than chain counts so the 6-fold math stays intact.
Ornament Body
Rnd 1 – Padded Ring (green)
Ch 10, sl st in first ch to form a ring.
Ch 1, work 24 sc into the ring. Sl st in first sc to join. (24 sc)
Pack the stitches snugly so the ring looks padded and the center hole stays open.
Rnd 2 – Shells (green)
Ch 1. Sc in next sc, skip 1 sc, 7 tr in next sc, skip 1 sc; rep from * 5 more times. Sl st in first sc to join. (6 sc + 42 tr = 48 sts; 6 shells)*
Each repeat uses exactly 4 sc of Rnd 1, and 6 × 4 = 24. The shells fan outward and form the lower half of each diamond petal.
Rnd 3 – Petal Points (green)
Sl st in first tr of the first shell.
Petal: Ch 4 (counts as first leg), tr6tog across the next 6 tr of the same shell, ch 1 to lock the point. Ch 4, sl st in top of the 7th tr of the same shell. Then sl st in the first tr of the next shell.
Rep Petal 5 more times. On the last repeat, end with the sl st in the 7th tr, then sl st into the base of the beginning ch-4. Fasten off.
(6 petal points, each with a ch-1 tip)
The first ch-4 and the closing ch-4 outline both upper edges of each petal, so the diamond is symmetrical. The sl st between shells joins neighboring petals at their widest points, as in the photo.
Rnd 4 – Cream Scallops
Join cream with a sc in the ch-1 tip of any petal.
Ch 13, sc in ch-1 tip of next petal, ch 13; rep from * 4 more times. Sl st in first sc to join. Fasten off.
(6 sc + 78 ch = 84 sts; 6 ch-13 loops)*
Each loop runs from one petal tip out toward the outer ring and back to the next tip, so it forms two scallops.
Border: Outer Corded Ring
The three green rounds form the “border” of this single motif and give the bauble its round silhouette.
Border gauge: 7 sts = 1 in (2.5 cm), the same as the main gauge.
Rnd 5 – Chain Frame (green)
Join green with a sc in the 7th (center) ch of any cream ch-13 loop.
Ch 11, sc in 7th ch of next cream loop, ch 11; rep from * 4 more times. Sl st in first sc to join.
(6 sc + 66 ch = 72 sts)*
Each of the 6 segments counts 1 sc + 11 ch = 12 sts.
Rnd 6 – Solid Ring
Ch 1. Sc in each sc and in each ch around. Sl st in first sc to join.
(72 sts worked 1-per-existing-st + 0 added = 72 sc)
Work into the chains themselves rather than around them, so the ring stays thin and even.
Rnd 7 – Corded Edge
Ch 1. Working from left to right, rev sc in each sc around. Sl st in first st to join. Fasten off.
(72 sts worked 1-per-existing-st + 0 added = 72 rev sc)
Why the Math Works
The ring has 72 sts, which is 6 petals × 12 sts per segment, so every cream loop sits at the same spacing. At 7 sts per inch, 72 sts give a circumference of about 10.3 in (26.2 cm). Dividing by π gives a centerline diameter of about 3.3 in (8.4 cm). The ring’s thickness then brings the outer edge to 3.5 in (8.9 cm).
The cream loops reach out to 3.2 in (8.1 cm) across, just inside the ring. That is why the ring sits snugly and doesn’t ruffle or pull.
Gold Cap
With gold, ch 4.
Row 1: Sc in 2nd ch from hook and in next 2 ch. (3 sc)
Rows 2–5: Ch 1, turn, sc blo in each sc across. (3 sc)
Fasten off, leaving a 6 in (15.2 cm) tail.
The 5 rows form vertical ridges when you turn the cap so the rows run up and down. The cap measures 0.6 in (1.5 cm) wide × 0.4 in (1.0 cm) tall.
Gold Hanging Loop
With gold, ch 21.
Sl st in the back bump of the 2nd ch from hook and in each ch across. (20 sl st)
Fasten off, leaving a 6 in (15.2 cm) tail. The sl sts make the chain firm and corded.
Assembly
- Choose a petal tip and turn the ornament so that tip points straight up.
- Center the cap on the outer ring directly above that petal, over the 6th ch of the Rnd 5 segment there. Its lower edge should cover about 4 sts of Rnd 7.
- Whipstitch the cap’s lower edge and side edges to the ring, catching both front and back.
- Fold the hanging loop in half. Sew both ends to the top center of the cap so the loop stands 0.8 in (2.0 cm) tall.
Final Blocking
- Weave in all ends along stitches of the same color.
- Lightly spray the ornament with water, or with light starch for extra stiffness.
- Lay it face up on the blocking mat.
- Pin the outer ring into a true circle 3.5 in (8.9 cm) across, placing pins about every 0.5 in (1.3 cm).
- Pin each petal tip outward so the opposite tips measure 2.6 in (6.6 cm) apart.
- Pull the center of each cream loop gently against the ring so the scallops are even.
- Let the piece dry completely before you remove the pins.
Final Quality-Control Checklist
- Center hole is open and round, about 0.3 in (0.8 cm) across
- All 6 petals have 7 legs and a sharp tip
- Neighboring petals touch at their widest points
- 6 cream loops, each touching the ring at its center
- Outer ring has 72 sts with an even corded edge
- Ornament measures 3.5 in (8.9 cm) across
- Cap is centered above a petal tip and sewn securely
- Loop stands 0.8 in (2.0 cm) and holds the ornament’s weight without tilting
- All ends are hidden
Troubleshooting
- Center ring cups: Your 24 sc are too tight. Redo Rnd 1 with a slightly looser tension, or make the starting ring ch 11 instead.
- Petals curl forward: Your tr6tog is pulled too hard. Keep the yarn-overs relaxed and block with starch.
- Petals have gaps between them: Make sure you sl st into the first tr of the next shell. Don’t skip it.
- Cream loops sag past the ring: Your chains are loose. Try ch 12 loops and ch 10 ring segments, and adjust Rnd 6 to 66 sc.
- Outer ring ruffles: Rnd 5 chains are too loose. Go down a hook size for Rnds 5–7 only.
- Rev sc looks uneven: Tilt the hook downward and keep each loop the same height.
- Ornament hangs crooked: Re-center the cap exactly above a petal tip.
Care
Hand wash gently in cool water, press out the water in a towel, and re-block flat to dry. Store the ornament flat between tissue paper so it keeps its shape.

Final Notes
The size chain runs from the center out. The padded ring measures 0.75 in (1.9 cm). The shells reach 1.5 in (3.8 cm), the petal points 2.6 in (6.6 cm), and the cream loops 3.2 in (8.1 cm). The 72-st corded ring brings the bauble to 3.5 in (8.9 cm). With the cap and loop, it is 4.7 in (11.9 cm) tall.
If you hit each checkpoint, the ornament will come out flat and round. Make one in sage and cream, or try other color pairs to fill a whole tree.
Happy crocheting!