

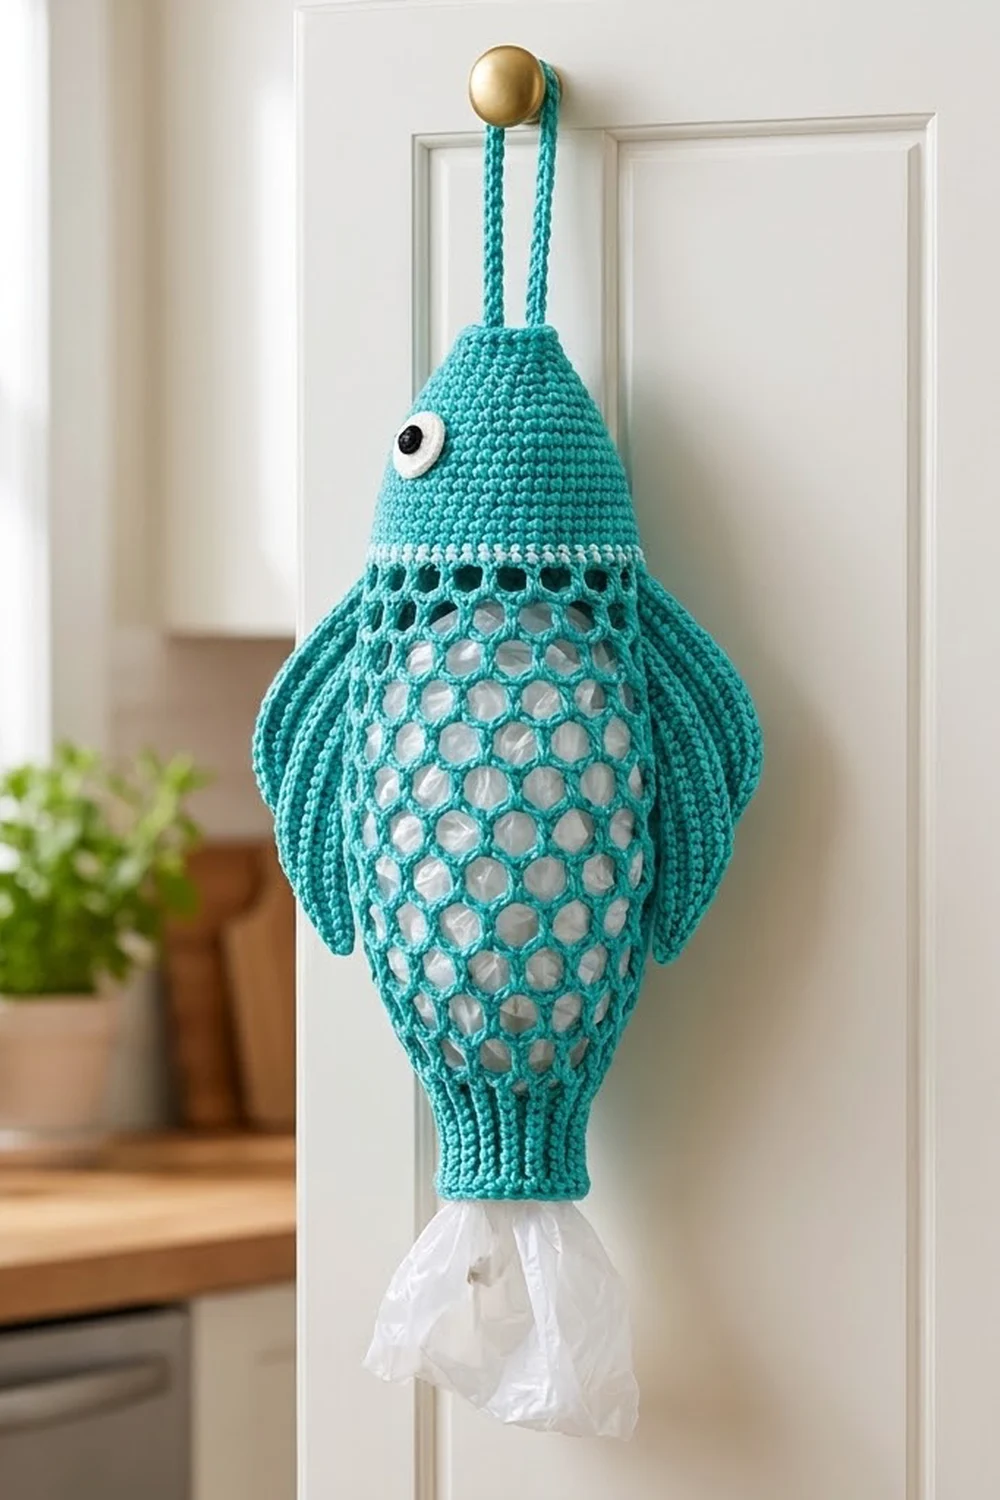
Bubbles is a hanging fish that keeps your plastic grocery bags in one tidy spot. You push bags in through the top of the head and pull them out one at a time through the ribbed cuff at the bottom, just above the tail.
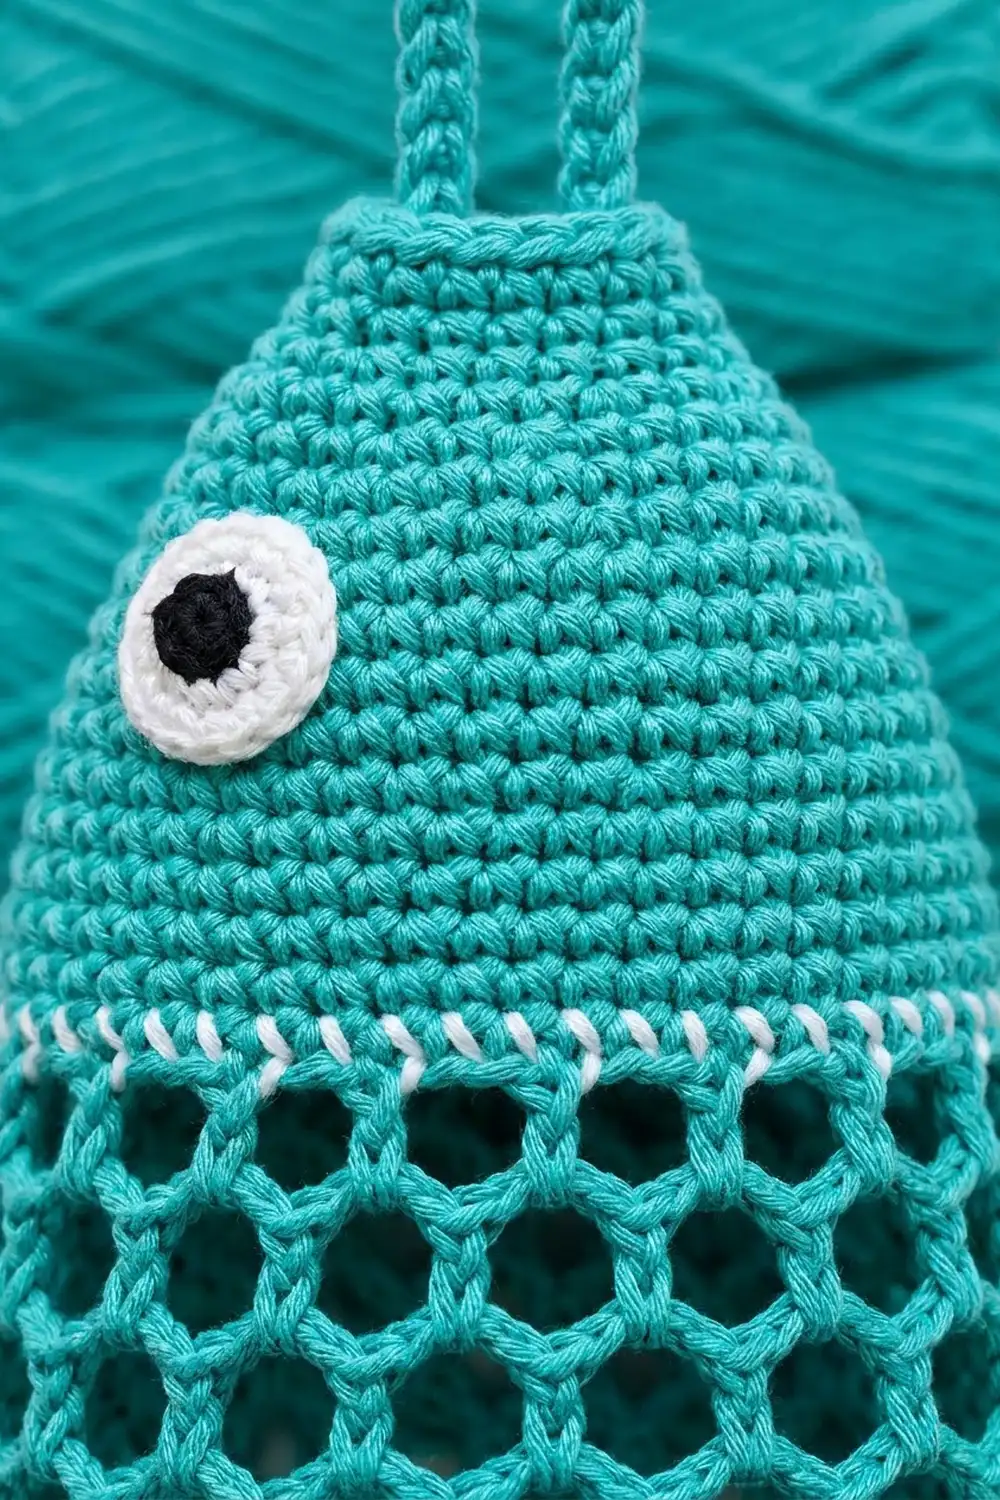
The sample is made in bright teal cotton. A single white stripe marks the “collar” between head and body, and the round white eye has a black pupil. The body is an open honeycomb mesh, so you can see the bags inside. The fins and tail have raised lengthwise ridges, and a small pinched bow sits where the tail meets the body. A coral fish made from the same pattern hangs beside the teal one.
This pattern uses US crochet terms. The finished body is about 16 in (40.6 cm) long and 6 in (15.2 cm) wide when laid flat. It is about 19 in (48.3 cm) long with the tail and about 23.5 in (59.7 cm) with the hanger.
You work the body in one piece from the bottom up: a ribbed cuff, a widening honeycomb mesh, a white conversion round, and then a solid single crochet head that narrows to the top opening. The fins, tail, eye and hanger rings are made separately and sewn on.
Finished Size and Construction
- Finished size: body 16 in (40.6 cm) long x 6 in (15.2 cm) wide flat; 19 in (48.3 cm) long with tail
- Skill level: Easy-Intermediate
- Terminology: US
- Yarn weight: #4 worsted cotton
- Hook: 5.0 mm (H-8)
- Number of pieces: 7 (1 body, 2 side fins, 1 tail unit, 1 eye, 2 hanger rings)
- Layout: body vertical; one fin on each side; tail at the bottom; eye and hanger at the top
- Piece sizes: fin 4 in x 1.5 in (10.2 x 3.8 cm); each tail lobe 5 in x 2 in (12.7 x 5.1 cm); eye 1 in (2.5 cm) across
- Size before border: top opening and cuff each 3 in (7.6 cm) wide flat
- Border depth: one slip stitch round, about 0.125 in (0.3 cm)
Materials
Use a smooth, firm worsted-weight cotton or cotton blend. Cotton holds the mesh shape and won’t stretch out under the weight of the bags the way acrylic can. The amounts below assume about 1.5 m of yarn per gram.
- Teal (main color): 120 g, about 180 m
- White: 6 g, about 9 m (stripe and eye)
- Black: 2 g, about 3 m (pupil)
Tools:
- 5.0 mm (H-8) crochet hook
- Tapestry needle
- Stitch markers
- Scissors
- Rust-proof pins and a spray bottle for blocking
- Measuring tape
All yarn amounts include a margin of about 15% for swatching and sewing.
Abbreviations (US Terms)
- ch – chain
- sl st – slip stitch
- sc – single crochet
- hdc – half double crochet
- dc – double crochet
- sc2tog – single crochet 2 together
- fpdc – front post double crochet
- bpdc – back post double crochet
- BLO – back loop only
- sk – skip
- sp – space
- rep – repeat
- st(s) – stitch(es)
Special stitches:
- Cluster (cl): (sc, ch 1, sc) all in the same loop. This makes the short vertical wall shared by two hexagons.
- Mesh move-up: sl st in the ch-1 sp of the first cluster, sl st in the next sc, then sl st in each of the next 2 ch. Your hook is now at the center of the next ch-4 loop.
Gauge and Checkpoints
Gauge: 16 sc x 18 rounds = 4 in (10.2 cm) in sc worked in the round.
Mesh gauge: One cluster plus its ch-4 loop is about 0.75 in (1.9 cm) wide. Each mesh round adds about 0.75 in (1.9 cm) of height.
Test the body first, because it sets the size. Work Rounds 1–8, then check your measurements.
Checkpoints:
- After Round 1, the cuff ring measures 6 in (15.2 cm) around, or 3 in (7.6 cm) flat.
- After Round 5, the cuff is 2 in (5.1 cm) tall.
- After Round 8, the mesh measures about 12 in (30.5 cm) around when gently stretched.
- After Round 19, the mesh section is 10.5 in (26.7 cm) tall.
- After Round 20, the white round measures 12 in (30.5 cm) around.
- After Round 35, the body is 16 in (40.6 cm) long.
If your work is too big, switch down to a 4.5 mm hook. If it’s too small, switch up to a 5.5 mm hook. You can also adjust the mesh loops: use ch 3 if the mesh is baggy, or ch 5 if it’s tight. Keep the same number of loops either way.
Body
Work the body in joined rounds from the bottom cuff up. Don’t turn at the end of rounds.
Cuff
With teal, ch 24 and join with a sl st to the first ch to form a ring. Make sure the chain isn’t twisted.
Rnd 1: Ch 1, sc in each ch around, join. (24 sc)
Rnd 2: Ch 2 (does not count as a st), fpdc around next st, bpdc around next st; rep from * around, join. (24 sts: 12 fpdc, 12 bpdc)
Rnds 3–5: Ch 2, fpdc around each fpdc and bpdc around each bpdc, join. (24 sts)
These post-stitch rounds make the vertical ribs. The cuff should now be 2 in (5.1 cm) tall.
Honeycomb Mesh
Rnd 6 (foundation): Ch 1, sc in first st, ch 4, sk 2 sts, sc in next st; rep from * 6 more times, ch 4, sk 2 sts, join to first sc. (8 sc, 8 ch-4 loops; 8 x 3 = 24 sts used)
Rnd 7 (growth): Sl st in each of next 2 ch, ch 1, [cl, ch 4, cl, ch 4] in next loop, [cl, ch 4] in next loop; rep from * 3 more times, join to first sc. (12 clusters, 12 loops)
Rnd 8 (growth): Mesh move-up, ch 1, [cl, ch 4, cl, ch 4] in next loop, [cl, ch 4] in each of next 2 loops; rep from * 3 more times, join. (16 clusters, 16 loops)
Rnds 9–19: Mesh move-up, ch 1, cl in next loop, ch 4; rep from * around, join. (16 clusters, 16 loops)
Each cluster sits in the center of a loop from the round below. Because the rounds are offset, the clusters form short vertical walls and the ch-4 loops form slanted walls, which together make the hexagons.
At the end of Rnd 19, fasten off teal. The mesh should be 10.5 in (26.7 cm) tall.
Collar Stripe
Rnd 20 (conversion): Join white in the ch-1 sp of any cluster. Ch 1, sc in ch-1 sp of cluster, 2 sc in next ch-4 loop; rep from * around. Join with teal and fasten off white. (48 sc = 16 sc worked 1-per-cluster + 32 sc added in the loops)
Head
Continue in teal.
Rnds 21–25: Ch 1, sc in each st around, join. (48 sc)
Rnd 26: Ch 1, sc in next 6 sts, sc2tog; rep from * around, join. (42 sc)
Rnd 27: Ch 1, sc in each st around, join. (42 sc)
Rnd 28: Ch 1, sc in next 5 sts, sc2tog; rep from * around, join. (36 sc)
Rnd 29: Ch 1, sc in each st around, join. (36 sc)
Rnd 30: Ch 1, sc in next 4 sts, sc2tog; rep from * around, join. (30 sc)
Rnd 31: Ch 1, sc in each st around, join. (30 sc)
Rnd 32: Ch 1, sc in next 3 sts, sc2tog; rep from * around, join. (24 sc)
Rnds 33–35: Ch 1, sc in each st around, join. (24 sc)
Don’t fasten off. Put the working loop on a stitch marker; you’ll use it for the border.
Rounds 20–35 are 16 rounds of sc, about 3.5 in (8.9 cm) at gauge. The body is now 16 in (40.6 cm) long: 2 in cuff + 10.5 in mesh + 3.5 in collar and head (5.1 + 26.7 + 8.9 cm).
Make All Pieces
Side Fins (make 2, teal)
Ch 16.
Row 1: Sl st in 2nd ch from hook, sc in next 2 ch, hdc in next 3 ch, dc in next 5 ch, hdc in next 3 ch, sc in last ch, turn. (15 sts)
Rows 2–4: Ch 1, working in BLO: sl st in first st, sc in next 2 sts, hdc in next 3 sts, dc in next 5 sts, hdc in next 3 sts, sc in last st, turn. (15 sts)
Fasten off, leaving a 12 in (30.5 cm) tail for sewing. Tall stitches in the middle and short ones at the ends give the fin its curved leaf shape. Working in BLO makes the lengthwise ridges. Each fin is 4 in x 1.5 in (10.2 x 3.8 cm).
Tail Lobes (make 2, teal)
Ch 21.
Row 1: Sl st in 2nd ch from hook, sc in next 3 ch, hdc in next 4 ch, dc in next 5 ch, hdc in next 4 ch, sc in last 3 ch, turn. (20 sts)
Rows 2–5: Ch 1, working in BLO, repeat the Row 1 stitch sequence across, turn. (20 sts)
Fasten off. Each lobe is 5 in x 2 in (12.7 x 5.1 cm).
Tail Bow (make 1, teal)
Ch 13.
Row 1: Sc in 2nd ch from hook and in each ch across, turn. (12 sc)
Rows 2–5: Ch 1, sc BLO in each st across, turn. (12 sc)
Fasten off, leaving a 24 in (61.0 cm) tail. Wrap this tail tightly 6 times around the center of the rectangle to pinch it into a bow, then secure it at the back. The bow is about 3 in (7.6 cm) wide and 1 in (2.5 cm) tall.
Assemble the tail unit: Lay the two lobes so their sl st ends meet at the top in a V, with the curved edges facing out. Whipstitch the first 5 foundation loops of each lobe together. Sew the bow centered over the join.
Eye (make 1)
With black, make a magic ring.
Rnd 1: Ch 1, 6 sc in ring, join with white. Fasten off black. (6 sc)
Rnd 2: With white, ch 1, 2 sc in each st, join. (12 sc)
Rnd 3: Ch 1, sc in next st, 2 sc in next st; rep from * around, join. (18 sc)
Fasten off, leaving a tail for sewing. The eye is 1 in (2.5 cm) across. If you want an eye on both sides of the fish, make a second one.
Hanger Rings (make 2, teal)
Ch 40 and join with a sl st to form a ring, without twisting.
Rnd 1: Ch 1, sc in each ch around, join. (40 sc)
Fasten off. Each ring is 10 in (25.4 cm) around and 5 in (12.7 cm) long when flattened.
Layout:
            ||  ||        <- hanger rings
         [   HEAD  o ]    <- eye
         [===========]    <- white stripe
   fin  /[  MESH     ]\  fin
        |[  MESH     ]|
         [  MESH     ]
          [   bow   ]
          [  cuff   ]
          /  \   /  \     <- tail lobes
Joining
Sew with whipstitch, using the long yarn tails. Go through both loops of each edge stitch so the seams lie flat.
Fins: Lay the body flat with the eye side facing you so the two side folds line up. Place a fin at each fold with the narrow end pointing down. Flip the second fin over so the two fins curve in opposite directions. Whipstitch the first 8 foundation loops at the top of each fin to the clusters along the fold in Rnds 15–18, sewing 2 loops into each cluster round. Leave the rest of each fin free so it can flare out.
Tail unit: Center the bow on the eye side at Rnd 6. Whipstitch the back of the bow to 4 of the Rnd 6 sc. Tack the top of each lobe to the outer cuff ribs at Rnd 5 so the lobes angle outward and the cuff opening stays clear.
Eye: Sew the eye to the head between Rnds 27 and 30, about 1.25 in (3.2 cm) in from the front fold.
Hanger: Flatten one ring. Whipstitch 4 sts at its lower end to the 4 center sts of Rnd 34 on the front of the head. Sew the second ring to the matching 4 sts on the back of the head.
Tension: Pull each stitch snug but not tight. Sewing too tightly will pucker the mesh.
Size checkpoint: The body should still lie 6 in (15.2 cm) wide flat. The overall length is 19 in (48.3 cm) with the tail, or 23.5 in (59.7 cm) with the rings held up.
Border
The border is one round of slip stitches around each opening. It firms up the edge without changing the size.
Border gauge: 1 sl st per st, at 4 sts per inch (2.54 cm), the same as the sc gauge.
Top rim, Rnd 36: Put the held loop back on your hook. Sl st loosely in each st around, join. (24 sl st = 12 on the front + 12 on the back when flat)
Cuff edge: Join teal in any free loop of the foundation chain at the base of Rnd 1. Sl st loosely in each loop around, join. (24 sl st = 12 on the front + 12 on the back when flat)
Why the math works: Both openings have 24 sts. At 4 sts per inch, that’s 6 in (15.2 cm) around, or 3 in (7.6 cm) flat. One sl st per st adds no stitches and removes none, so the rims won’t flare or pucker, and a standard grocery bag can still pass through.
Final Blocking
- Weave in all ends securely, especially at the color changes.
- Stuff the body lightly with a rolled towel so it measures 6 in (15.2 cm) wide flat.
- Mist the whole piece with water until it’s damp.
- Use your fingers to ease the mesh into even hexagons.
- Pin the fins and tail lobes flat on a board, smoothing the ridges.
- Let everything dry completely, then remove the towel.
Final Quality-Control Checklist
- [ ] Cuff and top rim each have 24 sts
- [ ] Mesh has 16 clusters per round from Rnd 8 up
- [ ] White stripe has 48 sc and lies flat
- [ ] Body is 16 in (40.6 cm) long and 6 in (15.2 cm) wide flat
- [ ] Fins curve in opposite directions and are sewn at Rnds 15–18
- [ ] Tail lobes leave the cuff opening clear
- [ ] Hanger rings are sewn securely to the front and back
- [ ] All ends are hidden
Troubleshooting
Mesh looks like diamonds, not hexagons: Work every cluster into the center of a loop, never into a cluster.
White round ruffles: You may have worked 3 sc into some loops. Recount to 48.
Head narrows too sharply: Don’t skip the plain rounds between the decrease rounds.
Fins curl: Wet-block them and pin them flat.
Bags won’t pull through: Work the cuff border sl sts more loosely.
Care
Hand wash in cool water and lay flat to dry, reshaping the mesh while it’s damp. Don’t tumble dry, because it can distort the honeycomb.
Final Notes
Here is how the measurements connect. The 24-st cuff is 6 in (15.2 cm) around. Two growth rounds widen the mesh from 8 loops to 16 loops, which is 12 in (30.5 cm) around. The 48-sc white round matches that 12 in (30.5 cm). The head decreases back to 24 sts, the same as the cuff. The finished body is 16 in (40.6 cm) long. If your checkpoints match, your fish will hang neatly and hand out bags one at a time.
Happy crocheting!