

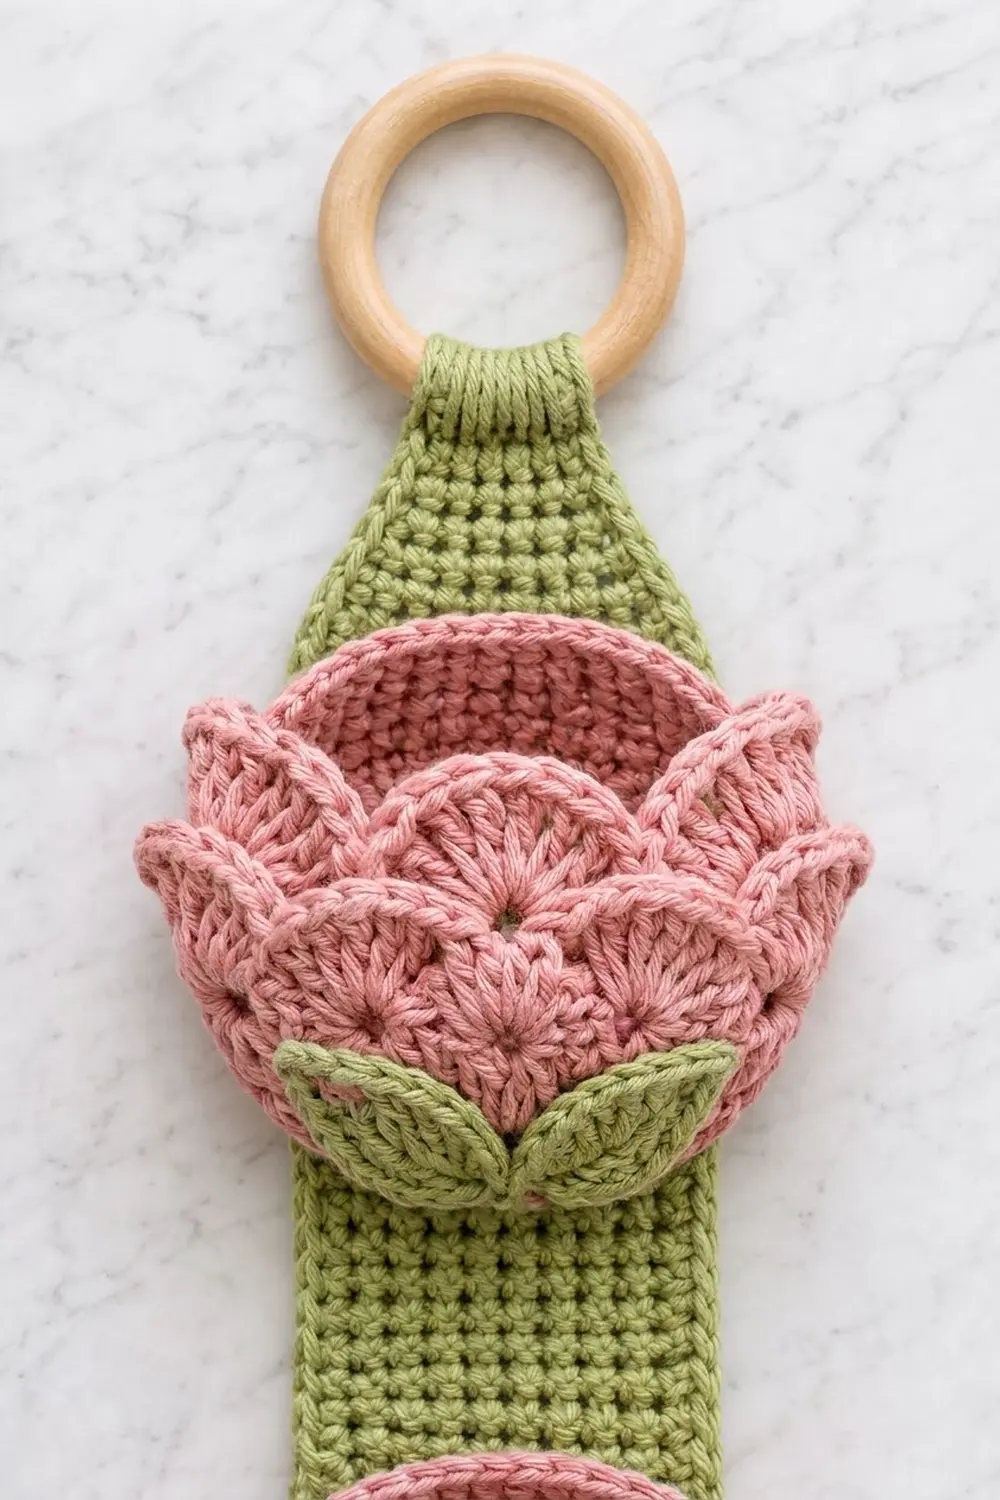
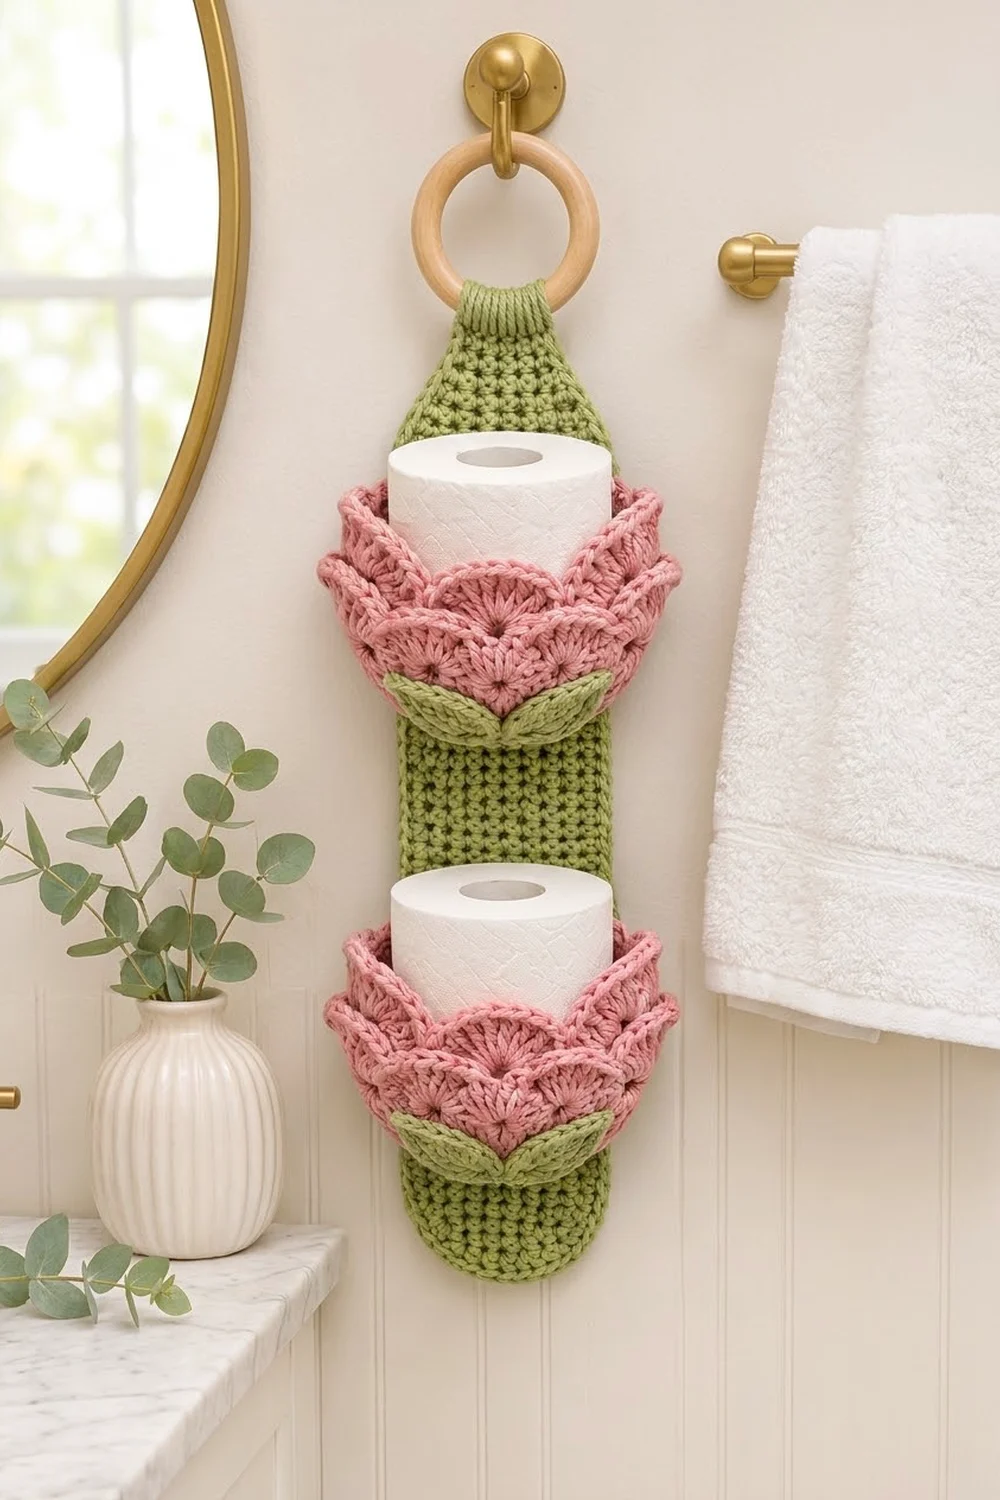
The Lotus Bloom holder is a hanging bathroom organizer. A sage-green strip hangs from a wooden ring and carries two dusty-pink lotus cups, each holding one standard roll. Every cup has three layers of pointed shell petals and two green leaves at the front, so it looks like a water lily opening on its stem.
The palette is soft: sage green for the strip, panels and leaves, and dusty pink for the cups. With cotton yarn the holder keeps its shape, and you can wash it.
This pattern uses US crochet terms. The finished strip measures 5 in (12.7 cm) wide and 25.4 in (64.5 cm) long laid flat. With the tab folded over the ring, it hangs about 23.6 in (59.9 cm) from the bottom edge to the fold, plus a 3 in (7.6 cm) ring.
You’ll work the strip flat in rows and the cups in joined rounds, then add the petal layers in rows across the free front loops. You sew each cup to a green D-shaped panel and sew the panels to the strip. A single-crochet border joins the panel sides to the strip as it goes around.
Finished Size and Construction
- Finished size: 5 in × 25.4 in (12.7 cm × 64.5 cm) flat; about 23.6 in (59.9 cm) hanging, plus the ring
- Skill level: Intermediate
- Terminology: US
- Yarn weight: Worsted (#4) cotton
- Hook: 4.5 mm (US 7)
- Number of pieces: 9 crocheted (1 strip, 2 panels, 2 cups, 4 leaves) plus 1 wooden ring
- Layout: two cups stacked vertically on one strip
- Strip before border: 4.5 in × 24.9 in (11.4 cm × 63.2 cm)
- Panel size: 4.5 in wide × 4 in tall (11.4 cm × 10.2 cm)
- Cup size: base 4.75 in (12.1 cm) across, walls 3.1 in (7.9 cm) tall
- Border depth: 0.25 in (0.6 cm) per edge
Materials
Use 100% cotton or a firm cotton blend in worsted weight, around 78 m (85 yd) per 50 g. Cotton holds the cup shape better than acrylic.
- Sage green: 150 g, about 235 m (strip, panels, border, leaves)
- Dusty pink: 160 g, about 250 m (two cups with petals)
These quantities include a margin of about 10% for swatching and tails.
Tools:
– 4.5 mm (US 7) crochet hook
– Wooden ring, 3 in (7.6 cm) outer diameter
– Tapestry needle
– 6 locking stitch markers
– Measuring tape
– Spray bottle and blocking pins
Abbreviations (US Terms)
- ch – chain
- sl st – slip stitch
- sc – single crochet
- hdc – half double crochet
- dc – double crochet
- inc – 2 sc in the same stitch
- sc2tog – single crochet 2 together
- BLO / FLO – back loop only / front loop only
- MR – magic ring
- st(s) – stitch(es)
- RS – right side
Special stitch – Shell: (3 dc, ch 2, 3 dc) in the same stitch. The ch-2 forms the pointed petal tip.
Half shell: 4 dc in the same stitch.
Gauge and Checkpoints
Gauge: 16 sc and 18 rows = 4 in (10.2 cm).
Make a 5 in (12.7 cm) square swatch and measure the center 4 in (10.2 cm). Then make one panel as a real test piece. It should measure 4.5 in × 4 in (11.4 cm × 10.2 cm).
Checkpoints:
– Strip after Row 5: 4.5 in (11.4 cm) wide
– Strip after Row 45: 10 in (25.4 cm) long
– Strip after Row 90: 20 in (50.8 cm) long
– Strip after Row 112: 24.9 in (63.2 cm) long
– Cup after Rnd 5: 2.4 in (6.1 cm) across
– Cup after Rnd 10: 4.75 in (12.1 cm) across
– Cup after Rnd 24: walls 3.1 in (7.9 cm) tall
If too big: go down to a 4 mm hook. If too small: go up to a 5 mm hook. Check the cup base most carefully, because a standard roll is up to 4.5 in (11.4 cm) across and must fit inside.
Strip (Make 1, Sage Green)
You start at the rounded bottom end. Ch 1 at the start of each row doesn’t count as a stitch.
Row 1: Ch 11, sc in 2nd ch from hook and in each ch across, turn. (10 sc)
Row 2: Ch 1, inc, sc in next 8, inc, turn. (12 sc)
Row 3: Ch 1, inc, sc in next 10, inc, turn. (14 sc)
Row 4: Ch 1, inc, sc in next 12, inc, turn. (16 sc)
Row 5: Ch 1, inc, sc in next 14, inc, turn. (18 sc)
Rows 1–5 make the rounded bottom. Check that the strip is 4.5 in (11.4 cm) wide.
Rows 6–90: Ch 1, sc in each st across, turn. (18 sc)
The strip should be 20 in (50.8 cm) long.
Taper:
– Row 91: Ch 1, sc2tog, sc in next 14, sc2tog, turn. (16 sc)
– Row 92: Ch 1, sc across, turn. (16 sc)
– Row 93: Ch 1, sc2tog, sc in next 12, sc2tog, turn. (14 sc)
– Row 94: Ch 1, sc across, turn. (14 sc)
– Row 95: Ch 1, sc2tog, sc in next 10, sc2tog, turn. (12 sc)
– Row 96: Ch 1, sc across, turn. (12 sc)
– Row 97: Ch 1, sc2tog, sc in next 8, sc2tog, turn. (10 sc)
– Row 98: Ch 1, sc across, turn. (10 sc)
Tab, Rows 99–112: Ch 1, sc in each st across, turn. (10 sc; 14 rows)
The tab is 2.5 in (6.4 cm) wide. Fasten off. The strip should measure 24.9 in (63.2 cm).
Panels (Make 2, Sage Green)
Rows 1–5: Work as Strip Rows 1–5. (18 sc after Row 5)
Rows 6–18: Ch 1, sc in each st across, turn. (18 sc)
Fasten off, leaving a 24 in (61 cm) tail. Each panel is 4.5 in wide × 4 in tall (11.4 cm × 10.2 cm). Row 1 is the rounded bottom and Row 18 is the straight top.
Lotus Cups (Make 2, Dusty Pink)
Work in joined rounds: sl st to the first sc and ch 1 (doesn’t count as a stitch). Don’t turn. Joining keeps st 1 in the same place every round, which you’ll need for the petals.
Base:
– Rnd 1: 6 sc in MR. (6)
– Rnd 2: Inc in each st. (12)
– Rnd 3: (Sc 1, inc) × 6. (18)
– Rnd 4: (Sc 2, inc) × 6. (24)
– Rnd 5: (Sc 3, inc) × 6. (30) — 2.4 in (6.1 cm) across
– Rnd 6: (Sc 4, inc) × 6. (36)
– Rnd 7: (Sc 5, inc) × 6. (42)
– Rnd 8: (Sc 6, inc) × 6. (48)
– Rnd 9: (Sc 7, inc) × 6. (54)
– Rnd 10: (Sc 8, inc) × 6. (60) — 4.75 in (12.1 cm) across
Walls:
– Rnd 11: Sc in BLO of each st. (60) This makes the turning ridge for the base.
– Rnds 12–13: Sc in each st. (60)
– Rnd 14: Sc in BLO of each st. (60) This leaves the front loops of Rnd 13 free.
– Rnds 15–17: Sc in each st. (60)
– Rnd 18: Sc in BLO of each st. (60) This leaves the front loops of Rnd 17 free.
– Rnds 19–21: Sc in each st. (60)
– Rnd 22: Sc in BLO of each st. (60) This leaves the front loops of Rnd 21 free.
– Rnds 23–24: Sc in each st. (60)
Fasten off. The walls are 3.1 in (7.9 cm) tall, and Rnd 24 is the plain pink rim.
Front and back: Sts 1–42 are the front. Sts 43–60 (18 sts) are the back. Place markers at st 1, st 21 (front center) and st 43.
Petal Layers
Work these in rows across the front loops of sts 1–42 only, with the outside of the cup facing you and the rim on top.
Layer A (front loops of Rnd 13): Join pink with a sl st in st 1. Ch 1, sc in the same st. Skip 3, Shell in next st, skip 3, sc in next st. Repeat from * 4 more times (5 shells), then sc in st 42. Fasten off.
The shells land on sts 5, 13, 21, 29 and 37. The center shell sits on st 21.
Count: 5 shells (30 dc, 5 ch-2 tips) and 7 sc.
Layer B (front loops of Rnd 17): Join in st 1. Ch 3 (counts as dc), 3 dc in the same st (half shell). Skip 3, sc in st 5. Skip 3, Shell in next st, skip 3, sc in next st. Repeat from * 3 more times (4 shells, ending with sc in st 37). Skip 3, 4 dc in st 41, sl st in st 42. Fasten off.
The shells land on sts 9, 17, 25 and 33, so each one sits between two Layer A shells.
Count: 32 dc (4 full shells plus 2 half shells), 4 ch-2 tips, 5 sc and 1 sl st.
Layer C (front loops of Rnd 21): Work as Layer A.
The top shells sit on the same stitch columns as Layer A, so the three layers alternate. The Layer C tips stand about 0.5 in (1.3 cm) above the rim. With the petals, each cup is about 3.5 in (8.9 cm) tall and 5.5 in (14.0 cm) wide.
Leaves (Make 4, Sage Green)
Ch 9.
- Side 1: Sl st in 2nd ch from hook, sc in next ch, hdc in next ch, dc in next 2 ch, hdc in next ch, sc in next ch.
- Tip: (Sc, ch 2, sc) in the last ch.
- Side 2: Working along the other side of the foundation chain: sc, hdc, dc, dc, hdc, sc, then sl st in the last ch.
Count: 16 sts plus 1 ch-2 tip. Each leaf is 2 in (5.1 cm) long and 1 in (2.5 cm) wide. Fasten off, leaving an 8 in (20.3 cm) tail.
Make All Pieces
- Sage green: 1 strip, 2 panels, 4 leaves
- Dusty pink: 2 cups
Layout on the strip (strip rows counted from the bottom):
Rows 99–112   Tab (folds over ring)
Rows 91–98    Taper
Rows 78–90    Plain strip
Rows 60–77    Upper panel + upper cup
Rows 28–59    Plain strip (gap 7.1 in / 18.0 cm)
Rows 10–27    Lower panel + lower cup
Rows 1–9      Rounded bottom (2 in / 5.1 cm)
Joining
1. Leaves to cups. Pin 2 leaves on each cup with their bases meeting just below the Layer A center shell (st 21), between Rnds 11 and 12. Angle the tips up and outward toward sts 13 and 29. Whipstitch each base and the lower half of each leaf.
2. Cups to panels. Hold the cup’s back (sts 43–60) flat against the front of a panel.
– Whipstitch the 18 rim sts of Rnd 24 to the 18 sts of panel Row 18, one stitch to one stitch.
– Whipstitch the back loops left over from Rnd 11 on the same 18 sts to panel Row 5 (also 18 sts), again one to one.
Panel Rows 5–18 are 14 rows and the cup walls (Rnds 11–24) are 14 rounds, so the back lies flat without bunching.
3. Panels to strip. Line the lower panel up on the strip front so panel Row 1 sits on strip Row 10 and panel Row 18 on strip Row 27. Line the upper panel up on strip Rows 60–77 the same way.
– Whipstitch the rounded bottom (panel Rows 1–4 and the foundation) to the strip surface.
– Whipstitch panel Row 18 to the matching strip row, one stitch to one stitch (18 to 18).
The panel sides get joined in the border round.
Tension: Use matching yarn and make each stitch snug but flat. Pulling too hard puckers the strip.
Checkpoint: The strip should still measure 4.5 in (11.4 cm) wide at every panel.
Border
Border gauge: You work 1 sc per row-end, which is 4.5 sc per inch along the long sides. That matches the row gauge, so the edges lie flat without stretching or rippling.
Rnd 1 (sage green): With the RS facing, join at the first st of Row 112.
– Top: 3 sc in the first st, sc in the next 8, 3 sc in the last st. (14 sc)
– Side 1: Sc in each row-end down to Row 1. (112 sc)
– Bottom: 3 sc in the first st of Row 1, sc in the next 8, 3 sc in the last st. (14 sc)
– Side 2: Sc in each row-end up to Row 112. (112 sc)
Sl st to the first sc. Total: 252 sc.
At panel Rows 5–18, put the hook through the panel row-end and the strip row-end together. This joins the panel sides without adding any stitches, because each pair still gets 1 sc.
Why the math works:
– Top: 10 stitches with 3 sc in each end stitch gives 8 + 3 + 3 = 14.
– Bottom: the same, 14.
– Sides: 1 sc per row-end, 112 each.
– Total: 14 + 112 + 14 + 112 = 252.
The border adds 0.25 in (0.6 cm) on every edge, so the strip goes from 4.5 in to 5 in (11.4 cm to 12.7 cm) wide and from 24.9 in to 25.4 in (63.2 cm to 64.5 cm) long. Fasten off.
Ring: Pass the tab through the 3 in (7.6 cm) ring. Fold Rows 106–112 to the back so Row 112 lands on Row 99, then whipstitch it in place. This leaves a 1.5 in (3.8 cm) loop.
Final Blocking
- Spray the whole holder until it’s evenly damp, not soaked.
- Lay the strip flat and pin it to 5 in × 25.4 in (12.7 cm × 64.5 cm).
- Put a roll or a rolled towel inside each cup to set the round shape.
- Tease each petal tip into a point and curl the petals slightly outward.
- Flatten the leaves and pin their tips.
- Let it dry completely, usually 24 hours, before hanging.
Final Quality-Control Checklist
- Strip measures 5 in × 25.4 in (12.7 cm × 64.5 cm) flat
- The border has 252 sc with no gaps along the panel sides
- Each cup has 5 shells in Layer A, 4 shells plus 2 half shells in Layer B, and 5 shells in Layer C
- The petal layers alternate cleanly
- The leaves meet in a V under the center shell
- A roll drops into each cup easily
- The ring loop is secure and centered
Troubleshooting
- Cup is too tight for the roll: The base is under 4.75 in (12.1 cm). Go up a hook size and remake the cup.
- Petals flop: Use firmer tension on the dc, or spray-starch the petals lightly.
- Strip edges wave: Check the border tension, or work the border with a hook 0.5 mm smaller.
- Cup sags forward: Add a few tacking stitches between the cup’s side walls and the panel.
- Layers don’t alternate: Make sure you joined each layer in st 1 and that your rounds were joined, not worked in a spiral.
Care
Hand wash in cool water with mild soap. Reshape and lay flat to dry.
Final Notes
The measurements build on each other:
– Gauge of 16 sc and 18 rows = 4 in (10.2 cm)
– Strip of 4.5 in × 24.9 in (11.4 cm × 63.2 cm) before the border
– Panels of 4.5 in × 4 in (11.4 cm × 10.2 cm)
– Cup bases of 4.75 in (12.1 cm)
– A 252-sc border that adds 0.25 in (0.6 cm) per edge
– Final strip of 5 in × 25.4 in (12.7 cm × 64.5 cm)
If you hit each checkpoint, the cups fit standard rolls and the strip hangs straight.
Happy crocheting!