

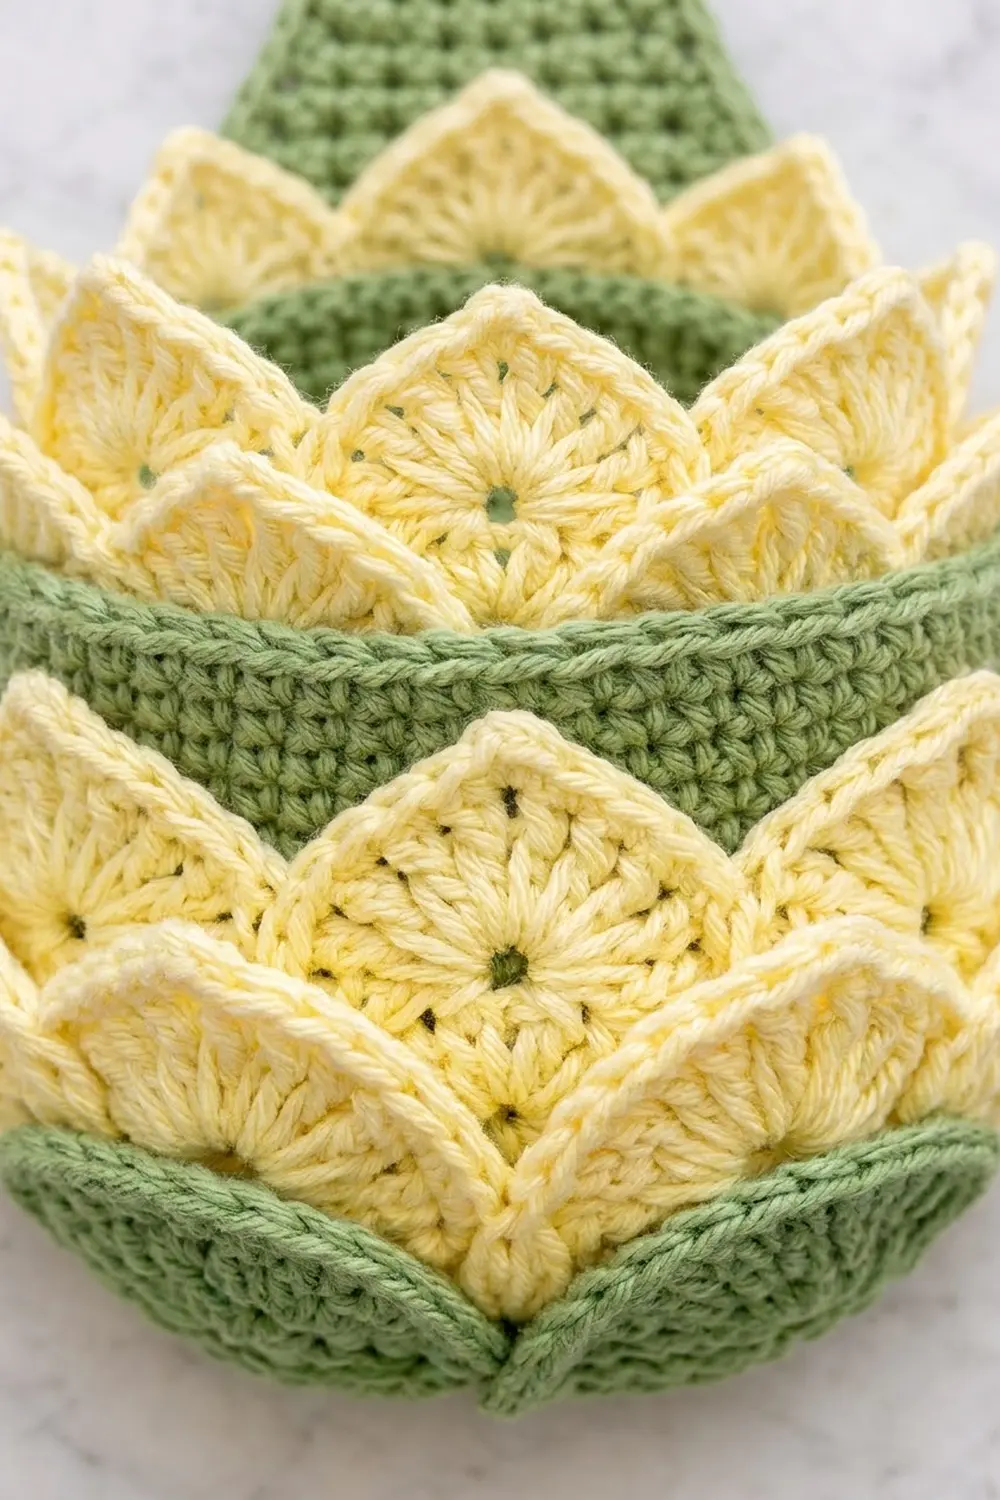
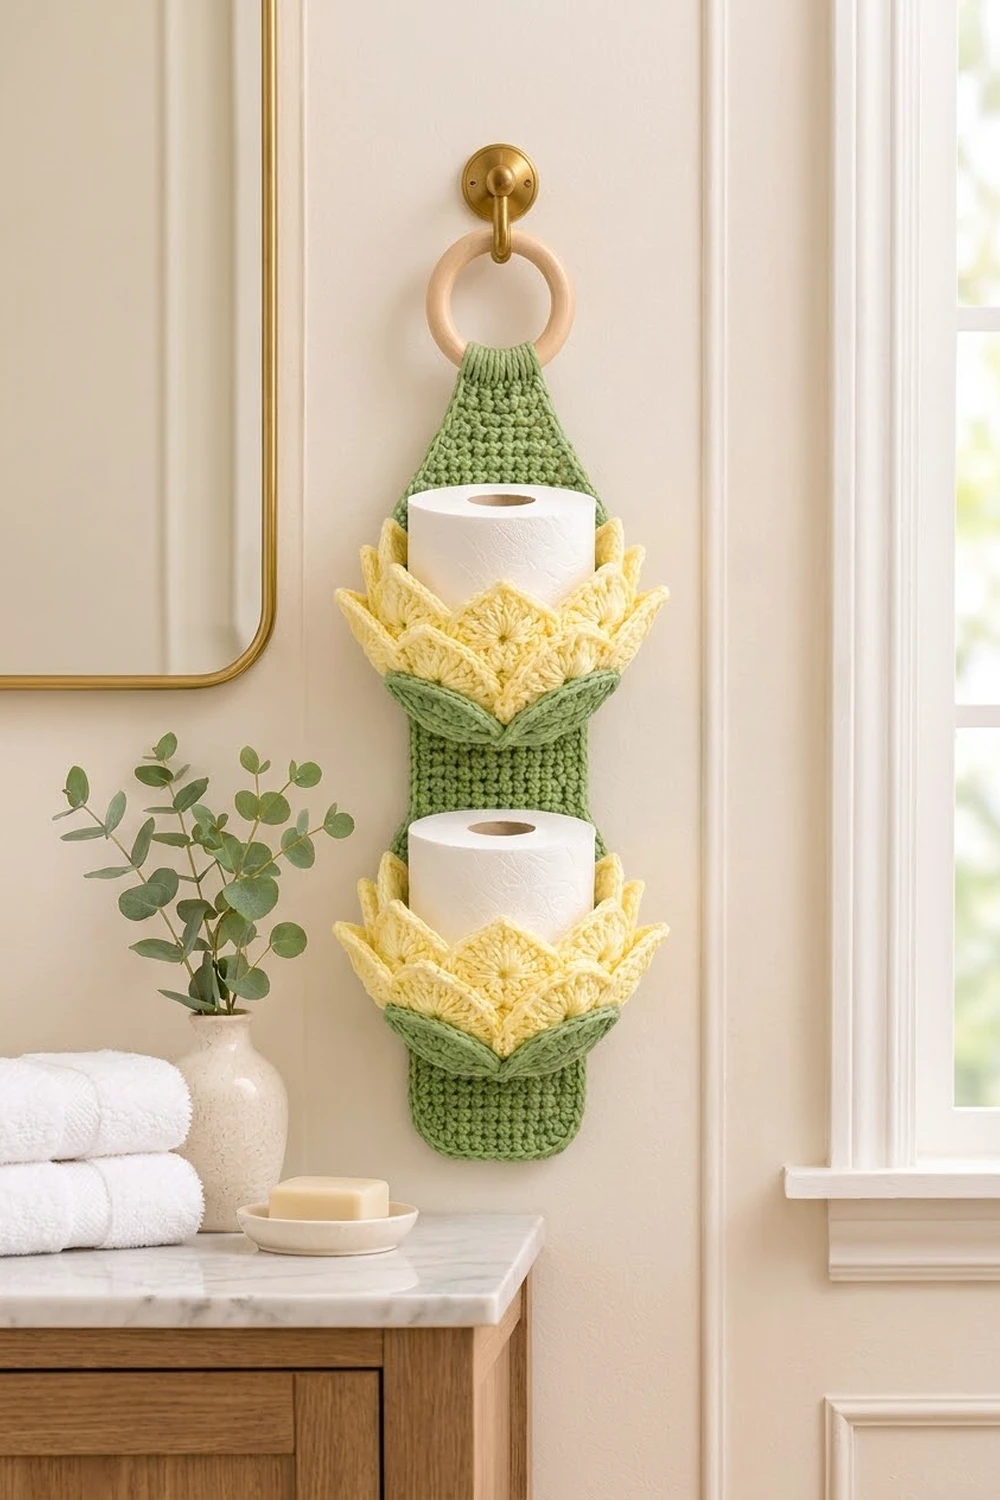
This hanging holder stores two spare rolls in a pair of lotus-flower cups. A long sage-green panel hangs from a wooden ring, and two round baskets are sewn to its front. Each basket is wrapped in two layers of pointed butter-yellow petals, with a ring of small green leaves at the base.
The colors are soft and work well in a spa-style bathroom: sage green for the structure and pale yellow for the blooms. The pattern uses US crochet terms throughout.
The finished panel measures 5 1/2 in (14.0 cm) wide and about 24 in (61.0 cm) from the bottom edge to the top of the ring loop. Including the ring, the holder hangs about 27 in (68.6 cm) long. Each cup is 5 1/4 in (13.3 cm) across, which fits a standard roll of about 4 1/2 in (11.4 cm) in diameter.
You will work the panel in rows, make the cups in joined rounds, and make the petals and leaves as small separate motifs. Then you sew everything together stitch to stitch, add a two-round border, and fold the top tab over the ring.
Finished Size and Construction
- Finished size: 5 1/2 in (14.0 cm) wide × about 24 in (61.0 cm) to the top of the ring loop; about 27 in (68.6 cm) including the ring
- Skill level: Intermediate
- Terminology: US
- Yarn weight: Worsted (#4) cotton
- Hook: 4.0 mm (US G-6)
- Number of pieces: 1 panel, 2 cups, 26 petals, 10 leaves (39 crocheted pieces), plus 1 ring
- Layout: Two cups stacked vertically on one panel
- Cup size: 5 1/4 in (13.3 cm) across × 2.4 in (6.1 cm) wall; 3.5 in (8.9 cm) tall including petals
- Panel size before border: 5 in (12.7 cm) × 25.1 in (63.8 cm) flat
- Border depth: 1/4 in (0.6 cm)
Materials
Use a smooth, firm worsted cotton or cotton blend. Cotton keeps the cups upright and stands up to bathroom humidity. Acrylic also works, but the cups will be softer.
- Sage green: 150 g, about 270 m (295 yd)
- Pale butter yellow: 60 g, about 108 m (118 yd)
These quantities include a safety margin of roughly 25%.
Tools:
– 4.0 mm (US G-6) crochet hook
– One 3 in (7.6 cm) wooden ring
– Tapestry needle
– 8–10 locking stitch markers
– Rust-proof pins
– Measuring tape
– Scissors
Abbreviations (US Terms)
- ch – chain
- sl st – slip stitch
- sc – single crochet
- hdc – half double crochet
- dc – double crochet
- tr – treble crochet
- sc2tog – single crochet 2 together
- BLO – back loop only
- MR – magic ring
- st(s) – stitch(es)
- sp – space
- Rnd – round
- RS – right side
Special stitch – Tip group: Work (dc, tr, ch 2, tr, dc) all in the same stitch. This group forms the sharp point of each petal.
Gauge and Checkpoints
Gauge: 16 sc and 18 rows = 4 in (10.2 cm). That is 4 sts and 4.5 rows per inch.
Before you start the full project, test one of each piece. Work Rows 1–20 of the panel and make one petal.
- Panel after Row 3: 20 sts = 5 in (12.7 cm).
- Panel after Row 20: 20 rows = 4.4 in (11.2 cm).
- Cup after Rnd 11: the flat base is 5 1/4 in (13.3 cm) across.
- One petal: 1 3/4 in (4.4 cm) wide × 2 1/4 in (5.7 cm) tall.
If your pieces are too big, go down a hook size, to 3.75 mm. If they are too small, go up to 4.5 mm. The cup measurement matters most. If a cup base is smaller than 5 in (12.7 cm), a roll will not fit.
Back Panel
Work the panel with green. Turn at the end of every row. The ch 1 at the start of a row does not count as a stitch.
Row 1: Ch 17. Sc in the 2nd ch from the hook and in each ch across. Turn. (16 sc)
Row 2: Ch 1. 2 sc in the first st, sc in the next 14, 2 sc in the last st. Turn. (18 sc)
Row 3: Ch 1. 2 sc in the first st, sc in the next 16, 2 sc in the last st. Turn. (20 sc)
These two increase rows create the rounded bottom corners.
Rows 4–90: Ch 1. Sc in each st across. Turn. (20 sc)
Checkpoint: the panel now measures 5 in × 20 in (12.7 × 50.8 cm).
Taper
Row 91: Ch 1. Sc2tog, sc in each st to the last 2 sts, sc2tog. Turn. (18 sc)
Row 92: Ch 1. Sc in each st across. Turn. (18 sc)
Rows 93–104: Repeat Rows 91–92 six more times. The odd rows give 16, 14, 12, 10, 8 and 6 sts, and each even row keeps the count. (6 sc after Row 104)
Checkpoint: the taper is 3.1 in (7.9 cm) tall.
Tab
Rows 105–113: Ch 1. Sc in each st across. Turn. (6 sc)
Checkpoint: the tab is 2 in (5.1 cm) long. The whole panel is 113 rows, or 25.1 in (63.8 cm). Fasten off.
Cup (Make 2)
Work the cup with green in joined rounds. Do not turn. Join each round with a sl st to the first sc. The ch 1 does not count as a stitch.
The join seam sits at the center back of the cup. The back is the part that will be sewn flat against the panel.
Rnd 1: MR, ch 1, 6 sc in the ring. Join. (6 sc)
Rnd 2: Ch 1. 2 sc in each st around. Join. (12 sc)
Rnd 3: Ch 1. Sc in the next st, 2 sc in the next st; repeat 6 times. Join. (18 sc)
Rnd 4: Ch 1. Sc in the next 2 sts, 2 sc in the next st; repeat 6 times. Join. (24 sc)
Rnds 5–11: Continue in the same way. Each round, work one more plain sc before each increase, so each round adds 6 sts. The totals are 30, 36, 42, 48, 54, 60 and 66 sc. (66 sc after Rnd 11)
Checkpoint: the base is 5 1/4 in (13.3 cm) across. That matches 66 sts at 4 sts per inch, which is a circumference of 16.5 in.
Rnd 12: Ch 1. Sc in the BLO of each st around. Join. (66 sc) This round turns the wall upward.
Rnds 13–22: Ch 1. Sc in each st around. Join. (66 sc)
Rnd 23: Sl st in each st around. (66 sl st) Fasten off.
Checkpoint: the wall is 2.4 in (6.1 cm) tall.
Zones on the cup:
– Back zone: Rnd 23 sts 59–66 and 1–8, which is 16 sts, or 4 in.
– Front zone: sts 9–58, which is 50 sts.
Mark st 9 and st 58 with stitch markers. The petals and leaves go only on the front zone, so the back can lie flat against the panel.
Petal (Make 26 in Yellow)
Rnd 1: MR, ch 3 (counts as dc), 11 dc in the ring. Pull the ring almost closed, leaving a hole of about 1/8 in (0.3 cm). Join to the top of the ch-3. (12 dc)
Rnd 2: Ch 1. Work as follows:
– sc in the same st, then sc in the next 2
– hdc in the next st
– dc in the next st
– Tip group in the next st
– dc in the next st
– hdc in the next st
– sc in the next 4
Join to the first sc. (15 sts and 1 ch-2 sp)
Rnd 3: Sl st loosely in each st up to the tip. Work (sl st, ch 2, sl st) in the ch-2 sp, then sl st in each remaining st. (17 sl st and 1 ch-2 sp)
Fasten off, leaving a 10 in (25.4 cm) tail.
The 12 sts of Rnd 2 sit around the ring as follows: 3 sc, hdc, dc, tip, dc, hdc, and 4 sc. This makes a symmetrical teardrop with a pointed tip and a rounded base. Rnd 3 adds the crisp outline.
Leaf (Make 10 in Green)
Ch 10. Work the first side of the leaf:
– sc in the 2nd ch from the hook
– hdc in the next ch
– dc in the next 4 ch
– hdc in the next ch
– sc in the next ch
Work (sc, ch 2, sc) in the last ch for the tip. Then work along the opposite side of the chain:
– sc in the next ch
– hdc in the next ch
– dc in the next 4 ch
– hdc in the next ch
– sc in the last ch
Sl st to the first sc. (18 sts and 1 ch-2 sp)
Fasten off, leaving a tail. The leaf is 2 1/4 in (5.7 cm) long and 1 1/4 in (3.2 cm) wide.
Make All Pieces
Green:
– 1 back panel
– 2 cups
– 10 leaves
Yellow:
– 26 petals (13 per cup)
Per cup:
– 7 lower petals
– 6 upper petals
– 5 leaves
Layout, from bottom to top:
              [ 3 in wooden ring ]
   Rows 105–113   tab (6 sts), folded over ring
   Rows 91–104    taper (20 -> 6 sts)
   Rows 77–90     plain panel
   Rows 60–76     UPPER CUP  (base Row 60, rim Row 71, petal tips ~Row 76)
   Rows 27–59     plain panel (roll clearance)
   Rows 10–26     LOWER CUP  (base Row 10, rim Row 21, petal tips ~Row 26)
   Rows 1–9       plain panel
Joining
Finish each cup completely before you sew it to the panel. Use matching yarn tails and whipstitch through both loops. Keep the tension snug but not tight, and do not let the cup wall pucker.
1. Lower petal tier. The petals are centered on these cup sts:
| Petal | 1 | 2 | 3 | 4 | 5 | 6 | 7 |
|---|---|---|---|---|---|---|---|
| Cup st | 12 | 19 | 26 | 33 | 40 | 47 | 54 |
The petals are 7 sts apart. Each petal is 1 3/4 in wide, and 7 sts measure 1 3/4 in, so neighboring petals just touch.
- Place the bottom of each petal on Rnd 13, with the center hole over Rnd 16.
- Whipstitch the petal’s lower half to the wall, from the 3 sc on one side, around the base, to the 3 sc on the other side.
- Leave the upper half free. The tips reach the rim at Rnd 23.
2. Upper petal tier. These petals sit in the gaps between the lower petals:
| Petal | 1 | 2 | 3 | 4 | 5 | 6 |
|---|---|---|---|---|---|---|
| Cup st | 16 | 23 | 30 | 37 | 44 | 51 |
- Place the bottom of each petal on Rnd 18, with the center hole over Rnd 21.
- Sew the lower half to the wall in the same way. The tips stand about 1.1 in (2.8 cm) above the rim.
3. Leaves. The leaves are centered on these cup sts:
| Leaf | 1 | 2 | 3 | 4 | 5 |
|---|---|---|---|---|---|
| Cup st | 13 | 23 | 33 | 43 | 53 |
- Place the stem end of each leaf on the Rnd 12 ridge.
- Tilt the leaves about 45°, alternating left and right.
- Sew along the center line of each leaf for 1 in (2.5 cm). Leave the tip free.
4. Cups to panel. With the panel RS up, mark panel sts 3–18 on Rows 10 and 21 for the lower cup, and on Rows 60 and 71 for the upper cup.
- Press the cup’s back zone flat against the panel.
- Sew the 16 back-zone sts of Rnd 12 to panel sts 3–18 of the base row, one cup st to one panel st.
- Sew the 16 back-zone sts of Rnd 23 to panel sts 3–18 of the rim row, again one to one.
The cup wall is 11 sc rounds tall, and the gauge is the same in both pieces. So 11 rounds on the cup match the 11 panel rows from Row 10 to Row 21, and from Row 60 to Row 71. Tack the two vertical edges of the back zone in 3 places.
Size checkpoint: the panel still lies flat at 5 in (12.7 cm) wide. There is 7.6 in (19.3 cm) of clearance between the lower petal tips and the upper cup base, which is plenty of room to slide in a 4 in (10.2 cm) roll.
Border
Border gauge: 4 sc per inch, the same as the panel stitches. Work with green, RS facing. The cups sit on sts 3–18, so the edges are free.
Rnd 1: Join green in the first st of Row 113. Work each side as follows:
- Top edge: Ch 1. 3 sc in the first st, sc in the next 4, 3 sc in the last st. (10 sc)
- First long side: Work into the row-ends. Sc in the next 8 row-ends, skip 1; repeat 12 times. Sc in the last 5 row-ends. (101 sc)
- Bottom edge: Work into the foundation chain. 2 sc in the first ch, sc in the next 14, 2 sc in the last ch. (18 sc)
- Second long side: Work as for the first long side. (101 sc)
Join to the first sc. (230 sc)
Rnd 2: Sl st in each st around. (230 sl st) Fasten off.
Why the math works:
– Long sides: The rows run at 4.5 per inch, but the border needs 4 sts per inch. Skipping 1 row-end in every 9 fixes this. The 113 row-ends become 12 × 8 + 5 = 101 sc, which measures 25.25 in at gauge and matches the panel length of 25.1 in.
– Bottom edge: 16 sts worked one per stitch plus 2 extra = 18 sc.
– Top edge: 6 sts worked one per stitch plus 4 extra = 10 sc.
– Total: 101 + 101 + 18 + 10 = 230 sc.
Checkpoint: the panel is 5 1/2 in × 25.6 in (14.0 × 65.0 cm).
Attach the ring. Slide the tab through the ring from front to back. Fold the tab so that Row 113 lies behind Row 103. Whipstitch the 6 sts of Row 113 to the back of the 6 sts of Row 103, one to one, sewing through the border edge as well. The loop uses 5 rows on each side of the fold.
Final Blocking
- Mist the whole piece lightly with water until it is damp, not wet.
- Pin the panel flat at 5 1/2 in (14.0 cm) wide and straight along its length.
- Stuff each cup with a toilet roll wrapped in a towel so it dries round and 5 1/4 in (13.3 cm) across.
- Curl each upper petal tip slightly outward with your fingers.
- Let everything dry completely, for about 24 hours, then remove the pins.
Final Quality-Control Checklist
- The panel has 20 sts in Rows 3–90, 6 sts in the tab, and 113 rows in total.
- Each cup base has 66 sts and measures 5 1/4 in (13.3 cm) across.
- Each cup has 7 lower petals, 6 upper petals and 5 leaves, all on sts 9–58.
- Each cup back zone is sewn one to one to panel sts 3–18.
- The border has 230 sts: 101 per long side, 18 on the bottom edge and 10 on the top edge.
- The ring loop is sewn securely, with no stitches showing on the front.
- A roll fits both cups and slides in easily.
Troubleshooting
- The cup is too tight for a roll. Your gauge is too tight. Remake the cup with a 4.5 mm hook, or add Rnd 12 as a plain increase round: sc in the next 10, 2 sc in the next, for 72 sts. Then continue with a BLO round and work the rest of the wall on 72 sts.
- The cup wall flares. Your tension loosened after Rnd 12. Rework the wall more firmly.
- The petals flop forward. Sew farther up the petal, to just above the center hole.
- The border ruffles. Skip 1 row-end in every 8 instead of every 9, and adjust the count evenly.
- The panel bows under the cups. Tack the vertical edges of the back zone more often.
- The magic ring opens up. Weave the petal tail around the ring twice, then pull it snug.
Care
Hand wash in cool water with mild soap. Press out the water in a towel, reshape the cups over a roll, and lay flat to dry.
Final Notes
Everything in this pattern comes back to one gauge: 4 sts and 4.5 rows per inch.
- Panel: 20 sts give 5 in (12.7 cm) of width. The 113 rows give 25.1 in (63.8 cm) of length, and the 1/4 in (0.6 cm) border brings it to 5 1/2 × 25.6 in (14.0 × 65.0 cm).
- Cups: 66 sts give a 5 1/4 in (13.3 cm) base. The 11 wall rounds give 2.4 in (6.1 cm) of height and line up with 11 panel rows.
- Petals and leaves: 7 petals at 7 sts apart fill the 50-st front zone. The upper petals stand 1.1 in (2.8 cm) above the rim.
If you check these measurements at each stage, the finished holder will hang straight and hold both rolls neatly.
Happy crocheting!