

This hanging bag holder makes a kitchen chore a little more cheerful. A sage green tube with a softly rounded bottom holds a full stash of plastic grocery bags. A wide oval slot near the base lets you pull them out one at a time.
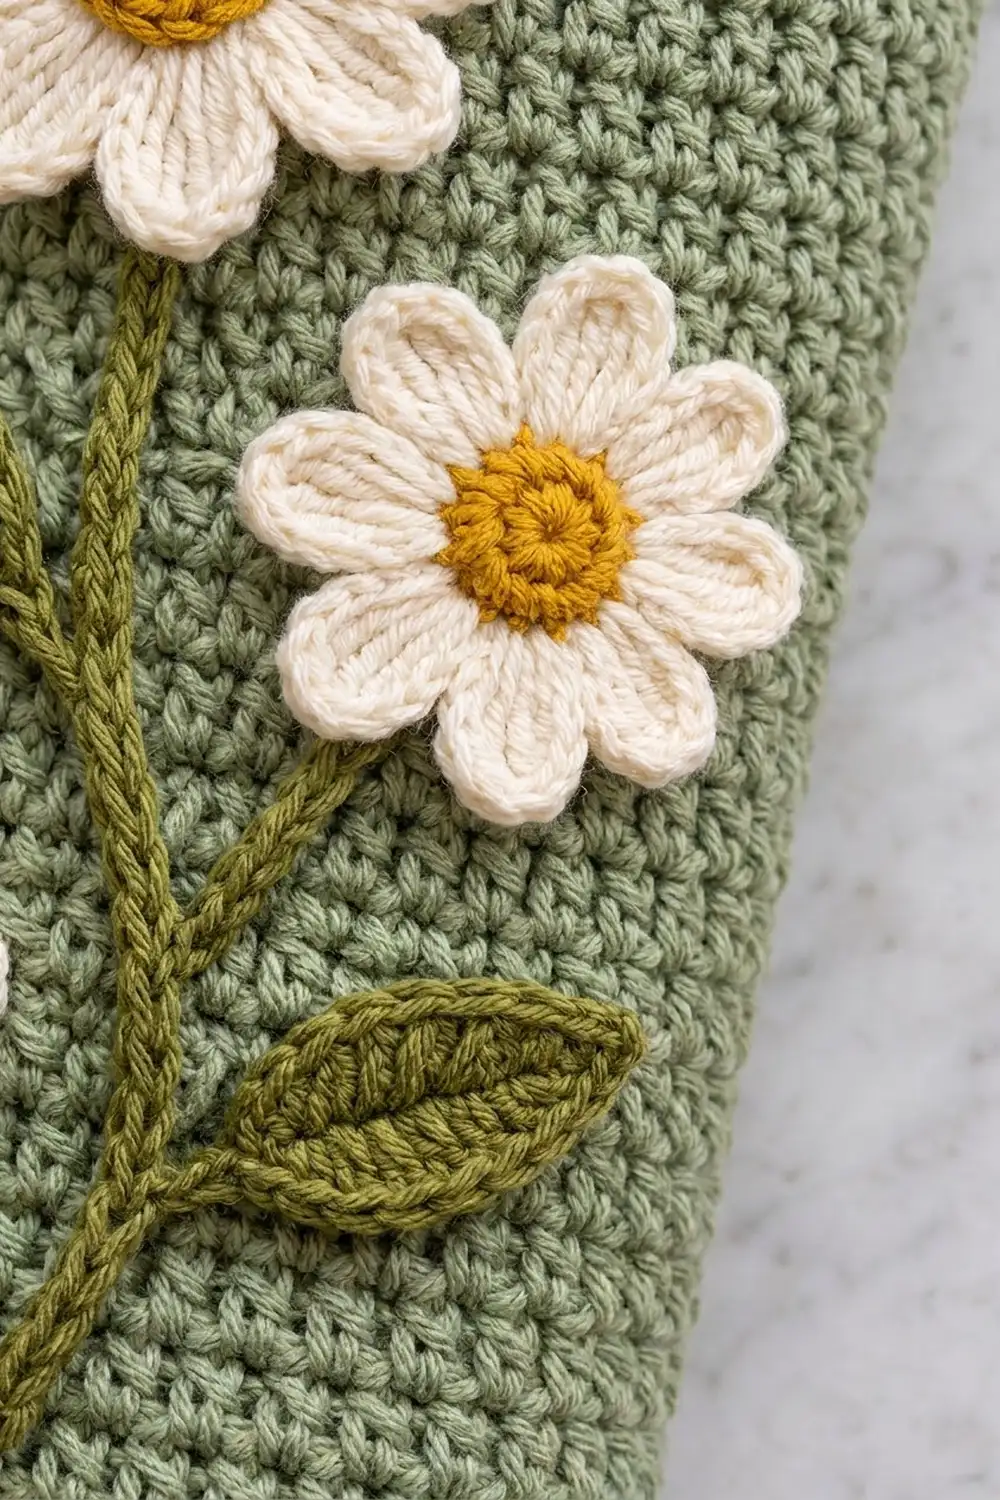
Cream bands trim the top edge and the lower body. Three textured daisies with mustard centers and cream petals bloom across the front, joined by an olive green stem with three leaves. A short sage tab loops through a cream-covered ring, so the holder can hang from a cabinet knob, a hook, or a pantry door.
The pattern uses US crochet terms. The finished holder is 6 in (15.2 cm) wide laid flat and 16 in (40.6 cm) long from the base to the top edge, not counting the tab and ring.
Construction is simple. You work the body from the bottom up in continuous single crochet rounds, starting with a flat circle. To make the slot, you work five short turned rows and then chain across the gap. Then you add a cream top band, make the tab, cover the ring, and sew on the appliqués.
Finished Size and Construction
- Finished size: 6 in (15.2 cm) wide flat x 16 in (40.6 cm) long; circumference 12 in (30.5 cm)
- Skill level: Easy to intermediate
- Terminology: US crochet terms
- Yarn weight: Worsted (#4 medium) cotton
- Hook: 5.0 mm (H-8)
- Number of pieces: 1 seamless body, plus 1 tab, 1 covered ring, 3 daisies, 1 stem set, and 3 leaves sewn on
- Layout: Slot centered on the front, 0.75 in (1.9 cm) above the cream stripe; daisies arranged diagonally above it
- Body width: 42 sts around, 21 sts per flat side
- Size before top band: 6 in (15.2 cm) x 15.25 in (38.7 cm)
- Top band depth: 3 sc rounds plus a slip stitch edge, 0.75 in (1.9 cm)
Materials
Choose a smooth worsted cotton or cotton blend. Cotton keeps its shape when the holder is stuffed with bags, and it wipes clean in a kitchen. The amounts below assume yarn of about 85 m per 50 g.
- Sage green (main color): 130 g, about 220 m
- Cream: 35 g, about 60 m
- Mustard: 10 g, about 17 m
- Olive green: 12 g, about 20 m
Tools:
- 5.0 mm (H-8) crochet hook
- 3 in (7.6 cm) wooden or metal ring
- Stitch markers
- Tapestry needle
- Scissors
- Rustproof pins and a tape measure
All quantities include a margin of about 15 percent for swatching and small differences in tension.
Abbreviations (US Terms)
- ch: chain
- sl st: slip stitch
- sc: single crochet
- hdc: half double crochet
- dc: double crochet
- inc: 2 sc in the same stitch
- st(s): stitch(es)
- rnd: round
- RS / WS: right side / wrong side
- Standing sc: start with a slip knot on your hook, insert the hook into the stitch, and complete a sc as usual. This joins new yarn without a sl st.
Gauge and Checkpoints
Gauge: 14 sc and 16 rounds = 4 in (10.2 cm) in sc worked in the round. That is 3.5 sts and 4 rounds per inch.
Test the base first. Work Rnds 1 to 7 and measure before you go on. If the circle is off, everything above it will be off too.
Checkpoints:
- After Rnd 7: a flat circle of 42 sts, about 3.75 in (9.5 cm) across.
- After Rnd 15: the tube flattens to 6 in (15.2 cm) wide. The side wall above the base is 2 in (5.1 cm) tall.
- After the slot: the opening is 4 in (10.2 cm) wide and 1.25 in (3.2 cm) tall.
- After Rnd 66: the side wall is 14.75 in (37.5 cm). The flat length is 15.25 in (38.7 cm), including the 0.5 in (1.3 cm) curve of the base.
- Finished: 6 in (15.2 cm) x 16 in (40.6 cm).
If your base is larger than 3.75 in (9.5 cm), go down half a hook size. If it is smaller, go up half a size. Change your hook, not the stitch counts, because the slot and the appliqué layout depend on 42 sts.
Body
Work in continuous spiral rounds. Don’t join or turn unless the pattern tells you to. Move your marker up to the first stitch of each round. A spiral avoids a visible seam line, which matters on a tube this tall.
Base (sage)
- Rnd 1: 6 sc in a magic ring. (6)
- Rnd 2: inc in each st. (12)
- Rnd 3: (sc 1, inc) 6 times. (18)
- Rnd 4: (sc 2, inc) 6 times. (24)
- Rnd 5: (sc 3, inc) 6 times. (30)
- Rnd 6: (sc 4, inc) 6 times. (36)
- Rnd 7: (sc 5, inc) 6 times. (42)
Check: 42 sts, 3.75 in (9.5 cm) across.
Lower wall
- Rnds 8 to 10: sc in each st around. (42)
Work Rnd 8 through both loops. This lets the wall curve up gradually and gives a rounded bottom instead of a sharp corner.
- Rnds 11 to 12 (cream): change to cream on the last pull-through of Rnd 10. Sc in each st around. (42)
- Rnds 13 to 15 (sage): change back to sage. Sc in each st around. (42)
At the end of Rnd 15, sl st in the next st and fasten off.
Lay the tube flat so the round start sits at the center of the back. The front face now holds sts 11 to 32, and the front center falls between sts 21 and 22. The slot goes over sts 15 to 28 of Rnd 15. Mark sts 15 and 28.
Slot (sage, turned rows)
- Row 16 (RS): standing sc in st 29 of Rnd 15. Sc in sts 30 to 42, then sc in sts 1 to 14. (28)
- Rows 17 to 20: ch 1, turn, sc in each st across. (28)
Row 20 is a RS row and ends at the st 14 edge of the slot. The 14 unworked sts of Rnd 15 form the bottom of the opening.
- Rnd 21: ch 14 loosely, skip the gap, and sc in each of the 28 sts of Row 20. (14 ch + 28 sc = 42)
- Rnd 22: sc in each of the 14 ch and each of the 28 sc. (42)
Place your marker in the first sc worked into the chain. From here on, each round starts at the edge of the slot.
Check: the slot is 4 in (10.2 cm) wide and 1.25 in (3.2 cm) tall.
Upper wall
- Rnds 23 to 66: sc in each st around. (42)
That is 44 more rounds. Check: the side wall is 14.75 in (37.5 cm). Do not fasten off.
Daisies, Stem, and Leaves
Large daisy (make 1)
- Rnd 1 (mustard): 6 sc in a magic ring. (6)
- Rnd 2: inc in each st. (12) Fasten off.
- Rnd 3 (cream): join with sl st in any st. *Ch 6, sc in 2nd ch from hook, hdc in next ch, dc in each of next 2 ch, hdc in last ch, sl st in the same center st, sl st in next st; rep from * 11 more times, ending at the first st. (12 petals)
Diameter: 3 in (7.6 cm).
Medium daisy (make 1)
- Rnd 1 (mustard): 10 sc in a magic ring. (10) Fasten off.
- Rnd 2 (cream): join with sl st in any st. *Ch 5, sc in 2nd ch from hook, hdc in next ch, dc in next ch, hdc in last ch, sl st in the same center st, sl st in next st; rep from * around. (10 petals)
Diameter: 2.25 in (5.7 cm).
Small daisy (make 1)
Work it like the medium daisy, but make each petal this way: ch 4, sc in 2nd ch from hook, hdc in each of next 2 ch. (10 petals)
Diameter: 1.75 in (4.4 cm).
Stem (olive)
- Main stem: ch 26, sl st in the back bump of the 2nd ch from hook and in each ch across. (25 sl st) Length: 6.5 in (16.5 cm).
- Branches (make 2): ch 11, sl st in the back bump of the 2nd ch from hook and in each ch across. (10 sl st) Length: 2.75 in (7.0 cm).
Leaf (make 3, olive)
Ch 8. Sc in 2nd ch from hook, hdc in next ch, dc in each of next 3 ch, hdc in next ch, 3 sc in last ch. Now work along the other side of the chain: hdc in next ch, dc in each of next 3 ch, hdc in next ch, sc in last ch, sl st to the first sc. (6 + 3 + 6 = 15 sts) Length: 2 in (5.1 cm).
The 3 sc at the tip turn the work and give each leaf a pointed end.
Top Band, Slot Rim, Tab, and Ring
Top band (cream)
Change to cream on the last pull-through of Rnd 66.
- Rnds 67 to 69: sc in each st around. (42 per round)
- Rnd 70: sl st in each st around. (42) Fasten off.
The band has the same gauge as the body, 4 rounds per inch. Three sc rounds plus the slip stitch edge make 0.75 in (1.9 cm).
The math works because the count never changes. Every round holds 42 sts, so the band stays exactly 12 in (30.5 cm) around and doesn’t flare or pull in. The sl st round firms up the rim, so it keeps its shape when you reach in to load bags.
Slot rim (sage)
Join sage with a standing sc at one corner of the slot. Then work:
- 1 sc in each of the 14 bottom sts
- 1 sc in each of the 5 row ends on one side
- 1 sc in each of the 14 ch along the top
- 1 sc in each of the 5 row ends on the other side
That gives 14 + 5 + 14 + 5 = 38 sc. Sl st to the first sc and fasten off.
One stitch per stitch and one per row end matches the slot’s edge exactly. Extra stitches at the corners make the rim ruffle. Skipped row ends make the slot pucker.
Tab (sage)
- Row 1: ch 7, sc in 2nd ch from hook and in each ch across. (6)
- Rows 2 to 16: ch 1, turn, sc in each st across. (6)
The tab is about 1.75 in (4.4 cm) wide and 4 in (10.2 cm) long.
Covered ring (cream)
Work sc around the 3 in (7.6 cm) ring, pushing the stitches together as you go, until the ring is fully covered. This takes about 62 sc. Sl st to the first sc and fasten off. Weave the tail through the stitches.
Assembly
- Flatten the holder with the slot centered on the front. Mark the 6 center sts of the back at the top.
- Fold the tab around the ring. Sew both tab ends to the inside of the back wall over the marked sts, overlapping the top band by 1 in (2.5 cm). About 0.75 in (1.9 cm) of tab shows above the rim.
- Pin the main stem to the front, starting 1 in (2.5 cm) above the slot and angling up toward the upper left. Pin one branch going right and one going to the lower left.
- Put the large daisy at the top of the main stem, the medium daisy at the end of the right branch, and the small daisy at the end of the left branch. Add the leaves along the stem, two on the right and one on the left.
- Sew everything down with olive or matching yarn, catching only the outer layer of the body. If you sew through to the back wall, you’ll close the tube.
Final Blocking
- Weave in all ends securely.
- Stuff the holder loosely with plastic bags or a rolled towel to hold the tube shape.
- Lay it flat and pin it to 6 in (15.2 cm) wide and 16 in (40.6 cm) long.
- Shape the slot into a smooth oval, 4 in (10.2 cm) wide and 1.25 in (3.2 cm) tall.
- Mist lightly with water. Press each daisy petal and leaf flat with your fingers.
- Let it dry completely before you remove the pins and stuffing.
Final Quality-Control Checklist
- The flat width is 6 in (15.2 cm) at the top, middle, and bottom.
- The length is 16 in (40.6 cm) from the base curve to the top edge.
- Every body round holds 42 sts.
- The slot is centered on the front and lies smooth, with 38 rim sts.
- The cream stripe and top band are straight, with no large jogs.
- The ring is fully covered with no gaps.
- The tab is secure and centered on the back.
- The appliqués lie flat, with every petal stitched down at its base.
Troubleshooting
- The tube flares or narrows: count your stitches. You probably added or missed one. Rip back to the last round with 42.
- The base ripples or cups: check Rnd 7. Ripples mean your gauge is too loose. Cupping means it’s too tight.
- The slot sits off center: recount sts 15 to 28 before you start Row 16.
- The chain across the slot is tight: redo Rnd 21 with a hook one size larger, for the chain only.
- There’s a visible jog at color changes: for the last st before the new color, work a sl st instead of a sc, or use a jogless color change.
- The daisy petals curl: steam them lightly and pin each petal flat.
- The holder sags under weight: use cotton, not acrylic, and go down a hook size for a denser fabric.
Care
Hand wash in cool water and lay flat to dry. Wipe small kitchen spots with a damp cloth.

Final Notes
Here’s how the measurements connect. Fourteen sc make 4 in (10.2 cm), so 42 sts make a 12 in (30.5 cm) circumference and a 6 in (15.2 cm) flat width. The 7-round base sets that count and the wall keeps it. The slot sets aside 14 sts and gets them back in the chain. The top band holds the same 42 sts to finish at 16 in (40.6 cm). Check your base and trust the counts, and the daisies will land right where they belong.
Happy crocheting!