
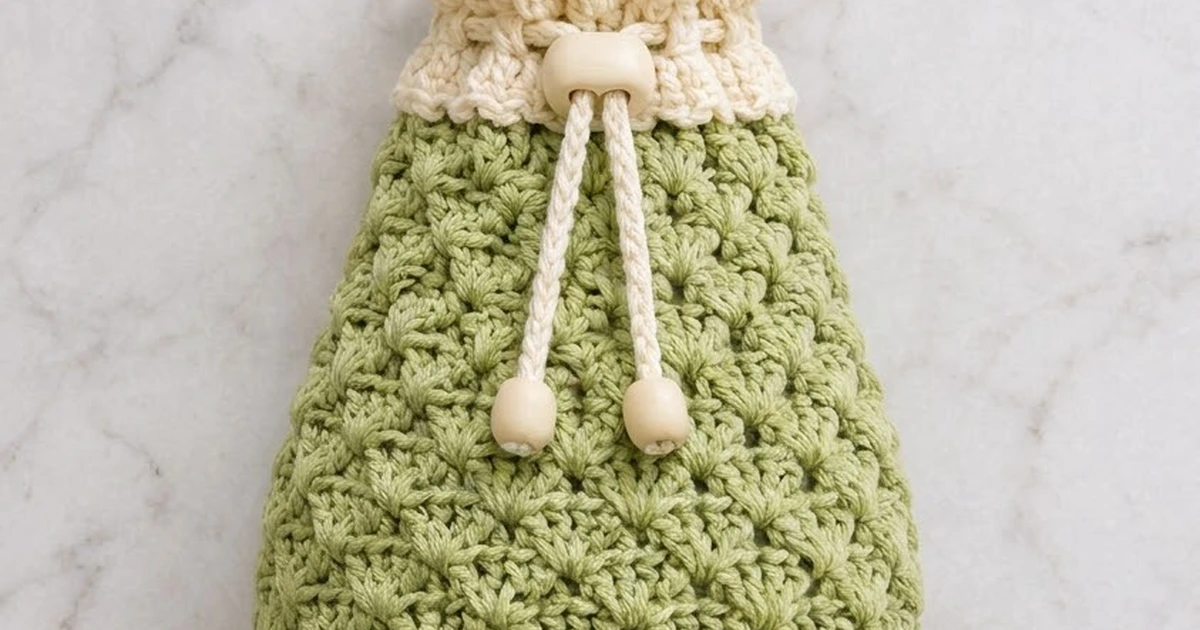
This plastic bag holder is shaped like a pear. It has a snug ribbed opening at the bottom, a rounded belly covered in staggered shells, and a narrower neck with a cream ruffle and drawstring. A flat green strap hangs it from a cabinet knob, so it keeps grocery bags tidy and still looks like part of the kitchen decor.
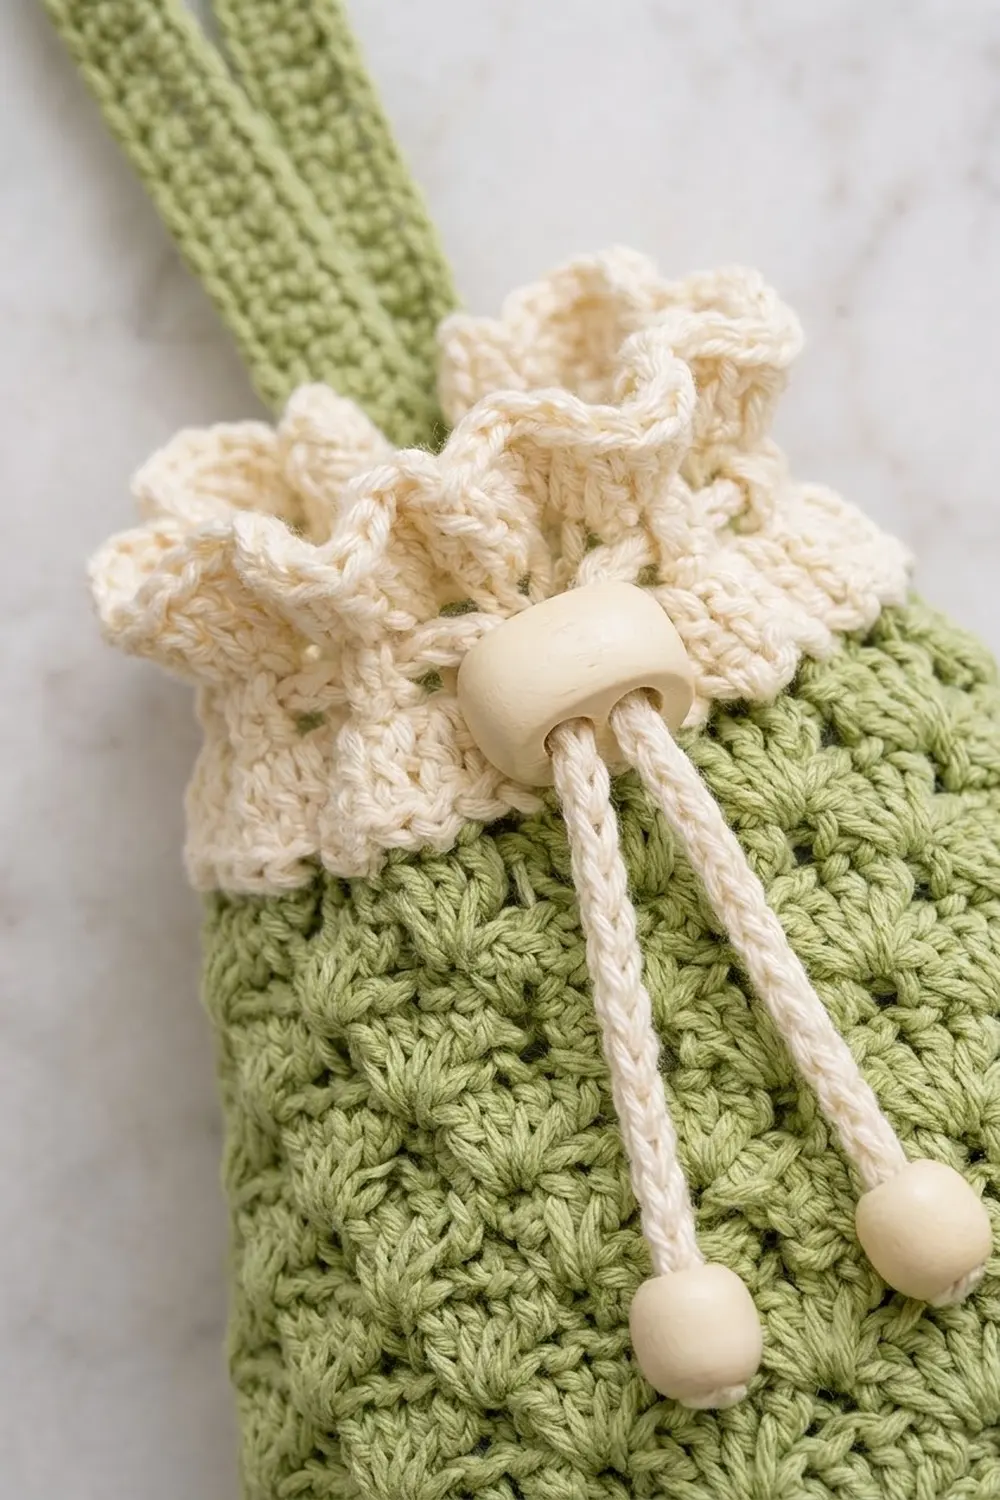
The body is sage green and uses a classic shell-and-single-crochet texture that makes overlapping fans. The top cuff is cream, with an eyelet round for the drawstring and a frilled loop edge. The cream chain drawstring runs through a cord lock and ends in two cream wooden beads.
All instructions use US crochet terms. Without the strap, the finished holder measures about 16.5 in (41.9 cm) from the bottom edge to the tips of the ruffle. Laid flat, it is about 12 in (30.5 cm) wide at its widest point.
The construction is simple and has no seams. First you crochet over an elastic hair tie to make the bottom opening, and then you work ribbing. From there the body grows upward in joined rounds. Single crochet transition rounds between the shell sections change the width. You work the cream cuff straight onto the top edge, then make the strap and drawstring separately and add them at the end.
Finished Size and Construction
- Finished size: 12 in (30.5 cm) wide flat at the widest point x 16.5 in (41.9 cm) long, plus the strap loop
- Skill level: Intermediate (front/back post stitches, shells in the round)
- Terminology: US
- Yarn weight: Worsted (#4), cotton or cotton blend
- Hook: 5 mm (H-8)
- Number of pieces: 3 crocheted pieces: body with cuff, strap, drawstring
- Layout: One tube worked from the bottom up, with the strap sewn inside the back and the drawstring threaded through the cuff
- Piece size: Body 12 in (30.5 cm) wide flat at its widest x 14.5 in (36.8 cm) tall
- Size before border: 14.5 in (36.8 cm) tall, with a top opening 7.5 in (19.1 cm) wide flat
- Border depth: The cream cuff adds 2 in (5.1 cm)
Materials
Pick a smooth worsted cotton or cotton blend. Cotton keeps the shell texture crisp and won’t stretch much when the holder is full of bags. Avoid very fuzzy yarn, because it blurs the fans.
- Sage green: 180 g, about 306 m (body, rim, strap)
- Cream: 50 g, about 85 m (cuff, drawstring)
These quantities include about 15 percent extra to cover your gauge swatch and differences in tension.
Tools and notions:
- 5 mm (H-8) crochet hook
- 1 elastic hair tie, about 2 in (5.1 cm) across when relaxed
- 1 two-hole cord lock, cream or white
- 2 cream wooden beads, about 0.5 in (1.3 cm), with holes big enough for the drawstring
- Stitch marker
- Tapestry needle
- Scissors and a measuring tape
Abbreviations (US Terms)
- ch chain
- sl st slip stitch
- sc single crochet
- sc2tog single crochet 2 together
- dc double crochet
- fpdc front post double crochet
- bpdc back post double crochet
- st(s) stitch(es)
- sk skip
- sp space
- rep repeat
Special stitch: Shell. Work 5 dc in the same stitch. Together, a shell and the sc after it use a 6-stitch repeat.
Gauge and Checkpoints
Gauge: 16 sc and 16 rounds = 4 in (10.2 cm). In shell pattern, 1 repeat (shell plus sc) is 1.5 in (3.8 cm) wide, and 4 shell rounds are 2.5 in (6.4 cm) tall. That makes each shell round about 0.625 in (1.6 cm) tall.
Since the body is one large tube, check your gauge before you start. Chain 25, then work 4 rows of 24 sc, followed by 4 rows of shell pattern (4 repeats). The 4 repeats should measure 6 in (15.2 cm) across.
Checkpoints (measured flat, from the bottom edge):
- After ribbing: 1.75 in (4.4 cm) tall
- After Section A: 9 in (22.9 cm) wide, 4.5 in (11.4 cm) tall
- After Section B: 12 in (30.5 cm) wide, 9.75 in (24.8 cm) tall
- After Section C: 9 in (22.9 cm) wide, 12.5 in (31.8 cm) tall
- After green rim: 7.5 in (19.1 cm) wide, 14.5 in (36.8 cm) tall
If your piece comes out too big, use a hook 0.5 mm smaller. If it comes out too small, use a hook 0.5 mm larger. Don’t change the stitch counts, because every section depends on multiples of 6.
Body
Work in joined rounds with the right side facing you. The chains at the start of a round don’t count as a stitch unless the pattern says they do.
Bottom Opening and Ribbing
With sage green, make a slip knot on your hook.
Rnd 1: Holding the hair tie, work 48 sc over it, pushing the stitches together so they bunch up. Join with sl st to first sc. (48 sts)
The tie will look crowded and ruffled. That’s correct, because the bunching lets the opening stretch when you pull a bag out.
Rnd 2: Ch 2, fpdc around next st, bpdc around next st; rep from * around. Join to first fpdc. (48 sts: 24 fpdc, 24 bpdc)*
Rnds 3-4: Ch 2, fpdc around fpdc, bpdc around bpdc; rep from * around. Join. (48 sts)*
Checkpoint: the ribbing is 1.75 in (4.4 cm) tall.
Transition 1
Rnd 5: Ch 1, sc in next st, 2 sc in next st; rep from * around. Join. (72 sts = 48 worked 1-per-stitch + 24 extra)*
Shell Pattern Rounds
The body alternates between two rounds. Both have the same stitch count.
Shell Rnd A: Ch 1, sc in same st as join, *sk 2, 5 dc in next st, sk 2, sc in next st; rep from * around, leaving out the final sc of the last repeat. Join to first sc.
Shell Rnd B: Ch 3 (counts as dc), 2 dc in same st as join (half shell made), *sk 2, sc in center dc of next shell, sk 2, 5 dc in next sc; rep from * around. On the last repeat, skip the 5 dc and instead work 2 dc in the same st as the beginning ch-3. Join to top of ch-3.
In Rnd B, the half shells at the start and end form one full 5-dc shell, so the count doesn’t change. The top of the beginning ch-3 sits in the center of that shell, which is where the next Rnd A starts. Because of this offset, the fans stack like bricks and create the diamond-fan texture.
Section A
Rnds 6-9: Work Rnd A, Rnd B, Rnd A, Rnd B. (72 sts each: 12 shells + 12 sc)
Checkpoint: 9 in (22.9 cm) wide flat, 4.5 in (11.4 cm) tall.
Transition 2
Rnd 10: Ch 1, sc in next 2 sts, 2 sc in next st; rep from * around. Join. (96 sts = 72 worked 1-per-stitch + 24 extra)*
Section B (Belly)
Rnds 11-18: Alternate Rnd A and Rnd B until you’ve worked each 4 times, ending with Rnd B. (96 sts each: 16 shells + 16 sc)
Checkpoint: 12 in (30.5 cm) wide flat, 9.75 in (24.8 cm) tall. This is the widest part of the pear.
Transition 3
Rnd 19: Ch 1, sc in next 2 sts, sc2tog; rep from * around. Join. (72 sts = 48 single sc + 24 sc2tog)*
Section C
Rnds 20-23: Work Rnd A, Rnd B, Rnd A, Rnd B. (72 sts each: 12 shells + 12 sc)
Checkpoint: 9 in (22.9 cm) wide flat, 12.5 in (31.8 cm) tall.
Transition 4
Rnd 24: Ch 1, sc in next 4 sts, sc2tog; rep from * around. Join. (60 sts = 48 single sc + 12 sc2tog)*
Section D (Neck)
Rnds 25-26: Work Rnd A, then Rnd B. (60 sts each: 10 shells + 10 sc)
Green Rim
Rnds 27-28: Ch 1, sc in each st around. Join. (60 sts)
Checkpoint: 7.5 in (19.1 cm) wide flat, 14.5 in (36.8 cm) tall. Fasten off the sage green.
Strap
With sage green, ch 49.
Row 1: Sc in 2nd ch from hook and in each ch across. Turn. (48 sts)
Rows 2-4: Ch 1, sc in each st across. Turn. (48 sts)
The strap is 12 in (30.5 cm) long x 1 in (2.5 cm) wide. Fasten off, leaving a 12 in (30.5 cm) tail for sewing.
Drawstring
With cream, ch 96, then sl st in the back bump of each ch back to the start. The cord should measure about 24 in (61.0 cm). Fasten off and weave in only the starting tail. Leave the other end loose for now.
Assembly
The body is a single tube, so you don’t need to join any motifs. You only add the strap here, and the drawstring goes in after the cuff.
Strap: Find the center back of the green rim. Using the side opposite the round join makes the join easiest to hide. Overlap each end of the strap 1.5 in (3.8 cm) onto the inside of Rnds 25-28, with the two ends side by side and 0.5 in (1.3 cm) apart. Whipstitch firmly through both layers, catching only the inner loops so the stitches don’t show on the front. This leaves 9 in (22.9 cm) of strap as a loop that rises about 4.5 in (11.4 cm) above the rim.
Sew firmly but not tightly. If the sewing puckers here, the cuff will lean backward.
Border: Cream Cuff
You work the cuff straight into the 60 sts of the green rim. Its gauge matches the body (16 sc = 4 in, or 10.2 cm), so the 60 sts stay 15 in (38.1 cm) around and 7.5 in (19.1 cm) wide flat. Join the cream with sl st at the center front.
Rnd 1: Ch 1, sc in each st around. Join. (60 sts)
Rnd 2 (eyelets): Ch 4 (counts as dc + ch 1), sk 1, dc in next st, ch 1, sk 1; rep from * around. Join to 3rd ch of ch-4. (60 sts: 30 dc + 30 ch-1 sps)*
Rnd 3: Ch 1, sc in each dc and each ch-1 sp around. Join. (60 sts)
Rnd 4 (ruffle base): Ch 3 (counts as dc), dc in same st, 2 dc in each st around. Join. (120 sts = 60 worked 1-per-stitch + 60 extra)
Rnd 5 (loop edge): Sc in next st, ch 3, sk 1; rep from * around. Join to first sc. (60 sc + 60 ch-3 loops)*
Fasten off. The cuff is 2 in (5.1 cm) deep.
Why the math works: The rim has 60 sts. The eyelet round uses each of them once, as either a dc or a ch-1, so it still totals 60 and gives you 30 eyelets. Because 30 is an even number, both drawstring ends come out at the front. Rnd 4 doubles every stitch to make 120 sts, which is what makes the cuff flare and ripple. Rnd 5 uses 2 sts per repeat, so 120 / 2 = 60 loops with nothing left over.
Drawstring: Start at the center front and weave the drawstring in and out through all 30 eyelets, so the two ends come out of neighboring eyelets at the front. Thread both ends through the cord lock. Then put a bead on each end and tie an overhand knot about 3 in (7.6 cm) below the cord lock. Trim the ends to 0.5 in (1.3 cm).
Final Blocking
- Weave in all remaining ends on the inside, following the direction of the stitches.
- Mist the body lightly with water until it’s damp but not soaked.
- Stuff the body loosely with a towel to shape the pear: narrow at the bottom, round at the belly, narrower at the neck.
- Use your fingers to gently press the stepped edges at each transition round and smooth the outline.
- Lay the holder flat and check the widths: 9 in (22.9 cm), 12 in (30.5 cm), 9 in (22.9 cm), and 7.5 in (19.1 cm).
- Pull the ruffle loops outward so they fan evenly.
- Pin the strap flat and straight.
- Let it dry completely before you hang it or fill it with bags.
Final Quality-Control Checklist
- Bottom opening stretches easily and springs back
- Ribbing has 48 sts, with even fpdc/bpdc columns
- Each shell section has the right count: 72, 96, 72, 60
- Fans are staggered like bricks, with no columns stacked directly on top of each other
- Total length is 16.5 in (41.9 cm) including the cuff
- 30 eyelets, with both drawstring ends coming out at the front
- Cord lock slides smoothly and holds when you let go
- Strap is sewn on securely and can’t be seen from the front
- All ends are woven in on the inside
Troubleshooting
Shells don’t line up between rounds. Check your starting point. Rnd A starts in the join stitch, and Rnd B starts with a half shell. Count 6 sts per repeat.
A round ends with extra or missing stitches. Recount the transition round underneath it. A shell round can’t fix a wrong base count, so the base must be a multiple of 6.
Bottom opening is too tight for bags. Work Rnd 1 more loosely, or use a larger hair tie.
The belly looks boxy. Block it over a rounded towel and press the transition rounds smooth.
Ruffle curls inward. Rnd 4 is too tight. Rework it with a hook 0.5 mm larger.
Strap stretches over time. Make it with a hook 0.5 mm smaller, or add a fifth row of sc.
Care
Hand wash in cool water with mild soap, roll it in a towel to press out the water, and dry it flat over a rounded shape. If the beads are unfinished wood, untie the knots and take them off before washing.

Final Notes
The whole design depends on one measurement chain. At 4 sts per in (2.5 cm), the 48 sts of ribbing grow to 72, then 96, then go back to 72 and finally 60 sts. That gives flat widths of 9 in (22.9 cm), 12 in (30.5 cm), 9 in (22.9 cm), and 7.5 in (19.1 cm). The body is 14.5 in (36.8 cm) tall, and the 2 in (5.1 cm) cuff brings the total to 16.5 in (41.9 cm). If your checkpoints match, your pear shape will match too.
Happy crocheting!