

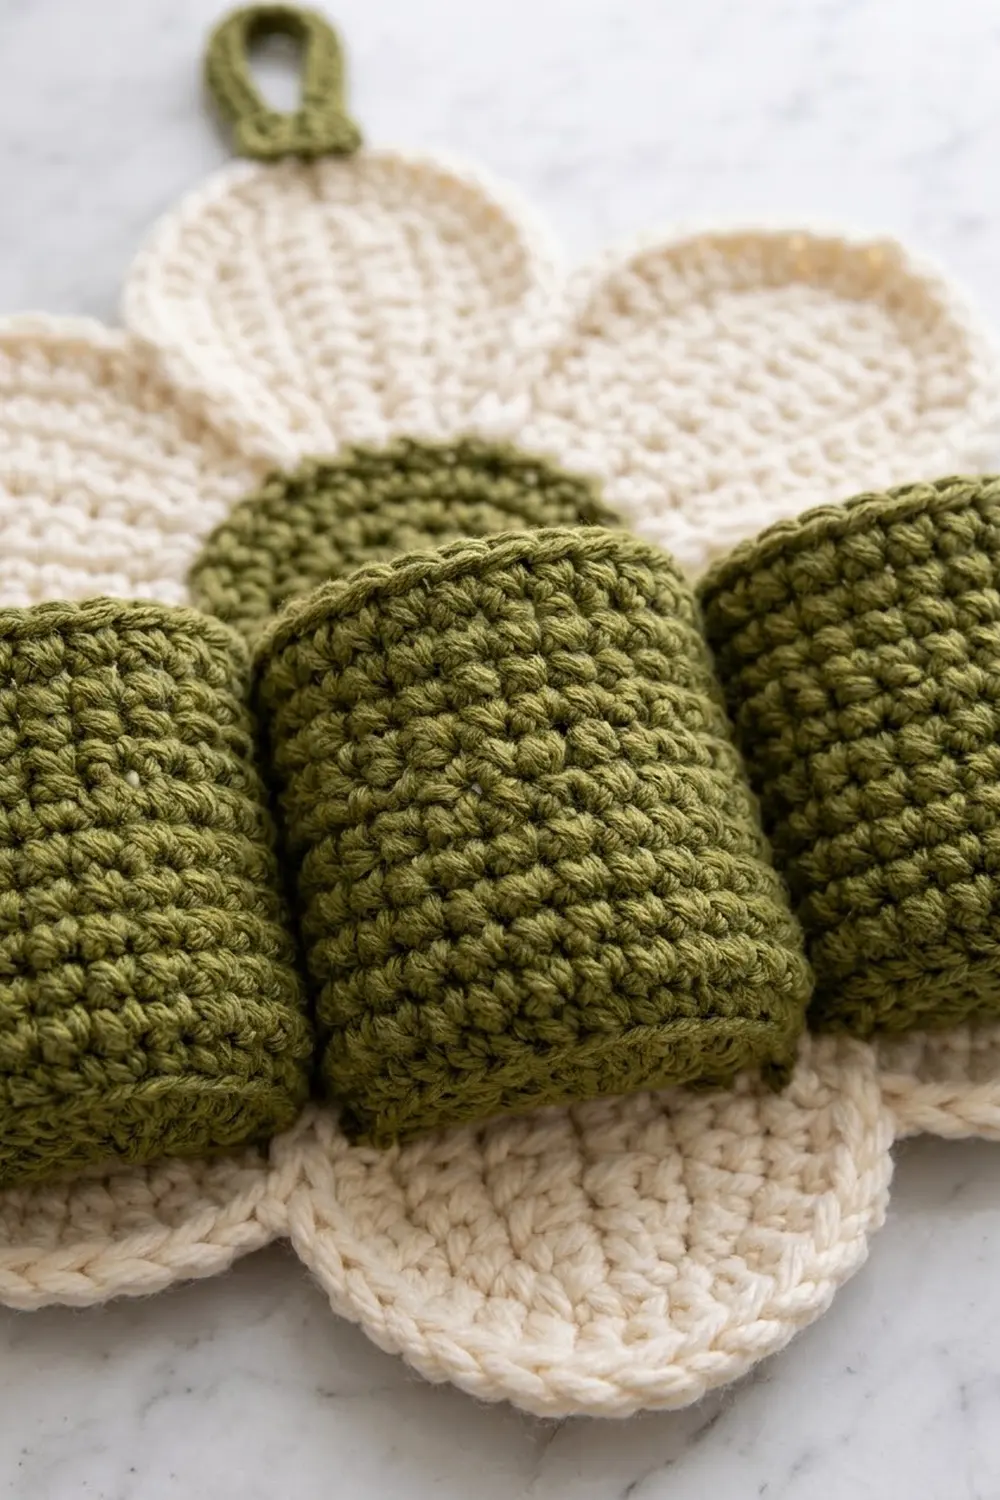
The Meadow Daisy Wall Organizer is a large, flat crochet flower that hangs on the wall and holds your desk clutter. Six cream teardrop petals surround a solid olive center. Three olive pockets sit across the lower half, sized for pens, a small notepad and a phone.
The look is calm and modern. It uses two colors and firm cotton fabric, and every petal has a raised, rope-like edge. Each petal also has a faint line down its middle where it was worked around a foundation chain. The pockets are worked in plain single crochet, so they look like neat little baskets.
This pattern uses US crochet terms. The finished flower measures 14.5 in (36.8 cm) across. With the hanging loop, the total height is 17.75 in (45.1 cm).
You make 11 separate pieces: one center circle, six petals, three pockets and one hanging loop. Each petal gets its own two-round edge border before assembly. Then you sew the petals behind the center, add the pockets and the loop, and block.
Finished Size and Construction
- Finished flower: 14.5 in (36.8 cm) across, tip to tip
- Total height with loop: 17.75 in (45.1 cm)
- Skill level: Intermediate
- Terminology: US terms
- Yarn weight: Worsted (#4) cotton
- Hook: 4.0 mm (US G-6)
- Number of pieces: 11 (1 center, 6 petals, 3 pockets, 1 loop)
- Layout: 6 petals spaced evenly around the center, 60 degrees apart; 3 pockets in a row across the lower half; loop at the top petal
- Center size: 4.5 in (11.4 cm) diameter
- Petal size before border: 3.25 in (8.3 cm) wide x 5 in (12.7 cm) long
- Petal size after border: 4 in (10.2 cm) wide x 5.75 in (14.6 cm) long
- Border depth: 0.375 in (1.0 cm) on every petal edge
- Pocket size: 2.75 in (7.0 cm) diameter x 3.5 in (8.9 cm) tall
Materials
Choose a smooth, mercerized or combed worsted-weight cotton. Cotton holds its shape on a wall and keeps the pockets upright. Acrylic also works, but the pockets will sag more.
- Color A, Cream: 70 g, about 140 m (153 yd), for the petals
- Color B, Olive: 90 g, about 180 m (197 yd), for the center, pockets and loop
The quantities assume a yarn of about 100 m per 50 g. They include a margin of about 15 percent for your gauge test and sewing tails.
Tools:
- 4.0 mm (US G-6) crochet hook
- Tapestry needle
- 8 stitch markers
- Locking pins or sewing clips
- Measuring tape
- Blocking mat and rust-proof pins
- Spray bottle
- Optional: a 2.75 in (7.0 cm) round jar or cardboard tube for shaping the pockets
Abbreviations (US Terms)
- ch: chain
- sl st: slip stitch
- sc: single crochet
- hdc: half double crochet
- dc: double crochet
- BLO: back loop only
- st(s): stitch(es)
- rev sc: reverse single crochet
Reverse single crochet (rev sc): Work from left to right (if you crochet right-handed). Insert the hook into the next stitch to the right, yarn over and pull up a loop. Yarn over again and pull through both loops. This makes the twisted, rope-like edge on the petals and the pocket rims.
Gauge and Checkpoints
Gauge: 16 sc and 18 sc rounds = 4 in (10.2 cm). 16 dc and 7 dc rows = 4 in (10.2 cm). Work firmly; you should not see light through the fabric.
Make the center circle first. It is your gauge test.
- Center after Round 6 (36 sts): 2.75 in (7.0 cm) across
- Center after Round 10 (60 sts): 4.5 in (11.4 cm) across
- Petal after Round 1: about 1.5 in (3.8 cm) wide x 4 in (10.2 cm) long
- Petal after Round 3: 3.25 in (8.3 cm) wide x 5 in (12.7 cm) long
- Petal after border: 4 in (10.2 cm) wide x 5.75 in (14.6 cm) long
- Pocket base after Round 6: 2.75 in (7.0 cm) across
If your center is too big, use a hook 0.5 mm smaller. If it is too small, use a hook 0.5 mm larger. Check again before you start the petals, because six petals multiply any error.
Center (Make 1, Color B)
Work in continuous spiral rounds without joining. Mark the first stitch of each round.
Round 1: Make a magic ring, 6 sc in ring. (6 sts)
Round 2: 2 sc in each st around. (12 sts)
Round 3: [Sc in next st, 2 sc in next st] 6 times. (18 sts)
Round 4: [Sc in next 2 sts, 2 sc in next st] 6 times. (24 sts)
Round 5: [Sc in next 3 sts, 2 sc in next st] 6 times. (30 sts)
Round 6: [Sc in next 4 sts, 2 sc in next st] 6 times. (36 sts)
Round 7: [Sc in next 5 sts, 2 sc in next st] 6 times. (42 sts)
Round 8: [Sc in next 6 sts, 2 sc in next st] 6 times. (48 sts)
Round 9: [Sc in next 7 sts, 2 sc in next st] 6 times. (54 sts)
Round 10: [Sc in next 8 sts, 2 sc in next st] 6 times. (60 sts)
Sl st in the next st to smooth the step at the end of the spiral. Fasten off, leaving a 36 in (91.4 cm) tail for sewing.
Place 6 markers in Round 10, one every 10 sts. Each 10-st section will sit over one petal.
Petals (Make 6, Color A)
Each petal is worked in joined rounds around both sides of a foundation chain. The base stays pointed because the stitches there are short. The tip rounds out because that is where the increases go.
Foundation: Ch 15.
Round 1: Sc in 2nd ch from hook, hdc in next 2 ch, dc in next 10 ch, 7 dc in last ch (tip). Rotate the work and continue along the bottom loops of the chain: dc in next 10 ch, hdc in next 2 ch, sc in last ch (the same ch as the first sc). Join with sl st to first sc. (33 sts: 13 on side 1, 7 at tip, 13 on side 2)
Round 2: Ch 1 (does not count as a st, here or in later rounds), sc in same st as join, hdc in next 2 sts, dc in next 10 sts, 2 dc in each of next 7 sts, dc in next 10 sts, hdc in next 2 sts, sc in last st. Join. (40 sts: 13 on side 1, 14 at tip, 13 on side 2)
Round 3: Ch 1, sc in same st, sc in next 2 sts, hdc in next 10 sts, [dc in next st, 2 dc in next st] 7 times, hdc in next 10 sts, sc in last 3 sts. Join. (47 sts: 13 on side 1, 21 at tip, 13 on side 2)
The single crochets on either side of the join make the pointed base. Do not fasten off. Go straight on to the Border section below.
Hanging Loop (Make 1, Color B)
Foundation: Ch 33.
Row 1: Sc in 2nd ch from hook and in each ch across. Turn. (32 sts)
Rows 2–3: Ch 1, sc in each st across. Turn. (32 sts)
Fasten off. The strip measures 8 in (20.3 cm) long and about 0.75 in (1.9 cm) wide. Fold it in half so the two ends meet. Whipstitch the two layers together for 1.25 in (3.2 cm) up from the ends to make a solid tab. The open loop above the tab is 2.75 in (7.0 cm) long.
Pockets (Make 3, Color B)
Rounds 1–6: Work as Center Rounds 1–6. (36 sts)
Round 7: Sc in BLO of each st around. (36 sts) This makes a crisp edge where the base meets the wall.
Rounds 8–21: Sc in each st around. (36 sts)
Round 22: Rev sc in each st around. (36 sts) Sl st to first st.
Fasten off, leaving a 30 in (76.2 cm) tail. Each pocket measures 2.75 in (7.0 cm) across and 3.5 in (8.9 cm) tall. That height comes from 15 wall rounds of sc at 0.22 in each, plus the rev sc rim.
Make All Pieces
| Piece | Color | Quantity |
|---|---|---|
| Center | B (Olive) | 1 |
| Petals, with border | A (Cream) | 6 |
| Pockets | B (Olive) | 3 |
| Hanging loop | B (Olive) | 1 |
Layout grid (front view, clock positions):
            [Loop]
           Petal 12
  Petal 10          Petal 2
          [Center]
  Petal 8           Petal 4
     [Pocket][Pocket][Pocket]
           Petal 6
Joining
Petals to center: Lay the center right side up. Slide each petal base under it so 0.75 in (1.9 cm) of the petal is hidden. Place the petal tips at 12, 2, 4, 6, 8 and 10 o’clock, with each petal’s middle line pointing at the magic ring. Pin. Using the center tail, whipstitch the 10 sts of Round 10 in each marked section to the petal underneath. That is one whipstitch per center stitch, 60 in total. Every petal gets exactly 10 sts, so the spacing stays even.
Petal to petal: Where neighboring petals touch near the center, join them from the back with 4 whipstitches through matching rev sc stitches. This keeps the flower stiff when the pockets are full.
Pockets: Flatten each pocket slightly so a 1 in (2.5 cm) wide strip of its back wall lies against the flower. Place the three pockets side by side, touching, with their rims 1 in (2.5 cm) below the center point of the flower. Whipstitch each pocket down both sides of a 4-st-wide strip of its back wall, through all 16 wall rounds. Then sew 4 sts across the base edge. Finally, sew neighboring pockets to each other through the 6 rounds just below the rims.
Loop: Place the tab behind the top petal so 0.75 in (1.9 cm) of it overlaps the petal tip. Whipstitch around the edges of the overlapping tab.
Tension: Sew snugly, but don’t pull so hard that the fabric puckers. From the front, your stitches should disappear into the cream fabric.
Size checkpoint: The flower measures 14.5 in (36.8 cm) from tip to tip. On each side, that is the 2.25 in (5.7 cm) center radius, minus 0.75 in (1.9 cm) of overlap, plus the 5.75 in (14.6 cm) petal. The loop adds 3.25 in (8.3 cm) on top.
Border (Petal Edge)
Work the border on each petal right after Round 3, before joining. It makes the raised, rope-like edge.
Border gauge: Same as the body, 16 sc = 4 in (10.2 cm). The sc round and the rev sc round together add 0.375 in (1.0 cm) to every edge.
Border Round 1: Ch 1, sc in same st, sc in next 12 sts (13 on side 1). Across the 21 tip sts, work [sc in next 6 sts, 2 sc in next st] 3 times (24 at tip). Sc in last 13 sts (13 on side 2). Join. (47 sts worked once + 3 added = 50 sts: 13, 24, 13)
Border Round 2: Ch 1, rev sc in each st around. Join. (50 sts: 13 on side 1, 24 at tip, 13 on side 2)
Fasten off, leaving a 12 in (30.5 cm) tail.
Why the math works: The petal tip is a half circle. Each round adds one stitch height to its radius, so its outer edge gets longer by pi times the stitch height. For a dc round, that is 3.14 x 0.57 in = 1.79 in (4.5 cm), or about 7 sts. That is why Rounds 1–3 add 7 tip sts each, giving 7, 14 and 21. An sc round is only 0.22 in (0.6 cm) tall, so the edge gets longer by about 0.7 in (1.8 cm), or 3 sts. Adding 3 keeps the tip flat; adding 7 would make it ruffle. The straight sides need no increases, so they stay at 13 sts.
Final Blocking
- Weave in all ends you no longer need for sewing.
- Lay the assembled organizer face up on a blocking mat.
- Mist the front until it is damp, not soaked.
- Pin the petal tips so the flower measures 14.5 in (36.8 cm) from tip to tip in all three directions.
- Smooth each petal so its middle line runs straight from the tip to the center.
- Slide a 2.75 in (7.0 cm) jar or tube into each pocket to round it out.
- Let it dry completely, for at least 12 hours.
- Remove the pins and the jars or tubes.
Final Quality-Control Checklist
- The center is 4.5 in (11.4 cm) across and lies flat.
- All six petals are 4 in (10.2 cm) x 5.75 in (14.6 cm).
- Every petal border has 50 sts with a clean rope edge.
- The petals are evenly spaced, with 10 center sts each.
- The pocket rims are level, 1 in (2.5 cm) below the flower’s center point.
- Each pocket is 3.5 in (8.9 cm) tall and stays open.
- The loop is centered behind the top petal and holds firm when you pull it.
- No sewing stitches show on the front.
Troubleshooting
Center cups: Your sc is tight. Use a larger hook or add 1 extra round of increases.
Center ruffles: Your sc is loose. Use a smaller hook and move where the increases fall each round.
Petal tip ruffles: Check Border Round 1. You need only 3 increases at the tip.
Petal tip cups: Your dc is short. Make your yarn overs looser, or use a larger hook for the petals only.
Petal base is rounded, not pointed: Make sure the first and last sts of Rounds 2 and 3 are sc, not hdc.
Pockets lean forward: Sew 2 more sts along the base edge and 1 more wall column on each side.
Organizer tilts on the wall: The loop is off-center. Sew it again directly behind the middle line of the top petal.
Care
Hand wash in cool water with mild soap. Roll in a towel to remove water, dry flat, and reshape the pockets over a jar while they are damp.

Final Notes
Every size in this organizer builds on the one before it. A gauge of 16 sc = 4 in (10.2 cm) gives a 4.5 in (11.4 cm) center. Each petal grows to 3.25 in (8.3 cm) x 5 in (12.7 cm), and the border brings it to 4 in (10.2 cm) x 5.75 in (14.6 cm). Six petals tucked 0.75 in (1.9 cm) under the center make a 14.5 in (36.8 cm) flower. Three 2.75 in (7.0 cm) pockets sit across the lower half, and the loop brings the total height to 17.75 in (45.1 cm).
Check your center first, and the rest will fall into place. Happy crocheting!