

The Sage Peaks Hanging Wall Organizer is a soft, sturdy storage panel that hangs from a wooden dowel. It holds four small cups for hooks, scissors and tape measures, plus one deep oval basket for the yarn you’re using.
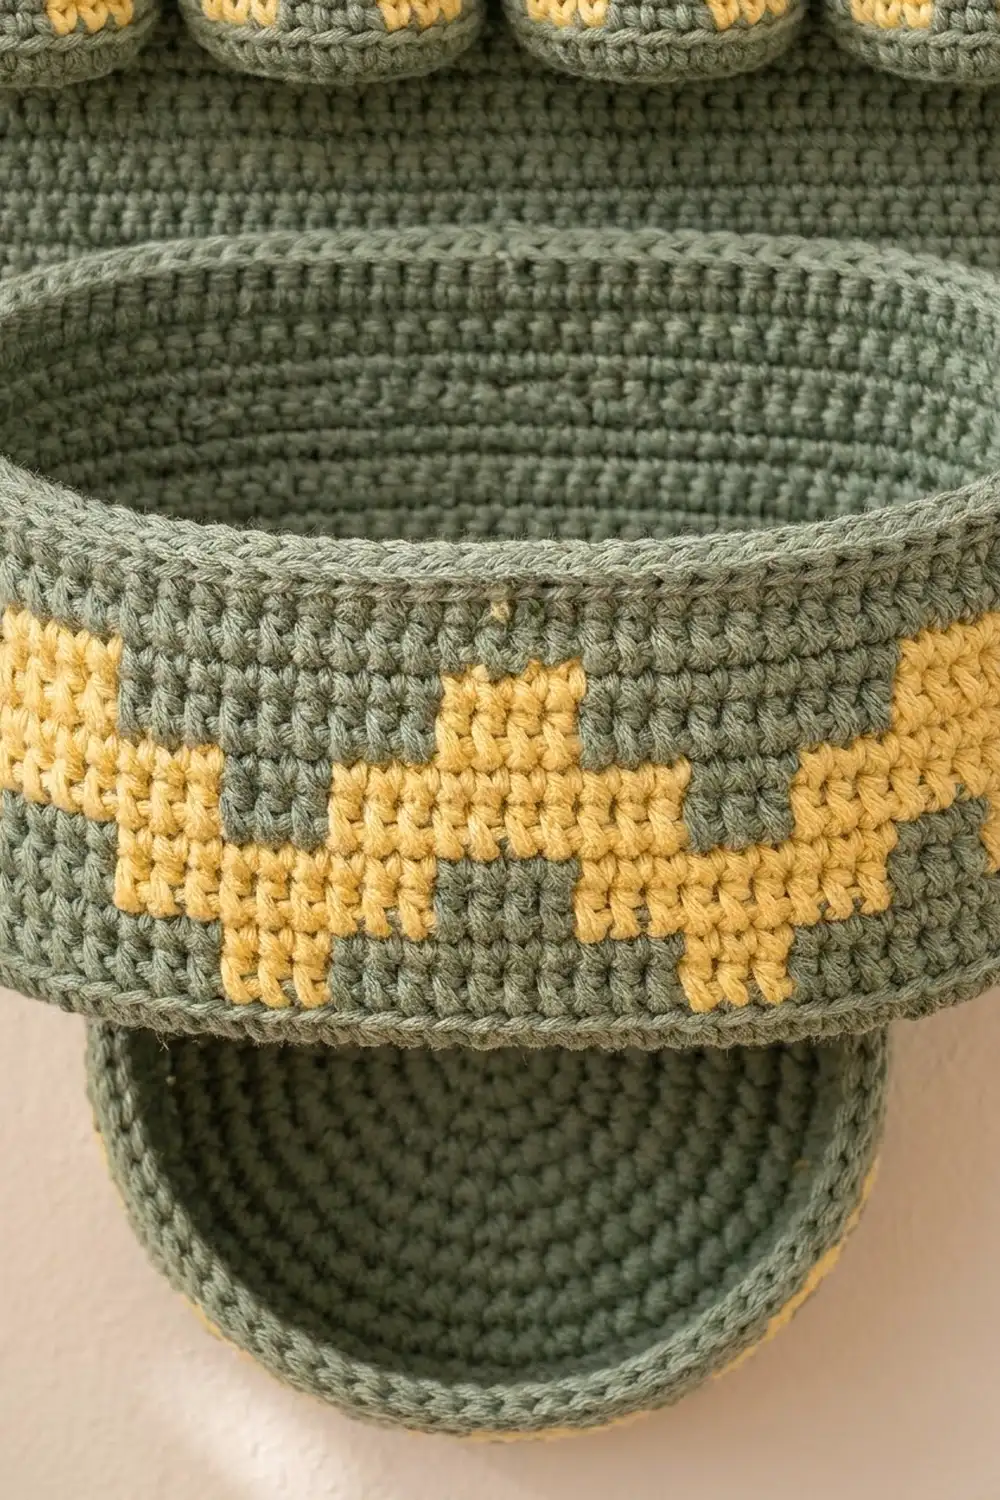
The colors are simple: sage green for the panel, straps and most of each container, with butter-yellow stepped “mountain” triangles worked in tapestry crochet around every cup and the basket. Light wooden rings, beads and the dowel finish the Scandinavian look.
This pattern uses US crochet terms. The finished panel measures 12 in wide x 15 in tall (30.5 x 38.1 cm), not counting the dowel and straps.
You crochet one flat panel in rows, four round-based cups, one oval basket and two hanging straps. You sew the cups and basket onto the panel. Then a two-round border with corner eyelets goes around the panel, and the straps and wooden rings connect it to the dowel.
Finished Size and Construction
- Finished panel size: 12 x 15 in (30.5 x 38.1 cm)
- Skill level: Intermediate (tapestry crochet, working in rounds, sewing)
- Terminology: US crochet terms
- Yarn weight: Worsted / medium (#4) cotton
- Hook: 4.0 mm (G-6)
- Number of pieces: 8 (1 panel, 4 cups, 1 basket, 2 straps)
- Layout: a row of 4 cups across the upper half and 1 oval basket across the lower half
- Cup size: about 2.4 in (6.1 cm) across x 3 in (7.6 cm) tall
- Basket size: 10 x 4 in (25.4 x 10.2 cm) base, with a 6 in (15.2 cm) wall
- Panel size before border: 11 x 14 in (27.9 x 35.6 cm)
- Border depth: 0.5 in (1.3 cm) on every side
Materials
Choose a firm, smooth worsted cotton or cotton blend. Cotton holds its shape, shows the color changes cleanly and does not stretch much when the basket is full. Avoid fuzzy or very soft yarns, because the containers will sag.
- Sage green (Color A): 200 g, about 380 yd (347 m)
- Butter yellow (Color B): 50 g, about 95 yd (87 m)
These amounts include a margin of roughly 15 percent to cover the test cup and the yarn carried inside the tapestry rounds.
Tools and notions:
- 4.0 mm (G-6) crochet hook
- Yarn needle
- Stitch markers, including 1 locking marker
- Scissors
- Wooden dowel, 14 in (35.6 cm) long and 5/8 in (1.6 cm) thick
- 2 wooden rings, 1.5 in (3.8 cm) across the outside
- 2 wooden beads, about 3/4 in (1.9 cm), with holes big enough for yarn
- 2 small wall hooks or dowel brackets
- Rustproof pins and a blocking mat
Abbreviations (US Terms)
- ch: chain
- sc: single crochet
- sl st: slip stitch
- st(s): stitch(es)
- BLO: back loop only
- inc: 2 sc in the same st
- rnd(s): round(s)
- A / B: sage green / butter yellow
Special technique: tapestry sc. Lay the color you’re not using along the tops of the current round’s stitches and work each sc over it, so the strand is hidden inside. To change color, work the last sc in the old color until 2 loops remain on the hook, then yarn over with the new color and pull through. Keep the carried strand loose so it does not pucker the fabric.
Gauge and Checkpoints
Gauge: 16 sc and 16 rows or rnds = 4 in (10.2 cm) in sc, worked firmly. This square gauge matters for two reasons. One panel row lines up with one container round when you sew, and one sc per row end along the panel sides lies flat.
Test one piece first. Make one cup before anything else. It’s a small, finished gauge check that includes tapestry rounds.
- After cup Rnd 5: the base is about 2.4 in (6.1 cm) across.
- After cup Rnd 17: the cup is 3 in (7.6 cm) tall from where the wall turns up.
- After panel Row 4: the panel is 11 in (27.9 cm) wide.
- After panel Row 56: the panel is 14 in (35.6 cm) tall.
- After border Rnd 2: the panel is 12 x 15 in (30.5 x 38.1 cm).
If your cup is too big, use a hook 0.5 mm smaller. If it’s too small, use a hook 0.5 mm larger. If the walls feel floppy, go down a hook size even if the width is close, because containers need dense stitches.
Cups (Make 4)
Work in joined rnds: at the end of each rnd, sl st to the first sc and ch 1. The ch 1 does not count as a st.
Rnd 1: With A, make a magic ring and work 6 sc in the ring. (6 sts)
Rnd 2: Inc in each st around. (12 sts)
Rnd 3: (Sc 1, inc) 6 times. (18 sts)
Rnd 4: (Sc 2, inc) 6 times. (24 sts)
Rnd 5: (Sc 3, inc) 6 times. (30 sts)
Checkpoint: the flat base measures about 2.4 in (6.1 cm) across.
Rnd 6: Working in BLO, sc in each st around. (30 sts) This turns the wall up.
Rnds 7–8: Sc in each st around. (30 sts)
Join B and carry it through Rnd 14. The color pattern repeats every 6 sts, 5 times per rnd.
Rnds 9–10: (6 B) 5 times. (30 sts)
Rnds 11–12: (1 A, 4 B, 1 A) 5 times. (30 sts)
Rnds 13–14: (2 A, 2 B, 2 A) 5 times. (30 sts)
Cut B and continue with A.
Rnds 15–17: Sc in each st around. (30 sts)
Rnd 18: Loosely sl st in each st around. Fasten off and weave in the ends.
This makes a solid yellow base that steps in to 4-st and then 2-st peaks. The result is five yellow mountains with green triangles between them.
Oval Basket (Make 1)
Base (A only):
Rnd 1: Ch 27. Sc in the 2nd ch from the hook and in the next 24 ch, then 3 sc in the last ch. Working along the other side of the chain, sc in the next 24 ch, then 2 sc in the last ch (the same ch as the first sc). Join. (54 sts: 24 on each straight side and 3 at each end)
Rnd 2: Sc in next 24, inc in next 3, sc in next 24, inc in next 3. (60 sts)
Rnd 3: Sc in next 24, (sc 1, inc) 3 times, sc in next 24, (sc 1, inc) 3 times. (66 sts)
Rnd 4: Sc in next 24, (sc 2, inc) 3 times, sc in next 24, (sc 2, inc) 3 times. (72 sts)
Rnd 5: Sc in next 24, (sc 3, inc) 3 times, sc in next 24, (sc 3, inc) 3 times. (78 sts)
Rnd 6: Sc in next 24, (sc 4, inc) 3 times, sc in next 24, (sc 4, inc) 3 times. (84 sts)
Rnd 7: Sc in next 24, (sc 5, inc) 3 times, sc in next 24, (sc 5, inc) 3 times. (90 sts)
Rnd 8: Sc in next 24, (sc 6, inc) 3 times, sc in next 24, (sc 6, inc) 3 times. (96 sts: 24 on each straight side and 24 on each curved end)
Checkpoint: the base measures 10 x 4 in (25.4 x 10.2 cm). Place a marker in the first and last st of one straight side. That side is the back.
Wall:
Rnd 9: Working in BLO, sc in each st around. (96 sts)
Rnds 10–14: Sc in each st around. (96 sts)
Join B and carry it through Rnd 26. The color pattern repeats every 12 sts, 8 times per rnd.
Rnds 15–18: (12 B) 8 times. (96 sts)
Rnds 19–22: (2 A, 8 B, 2 A) 8 times. (96 sts)
Rnds 23–26: (4 A, 4 B, 4 A) 8 times. (96 sts)
Cut B and continue with A.
Rnds 27–32: Sc in each st around. (96 sts)
Rnd 33: Loosely sl st in each st around. Fasten off.
Checkpoint: the wall is 6 in (15.2 cm) tall (24 rnds at 4 rnds per inch), with eight large yellow mountains around the basket.
Back Panel (Make 1)
Work flat in rows with A only.
Row 1: Ch 45. Sc in the 2nd ch from the hook and in each ch across. Turn. (44 sts)
Rows 2–56: Ch 1 (does not count as a st), sc in each st across. Turn. (44 sts)
Checkpoints: 11 in (27.9 cm) wide after Row 4 and 14 in (35.6 cm) tall after Row 56. Don’t fasten off. Put the live loop on a locking marker. Count rows from the bottom (Row 1), and count sts from the right edge of Row 56.
Hanging Straps (Make 2)
Row 1: With A, ch 33. Sc in the 2nd ch from the hook and in each ch across. Turn. (32 sts)
Rows 2–3: Ch 1, sc in each st across. Turn. (32 sts)
Fasten off, leaving a 12 in (30.5 cm) tail. Each strap measures 8 x 0.75 in (20.3 x 1.9 cm).
Make All Pieces
Before you start sewing, check that you have:
- Cups: 4, made with A and B
- Oval basket: 1, made with A and B
- Back panel: 1, A only
- Straps: 2, A only
Here’s where each piece goes on the panel, seen from the front. Rows are counted before the border.
Rows 43–56   [ empty top margin, 3.5 in / 8.9 cm ]
Rows 31–42   [ Cup ] [ Cup ] [ Cup ] [ Cup ]
Row 30       cup bases sewn here
Rows 27–29   [ gap, 0.75 in / 1.9 cm ]
Rows 3–26    [ ======= Oval Basket ======= ]
Row 2        basket base sewn here
Row 1        [ bottom edge ]
Joining
Use a yarn needle and a long strand of A. Whipstitch through both the container and one full st or row end of the panel. Pull each stitch snug but not tight, so the panel stays flat with no dimples.
Basket: Center the marked straight back section (24 sts) on panel sts 11–34, leaving 10 sts free on each side. Sew the 24 back base sts to the 24 sts of panel Row 2, one base st to one panel st. Next, sew a vertical line up the wall at each marker, from Rnd 9 to Rnd 32. Each wall rnd meets one panel row (Rows 3–26), so each line has 24 sewing stitches. Tack the rim to the panel at every 4th st along the back.
Cups: Center the cups on panel sts 6, 17, 28 and 39, so they are 11 sts (2.75 in / 7.0 cm) apart. Sew 4 back base sts of each cup along Row 30. Then sew two vertical lines through the back wall, 2 sts on either side of center (1 in / 2.5 cm apart), from Rnd 6 to Rnd 17. That’s 12 sewing stitches per line, one for each of panel Rows 31–42.
Size checkpoint: lay the panel flat. It should still measure 11 x 14 in (27.9 x 35.6 cm). If it has shrunk, your sewing is too tight, so loosen it and sew again.
Border
Border gauge: the same 16 sc = 4 in (10.2 cm). One sc per row end works along the sides because your row gauge matches your stitch gauge.
Rnd 1: With the live loop at the end of Row 56 and the right side facing, ch 1. Work 3 sc in the last st of Row 56 (corner). Down the side, sc in the ends of Rows 55 to 2 (54 sts). Along the foundation chain, 3 sc in the first ch (corner), sc in the next 42 ch, then 3 sc in the last ch (corner). Up the other side, sc in the ends of Rows 2 to 55 (54 sts). Across the top, 3 sc in the first st of Row 56 (corner), then sc in the next 42 sts. Join to the first sc. (204 sts)
Count check: 4 corners x 3 sts = 12, plus 2 x 42 = 84 on the top and bottom, plus 2 x 54 = 108 on the sides. 12 + 84 + 108 = 204.
Rnd 2 (eyelets): Ch 1. Sc in each st around, but in the center st of each 3-st corner, work (sc, ch 2, sc). Join and fasten off. (208 sc and 4 ch-2 eyelets)
Per side, counted between eyelets: the top and bottom have 46 sc each (1 + 1 + 42 + 1 + 1), and each side has 58 sc (1 + 1 + 54 + 1 + 1). 2 x 46 + 2 x 58 = 208.
Why the math works: 46 sc at 4 sts per inch is 11.5 in (29.2 cm). Each corner eyelet adds about 0.25 in (0.6 cm), which brings the width to 12 in (30.5 cm). In the same way, 58 sc = 14.5 in (36.8 cm), plus the corners, makes the sides 15 in (38.1 cm). The two border rnds add 0.5 in (1.3 cm) on each side.
Attach the straps and rings: Fold one strap around the dowel. Pass both ends through a wooden ring, fold them back 1 in (2.5 cm), and sew them flat with the tail. Thread a bead onto a 12 in (30.5 cm) strand of A and sew it just above the ring. Cut a 16 in (40.6 cm) strand of A and pass it through the ring and the top corner eyelet 3 times. Wrap the tails tightly around the bundle 6 times, knot, and hide the ends. Repeat on the other side.
Final Blocking
- Slide the dowel out of the straps.
- Mist the panel with water until it’s damp but not soaked.
- Pin the panel flat to 12 x 15 in (30.5 x 38.1 cm), with a pin through each eyelet.
- Stuff each cup and the basket with plastic bags or a folded towel so they dry in an even round or oval shape.
- Let everything dry completely, for at least 24 hours.
- Unpin, put the dowel back and hang.
Final Quality-Control Checklist
- The panel measures 12 x 15 in (30.5 x 38.1 cm).
- All four corner eyelets are open and even.
- The cups sit level, 11 sts apart, and are the same height.
- The basket is centered, with 1 in (2.5 cm) of panel showing on each side.
- No carried yellow shows through the green stitches.
- The mountains line up and the peaks point straight up.
- All ends are woven in on the back.
- The straps are the same length and the panel hangs level.
Troubleshooting
- Yellow peeks through the green: carry the unused strand on top of the stitches and keep the hook close to the back.
- Mountains lean to one side: joined tapestry rnds do this naturally. Block firmly, or turn your work every rnd for straighter peaks.
- Walls flare outward: your tension is too loose, or you missed a BLO rnd. Go down a hook size.
- Panel sides ripple: your rows are slightly taller than your stitches are wide. In border Rnd 1, skip 1 row end out of every 8, and remember your side count will change.
- Panel puckers behind a cup: the sewing is too tight, so loosen those stitches.
- Basket tips forward: add more rim tacks along the back.
Care
Spot clean, or hand wash in cool water. Roll it in a towel to press out the water and dry it flat with the containers stuffed. Do not tumble dry.

Final Notes
Everything in this project follows from one gauge: 16 sc and 16 rows per 4 in (10.2 cm). That gauge gives cups 2.4 in (6.1 cm) across and 3 in (7.6 cm) tall, and a 10 in (25.4 cm) basket with a 6 in (15.2 cm) wall. It also gives an 11 x 14 in (27.9 x 35.6 cm) panel where one row matches one container round, and a border that brings everything to 12 x 15 in (30.5 x 38.1 cm). Check each measurement as you go and the organizer will hang straight and keep its shape.
Happy crocheting!