
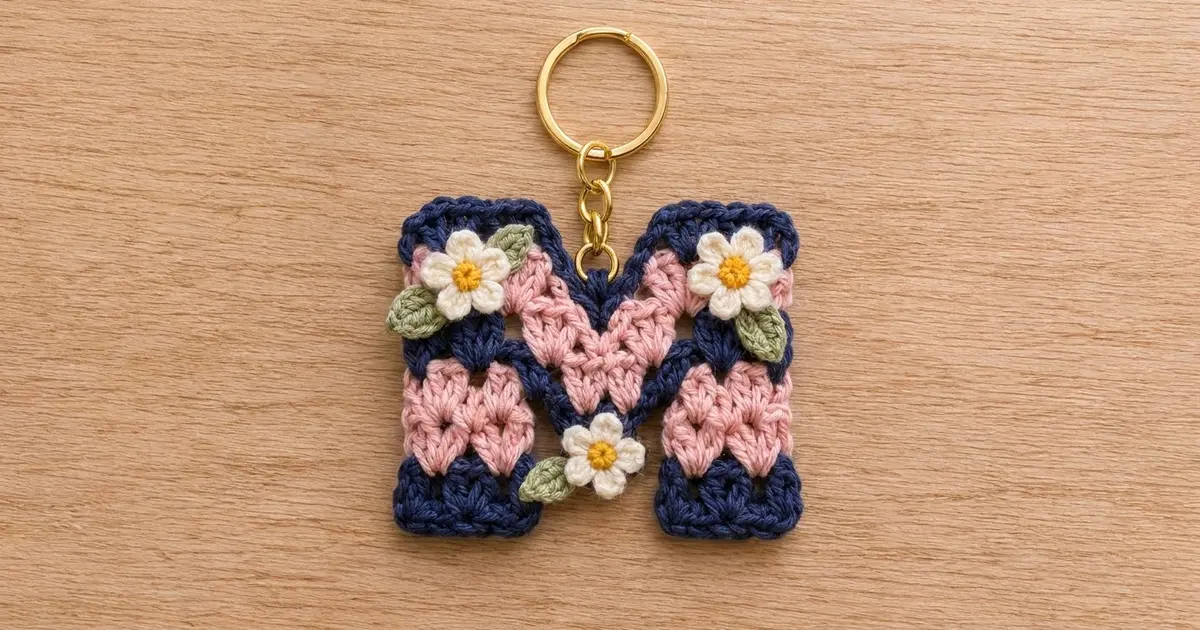
This little letter M is a quick, personal accessory. Rows of soft granny clusters stack into navy and pink stripes. A navy edge keeps the letter crisp, and three tiny cream daisies with sage leaves add a cottage-garden finish. Clip it to a tote, a backpack zipper, or your keys.
The palette is navy, dusty pink, cream, yellow, and sage. Navy frames the shape, pink fills the middle bands, and the flowers add light against the dark edge. The style is neat and slightly vintage, and the clusters give it texture.
This pattern uses US crochet terms. The finished keychain measures 3.25 in (8.3 cm) wide by 2.75 in (7.0 cm) tall, not counting the hardware.
Construction is simple. You work two short legs separately, then join them with a chain bridge in one long row. Three more rows build the center and the two shoulders. A single round of navy single crochet finishes the edge. Last, you sew on the flowers and leaves and attach the keyring.
Finished Size and Construction
- Finished size: 3.25 in (8.3 cm) wide x 2.75 in (7.0 cm) tall
- Skill level: Advanced beginner
- Terminology: US crochet terms
- Yarn weight: Sport weight (#2) cotton
- Hook: 2.5 mm
- Number of pieces: 1 letter piece, plus 3 small flowers and 4 leaves for decoration
- Layout: Single motif, no assembly grid
- Piece size before border: 3 in (7.6 cm) wide x 2.5 in (6.4 cm) tall
- Border depth: 0.125 in (0.3 cm) on every edge
Materials
Use a smooth mercerized or matte cotton in sport weight. Cotton holds the letter’s sharp corners and wears well on a keychain. Stay away from fuzzy or very stretchy yarns, because the clusters will blur and the letter will lose its shape.
Yarn:
- Navy: 6 g (18 m)
- Dusty pink: 4 g (12 m)
- Cream: 2 g (6 m)
- Yellow: 1 g (3 m)
- Sage green: 1 g (3 m)
All quantities include a margin for swatching and weaving in ends.
Tools:
- 2.5 mm crochet hook
- Tapestry needle
- Scissors
- Stitch markers (2)
- Gold split keyring, 1 in (2.5 cm) across, with a short attached chain
- One small gold jump ring and two pairs of flat-nose pliers
- Pins and a foam blocking mat
- Spray bottle with water
Abbreviations (US Terms)
- ch – chain
- sl st – slip stitch
- sc – single crochet
- hdc – half double crochet
- dc – double crochet
- sc2tog – single crochet 2 together
- sp – space
- sk – skip
- st(s) – stitch(es)
- tch – turning chain
- RS / WS – right side / wrong side
Special stitch – Group: 3 stitches worked together in the same chain-1 space, so they form one cluster. In this pattern a group is usually 3 dc. At the edges, a ch-3 turning chain plus 2 dc also counts as one group.
Stitch counting: Each dc, hdc, sc, and each ch-1 space counts as 1 stitch. A ch-3 turning chain counts as 1 dc. A ch-4 turning chain counts as 1 dc plus 1 ch-1 space (2 stitches).
Gauge and Checkpoints
The whole keychain is one piece. Make the first leg as your gauge test, then measure it before you go on.
Gauge: 23 sts and 8 rows in group pattern = 3 in (7.6 cm) wide x 2.5 in (6.4 cm) tall.
Checkpoints:
- After one leg (Row 4): 0.9 in (2.3 cm) wide x 1.25 in (3.2 cm) tall.
- After Row 6: 3 in (7.6 cm) wide x 1.9 in (4.8 cm) tall. The gap between the legs is 1.2 in (3.0 cm) wide.
- After Row 8: 3 in (7.6 cm) wide x 2.5 in (6.4 cm) tall at the shoulders.
- After the border: 3.25 in (8.3 cm) x 2.75 in (7.0 cm).
Leg too big? Go down to a 2.25 mm hook, or make your loops shorter as you pull up each dc.
Leg too small? Go up to a 2.75 mm hook.
A small difference won’t matter for one leg, but it adds up across the full letter. Fix it at checkpoint 1.
Pattern
Legs (Make 2)
Make the first leg (the left leg) and fasten off. Make the second leg (the right leg) the same way, but don’t fasten off. Follow the note at the end of Row 4.
Row 1 (RS, navy): Ch 9. Dc in 4th ch from hook (the skipped 3 ch count as 1 dc). Dc in next ch, ch 1, sk next ch, dc in last 3 ch. Turn. (6 dc + 1 ch-1 sp = 7 sts; 2 groups.)
Row 2 (WS, navy): Ch 4 (counts as dc + ch 1). 3 dc in next ch-1 sp, ch 1, dc in 3rd ch of tch. Change to pink on the last yarn-over. Turn. (7 sts: 1 dc, 1 ch-1 sp, 3 dc, 1 ch-1 sp, 1 dc.)
Row 3 (RS, pink): Ch 3 (counts as dc). 2 dc in first ch-1 sp, ch 1, 2 dc in next ch-1 sp, dc in 3rd ch of tch. Turn. (7 sts; 2 groups.)
Row 4 (WS, pink): Repeat Row 2 without changing color. (7 sts.)
- Left leg: Fasten off and leave a 6 in (15.2 cm) tail.
- Right leg: Change to navy on the last yarn-over of Row 4. Turn, but do not fasten off.
Checkpoint 1: each leg is 0.9 in (2.3 cm) x 1.25 in (3.2 cm).
Joining Row and Center
Lay both legs RS up, with the right leg on the right. Leave 1.2 in (3.0 cm) between them.
Row 5 (RS, navy):
- Right leg: Ch 3 (counts as dc). 2 dc in first ch-1 sp, ch 1, 2 dc in next ch-1 sp, dc in 3rd ch of tch. (7 sts.)
- Bridge: Ch 9. Keep the chain flat and untwisted.
- Left leg: Start at its top right corner. Dc in first dc, 2 dc in next ch-1 sp, ch 1, 2 dc in next ch-1 sp, dc in 3rd ch of tch. (7 sts.)
Turn.
Row 5 count: 7 + 9 + 7 = 23 sts. You have 4 groups on the legs and 9 bridge chains. In the group pattern, those 9 chains stand in for 1 sp + 3 + 1 sp + 3 + 1 sp.
Row 6 (WS, pink): Change to pink on the last yarn-over of Row 5, then turn.
- Ch 4 (counts as dc + ch 1).
- 3 dc in the leg’s ch-1 sp, ch 1.
- Count the bridge chains from the end nearest you. 3 dc in 1st bridge ch, ch 1, sk 3 ch.
- 3 dc in 5th ch, ch 1, sk 3 ch.
- 3 dc in 9th ch, ch 1.
- 3 dc in the other leg’s ch-1 sp, ch 1, dc in 3rd ch of tch.
Turn.
Row 6 count: 1 dc + 1 ch + (5 groups x 3 dc = 15) + 4 ch between groups + 1 ch + 1 dc = 23 sts. This row has 6 ch-1 spaces.
Checkpoint 2: 3 in (7.6 cm) wide x 1.9 in (4.8 cm) tall.
Row 7 (RS, pink, V-dip shaping): This row makes the pink stripe dip in the center. The stitches get shorter toward the middle, then taller again.
- Ch 3 (counts as dc), 2 dc in first ch-1 sp, ch 1. [Group 1]
- (Dc, hdc, sc) in next ch-1 sp, ch 1. [Group 2]
- 3 sc in next ch-1 sp, ch 1. [Group 3]
- 3 sc in next ch-1 sp, ch 1. [Group 4]
- (Sc, hdc, dc) in next ch-1 sp, ch 1. [Group 5]
- 2 dc in last ch-1 sp, dc in 3rd ch of tch. [Group 6]
Change to navy on the last yarn-over. Turn.
Row 7 count: 6 groups x 3 sts = 18 + 5 ch-1 sps = 23 sts. This is a shaping row, so the count stays at 23 and only the stitch heights change.
Place one marker in the ch-1 sp between Group 2 and Group 3. Place the other in the ch-1 sp between Group 4 and Group 5.
Shoulders
Row 8 (WS, navy), first shoulder:
- Ch 4 (counts as dc + ch 1).
- 3 dc in next ch-1 sp (between Groups 6 and 5), ch 1.
- Dc in the marked sp (between Groups 5 and 4).
Fasten off. (7 sts.)
Row 8, second shoulder: With WS facing, join navy in the other marked sp (between Groups 3 and 2).
- Ch 4 (counts as dc + ch 1).
- 3 dc in next ch-1 sp (between Groups 2 and 1), ch 1.
- Dc in 3rd ch of tch.
Fasten off. (7 sts.)
Check the math: 7 sts per shoulder. Seven Row 7 stitches stay unworked in the center (Group 3, 1 sp, Group 4). That gap forms the top notch.
Checkpoint 3: 3 in (7.6 cm) x 2.5 in (6.4 cm).
Border
Border gauge: Work 1 sc in each stitch along tops and bottoms. Work 2 sc along the side of each dc row. Work 1 sc in each chain along the bottom of the bridge. At each outer corner, ch 1.
With RS facing, join navy at the bottom right corner of the left leg, in the base of its last ch. Work the border round as follows.
- Left leg bottom: 7 sc, one in each foundation ch from the last ch back to the ch-3 base. Ch 1 (corner).
- Left outer side: 2 sc per row along Rows 1–8 = 16 sc. Ch 1 (corner).
- Left shoulder top: 7 sc. Ch 1 (corner).
- Notch, left side: 2 sc down the end of Row 8.
- Notch floor: 7 sc across Group 4, the center sp, and Group 3.
- Notch, right side: 2 sc up the end of Row 8. Ch 1 (corner).
- Right shoulder top: 7 sc. Ch 1 (corner).
- Right outer side: 16 sc down Rows 8–1. Ch 1 (corner).
- Right leg bottom: 7 sc. Ch 1 (corner).
- Right leg inner side: 8 sc up Rows 1–4.
- Bridge underside: 9 sc, one in each bridge ch.
- Left leg inner side: 8 sc down Rows 4–1. Ch 1 (corner).
Join with a sl st to the first sc and fasten off.
Border total: 7 + 16 + 7 + 2 + 7 + 2 + 7 + 16 + 7 + 8 + 9 + 8 = 96 sc, plus 8 ch-1 corners.
Why the math works:
- A sport-weight dc row is about as tall as 2 sc, so 2 sc per row end keeps the sides flat.
- Tops, bottoms, and the bridge get 1 sc per stitch, so those edges keep their original widths.
- The ch-1 at each outer corner lets the corner turn without curling.
- The 2 inner corners under the bridge and the 2 corners at the base of the notch have no ch-1. Their sc stay snug, so the inner corners stay sharp.
- The border adds 0.125 in (0.3 cm) on every side. That changes 3 in x 2.5 in (7.6 x 6.4 cm) into 3.25 in x 2.75 in (8.3 x 7.0 cm).
Daisies and Leaves
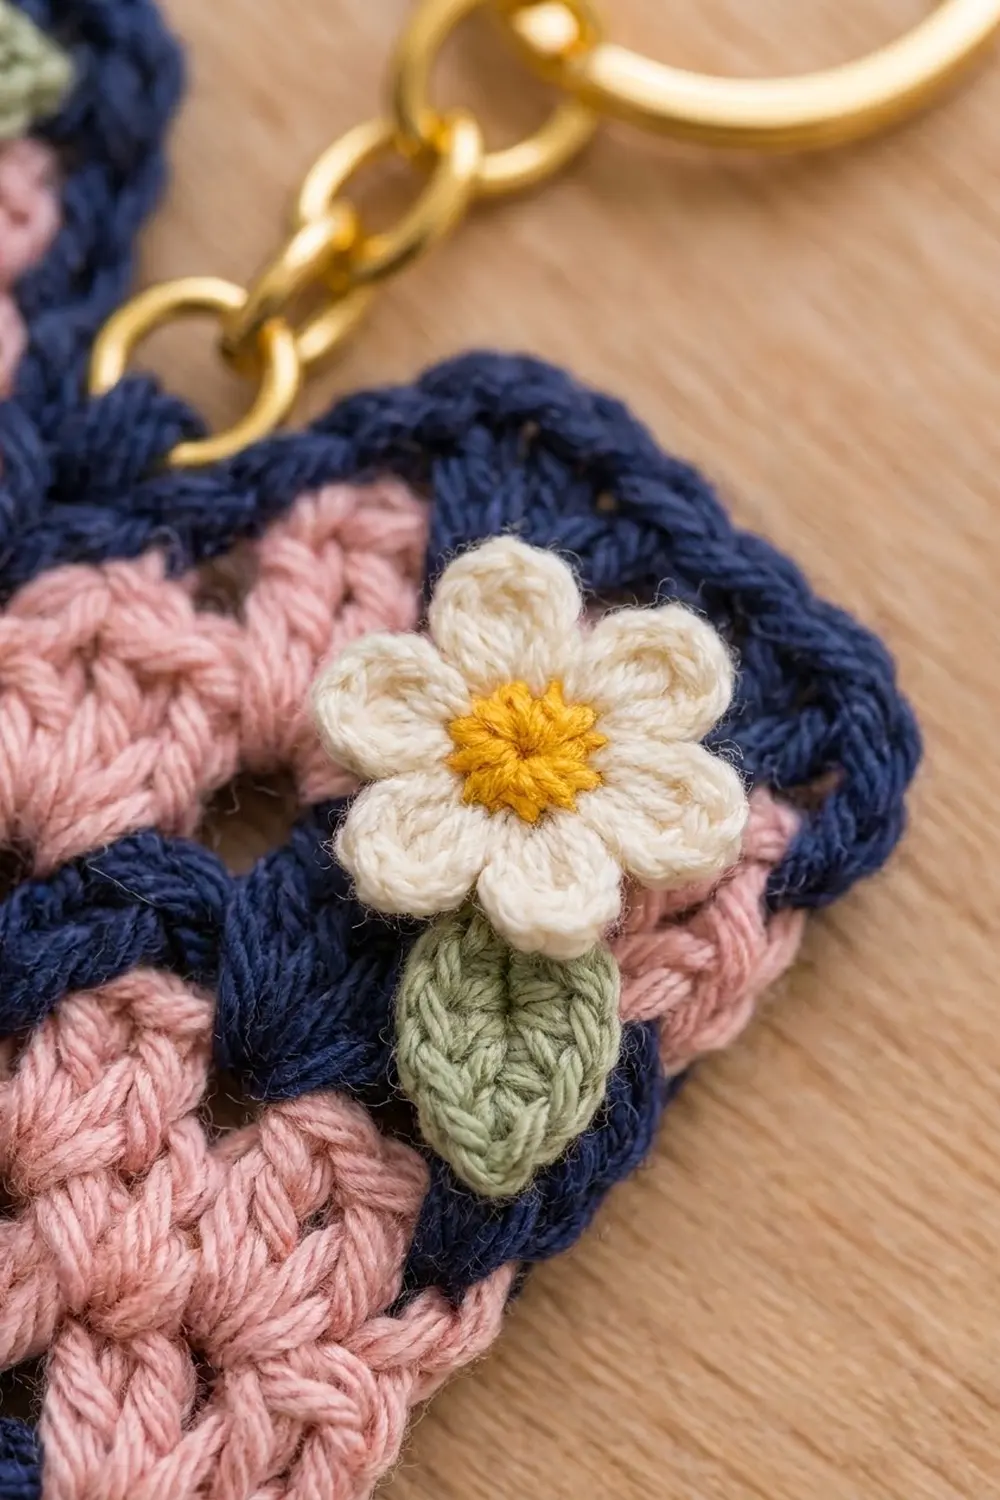
Flower center (make 3, yellow): Make a magic ring. Ch 1, then work 5 sc in the ring. Pull the ring closed and join with a sl st to the first sc. Fasten off. (5 sts.)
Petals (cream): Join cream in any sc. In each sc around, work (ch 2, dc, ch 2, sl st). (5 petals.) Fasten off and leave a 6 in (15.2 cm) tail for sewing.
Each flower measures about 0.6 in (1.5 cm) across.
Leaf (make 4, sage): Ch 5. Starting in the 2nd ch from hook, work sl st, sc, hdc, sc. Fasten off and leave a sewing tail. Each leaf is about 0.5 in (1.3 cm) long.
Placement:
- Flower 1: Center it on the left shoulder, half over the navy and half over the pink. Add one leaf to its outer left and one to its upper right.
- Flower 2: Center it on the right shoulder. Add one leaf below it, angled toward the outer edge.
- Flower 3: Place it low in the center, over the bridge area under the V-dip. Add one leaf to its left.
Sew each piece on with small stitches through the back loops of the clusters, so they don’t show on the back.
Keyring: Open the jump ring with the pliers. Thread it through the center sc of the notch floor, so it catches the sc above the Row 7 center sp. Link it to the bottom of the keyring chain and close it tightly.
Final Blocking
- Weave in all ends along stitches of the same color.
- Pin the letter RS up on the mat at 3.25 in (8.3 cm) x 2.75 in (7.0 cm).
- Pin each outer corner square. Pin the notch and the gap between the legs straight.
- Mist with water until the piece is damp, not soaked.
- Press the clusters flat with your fingertips.
- Let it dry completely before you sew on the flowers or attach the keyring.
Final Quality-Control Checklist
- Each leg has 7 sts per row and 4 rows.
- Rows 5 and 6 each have 23 sts.
- Row 7 dips evenly in the center and still has 23 sts.
- Each shoulder has 7 sts, and 7 sts stay unworked in the notch.
- The border has 96 sc plus 8 ch-1 corners.
- The piece measures 3.25 in (8.3 cm) x 2.75 in (7.0 cm).
- The flowers and leaves are sewn on securely.
- The jump ring is fully closed.
Troubleshooting
The legs flare at the bottom. Your foundation chain is too tight. Chain with a hook one size larger, then switch back.
The bridge sags or twists. Check that the 9 ch lie flat before you work Row 6. Keep the space between the legs at 1.2 in (3.0 cm).
The center V doesn’t show. Make sure Groups 3 and 4 in Row 7 are true sc, not hdc.
The border ruffles. Use 1 sc per row end on a few rows, or change to a smaller hook.
The border cups. Make sure you worked the ch-1 at every outer corner.
The flowers curl. Steam them lightly before sewing.
Care
Hand wash in cool water with mild soap, press out the water in a towel, and dry flat. Take off the metal keyring before washing so it doesn’t tarnish or snag the yarn.

Final Notes
Each measurement builds on the one before. A 7-stitch leg measures 0.9 in (2.3 cm). Two legs plus the 9-chain bridge give 23 stitches and 3 in (7.6 cm) of width. Eight rows reach 2.5 in (6.4 cm). The 0.125 in (0.3 cm) border brings the piece to 3.25 in x 2.75 in (8.3 x 7.0 cm). If the first leg matches gauge, the rest of the letter will follow.
Happy crocheting!