
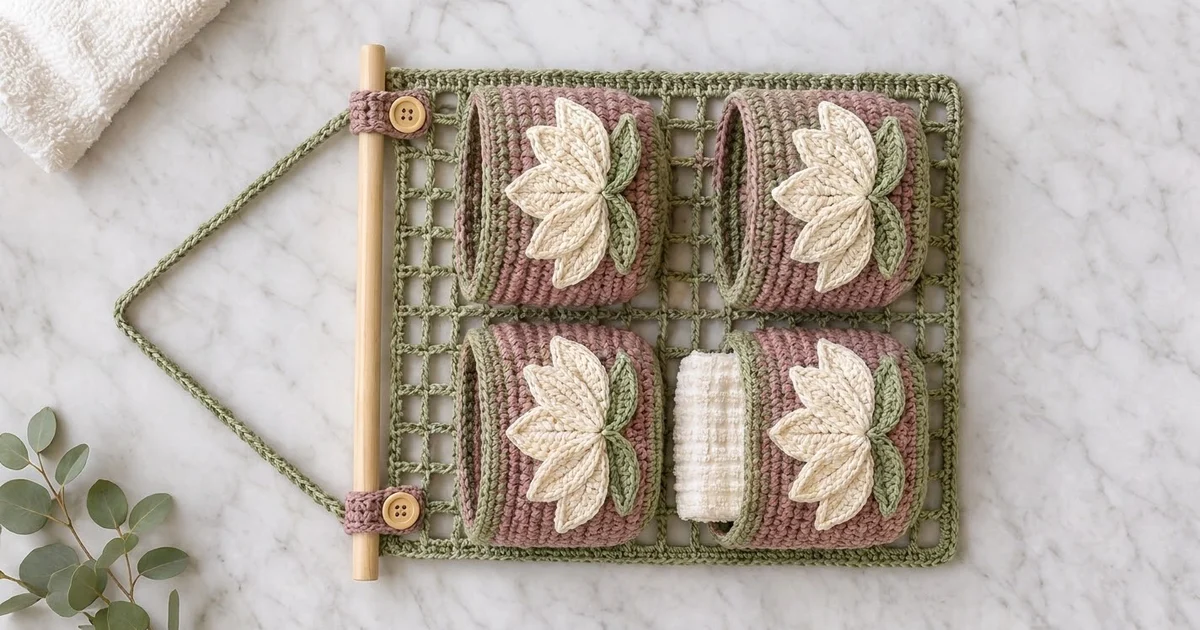
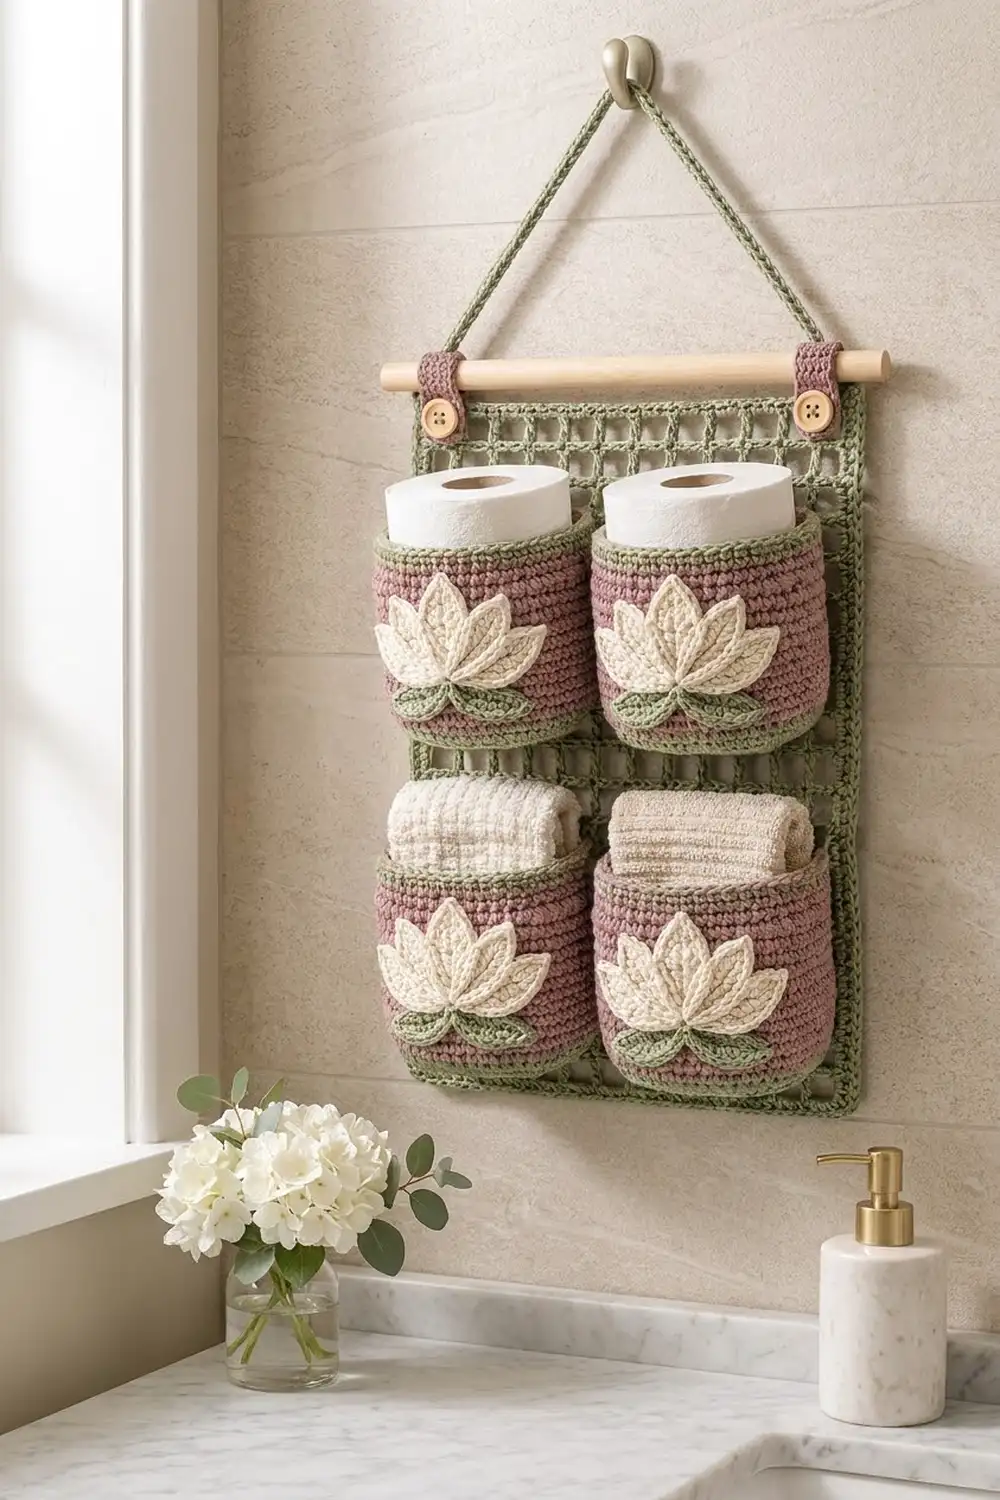
This wall organizer keeps spare toilet rolls and washcloths within reach and looks soft and calm while doing it. Four round pockets sit on an open sage-green mesh panel. Each pocket has a cream lotus with five layered petals and two small leaves.
The palette is dusty mauve, sage green and cream. The pockets are worked in firm single crochet, so they hold their shape. The back panel is a light filet mesh that lets the wall show through. A wooden dowel, two buttoned tabs and a slip-stitch cord finish the top.
This pattern uses US crochet terms. The finished panel measures 12.25 x 14.5 in (31.1 x 36.8 cm). Each pocket is 4.75 in (12.1 cm) across and 4.5 in (11.4 cm) tall, which fits a standard toilet roll.
Here’s the construction in brief. You crochet the mesh panel flat, then make four pockets from the base up in joined rounds. Next you make and layer the lotus petals and leaves, then sew them on. Last, you sew the pockets to the panel, add a 2-round border, and attach the tabs, dowel and cord.
Finished Size and Construction
- Finished size: 12.25 x 14.5 in (31.1 x 36.8 cm), not counting the dowel or cord
- Skill level: Intermediate
- Terminology: US
- Yarn weight: Worsted (#4) cotton
- Hook: 4.5 mm (US 7)
- Number of pieces: 1 panel, 4 pockets, 20 petals, 8 leaves, 2 tabs, 1 cord
- Layout: pockets in 2 columns x 2 rows
- Pocket size: 4.75 in (12.1 cm) diameter x 4.5 in (11.4 cm) tall
- Panel before border: 11.25 x 13.5 in (28.6 x 34.3 cm), 15 meshes x 18 rows
- Border depth: 0.5 in (1.3 cm) on each side
Materials
Use a smooth worsted-weight cotton or cotton blend, about 170 m per 100 g. Cotton keeps the pockets firm and copes well with bathroom humidity.
- Sage green: 200 g / 340 m (panel, border, pocket bases and rims, leaves, cord)
- Dusty mauve: 170 g / 289 m (pocket bodies, tabs)
- Cream: 30 g / 51 m (lotus petals)
These quantities include a margin of roughly 10%.
Tools:
– 4.5 mm (US 7) crochet hook
– Tapestry needle
– Stitch markers
– Two 0.75 in (1.9 cm) wooden buttons
– One wooden dowel, 14 in (35.6 cm) long and 0.5 in (1.3 cm) in diameter
– Rust-proof pins and a tape measure
Abbreviations (US Terms)
- ch – chain
- sl st – slip stitch
- sc – single crochet
- hdc – half double crochet
- dc – double crochet
- inc – 2 sc in the same stitch
- BLO – back loop only
- MR – magic ring
- sk – skip
- sp – space
- st(s) – stitch(es)
- rep – repeat
Special stitch – reverse sc (rev sc): Working from left to right (right-handers), insert the hook into the next stitch to the right, pull up a loop, yarn over and pull through both loops. This makes the rounded, corded rim.
Gauge and Checkpoints
- Sc gauge: 16 sc and 16 rounds = 4 in (10.2 cm)
- Mesh gauge: 4 meshes x 4 rows = 3 x 3 in (7.6 x 7.6 cm), so each mesh is 0.75 in (1.9 cm) square
Test one pocket first. It is the best gauge swatch for this project.
- Base checkpoint: after Rnd 10 the base measures 4.75 in (12.1 cm) across.
- Wall checkpoint: after Rnd 28 the wall measures 4.5 in (11.4 cm) tall.
- Panel checkpoint: after Row 4 the panel measures 11.25 in (28.6 cm) wide and 3 in (7.6 cm) tall.
- Lotus checkpoint: the layered lotus measures about 4.25 in (10.8 cm) wide and 2.75 in (7.0 cm) tall.
If your piece is too big, go down 0.5 mm in hook size. If it’s too small, go up 0.5 mm. If the mesh rows come out short, pull up the dc loops slightly taller instead of changing the hook.
Pocket (Make 4)
Work in joined rounds. Ch 1 at the start of each round doesn’t count as a stitch. Join each round with a sl st to the first sc. Keep the join line at the back of the pocket, because that side will be sewn to the panel.
Base (sage green)
- Rnd 1: MR, 6 sc in ring. (6)
- Rnd 2: Inc in each st around. (12)
- Rnd 3: (Sc 1, inc) 6 times. (18)
- Rnd 4: (Sc 2, inc) 6 times. (24)
- Rnd 5: (Sc 3, inc) 6 times. (30)
- Rnd 6: (Sc 4, inc) 6 times. (36)
- Rnd 7: (Sc 5, inc) 6 times. (42)
- Rnd 8: (Sc 6, inc) 6 times. (48)
- Rnd 9: (Sc 7, inc) 6 times. (54)
- Rnd 10: (Sc 8, inc) 6 times. (60)
The base should be 4.75 in (12.1 cm) across.
Walls
- Rnd 11: Sc in BLO of each st around. (60) This sets the wall upright and leaves a ring of free front loops at the bottom edge.
- Rnd 12: Sc in each st around. (60) On the last sl st, change to mauve.
- Rnds 13–25 (mauve): Sc in each st around. (60 each, 13 rounds) On the last sl st, change to sage.
- Rnds 26–27 (sage): Sc in each st around. (60 each)
- Rnd 28: Rev sc in each st around. (60) Fasten off.
The wall is Rnds 11–28, which is 18 rounds or 4.5 in (11.4 cm) tall. Weave in the ends on the inside.
Lotus Petals and Leaves
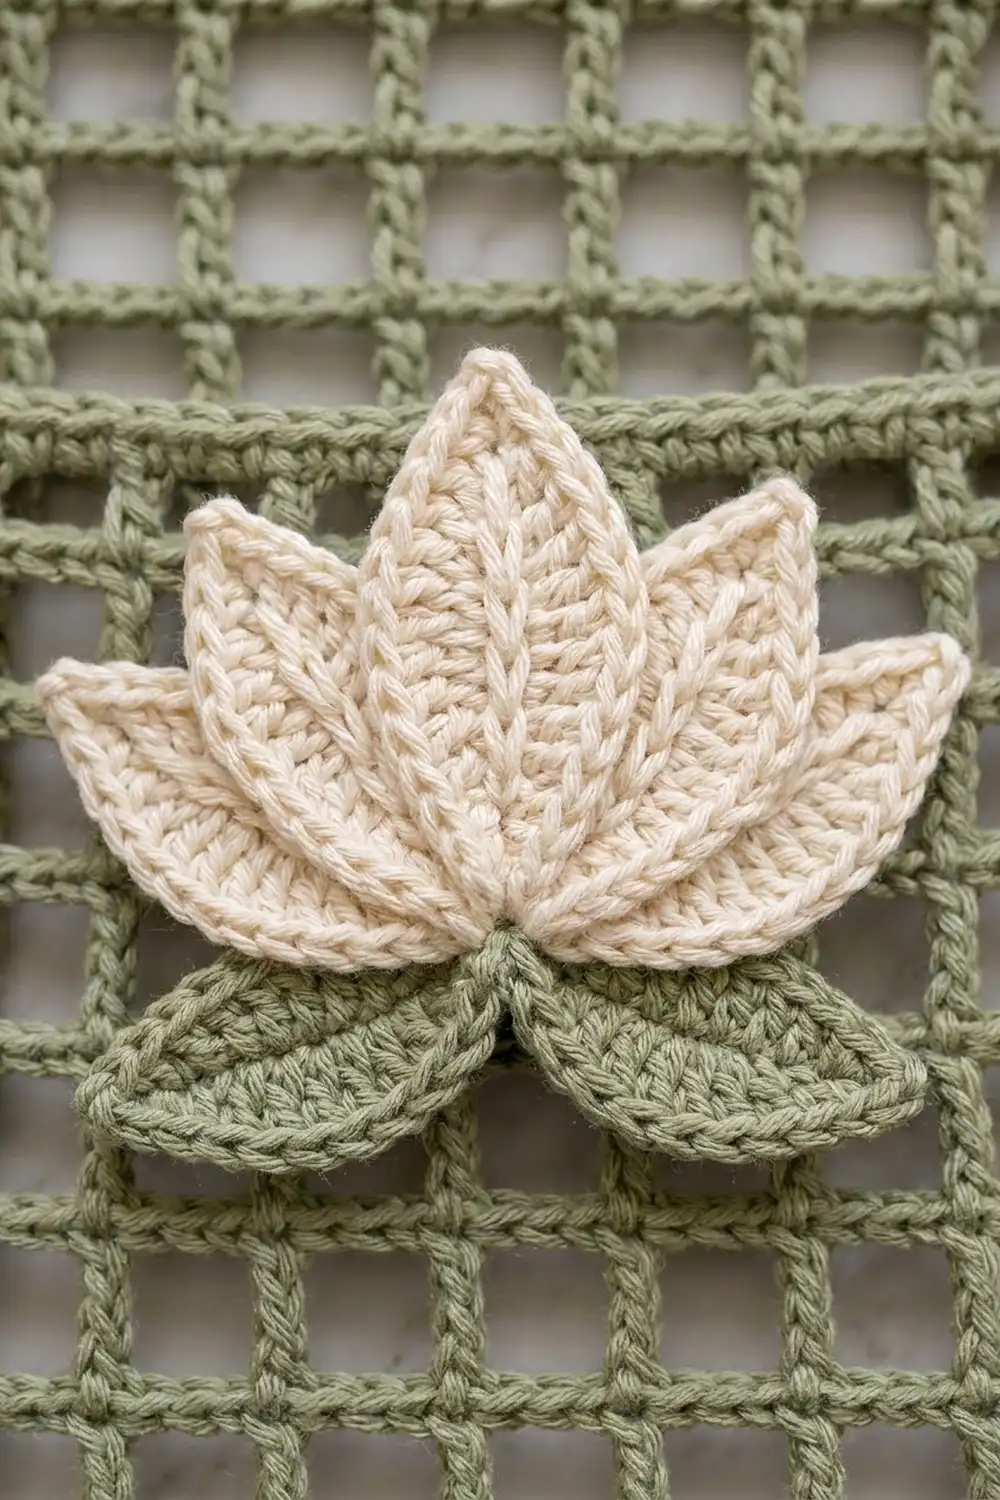
Each petal is worked around both sides of a foundation chain. The chain stays as a raised center vein, and the tip gets a small picot point.
Large petal (cream, make 1 per pocket):
– Ch 11.
– Working in the 2nd ch from hook (the tip): sl st, sc in next ch, hdc in next ch, dc in next 4 ch, hdc in next ch, sc in next ch, 3 sc in last ch (the base).
– Working along the other side of the chain: sc, hdc, dc in next 4, hdc, sc.
– In the tip ch: sc, ch 2, sl st in first ch.
– Sl st to the first sl st and fasten off.
– (21 sts plus picot; about 2.25 in / 5.7 cm long)
Medium petal (cream, make 2 per pocket):
– Ch 9.
– In the 2nd ch from hook: sl st, sc, hdc, dc in next 2, hdc, sc, 3 sc in last ch.
– Other side: sc, hdc, dc in next 2, hdc, sc.
– Finish the tip as for the large petal.
– (17 sts plus picot; about 1.75 in / 4.4 cm)
Small petal (cream, make 2 per pocket):
– Ch 7.
– In the 2nd ch from hook: sl st, sc, hdc, dc, hdc, 3 sc in last ch.
– Other side: hdc, dc, hdc, sc.
– Finish the tip as above.
– (13 sts plus picot; about 1.5 in / 3.8 cm)
Leaf (sage, make 2 per pocket): Work as for the medium petal. (17 sts plus picot)
Layering the lotus:
1. Bring all five petal bases to one point.
2. Lay the two small petals at the bottom, fanned out about 60° to the left and right.
3. Place the two medium petals over them at about 30°.
4. Set the large petal upright on top, in the center.
5. Tack the petals together at the base. Then tack each petal once at mid-length to the petal underneath.
6. Sew the two leaves under the base, pointing left and right with a slight downward angle.
Placing the lotus: Center the lotus on the side of the pocket opposite the join line. The bottom of the leaves should sit on Rnd 14, just above the green band. Whipstitch around each petal and leaf edge with matching yarn, leaving the picot tips free.
Panel Body (Sage Green)
- Foundation: Ch 50.
- Row 1: Dc in the 8th ch from hook. Ch 2, sk 2 ch, dc in next ch. Rep from * 13 more times.
- Count: 15 meshes, 16 dc posts (the skipped chains count as the first post). That is 46 sts: 16 posts + 15 ch-2 sps of 2 ch each.
- Row 2: Ch 5 (counts as dc + ch 2), turn. Dc in next dc. Ch 2, dc in next dc. Rep from * across, ending with dc in the 5th of the 7 skipped beginning chains. (15 meshes)
- Rows 3–18: Ch 5, turn. Dc in next dc. Ch 2, dc in next dc. Rep from * across, ending with dc in the 3rd ch of the turning ch-5. (15 meshes each row)
Don’t fasten off. Check the size: 11.25 x 13.5 in (28.6 x 34.3 cm). Set the panel aside with a stitch marker in the live loop.
Why the chain count works: 15 meshes x 3 chains + 5 = 50. The first 7 skipped chains make the first mesh’s top bar, the first post and the first skipped pair.
Tabs (Mauve, Make 2)
- Ch 6.
- Row 1: Sc in 2nd ch from hook and in each ch across. (5)
- Rows 2–10: Ch 1, turn, sc in each st. (5)
- Row 11: Ch 1, turn, sc 1, ch 2, sk 2, sc 2. (3 sc + ch-2 sp)
- Row 12: Ch 1, turn, sc 2, 2 sc in ch-2 sp, sc 1. (5)
- Row 13: Ch 1, turn, sc in each st. (5) Fasten off.
Each tab measures 1.25 x 3.25 in (3.2 x 8.3 cm).
Hanging Cord (Sage)
Ch 90. Sl st in the 2nd ch from hook and in each ch across. (89 sl sts) Fasten off, leaving 6 in (15.2 cm) tails. The cord is about 22 in (55.9 cm) long.
Make All Pieces
- Pockets: 4. Each uses sage for Rnds 1–12 and 26–28, and mauve for Rnds 13–25.
- Petals (cream): 4 large, 8 medium, 8 small
- Leaves (sage): 8
- Tabs (mauve): 2
- Panel and cord (sage): 1 each
Mesh layout, with columns counted from the left and rows counted from the top edge:
Rows    | Col 1  | Cols 2–7  | Col 8 | Cols 9–14 | Col 15
1–2     | open   | open      | open  | open      | open
3–8     | open   | POCKET A  | open  | POCKET B  | open
9–10    | open   | open      | open  | open      | open
11–16   | open   | POCKET C  | open  | POCKET D  | open
17–18   | open   | open      | open  | open      | open
Each pocket covers 6 meshes x 6 rows, which is 4.5 x 4.5 in (11.4 x 11.4 cm). That matches the 4.5 in (11.4 cm) wall height, and there’s one open mesh column at each edge and between the pockets.
Joining
Use the sage yarn and a whipstitch, working from the back of the panel. Turn each pocket so the lotus faces forward and the join line sits against the mesh.
Rim (stitch-to-stitch):
1. Count 19 sts of Rnd 27, centered on the join line.
2. Sew these 19 sts along the horizontal bar at the top of mesh row 3, from the post at the left of the pocket’s first column to the post at the right of its sixth column.
3. Use 3 rim sts per mesh: 1 into the post and 2 across the ch-2 bar. Add 1 more st for the final post.
4. Check the count: 6 x 3 + 1 = 19.
5. The other 41 sts bulge forward to form the round pocket front.
Base: Sew the matching 19 free front loops of Rnd 10 along the bar at the bottom of mesh row 8.
Sides: Whipstitch the wall to the two vertical posts at the pocket edges, from rim to base, over 6 mesh rows.
Tension: Pull each stitch just snug. If the mesh squares narrow or pucker, loosen the stitches. Each square should stay 0.75 in (1.9 cm).
Checkpoint: The panel still measures 11.25 x 13.5 in (28.6 x 34.3 cm). Each pocket front spans about 5 in (12.7 cm).
Border (Sage)
Border gauge: 4 sc per inch (2.5 cm) along every edge. The pockets are sewn inside the outer mesh columns and rows, so they don’t affect the border counts.
Rnd 1: Pick up the live loop, ch 1, and work around the panel:
– Top edge: 3 sc in the corner post. Then 2 sc in each of the 15 ch-2 sps and 1 sc in each of the 14 inner posts, for 44 sts. Finish with 3 sc in the other corner post.
– Sides: 3 sc around each of the 18 row-end posts. (54 sts)
– Bottom edge: Work into the foundation: 3 sc in the corner, 2 sc in each of the 15 skipped-chain sps, 1 sc at the base of each of the 14 inner posts (44 sts), then 3 sc in the other corner.
– Join with a sl st.
– Count per side, including the 2 corner center sts: top and bottom 48 each, left and right 58 each.
– Total: 2 x 48 + 2 x 58 − 4 shared corners = 208.
Rnd 2: Ch 1. Sc in each st, working 3 sc in each corner center st. Join and fasten off.
– Per side: top and bottom 50 each, left and right 60 each.
– Total: 2 x 50 + 2 x 60 − 4 = 216 (208 + 8 corner increases).
Why the math works:
– Each side edge is 18 rows x 0.75 in = 13.5 in, and 13.5 x 4 = 54 sts, which matches the side count exactly.
– The top and bottom edges are 11.25 in, and 11.25 x 4 = 45. The 46 sts on each edge (44 plus the outer sts of the corner groups) give just enough ease to keep the corners flat.
– Two rounds add 0.5 in (1.3 cm) per side. The panel becomes 12.25 x 14.5 in (31.1 x 36.8 cm).
Top hardware:
1. Sew 0.5 in (1.3 cm) of each tab’s Row 1 end to the back of the top border, centered over columns 2 and 14.
2. Slide the dowel through, fold each tab over it to the front, and mark where the buttonhole falls.
3. Sew a button there, on mesh row 1.
4. Button the tabs.
5. Tie the cord ends around the dowel just outside each tab.
Final Blocking
- Unbutton the tabs and remove the dowel.
- Fill each pocket with a rolled hand towel so the shape stays round.
- Pin the panel flat to 12.25 x 14.5 in (31.1 x 36.8 cm), and pin along each mesh line so the squares sit straight.
- Steam lightly from about 1 in (2.5 cm) away without touching the fabric. Mist the lotus petals and shape the tips with your fingers.
- Let everything dry completely, then unpin and refit the dowel.
Final Quality-Control Checklist
- [ ] Panel measures 12.25 x 14.5 in (31.1 x 36.8 cm)
- [ ] Every mesh is square at 0.75 in (1.9 cm)
- [ ] Each pocket base is 4.75 in (12.1 cm) and each wall is 4.5 in (11.4 cm)
- [ ] Border counts are 50 / 60 / 50 / 60 sts per side, 216 total
- [ ] Rim joins use exactly 19 sts per pocket
- [ ] Lotus layers are in order (small, medium, large) and the leaves sit on Rnd 14
- [ ] Join lines are hidden against the panel
- [ ] Buttons are secure and all ends are woven in
Troubleshooting
- Pocket base ruffles: Your increases are too tight compared with your rounds. Stagger the increase positions, or go down 0.5 mm in hook size for the base only.
- Pocket base cups up: Check that each round has exactly 6 increases.
- Mesh leans: Work the last dc of each row into the turning chain, not into the last ch-2 sp.
- Petals curl: Steam-block them before sewing.
- Pocket sags forward: Add a tack stitch at the center back halfway up the wall.
- Border ripples: Change to 2 sc per row-end on the sides only. Then recount and keep the totals even on opposite sides.
Care
Hand wash cold and lay flat to dry, with the pockets stuffed so they keep their shape. Remove the dowel and buttons before washing.
Final Notes
Everything is built on one measurement chain:
– 16 sc = 4 in (10.2 cm) gives a 60-stitch pocket that is 4.75 in (12.1 cm) across and an 18-round wall that is 4.5 in (11.4 cm) tall.
– The 0.75 in (1.9 cm) mesh fits each pocket into exactly 6 x 6 meshes.
– The 15 x 18 mesh panel measures 11.25 x 13.5 in (28.6 x 34.3 cm), and the 0.5 in (1.3 cm) border brings it to 12.25 x 14.5 in (31.1 x 36.8 cm).
If you check gauge on the first pocket, the rest of the project will fit together. Happy crocheting!