
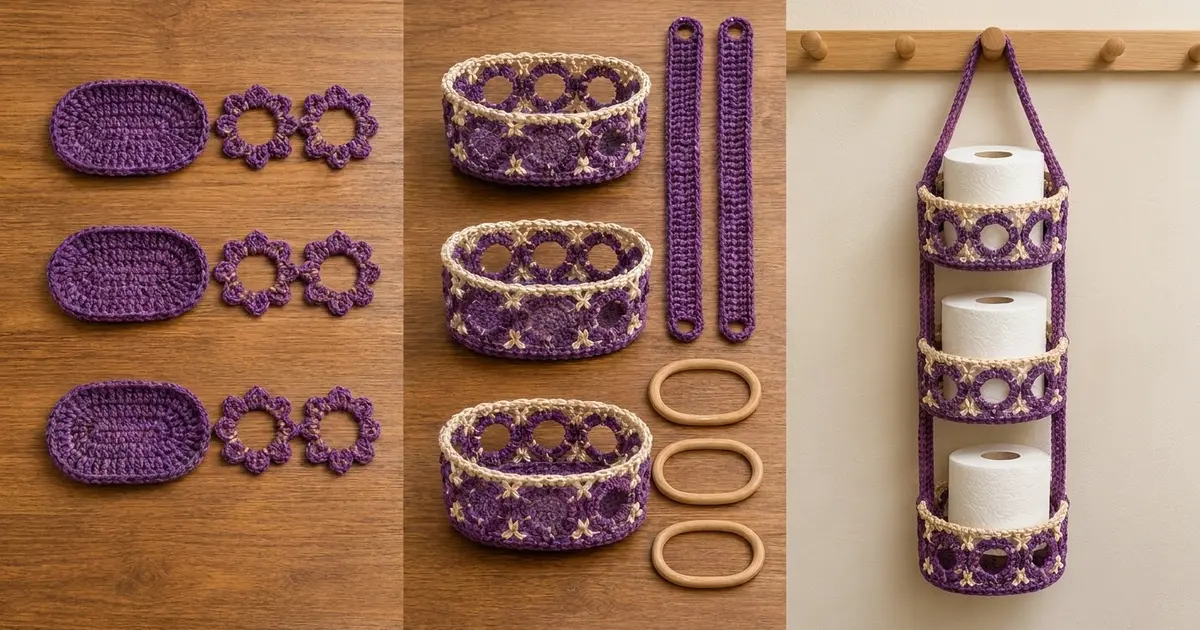
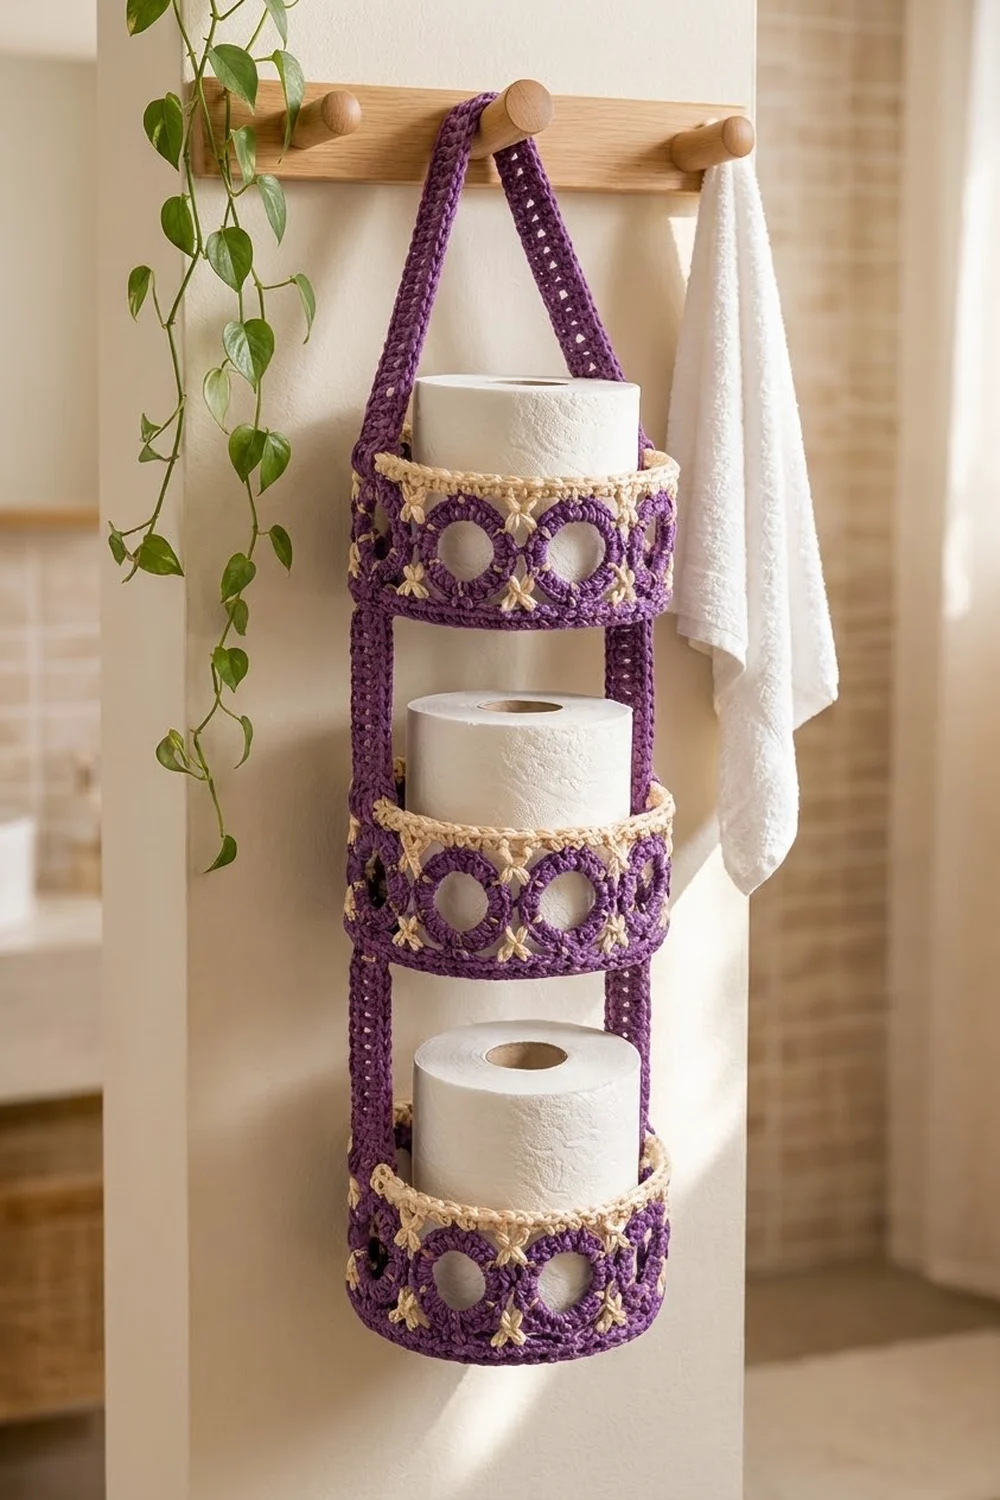
The Violet Ring Tower is a hanging toilet paper holder with three oval baskets stacked on two long straps. It hangs from a single wall peg. Each basket has a solid purple base, a round of cream crossed stitches, a band of open purple rings with scalloped edges, and a corded cream rim.
The palette is heathered violet with a warm cream accent, so it works in a plain bathroom or a boho one. The open rings keep each basket light and let you see how many rolls are left.
This pattern uses US crochet terms. Each basket is 7.5 in (19.1 cm) long, 5 in (12.7 cm) wide and 4.25 in (10.8 cm) tall. The assembled holder hangs about 25 in (63.5 cm) from peg to bottom.
You work each basket base in oval rounds and turn up the wall with a back-loop round. Then you make a strip of eight ring motifs, joined as you go into a closed band, and crochet it onto the wall. A cream rim finishes the top. Two straps with an eyelet at each end are sewn to the curved ends of all three baskets and meet at the peg.
Finished Size and Construction
- Basket size: 7.5 x 5 in (19.1 x 12.7 cm) base, 4.25 in (10.8 cm) tall
- Overall hanging length: about 25 in (63.5 cm)
- Skill level: Intermediate
- Terminology: US
- Yarn weight: Worsted (#4) cotton
- Hook: US 7 (4.5 mm)
- Number of pieces: 29 (3 baskets, 24 ring motifs, 2 straps)
- Layout: 3 baskets stacked vertically, 2.75 in (7.0 cm) apart
- Ring motif size: 2.5 in (6.4 cm) tip to tip
- Basket height before rim: 3.5 in (8.9 cm)
- Rim depth: 0.75 in (1.9 cm), 3 rounds
Materials
Use worsted-weight cotton or a cotton blend. It holds its shape under the weight of the rolls and copes with bathroom humidity. Avoid stretchy acrylic, which lets the baskets sag over time.
- Purple (Color A): 250 g / 480 m
- Cream (Color B): 60 g / 115 m
- US 7 (4.5 mm) crochet hook
- Tapestry needle
- 4 stitch markers
- Scissors and tape measure
- Optional: 3 oval wooden or plastic rings, about 7.5 x 5 in (19.1 x 12.7 cm), to stiffen the rims
The quantities include a margin of about 15% for gauge differences and sewing.
Abbreviations (US Terms)
- ch – chain
- sl st – slip stitch
- sc – single crochet
- dc – double crochet
- BLO – back loop only
- rev sc – reverse single crochet (crab stitch)
- inc – 2 sc in the same stitch
- sp – space
- st(s) – stitch(es)
- rep – repeat
Crossed dc pair: Skip the next st and dc in the following st. Then, working in front of the dc you just made, dc in the skipped st. This makes 2 sts that form an X.
Sc-join: Insert the hook through the center dc of the stated petal, then into the next wall stitch. Complete one sc through both layers.
Reverse sc: Working from left to right (right-handed), insert the hook into the next stitch to the right, pull up a loop, yo and draw through both loops.
Gauge and Checkpoints
Gauge: 16 sc and 16 rounds = 4 in (10.2 cm) in sc. So 4 sc = 1 in (2.5 cm) and 4 rounds = 1 in (2.5 cm).
Before committing to all three baskets, make one ring motif and one base first.
- Ring motif: 2.5 in (6.4 cm) tip to tip, with a center opening of about 1.25 in (3.2 cm).
- Base after Rnd 5: 5 x 2.5 in (12.7 x 6.4 cm), 50 sts.
- Base after Rnd 10: 7.5 x 5 in (19.1 x 12.7 cm), 80 sts.
- Wall before rim: 3.5 in (8.9 cm) tall.
If your base is too big, go down one hook size. If it is too small, go up one size. Use the same hook for the rings, because the ring band has to match the 80-stitch wall.
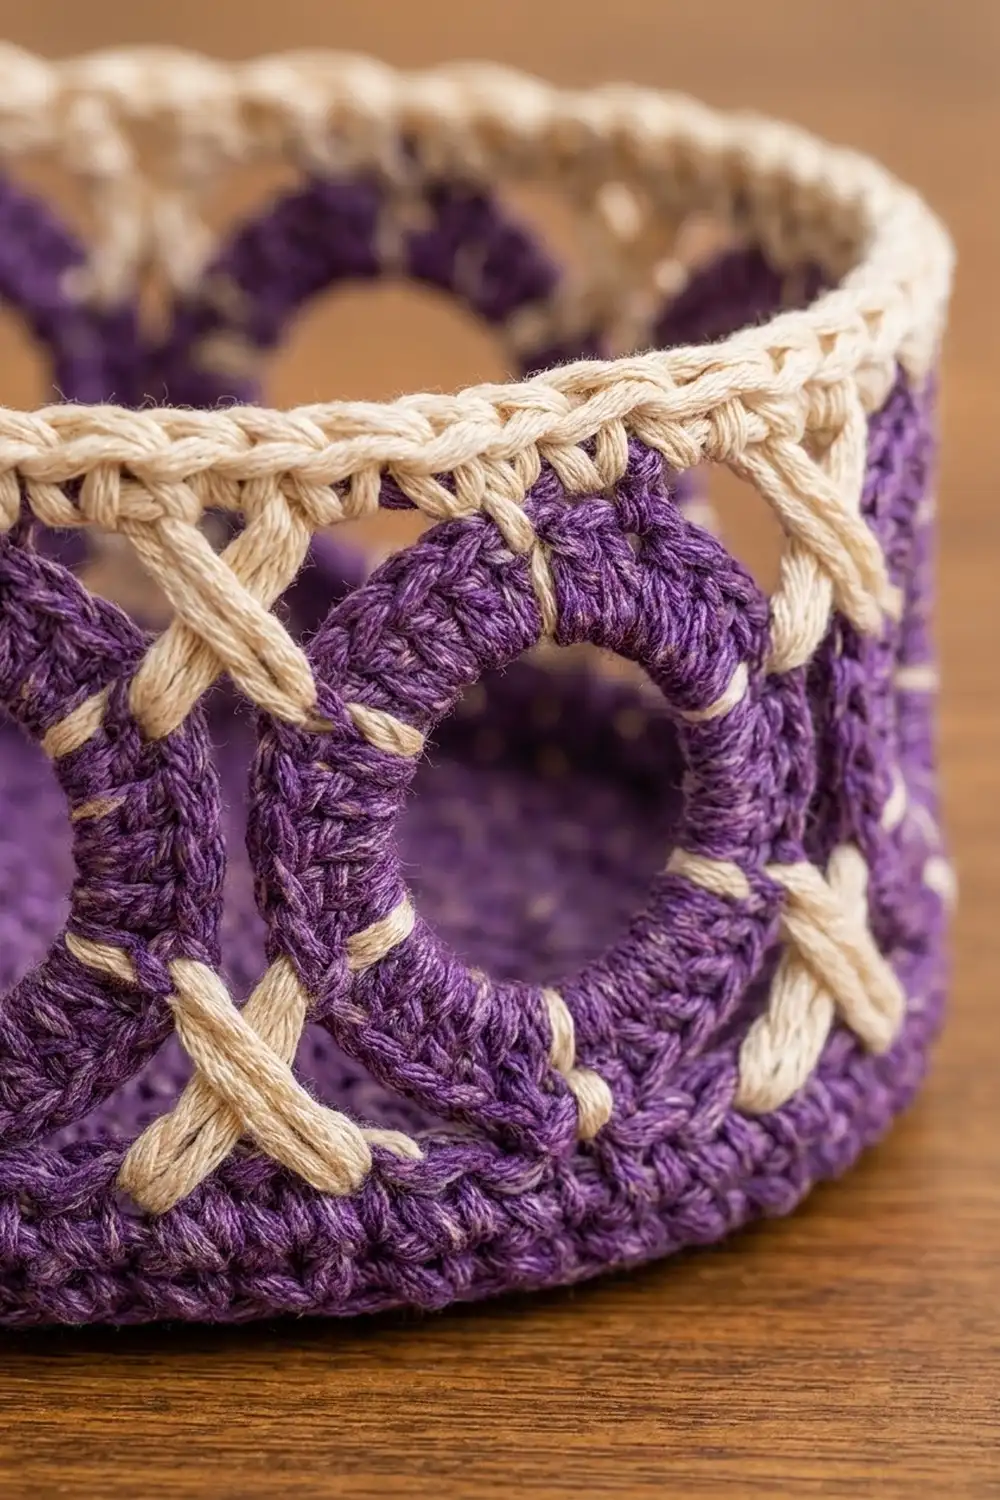
Basket Base and Lower Wall (Make 3)
Use Color A. Join each round with a sl st to the first st. The ch 1 at the start of each round does not count as a stitch, and the first st of each round goes into the same st as the join.
Rnd 1: Ch 13. Work 3 sc in the 2nd ch from the hook, sc in the next 10 ch, then 3 sc in the last ch. Rotate and work along the underside of the chain: sc in the next 10 ch. Join. (26 sts)
Each round now has two curved ends and two straight sides of 10 sts. Every round adds 3 increases to each end.
Rnd 2: Ch 1. Inc in each of the next 3 sts, sc in the next 10 sts; rep from * once. Join. (32 sts)
Rnd 3: Ch 1. [Sc in the next st, inc] 3 times, sc in the next 10 sts; rep from * once. Join. (38 sts)
Rnds 4–10: Ch 1. [Sc in the next (Rnd number minus 2) sts, inc] 3 times, sc in the next 10 sts; rep from * once. Join.
Stitch counts are Rnd 4: 44, Rnd 5: 50, Rnd 6: 56, Rnd 7: 62, Rnd 8: 68, Rnd 9: 74, Rnd 10: 80 sts. In Rnd 10 each end holds 30 sts and each side holds 10 sts.
Checkpoint: 7.5 x 5 in (19.1 x 12.7 cm). Place markers in the 16th and 56th sts of Rnd 10. These mark the centers of the two curved ends, and the straps will sit over them. Move the markers up as you work.
Rnd 11 (turning round): Ch 1, sc BLO in each st around. Join. (80 sts) The wall turns up here.
Rnd 12: Ch 1, sc in each st around. Join. (80 sts) Fasten off Color A.
Rnd 13 (cream crossed round): Join Color B in any st. Ch 3 (does not count as a stitch). Work 40 crossed dc pairs around. Join with a sl st to the top of the first dc. (80 sts: 40 X shapes) Do not fasten off.
The lower wall now measures 1 in (2.5 cm) from the base fold. Set the basket aside with the cream loop on a stitch marker.
Ring Motif (Make 24)
Use Color A.
Rnd 1: Ch 16 and join with a sl st to form a ring. Ch 1, then work 32 sc into the ring, covering the chain. Join. (32 sc)
Rnd 2 (petals): Skip the next st, 5 dc in the next st, skip the next st, sl st in the next st; rep from * 7 more times. The last sl st lands in the join. (8 petals, 5 dc each)
The 3rd dc of each petal is its center dc. Number the petals 1–8 clockwise. Petal 1 is the first petal joined, and petal 5 is directly opposite it.
Checkpoint: 2.5 in (6.4 cm) tip to tip, with a 1.25 in (3.2 cm) opening.
Ring Band (Make 3 bands of 8 rings)
Make Ring 1 complete. For Rings 2–8, work Rnd 2 until you reach petal 1. Work 2 dc, sl st into the center dc of petal 5 on the previous ring, then work the remaining 3 dc of the petal.
On Ring 8, also join petal 5 to the center dc of petal 1 on Ring 1, in the same way. This closes the band into a loop of 8 rings.
On every ring, petals 2, 3 and 4 face up and petals 6, 7 and 8 face down.
Checkpoint: Lay the band flat as a doubled strip. Each half measures 10 in (25.4 cm), so the full loop is 20 in (50.8 cm). That matches 80 sts at 4 sts per inch.
Strap (Make 2)
Use Color A.
Row 1: Ch 7. Sc in the 2nd ch from the hook and in each remaining ch. Turn. (6 sc)
Row 2: Ch 1, sc in each st. Turn. (6 sc)
Row 3 (eyelet): Ch 1, sc in the next 2 sts, ch 2, skip 2 sts, sc in the next 2 sts. Turn. (4 sc + ch-2 sp)
Row 4: Ch 1, sc in the next 2 sts, 2 sc in the ch-2 sp, sc in the next 2 sts. Turn. (6 sc)
Rows 5–108: Ch 1, sc in each st. Turn. (6 sc)
Rows 109–110: Work the same as Rows 3–4.
Rows 111–112: Work the same as Row 2. Fasten off.
Checkpoint: 1.5 x 28 in (3.8 x 71.1 cm).
Make All Pieces
- Color A: 3 bases with lower walls (Rnds 1–12), 24 ring motifs (3 bands of 8), 2 straps
- Color B: Rnd 13 on each basket, plus the joining round and rim (worked later)
Strap row layout, from the bottom up:
Rows 82–112  hanging leg (top eyelet in Rows 109–110)
Rows 65–81   TOP BASKET     (4.25 in / 10.8 cm)
Rows 54–64   gap            (2.75 in / 7.0 cm)
Rows 37–53   MIDDLE BASKET  (4.25 in / 10.8 cm)
Rows 26–36   gap            (2.75 in / 7.0 cm)
Rows 9–25    BOTTOM BASKET  (4.25 in / 10.8 cm)
Rows 1–8     tab folded under base (2 in / 5.1 cm)
The rows add up as 8 + 17 + 11 + 17 + 11 + 17 + 31 = 112.
Joining
Part 1: Ring band to wall (Rnd 14)
Put the cream loop from Rnd 13 back on the hook. Sl st across to the st above the first marker, at the center of a curved end. Position the band so that the joined petals between two rings sit at this marker.
Rnd 14: Ch 1. Sc in the next 2 sts, sc-join the first lower petal of the next ring. Sc in the next 2 sts, sc-join the second lower petal. Sc in the next 2 sts, sc-join the third lower petal. Sc in the next st; rep from * 7 more times. Join. (80 sts: 10 per ring)
Work the lower petals in the order you meet them. Each 10-st section holds exactly one ring.
The second marker falls at st 41 of this round, the start of the 5th section, so a ring seam sits over each strap position. Keep the tension even. If the sc-joins are pulled tight, the rings tilt inward.
Checkpoint: The wall is 3.5 in (8.9 cm) tall to the tops of the rings.
Part 2: Straps to baskets (after the rim)
Finish the rim on all three baskets first. Then lay the straps out using the row layout above.
Center each strap over a marked end. Fold rows 1–8 under the bottom basket’s base and whipstitch them flat. With Color A, whipstitch both long edges of the strap to the wall. Work one stitch per strap row, from the base fold to the top of the rim, so 17 rows cover the 4.25 in (10.8 cm) basket.
Leave 11 rows free for each gap. Repeat for the middle and top baskets. Bring both hanging legs together and stack the top eyelets. Tension should be snug but flat. If the strap ripples, you are taking too many wall stitches per row.
Size checkpoint: About 18.25 in (46.4 cm) from the bottom of the lowest base to the top rim. With the legs meeting at the peg, the total is about 25 in (63.5 cm).
Border (Cream Rim)
Border gauge: 4 sts = 1 in (2.5 cm), the same as the base. Each basket half (front or back, between the strap centers) carries 4 rings, which is 40 sts or 10 in (25.4 cm).
Continue with Color B from Rnd 14. Sl st up to the first upper petal.
Rnd 15: Ch 1. Sc in the center dc of petal 2, ch 2, sc in the center dc of petal 3, ch 2, sc in the center dc of petal 4, ch 3; rep from * on every ring. Join. (3 sc + 7 ch = 10 per ring; 40 per side; 80 total)
Rnd 16: Ch 1. Work 1 sc in each sc, 2 sc in each ch-2 sp and 3 sc in each ch-3 sp. If you are using a stiffener ring, hold it against the top edge and work every sc over it. Join. (10 per ring; 40 per side; 80 total)
Rnd 17: Ch 1, rev sc in each st around. Join and fasten off. (80 sts)
Why the math works: The base ends at 80 sts, the wall stays at 80, and 8 rings at 2.5 in (6.4 cm) each make 20 in (50.8 cm). That is also 80 sts at 0.25 in (0.6 cm) each. The joining round and every rim round give each ring exactly 10 sts, so nothing gathers or flares.
Final Blocking
- Weave in all ends along stitches of the same color.
- Wet each basket and press out the excess water in a towel.
- Stuff each basket firmly with a towel or a toilet roll wrapped in plastic so the walls stand straight.
- Pin each ring flat so the petals spread evenly.
- Hang the straps with a light weight at the bottom so they dry straight.
- Let everything dry completely, then assemble or re-check the strap seams.
Final Quality-Control Checklist
- Each base measures 7.5 x 5 in (19.1 x 12.7 cm) and lies flat.
- All wall and rim rounds count 80 sts.
- Every ring is 2.5 in (6.4 cm) across with 8 even petals.
- Ring seams sit over both strap positions.
- Each strap is 28 in (71.1 cm) long with eyelets aligned.
- The gaps between baskets are 2.75 in (7.0 cm) on both straps.
- The baskets hang level when empty and when loaded.
Troubleshooting
- Base cups: Your increases are too tight. Go up a hook size or loosen the 2-sc stitches.
- Base ruffles: Stagger the increases more evenly, or check that each straight side has 10 sts.
- Ring band too long for the wall: The rings are oversized. Remake them with a tighter Rnd 1.
- Rim flares: Recount Rnd 16. Each ring needs exactly 10 sts.
- Basket tilts: One strap gap is longer than the other. Unpick it and recount the rows.
- Rings lean inward: Loosen the sc-joins in Rnd 14.
Care
Hand wash in cool water and reshape while damp. Dry flat, or hang it empty so it holds its shape.
Final Notes
The measurement chain is simple. A 7.5 x 5 in (19.1 x 12.7 cm) base gives 80 sts. The 80-st wall holds 8 rings at 2.5 in (6.4 cm), which is 20 in (50.8 cm) around. The rim adds 10 sts per ring, and each basket finishes 4.25 in (10.8 cm) tall. Two 28 in (71.1 cm) straps spaced at 17 rows per basket and 11 rows per gap bring the holder to about 25 in (63.5 cm).
Check each stage before moving on and the assembly will come out even. Happy crocheting!