

The Lotus Tier holder is a slim three-tier organizer that hangs on a wall hook and stores three spare toilet rolls. Each roll sits in a small round basket with a rim of pointed lotus petals. An open diamond mesh holds the three baskets in a column and narrows at the top into a band that wraps around a wooden ring.
The sample is in soft sage green, and a second holder in lavender shows how well the design works in pastels. Use one solid color for each holder. The mesh and baskets look best when they match exactly.
This pattern uses US crochet terms. The finished holder is about 9.5 in (24.1 cm) wide across the bordered mesh and about 26.5 in (67.3 cm) long from the top of the ring to the bottom edge. Each basket is 4.75 in (12.1 cm) across and 3.25 in (8.3 cm) tall at the petal tips.
You will make three baskets in the round and one mesh panel in rows. Then you sew the baskets to the panel, add a narrow border to the panel edges, and fold the top strap over the ring.
Finished Size and Construction
- Finished size: 9.5 in × 26.5 in (24.1 cm × 67.3 cm), ring included
- Skill level: Intermediate
- Terminology: US
- Yarn weight: Worsted (#4) cotton
- Hook: 4.0 mm (G-6)
- Number of pieces: 4 (3 baskets, 1 mesh panel) plus a wooden ring
- Layout: baskets stacked vertically on the panel, 7 in (17.8 cm) apart from one base to the next
- Piece size: basket 4.75 in (12.1 cm) across × 3.25 in (8.3 cm) tall; mesh panel 9 in × 23 in (22.9 cm × 58.4 cm), plus a 2 in (5.1 cm) strap
- Size before border: 9 in × 23 in (22.9 cm × 58.4 cm)
- Border depth: 0.25 in (0.6 cm)
Materials
Choose a smooth, firm cotton or cotton blend. Cotton keeps the baskets upright and holds the petal points crisply. Avoid acrylics that stretch, because the mesh will sag under the weight of the rolls.
- Sage Green (sample): 130 g / about 230 m
- Lavender (optional second holder): 130 g / about 230 m
- 4.0 mm (G-6) crochet hook
- Wooden ring, 2.5 in (6.4 cm) outer diameter
- Tapestry needle
- 4 locking stitch markers
- Measuring tape
- Spray bottle and blocking pins
These quantities include a margin of about 25% for your gauge swatch and for differences in tension.
Abbreviations (US Terms)
- ch – chain
- sl st – slip stitch
- sc – single crochet
- dc – double crochet
- BLO – back loop only
- inc – 2 sc in the same stitch
- sp – space
- st(s) – stitch(es)
- rep – repeat
Special stitch – Petal Shell: 7 dc in the same stitch.
Gauge and Checkpoints
Solid gauge: 16 sc × 18 rows = 4 in (10.2 cm) in sc. That works out to 4 sc and 4.5 rows per inch.
Mesh gauge: 9 ch-5 loops = 9 in (22.9 cm) wide, and 2 mesh rows = 1 in (2.5 cm) tall, measured lightly stretched.
Make one basket before anything else, because it is the best gauge test. Check these measurements:
- After Rnd 5: base diameter 2.4 in (6.1 cm)
- After Rnd 10: base diameter 4.75 in (12.1 cm)
- After Rnd 19: wall height 2 in (5.1 cm) above the base ridge
- Finished basket: 3.25 in (8.3 cm) tall at the petal tips
On the mesh panel, check the width after Row 4. It should be 9 in (22.9 cm). After Row 8 the panel should be 4 in (10.2 cm) tall.
If your base is too big, go down half a hook size. If it is too small, or a standard roll (about 4.5 in / 11.4 cm across) will not sit inside, go up half a hook size. If the mesh comes out too long, keep the same hook and chain 4 loops instead of 5 throughout the panel.
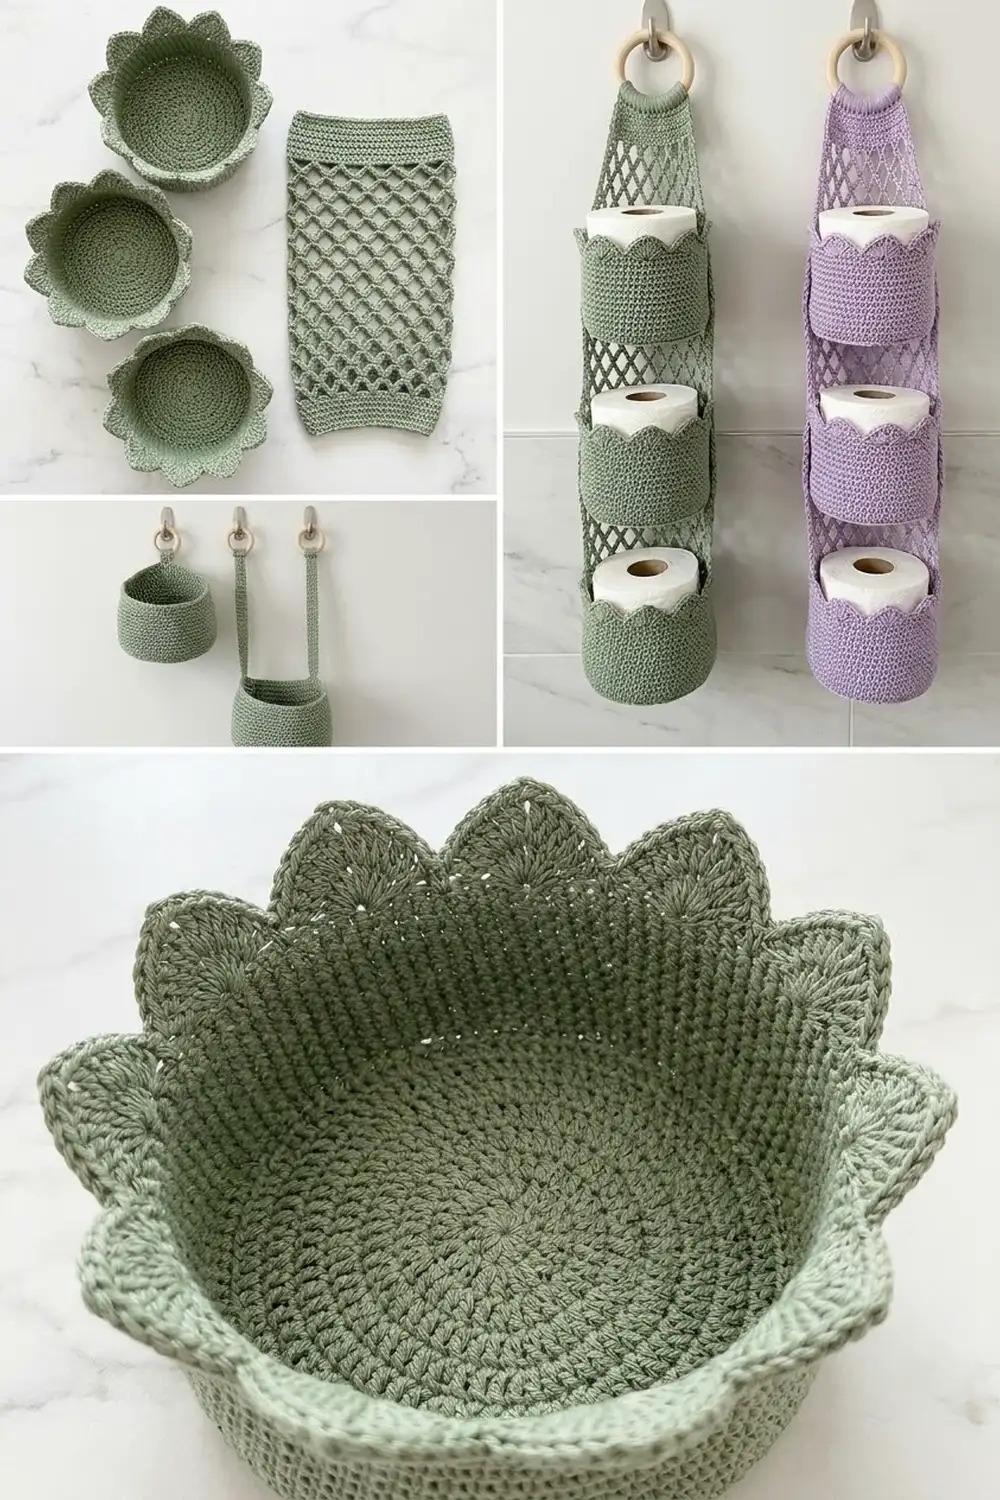
Basket (make 3)
Base
Rnd 1: Make a magic ring, ch 1, 6 sc in the ring, sl st to the first sc. (6 sts)
Rnd 2: Ch 1, inc in each st around, sl st to the first sc. (12 sts)
Rnd 3: Ch 1, (sc in next st, inc) 6 times, sl st to join. (18 sts)
Rnd 4: Ch 1, (sc in next 2 sts, inc) 6 times, join. (24 sts)
Rnd 5: Ch 1, (sc in next 3 sts, inc) 6 times, join. (30 sts)
Rnds 6–10: Keep increasing 6 sts per round, with one more sc between increases each round. Rnd 6 is (sc in next 4 sts, inc) 6 times.
- Rnd 6: 36 sts
- Rnd 7: 42 sts
- Rnd 8: 48 sts
- Rnd 9: 54 sts
- Rnd 10: 60 sts
The base is now 4.75 in (12.1 cm) across.
Walls
Rnd 11 (conversion round): Ch 1, sc in the BLO of each st around, join. (60 sts: 60 worked one into each st + 0 added)
The unused front loops of Rnd 10 form a ridge around the outside of the base. You will use this ridge for joining later.
Rnds 12–19: Ch 1, sc in each st around, join. (60 sts)
The wall is now 2 in (5.1 cm) tall. Place a marker in the joining stitch of Rnd 19 and call it st 1.
Petal Rim
Rnd 20: Ch 1, sc in the first st. Then repeat 10 times: skip 2 sts, Petal Shell in the next st, skip 2 sts, sc in the next st. On the last repeat, skip the final sc and sl st to the first sc instead. (80 sts: 70 dc + 10 sc, which makes 10 shells)
Each repeat uses 6 stitches of Rnd 19, and 10 × 6 = 60, so the shells fit exactly.
Rnd 21 (outline): Ch 1. Repeat 10 times: sc in each of the next 3 dc, (sc, ch 2, sc) in the next dc, sc in each of the next 3 dc, sl st in the next sc. The final sl st lands in the first st. (80 sc + 10 ch-2 points + 10 sl sts)
Each petal now has 8 sc outlining a 7-dc fan, with a sharp ch-2 point at the center dc. Fasten off and leave a 24 in (61 cm) tail for sewing.
Mesh Panel (make 1)
Straight Section
Foundation: Ch 38.
Row 1: Sc in the 6th ch from the hook, then work (ch 5, skip 3 ch, sc in the next ch) 8 times. (9 loops, 9 sc)
The first 5 skipped chains form the first loop. The remaining 32 chains make 8 repeats of 4 chains each.
Row 2: Ch 5, turn, sc in the first ch-5 sp, then (ch 5, sc in the next ch-5 sp) 8 times. (9 loops, 9 sc)
Rows 3–40: Repeat Row 2.
Each row has 10 anchor points: the base of the turning ch-5 plus the 9 sc. These points sit 1 in (2.5 cm) apart. After Row 40 the panel measures 9 in × 20 in (22.9 cm × 50.8 cm).
Taper
Each taper row works one fewer ch-5 space than the row before, leaving the last space unworked.
Row 41: Ch 5, turn, sc in the first ch-5 sp, (ch 5, sc in the next sp) 7 times. Leave the last sp unworked. (8 loops)
Row 42: Ch 5, turn, sc in the first sp, (ch 5, sc in the next sp) 6 times. (7 loops)
Rows 43–46: Continue the same way, working one fewer repeat each row.
- Row 43: 6 loops
- Row 44: 5 loops
- Row 45: 4 loops
- Row 46: 3 loops
You turn at the end of every row, so the dropped loop alternates sides and the taper stays balanced. The panel is now 23 in (58.4 cm) long.
Strap
Row 47: Ch 1, turn, 3 sc in each of the 3 ch-5 sps. (9 sc)
Rows 48–55: Ch 1, turn, sc in each st across. (9 sc)
The strap is 2.25 in (5.7 cm) wide and 2 in (5.1 cm) long. Fasten off and leave a 12 in (30.5 cm) tail.
Make All Pieces
Sage Green: 3 baskets and 1 mesh panel. For a lavender holder, make the same set in Lavender.
Layout, from top to bottom:
            ( RING )
           [ STRAP  Rows 47–55 ]
          /  TAPER  Rows 41–46  \
         |   open mesh 34–40     |
         |   BASKET 3  Rows 29–33|
         |   open mesh 20–28     |
         |   BASKET 2  Rows 15–19|
         |   open mesh 6–14      |
         |   BASKET 1  Rows 1–5  |
          \_____ bottom edge ____/
Joining
Each basket is sewn to the panel along two horizontal lines:
- Lower line: the front-loop ridge of Rnd 10 meets the anchors of the basket’s lower row.
- Upper line: Rnd 19 meets the anchors of the basket’s upper row.
| Basket | Lower row | Upper row |
|---|---|---|
| Basket 1 | Row 1 | Row 5 |
| Basket 2 | Row 15 | Row 19 |
| Basket 3 | Row 29 | Row 33 |
Stitch-to-stitch logic: Starting from the marked st 1, use the 37 sts from st 1 to st 37. Tack anchors 1 through 10 to sts 1, 5, 9, 13, 17, 21, 25, 29, 33 and 37. That is every 4th stitch, so the 9 gaps cover 36 stitches, or 9 in (22.9 cm). This matches the 9 in (22.9 cm) between the panel’s edge anchors.
Use the same stitch numbers on the Rnd 10 ridge, directly below. The remaining 23 stitches, about 5.75 in (14.6 cm), stay free and form the open front where you load the rolls.
Method: Use the basket’s tail and whipstitch each anchor to its stitch 2–3 times, then run the needle inside the wall to the next stitch. Lay the panel flat with the right side down, set the basket on it rim-up, and curve the panel up around the back half of the basket.
Tension: Pull each tack just until the anchor touches the stitch. If you pull harder, the diamonds distort and the basket tilts forward.
Checkpoint: With all three baskets attached, the panel is still 9 in (22.9 cm) between the side edges at each basket line, measured around the curve. The length is still 23 in (58.4 cm).
Border
The border is worked as an open U shape: down one side of the panel, across the bottom, and up the other side. It leaves the strap free.
Border gauge: 4 sc per inch, which is the same as the solid gauge.
Row 1: Join the yarn at the base of the strap on side A, at the end of Row 46.
- Side A: Work 2 sc in each row end down to Row 1. Work into the ch-5 turning loop where there is one, or around the post of the sc where there isn’t. (46 rows × 2 = 92 sc)
- Bottom: 3 sc in the first foundation ch, 1 sc in each of the next 36 foundation chs, then 3 sc in the last foundation ch. (36 sc between the corners)
- Side B: Work 2 sc in each row end up to Row 46. (92 sc)
Total: 92 + 3 + 36 + 3 + 92 = 226 sc.
Row 2: Ch 1, turn, sl st in each sc. (226 sl sts) Fasten off.
Why the math works: 92 sc at 4 per inch is 23 in, which is exactly 46 rows at 0.5 in each. Across the bottom, 36 sc at 4 per inch is 9 in, which matches 9 loops at 1 in each. The 3-sc groups add just enough at the corners to turn them flat. The finished panel measures 9.5 in × 23.25 in (24.1 cm × 59.1 cm).
To attach the ring, slide the strap through the wooden ring from front to back. Fold the strap so that Row 55 lies on Row 49, then whipstitch it down.
Final Blocking
- Mist the whole holder until it is damp, not soaked.
- Put a toilet roll or a 4.5 in (11.4 cm) jar inside each basket.
- Pinch each petal tip into a point and fan the dc out evenly.
- Hang the holder from the ring on a hook.
- Ease the side borders straight and check that each diamond is the same size.
- Let it dry completely while hanging, for about 24 hours.
Final Quality-Control Checklist
- [ ] Each basket base measures 4.75 in (12.1 cm)
- [ ] Each basket has 10 petals with clean ch-2 points
- [ ] The baskets are spaced 7 in (17.8 cm) apart, base to base
- [ ] The panel is 9.5 in (24.1 cm) wide after the border
- [ ] Each side border has 92 sc with no gaps
- [ ] The strap is folded neatly and secure on the ring
- [ ] All ends are woven in through solid stitches
- [ ] A standard roll drops in and lifts out easily
Troubleshooting
- The base cups before Rnd 11: your tension is too tight. Go up half a hook size.
- The base ruffles: you have too many stitches. Recount each round against its multiple of 6.
- The petals are uneven: check that each repeat in Rnd 20 skips exactly 2 sts on each side of the shell.
- The mesh sags: use 4-ch loops instead of 5 and tack the baskets more firmly.
- The baskets tilt forward: add an extra tack at anchors 5 and 6, at the center back.
- The border waves: work 3 sc into every other row end instead of 2 only if your border is pulling. Otherwise, check your tension.
Care
Hand wash in cool water and reshape while damp. Dry flat or hanging, away from direct heat.

Final Notes
The measurements build on each other in a single chain:
- 16 sc = 4 in gives a base of 60 sts that measures 4.75 in (12.1 cm).
- 60 sts divide into 10 petal repeats of 6 sts each.
- The mesh is 9 loops wide at 1 in each, for 9 in (22.9 cm), with 2 rows per inch.
- 46 rows make 23 in (58.4 cm) of panel.
- The border has 92 sc per side and 36 across the bottom, all at 4 sc per inch, for a finished panel of 9.5 in × 23.25 in (24.1 cm × 59.1 cm).
- With the strap and ring, the holder hangs 26.5 in (67.3 cm).
If your gauge matches at the first checkpoint, every piece after it will fit.
Happy crocheting!