

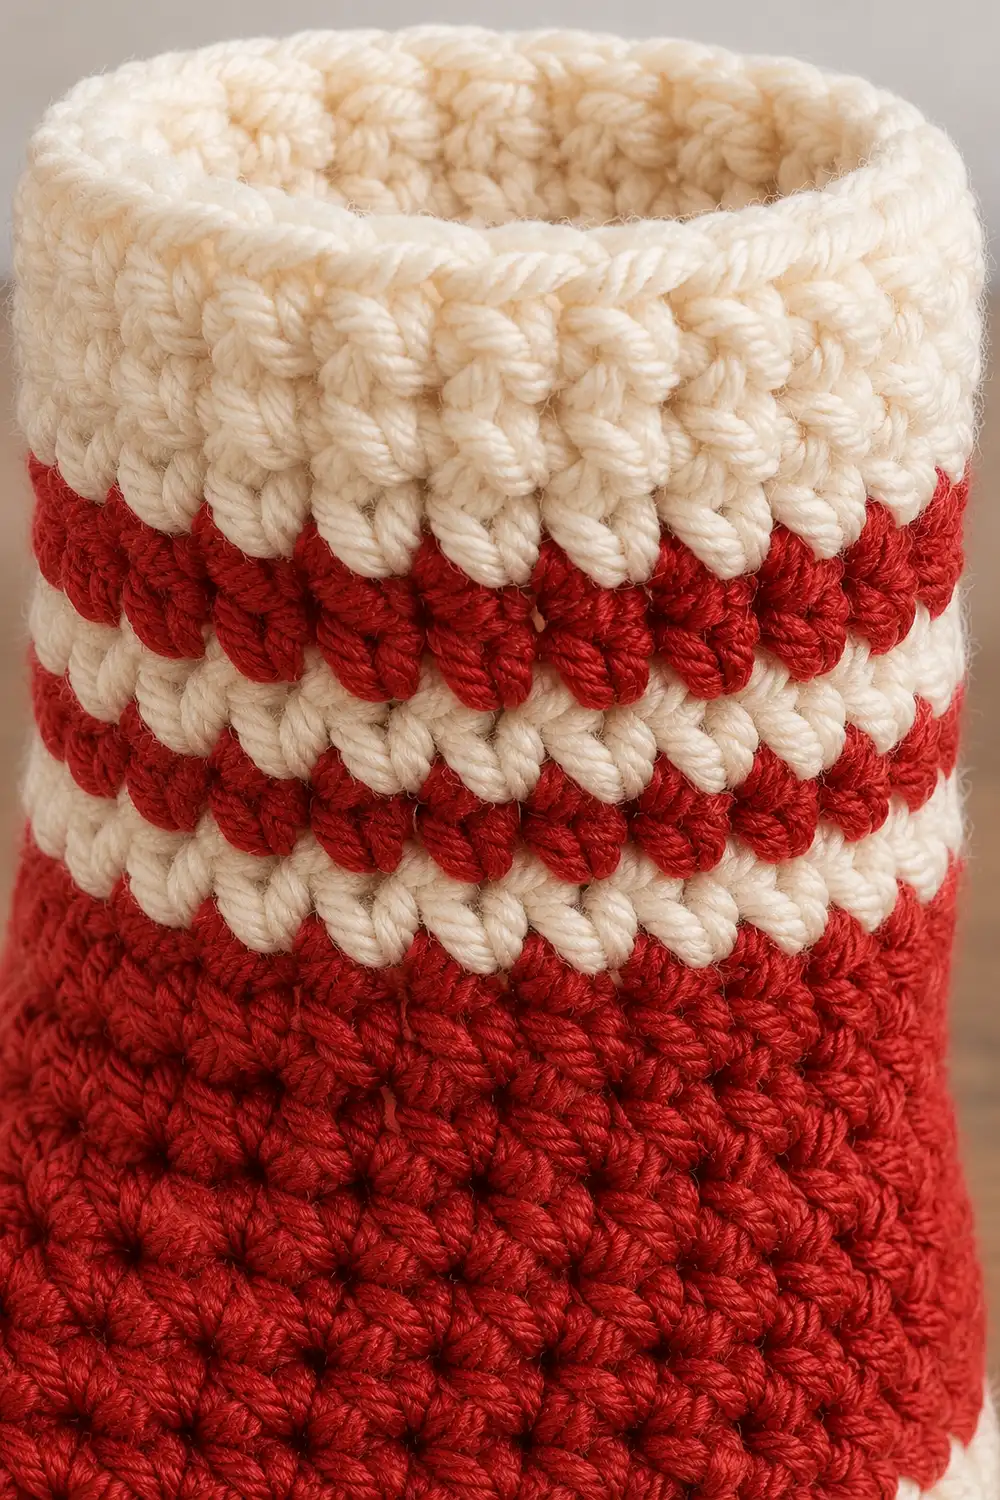
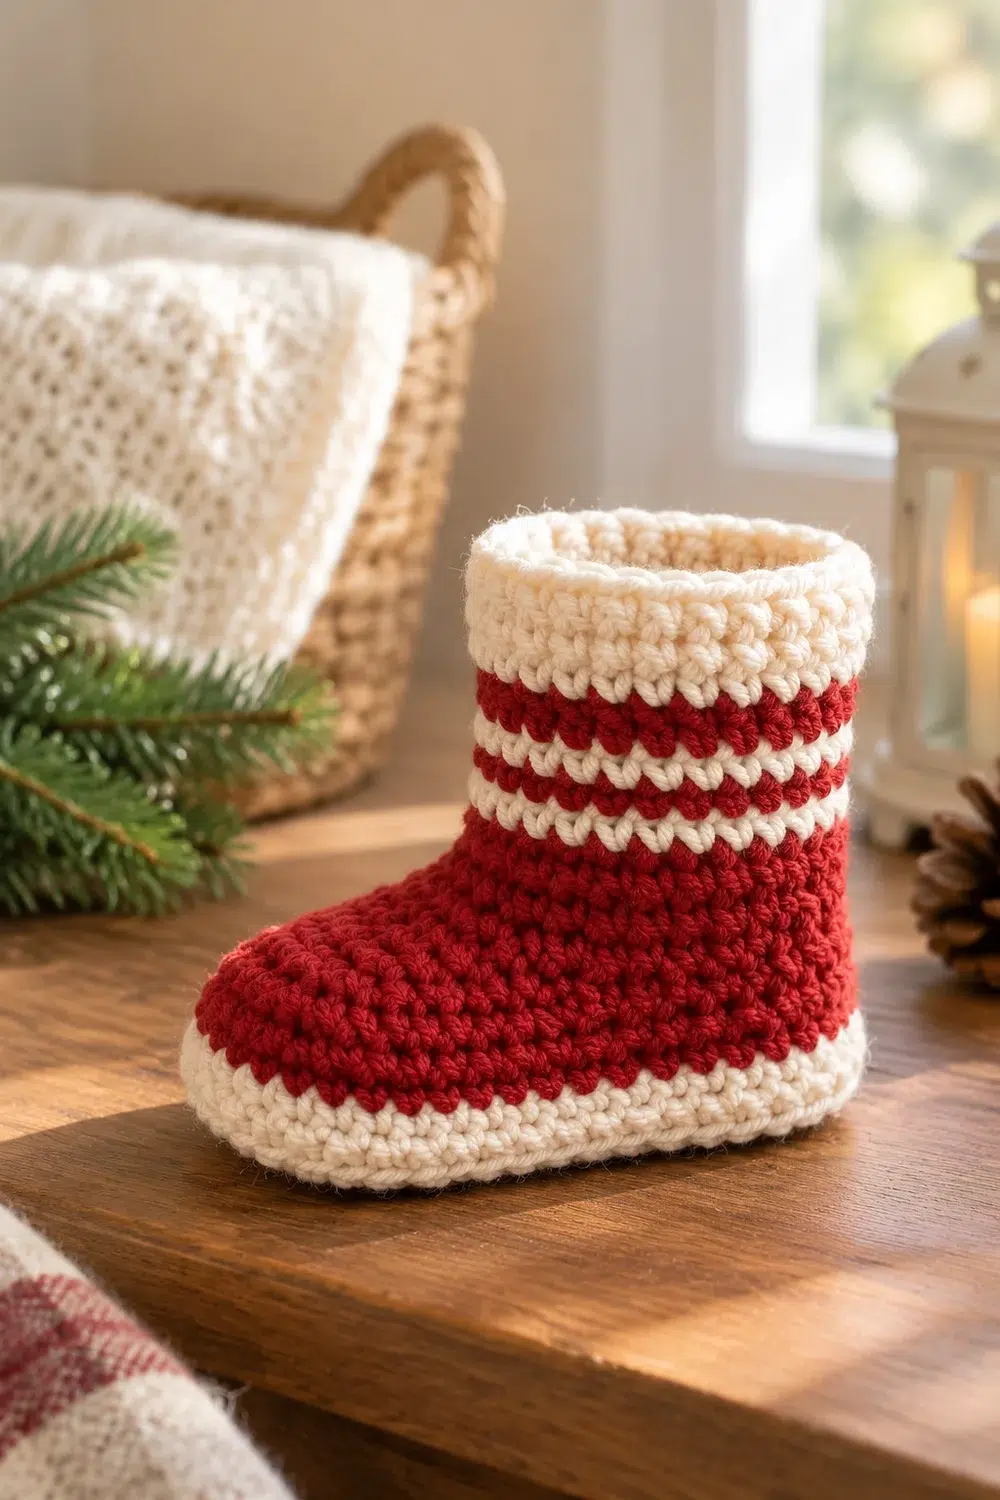
The Peppermint Cuff Boot is a single crocheted boot worked in one piece in the round. It has a cream cuff at the top, cream and red stripes beneath it, a solid red body, and a cream sole and base. The dense stitches make a sturdy fabric that holds the boot upright on its own.
The palette is classic holiday red and warm cream. The finished boot works as a seasonal display piece, a small gift holder, or a tabletop decoration.
This pattern uses US crochet terms. The finished boot is about 4.9 in (12.4 cm) tall, with a foot about 5 in (12.7 cm) long and 3 in (7.6 cm) wide.
Construction is simple. You crochet an oval sole in half double crochet (hdc). Then you work single crochet (sc) rounds straight up from the sole edge. You shape the toe with decreases, add stripes, and work the cuff. A slip-stitch round finishes the top. There are no seams.
Finished Size and Construction
- Finished height: about 4.9 in (12.4 cm)
- Foot (sole) size: about 5 in x 3 in (12.7 x 7.6 cm)
- Leg opening circumference: about 9.1 in (23.1 cm)
- Skill level: Easy / advanced beginner
- Terminology: US crochet terms
- Yarn weight: Worsted (#4)
- Hook: 4.0 mm (G-6)
- Number of pieces: 1
- Layout: Single piece, no assembly
- Height before border: about 4.75 in (12.1 cm)
- Border depth: about 1/8 in (0.3 cm), one slip-stitch round
Materials
Yarn: Use a smooth worsted-weight yarn in acrylic, cotton, or a wool blend. Smooth yarn shows the stitch texture clearly. Choose a firm yarn so the boot stands up well. Avoid fuzzy or very splitty yarns.
- Red (Color A): 20 g, about 40 m
- Cream (Color B): 20 g, about 40 m
These quantities include a margin of about 25% for your gauge swatch and weaving in ends.
Tools:
– 4.0 mm (G-6) crochet hook
– 2 stitch markers (one for the round start, one for the toe center)
– Yarn needle
– Scissors
– Ruler or tape measure
– Pins and a spray bottle for blocking
Abbreviations (US Terms)
- ch – chain
- sl st – slip stitch
- sc – single crochet
- hdc – half double crochet
- sc2tog – single crochet 2 together
- BLO – back loop only
- st(s) – stitch(es)
- rnd(s) – round(s)
sc2tog (special stitch): Insert the hook into the next st, yarn over, and pull up a loop. Insert the hook into the following st, yarn over, and pull up a loop (3 loops on hook). Yarn over and pull through all 3 loops. This turns 2 sts into 1.
Color change: Work the last st of the round until 2 loops remain on the hook. Drop the old color, yarn over with the new color, and pull through. Then sl st to the first st in the new color.
Round structure: All rounds are joined. Each round starts with ch 1, which does not count as a stitch. Work the first st into the same st as the join, and finish each round with a sl st into the first st. Joined rounds keep the stripes level.
Gauge and Checkpoints
Gauge:
– 14 sc and 16 rnds = 4 in (10.2 cm)
– 14 hdc and 9 rnds = 4 in (10.2 cm)
Before you start, crochet the sole (Rnds 1–3) as your test piece. This takes about 10 minutes and shows right away whether your tension matches.
Checkpoints:
– After Rnd 2: sole about 4 in x 2 in (10.2 x 5.1 cm)
– After Rnd 3: sole about 5 in x 3 in (12.7 x 7.6 cm)
– After Rnd 6: cream base band about 0.75 in (1.9 cm) tall
– After Rnd 13: wall height about 2.5 in (6.4 cm), and the opening lies about 4.6 in (11.7 cm) wide when pressed flat
– After Rnd 22: total height about 4.75 in (12.1 cm)
If the sole is too big: Go down 0.5 mm in hook size, to 3.5 mm.
If the sole is too small: Go up 0.5 mm in hook size, to 4.5 mm.
If the sole cups or ruffles: A cupping sole means your hdc are too tight. A ruffling sole means they are too loose. Adjust your tension on the hdc rounds only, then recheck.
Sole (Color B, Cream)
The sole is an oval with two straight sides and two rounded ends: the heel and the toe. The round always starts at the heel, so color-change joins stay hidden at the back of the boot.
Foundation: With cream, ch 11.
Rnd 1: Hdc in the 3rd ch from the hook. The 2 skipped ch do not count. Hdc in the next 7 ch, for 8 hdc so far. Work 6 hdc in the last ch. Rotate the piece and work along the other side of the foundation chain: hdc in the next 7 ch, then 5 hdc in the last ch. This is the same ch that holds your first hdc. Sl st to the first hdc. (26 sts)
Your stitch layout is:
– 6 heel sts (st 1 and sts 22–26)
– 7 straight sts on each side
– 6 toe sts (sts 9–14)
Check: 6 + 7 + 6 + 7 = 26.
Rnd 2: Ch 1. 2 hdc in the first st, hdc in the next 7, 2 hdc in each of the next 6, hdc in the next 7, 2 hdc in each of the last 5. Sl st to the first hdc. (38 sts)
Check: 2 + 7 + 12 + 7 + 10 = 38. You added 12 sts: 6 at the heel and 6 at the toe.
Rnd 3: Ch 1. 2 hdc in the first st, hdc in the next st, hdc in the next 7, [2 hdc in the next st, hdc in the next st] 6 times, hdc in the next 7, [2 hdc in the next st, hdc in the next st] 5 times. Sl st to the first hdc. (50 sts)
Check: 3 + 7 + 18 + 7 + 15 = 50. You again added 12 sts, 6 at each end.
Measure now. The sole should be about 5 in x 3 in (12.7 x 7.6 cm) and lie flat.
Base Band and Body
From here on, every round is sc. The fabric now grows upward, not outward.
Rnd 4 (turning round, cream): Ch 1. Sc in the BLO of each st around. Sl st to the first sc. (50 sts)
This is a conversion round: 50 sc worked 1 per existing hdc, plus 0 extra sts. Working in back loops leaves a ridge on the outside and turns the work upward to start the wall.
Rnds 5–6 (cream): Ch 1. Sc in each st around. Sl st to the first sc. (50 sts)
On the last sl st of Rnd 6, change to red. Fasten off cream, leaving a 4 in (10.2 cm) tail.
Checkpoint: The cream base band is about 0.75 in (1.9 cm) tall.
Rnds 7–9 (red): Ch 1. Sc in each st around. Sl st to the first sc. (50 sts)
The red body starts here. The wall should rise straight up from the sole without flaring.
Toe Shaping (Color A, Red)
In the sole, the toe sts sat at positions 11–28 of Rnd 3. Each sc round keeps the same positions, so all toe decreases fall near st 16. Place a marker in st 16 of Rnd 9 to mark the toe center.
Rnd 10: Ch 1. Sc in the first 13 sts, [sc2tog] 6 times, sc in the remaining 25 sts. Sl st to the first sc. (44 sts)
Check: 13 + 12 + 25 = 50 sts worked into; 13 + 6 + 25 = 44 sts made.
Rnd 11: Ch 1. Sc in the first 12 sts, [sc2tog] 4 times, sc in the remaining 24 sts. Sl st to the first sc. (40 sts)
Check: 12 + 8 + 24 = 44 worked into; 12 + 4 + 24 = 40 made.
Rnd 12: Ch 1. Sc in the first 12 sts, [sc2tog] 4 times, sc in the remaining 20 sts. Sl st to the first sc. (36 sts)
Check: 12 + 8 + 20 = 40 worked into; 12 + 4 + 20 = 36 made.
Rnd 13: Ch 1. Sc in the first 12 sts, [sc2tog] 4 times, sc in the remaining 16 sts. Sl st to the first sc. (32 sts)
Check: 12 + 8 + 16 = 36 worked into; 12 + 4 + 16 = 32 made.
The decreases pull the top of the foot inward to form a rounded toe. The heel stays upright because it has no decreases.
Checkpoint: The wall is about 2.5 in (6.4 cm) tall. The opening measures about 9.1 in (23.1 cm) around, or about 4.6 in (11.7 cm) wide when flat.
Leg and Stripes
Rnds 14–15 (red): Ch 1. Sc in each st around. Sl st to the first sc. (32 sts)
Change to cream on the last sl st of Rnd 15.
Rnd 16 (cream): Ch 1. Sc in each st around. Sl st to the first sc. Change to red. (32 sts)
Rnd 17 (red): Ch 1. Sc in each st around. Sl st to the first sc. Change to cream. (32 sts)
Rnd 18 (cream): Ch 1. Sc in each st around. Sl st to the first sc. Change to red. (32 sts)
Rnd 19 (red): Ch 1. Sc in each st around. Sl st to the first sc. Change to cream. Fasten off red. (32 sts)
The stripes are only 1 round each, so carry the unused color loosely up the inside at the heel. Do not cut it each time. The stripe section is about 1 in (2.5 cm) tall.
Cuff (Color B, Cream)
Rnds 20–22 (cream): Ch 1. Sc in each st around. Sl st to the first sc. (32 sts)
Checkpoint: The total height is about 4.75 in (12.1 cm). The cuff is about 0.75 in (1.9 cm) deep.
Border
The border is a single round of slip stitches in cream, worked at the same density as the body: 1 sl st per sc.
Border gauge: 1 sl st per existing sc, which matches 14 sts per 4 in (10.2 cm).
Rnd 23 (cream): Ch 1. Sl st loosely in each st around. Join to the first sl st. (32 sts)
Fasten off and leave a 6 in (15.2 cm) tail.
When the boot is pressed flat, the opening splits into two halves:
– Front half: 16 sts
– Back half: 16 sts
Total: 16 + 16 = 32.
Why the math works: Each sl st sits on exactly one sc, so the border has the same stitch count as the cuff. Nothing is added or removed. The opening stays 9.1 in (23.1 cm) around, so the edge neither flares nor tightens. The slip stitches form a firm, rounded rim that helps the cuff hold its shape. The rim adds about 1/8 in (0.3 cm), which brings the finished height to about 4.9 in (12.4 cm).
Tension tip: Keep the slip stitches loose. If you pull them tight, the opening will narrow. If your slip stitches tend to be tight, use a 4.5 mm hook for this round only.
Final Blocking
- Weave in all ends on the inside. Run each tail through at least 1 in (2.5 cm) of sts in the same color.
- Lightly spritz the whole boot with water until it is damp, not soaked.
- Stuff the boot firmly with a rolled towel or plastic bags. Shape the toe into a smooth curve.
- Flatten the sole on a table. Check that it measures 5 in x 3 in (12.7 x 7.6 cm).
- Stand the boot upright. Smooth the cuff so it measures about 9.1 in (23.1 cm) around.
- Line up the stripes so they run level. Gently nudge any tilted rounds into place.
- Leave the boot to dry fully, usually 12–24 hours, before removing the stuffing.
For acrylic yarn, you can steam lightly instead. Hold the iron above the fabric and never press it directly onto the stitches.
Final Quality-Control Checklist
- Sole lies flat and measures about 5 in x 3 in (12.7 x 7.6 cm)
- BLO ridge is visible all the way around the base
- Cream base band is about 0.75 in (1.9 cm) tall
- Toe is evenly rounded, with no holes at the decreases
- Leg has 32 sts in every round from Rnd 13 to Rnd 23
- Stripes alternate in this order from the bottom: cream, red, cream, red
- All color joins sit at the back of the heel
- Cuff is solid cream and about 0.75 in (1.9 cm) deep
- Total height is about 4.9 in (12.4 cm)
- All ends are woven in on the inside
- Boot stands upright without support
Troubleshooting
Sole curls up like a bowl: Your hdc are too tight. Redo Rnds 2–3 with a looser tension or a 4.5 mm hook.
Sole ruffles: Your hdc are too loose. Use a 3.5 mm hook for the sole only.
Wall flares outward: Make sure Rnd 4 is worked in the BLO. Keep Rnds 5–9 at an even tension.
Toe looks pointy: Count the decreases again. They must be centered on st 16, the marked toe center.
Stripes jog or tilt: Use joined rounds, not a spiral. Complete each color change on the last yarn over before the sl st.
Holes at decreases: Use the invisible sc2tog through front loops only, or pull each loop snug.
Opening is too tight: Redo the border more loosely, or use a larger hook for that round.
Stitch count is off: Count each round before joining. Mark the first st of every round.
Care
Hand wash in cool water with a mild detergent. Reshape the boot while it is damp and let it dry flat or stuffed.
Final Notes
Every measurement in this pattern builds on the one before it:
- Gauge of 14 sts per 4 in (10.2 cm)
- Sole of 50 sts, about 5 in x 3 in (12.7 x 7.6 cm)
- Wall straight at 50 sts
- Toe decreased to 32 sts, about 9.1 in (23.1 cm) around
- Stripes and cuff held at 32 sts
- Border at 32 sts, finishing about 4.9 in (12.4 cm) tall
If you check each stage against its checkpoint, the finished boot will match the size above.
Optional: if you would like a pair, simply repeat the pattern for a second boot.
Happy crocheting!