

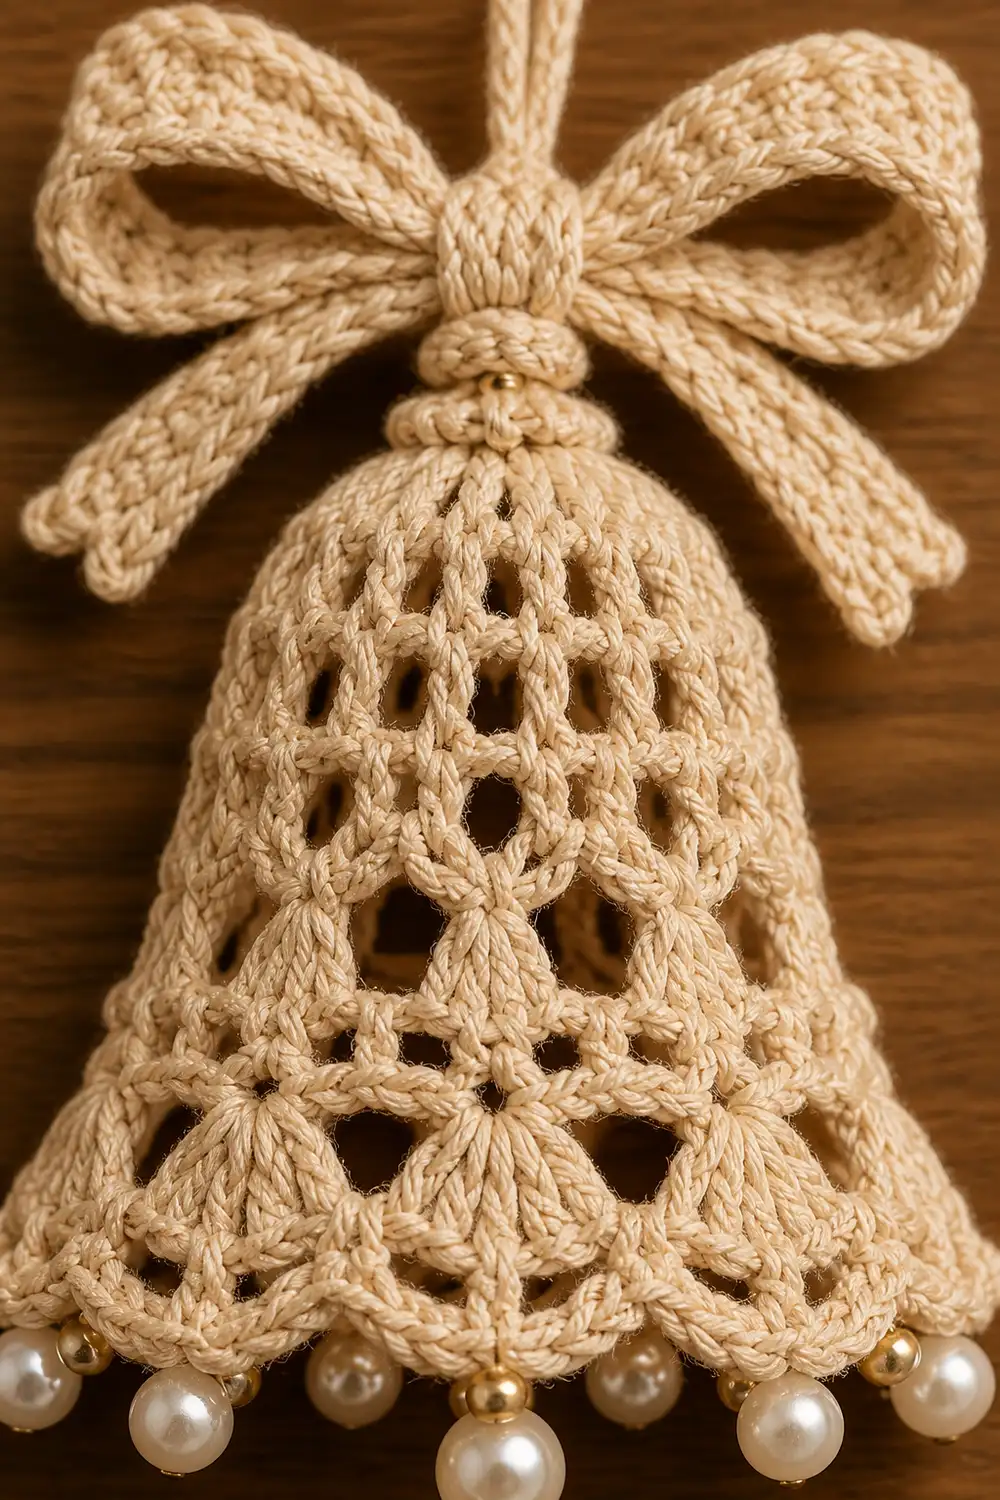
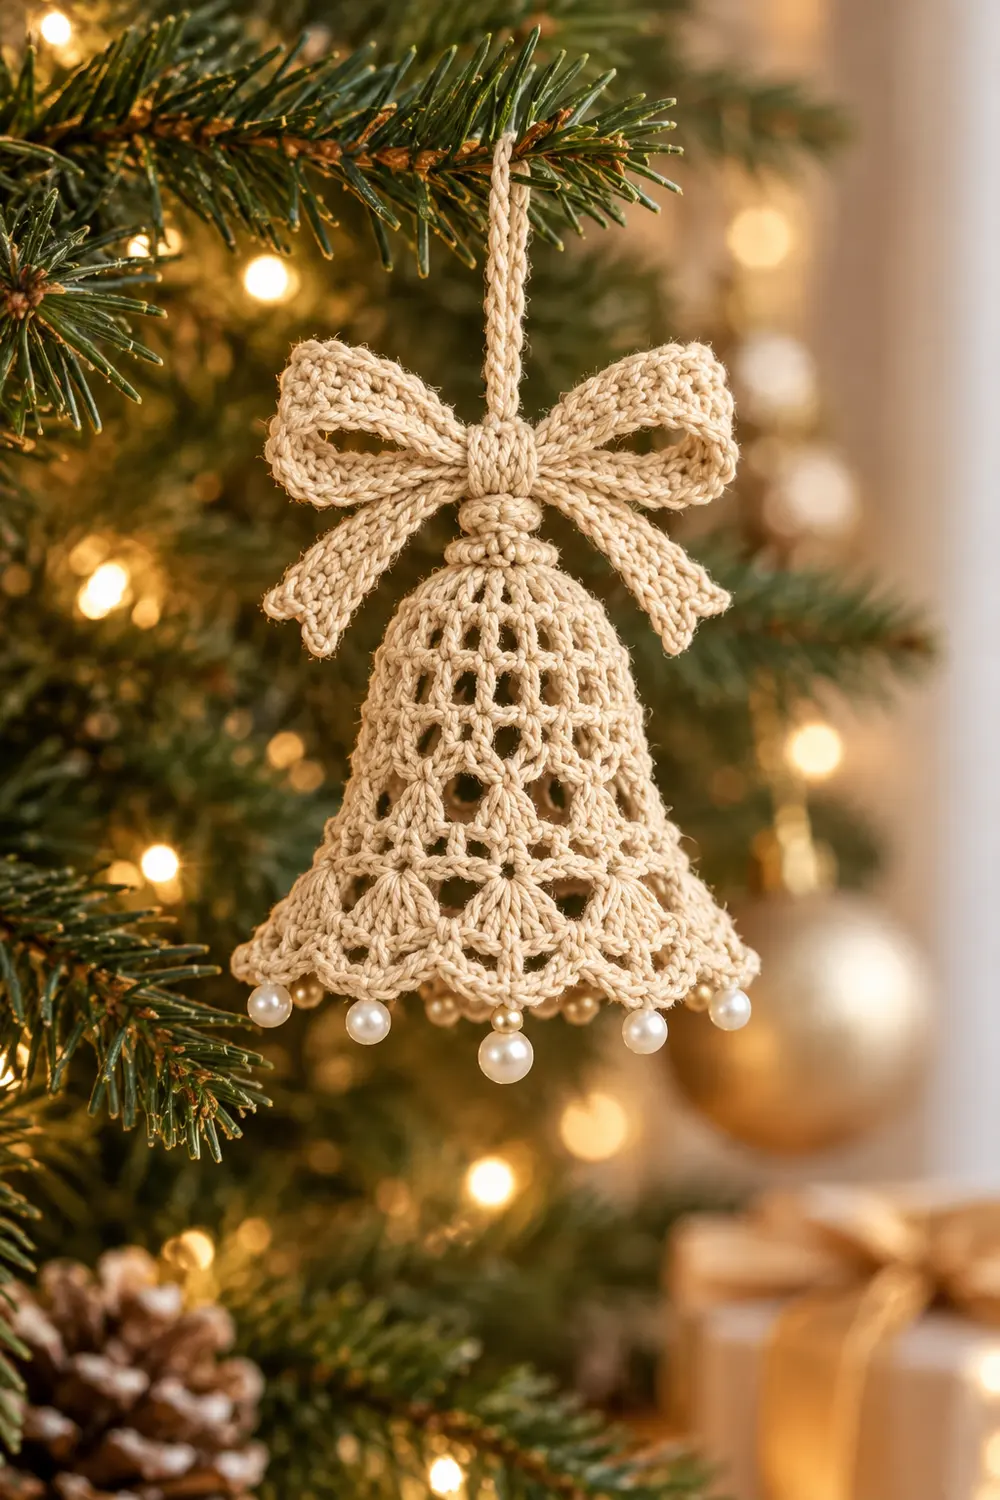
This little bell is a classic holiday ornament in natural cream thread. It has a rounded dome top, an open lace body built from shells and chain spaces, a crocheted bow with two looped ends and a center knot, and a scalloped shell trim along the hem. Five small pearl beads sit along the lower edge.
The style is soft, vintage, and airy. The shells start small at the top and grow larger toward the hem, so the bell flares naturally. The piece is worked flat and is meant to hang or lie flat on a tree, a gift tag, or a window.
This pattern uses US crochet terms. The finished bell body measures about 3 in (7.6 cm) wide at the hem and 2.25 in (5.7 cm) tall. With the bow, the ornament is about 3.25 in (8.3 cm) tall, not counting the hanging loop.
Construction overview: You work the bell flat from the top down in 7 rows, starting from a small ring that forms the rounded dome. A border round adds the scalloped hem trim and neat single-crochet side edges. The bow is crocheted directly onto the top of the bell, so there is nothing to sew except the beads.
Finished Size and Construction
- Finished size: 3 in (7.6 cm) wide × 3.25 in (8.3 cm) tall including bow
- Bell body with trim: 3 in (7.6 cm) wide × 2.25 in (5.7 cm) tall
- Size before border: 2.75 in (7.0 cm) wide × 2 in (5.1 cm) tall
- Border depth: 0.25 in (0.6 cm) at the hem
- Bow: about 2 in (5.1 cm) wide, rising about 1 in (2.5 cm) above the dome
- Skill level: Intermediate (shells, flat lace rows, edging)
- Terminology: US
- Yarn weight: Size 3 cotton crochet thread (fine)
- Hook: 2.25 mm (US B-1)
- Number of pieces: 1 (bell with the bow worked directly onto it)
- Layout: Single flat ornament, no assembly grid
Materials
Yarn advice: Use mercerized size 3 cotton crochet thread. It has crisp stitch definition, holds the shell shapes well, and takes stiffener evenly. A matte cotton works too, but the lace will look softer.
- Cream / natural: about 6 g, approximately 25 m (27 yd)
Tools:
- 2.25 mm (US B-1) crochet hook
- Tapestry needle
- Beading needle and cream sewing thread
- 5 pearl beads, 4 mm
- Scissors
- 1 stitch marker
- Fabric stiffener or spray starch
- Blocking board or foam mat
- Rust-proof pins
The quantity above includes a margin of roughly 30% for your gauge swatch, weaving in ends, and the long tail used for the bow’s center knot.
Abbreviations (US Terms)
- ch – chain
- sl st – slip stitch
- sc – single crochet
- hdc – half double crochet
- dc – double crochet
- sk – skip
- sp(s) – space(s)
- st(s) – stitch(es)
- RS / WS – right side / wrong side
Special stitches:
- V-st (V-stitch): (dc, ch 1, dc) in the same st.
- sm-sh (small shell): (2 dc, ch 1, 2 dc) in the same sp.
- lg-sh (large shell): (3 dc, ch 2, 3 dc) in the same sp.
- Fan: 7 dc in the same sp.
Gauge and Checkpoints
Gauge: 8 dc and 4 dc rows = 1 in (2.5 cm) with size 3 thread and a 2.25 mm hook.
Test first: Work the foundation and Rows 1–3, then measure before continuing. If those rows match the checkpoint, keep going. If they don’t, adjust now, while you have only three rows to redo.
Checkpoints (measured lightly flattened, before blocking):
- After Row 1: half circle about 0.75 in (1.9 cm) wide
- After Row 3: 1.5 in (3.8 cm) wide × 1 in (2.5 cm) tall
- After Row 5: 2.25 in (5.7 cm) wide × 1.5 in (3.8 cm) tall
- After Row 7: 2.75 in (7.0 cm) wide × 2 in (5.1 cm) tall
- After border: 3 in (7.6 cm) wide × 2.25 in (5.7 cm) tall
- With bow: 3.25 in (8.3 cm) tall overall
If your piece is too big: go down a hook size, to 2 mm. If it’s too small: go up to 2.5 mm. A difference of 0.25 in (0.6 cm) at Row 3 grows to about 0.5 in (1.3 cm) at the hem, so don’t ignore small differences.
Bell Body
Work flat in rows. Do not join at the ends of rows. Turning chains count as stitches.
Foundation: Ch 5, sl st in first ch to form a ring.
Row 1 (RS): Ch 3 (counts as dc), 6 dc in ring. Turn. (7 dc)
The dc fill only the lower half of the ring. This half circle is the rounded dome. Leave the upper half of the ring free; you’ll use it in the border.
Row 2 (WS): Ch 4 (counts as dc + ch 1), dc in first dc (first V-st made). Ch 1, sk next dc, V-st in next dc; repeat from * 2 more times, working the last V-st into the top of the turning ch. Turn.
(4 V-sts: 8 dc, 7 ch-1 sps — 4 inside the V-sts, 3 between them)
Row 3: Sl st in first dc and in next ch-1 sp (center of first V-st). Ch 3 (counts as dc), (dc, ch 1, 2 dc) in same sp (first sm-sh made). Ch 1, sk next ch-1 sp, sm-sh in center sp of next V-st; repeat from * 2 more times. Turn.
(4 sm-sh: 16 dc; 3 ch-1 sps between shells)
Check your gauge here: 1.5 in (3.8 cm) wide.
Row 4: Sl st in first 2 dc and in next ch-1 sp (shell center). Ch 3, (dc, ch 1, 2 dc) in same sp. Ch 1, dc in next ch-1 sp between shells, ch 1, sm-sh in next shell’s ch-1 sp; repeat from * 2 more times. Turn.
(4 sm-sh + 3 single dc = 19 dc)
Row 5: Sl st in first 2 dc and in next ch-1 sp. Ch 3, (dc, ch 1, 2 dc) in same sp. Ch 2, dc in next single dc, ch 2, sm-sh in next shell’s ch-1 sp; repeat from * 2 more times. Turn.
(4 sm-sh + 3 single dc = 19 dc; 6 ch-2 sps)
Rows 4 and 5 keep the same stitch count, which gives the bell its straight upper sides. The longer ch-2 sps in Row 5 open up the lace.
Row 6: Sl st in first 2 dc and in next ch-1 sp. Ch 3 (counts as dc), (2 dc, ch 2, 3 dc) in same sp (first lg-sh made). Ch 2, sc in next single dc, ch 2, lg-sh in next shell’s ch-1 sp; repeat from * 2 more times. Turn.
(4 lg-sh: 24 dc; 3 sc)
Row 7: Sl st in first 3 dc and in next ch-2 sp. Ch 3 (counts as dc), 6 dc in same sp (first fan made). Ch 1, sc in next sc, ch 1, fan in next lg-sh’s ch-2 sp; repeat from * 2 more times. Do not fasten off.
(4 fans: 28 dc; 3 sc)
This is the flare. The shells have grown from V-sts to small shells, then large shells, then 7-dc fans, so the scallop motifs shrink toward the top.
Checkpoint: 2.75 in (7.0 cm) wide × 2 in (5.1 cm) tall.
Border
Border gauge: Along the sides, work 2 sc per dc row end. Rows run 4 per inch, so that’s 8 sc per inch, which matches the body gauge of 8 dc per inch. The edge will lie flat without ruffling or pulling.
Work the border in one round: hem trim, up one side, across the top of the ring, and down the other side.
Hem trim (WS): Ch 1, turn. Skip the ch-1 sps throughout.
- Sc in first dc of fan, sk 2 dc, 5 dc in next (4th) dc, sk 2 dc, sc in last (7th) dc of fan.
- 3 dc in next sc (between fans), sc in first dc of next fan, sk 2 dc, 5 dc in next dc, sk 2 dc, sc in last dc of fan.
- Repeat from * 2 more times.
Hem count: 4 large scallops (4 × 5 dc = 20 dc) + 3 small scallops (3 × 3 dc = 9 dc) + 8 sc (2 per fan) = 37 sts.
Why it works: Each fan has 7 dc. You use the 1st, 4th, and 7th, skipping 2 on each side, so every large scallop is centered on its fan. Each of the 3 sc from Row 7 becomes one small scallop.
Right side: Do not turn. Rotate to work along the row ends. Work 2 sc in each row end up the side, 7 rows × 2 = 14 sc.
Top: Work 3 sc in the free upper half of the ring = 3 sc. Place a marker in the middle sc; this is where the bow attaches.
Left side: Work 2 sc in each row end down the other side = 14 sc. Sl st in first sc of the hem trim. Fasten off and weave in the end.
Border total: 37 + 14 + 3 + 14 = 68 sts.
Checkpoint: 3 in (7.6 cm) wide × 2.25 in (5.7 cm) tall.
Bow and Hanging Loop
With the RS facing, join the thread with a sl st in the marked middle sc at the top.
Left half: Ch 22, hdc in 3rd ch from hook and in each ch across, then sl st in the marked sc. (20 hdc, about 2.5 in / 6.4 cm long)
Right half: Ch 22, hdc in 3rd ch from hook and in each ch across, then sl st in the marked sc. (20 hdc)
Hanging loop: Ch 16, sl st in the marked sc. Fasten off, leaving a 12 in (30.5 cm) tail.
Shape the bow:
- On one strip, count 14 hdc out from the base.
- Fold that point back to the base. Hdc 1–14 form a loop, and the last 6 hdc plus the tip hang down as a tail.
- Repeat on the other strip.
- Thread the long tail onto a tapestry needle. Wrap it 6–8 times around the base of both loops and the top sc to form the center knot.
- Stitch through the knot twice to lock it, then weave the tail inside the knot.
Angle the tails down and outward so they frame the dome.
Adding the Pearls
Attach the beads with the beading needle and cream sewing thread. Use 4 beads at the hem and 1 at the center, spaced evenly as follows.
The hem reads: large – small – large – small – large – small – large. Sew 1 bead each to:
- the center dc of each of the 3 small scallops
- the center (3rd) dc of the 2 middle large scallops
That’s 5 beads, symmetric around the middle small scallop. Pass through each bead twice, knot on the WS, and hide the thread ends in the stitches.
Final Blocking
- Lightly dampen the ornament, or mist it with spray starch.
- Lay it RS up on the blocking board.
- Pin the hem to 3 in (7.6 cm) wide, with one pin in the center dc of each large scallop.
- Pin the top of the dome so the total body height is 2.25 in (5.7 cm).
- Open each ch-sp and shell with a pin tip so the lace reads clearly.
- Shape the bow loops round, and pin the tails at matching angles.
- Apply fabric stiffener if you want a firm ornament, and blot any excess.
- Let it dry completely, at least 12 hours, before unpinning.
Final Quality-Control Checklist
- Rows 1–7 match the counts: 7, 8, 16, 19, 19, 24, 28 dc.
- 4 shells or fans per row from Row 2 to Row 7.
- Hem has 4 large and 3 small scallops, 37 sts total.
- Each side has 14 sc, and the top has 3 sc.
- Width is 3 in (7.6 cm), and body height is 2.25 in (5.7 cm).
- Both bow strips have 20 hdc, with equal loops and tails.
- The center knot is secure, and the hanging loop is centered.
- 5 pearls are sewn on symmetrically and firmly.
- All ends are woven in invisibly.
Troubleshooting
Dome is cupped: Row 1 crowded the ring. Make sure you work only 7 dc and leave the upper half of the ring free.
Sides wave or ruffle: You worked more than 2 sc per row end. Recount to 14 per side.
Sides pull in: Your sc are too tight. Loosen them, or use a slightly larger hook for the side sc only.
Hem scallops lean: You missed the skip-2 rule. Each large scallop must sit on the 4th dc of its fan.
Lace looks closed: Your tension is too tight, or the piece needs firmer blocking. Open the spaces with pins.
Bow is floppy: Add stiffener to the bow and dry the loops over a rolled-up scrap of paper.
Beads sag: Sew through each bead twice, and anchor into a dc post rather than a loose loop.
Care
Spot clean only with cool water and a mild soap. Re-block and re-stiffen if needed, then store flat in tissue paper.
Final Notes
The measurement chain is simple:
- Row 3 is 1.5 in (3.8 cm) wide, and Row 5 is 2.25 in (5.7 cm).
- Row 7 is 2.75 in (7.0 cm) wide × 2 in (5.1 cm) tall.
- The border brings it to 3 in (7.6 cm) × 2.25 in (5.7 cm).
- The bow brings the ornament to 3.25 in (8.3 cm) tall.
If each checkpoint matches, the finished bell will too.
Optional: make several bells in the same thread for a matching set of tree ornaments.
Happy crocheting!