

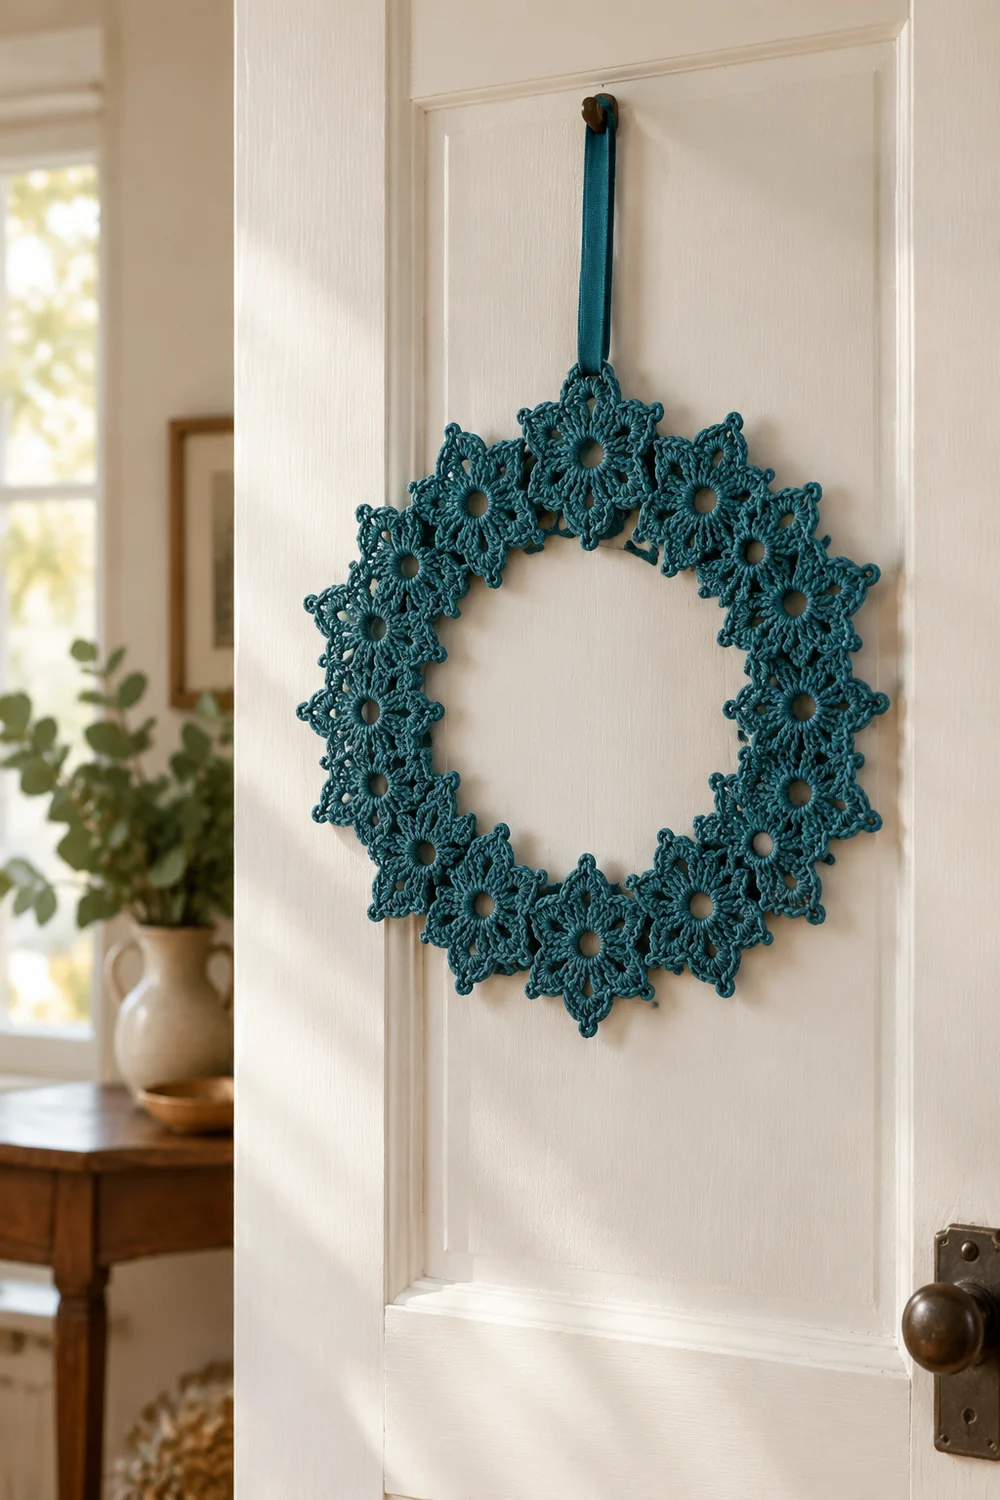
This wreath is a ring of twelve lacy star motifs in a deep teal, joined edge-to-edge around a large open center. Each star has six pointed tips, a hollow middle, and open stitch work that gives the whole piece a delicate, filigree look. A matching teal crochet strap at the top lets it hang flat on a door or wall.
The style sits somewhere between a snowflake and a classic lace star, and it works for winter and holiday decor. One color makes it simple to plan, and the openwork keeps it light enough to hang from a single loop.
The pattern uses US crochet terms. The finished wreath measures about 13.5 in (34.3 cm) across, tip to tip, with an open center of about 6 in (15.2 cm) between the inner points.
You make the first star on its own. Stars 2 to 12 are joined to their neighbors as you work their last round, and Star 12 also joins back to Star 1 to close the ring. A short crochet strap is sewn to the back of the top star for hanging.
Finished Size and Construction
- Finished size: about 13.5 in (34.3 cm) outer diameter; open center about 6 in (15.2 cm) between inner tips
- Skill level: Intermediate (join-as-you-go)
- Terminology: US crochet terms
- Yarn weight: Worsted (#4), cotton or cotton blend recommended
- Hook: 4.0 mm (G-6)
- Number of pieces: 13 (12 star motifs + 1 hanging strap)
- Layout: 12 stars in a single closed ring
- Piece size: each star 3.75 in (9.5 cm) tip to tip; 2.5 in (6.4 cm) valley to opposite valley
- Size before border: 13.5 in (34.3 cm)
- Border depth: none, 0 in (0 cm). The star points are the finished edge.
Materials
Yarn advice: Choose a smooth, tightly plied worsted cotton or cotton blend. It shows the openwork clearly and holds sharp points after blocking. Fuzzy or very soft acrylic will blur the lace and let the tips droop.
- Teal: 90 g (about 165 m / 180 yd)
Tools:
- 4.0 mm (G-6) crochet hook
- Tapestry needle
- Scissors
- Stitch marker
- Rust-proof pins
- Blocking board or foam mats
- Spray bottle
- Optional: fabric stiffener
Quantities include a margin of roughly 20% for gauge differences and a test star. The twelve stars use about 70 g, and the strap uses about 3 g.
Abbreviations (US Terms)
- ch – chain
- sl st – slip stitch
- sc – single crochet
- dc – double crochet
- tr – treble crochet
- sk – skip
- sp – space
- st(s) – stitch(es)
- rep – repeat
- RS – right side
Special stitches:
- V-st: (dc, ch 2, dc) in the same st.
- Shell: (2 dc, ch 2, 2 dc) in the same sp.
- Picot: ch 3, sl st in 3rd ch from hook.
- Joined picot: ch 1, insert hook from front through the neighbor star’s picot loop, sl st, ch 1, sl st in first ch made. This replaces a regular picot.
- Point: (dc, tr, picot, tr, dc) in the same ch-2 sp.
Gauge and Checkpoints
Make one complete star before anything else. Every wreath measurement depends on star size, so this test piece is your gauge swatch.
Strap gauge: 18 sc and 20 rows = 4 in (10.2 cm).
Star checkpoints, measured flat without stretching:
- After Round 1: 1.5 in (3.8 cm) across, with a center hole of about 0.5 in (1.3 cm)
- After Round 2: 2.25 in (5.7 cm) across
- After Round 3: 2.75 in (7.0 cm) across the shells
- After Round 4: 3.75 in (9.5 cm) tip to tip and 2.5 in (6.4 cm) valley to opposite valley
If your star is too big, go down 0.5 mm in hook size. If it is too small, go up 0.5 mm.
A tolerance of 0.25 in (0.6 cm) on the star is fine. Each 0.25 in (0.6 cm) change in star size changes the wreath diameter by about 0.9 in (2.3 cm). A star between 3.5 in (8.9 cm) and 4 in (10.2 cm) keeps the wreath in the 12.5 to 14.3 in (31.8 to 36.3 cm) range.
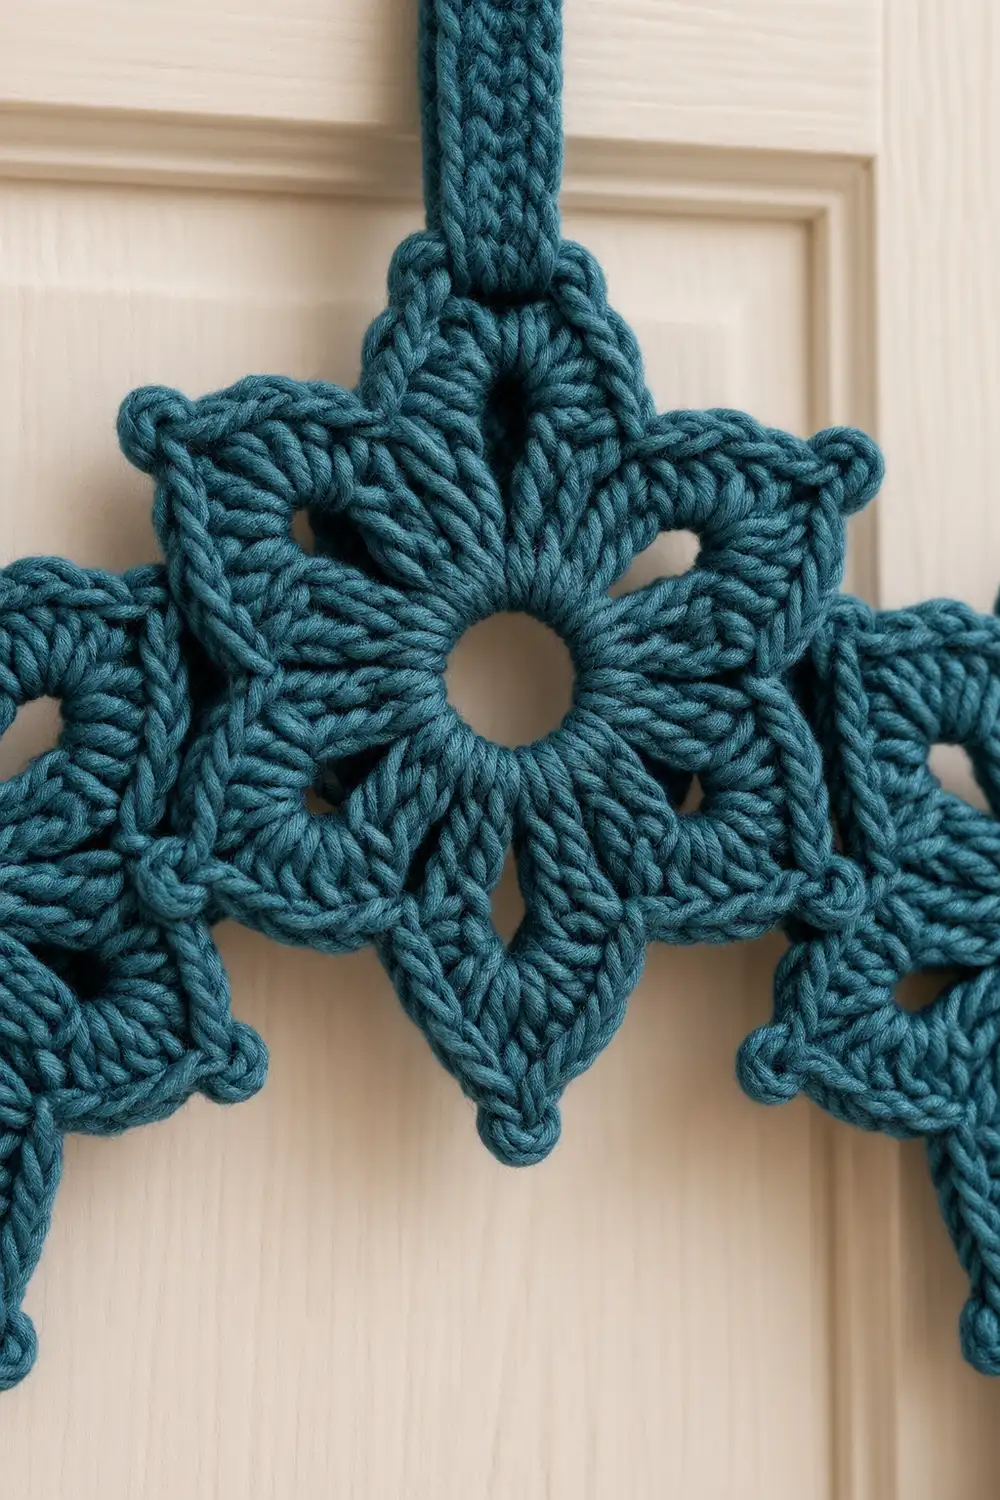
Star Motif (Rounds 1–4)
Work with the RS facing throughout. Do not turn.
Round 1: Ch 10, sl st in first ch to form a ring. Ch 3 (counts as dc), 23 dc in ring. Join with sl st to top of beg ch-3.
(24 dc)
The chain ring creates the hollow center. Do not pull it closed.
Round 2: Ch 5 (counts as dc + ch 2), dc in same st (first V-st made). Ch 1, sk 1 st, dc in next st, ch 1, sk 1 st.
V-st in next st, ch 1, sk 1 st, dc in next st, ch 1, sk 1 st; rep from * 4 more times.
Join with sl st to 3rd ch of beg ch-5.
(18 dc, 6 ch-2 sps, 12 ch-1 sps)
Each repeat uses 4 sts of Round 1, so 24 ÷ 4 = 6 repeats. The six ch-2 sps become the six points.
Round 3: Sl st into first ch-2 sp. Ch 3 (counts as dc), (dc, ch 2, 2 dc) in same sp (first shell made). Ch 1, sk next dc, dc in next ch-1 sp, dc in next dc, dc in next ch-1 sp, ch 1, sk next dc.
Shell in next ch-2 sp, ch 1, sk next dc, dc in next ch-1 sp, dc in next dc, dc in next ch-1 sp, ch 1, sk next dc; rep from * 4 more times.
Join to top of beg ch-3.
(42 dc: 6 repeats × 7 dc; 6 ch-2 sps, 12 ch-1 sps)
Round 4 (points round): Sl st in next dc, sl st into ch-2 sp. Ch 3 (counts as dc), (tr, picot, tr, dc) in same sp. This is Point 1 (P1).
Next, work the valley: ch 2, sk 2 dc, sc in next ch-1 sp, ch 2, sk 1 dc, sc in next dc (the valley center sc), ch 2, sk 1 dc, sc in next ch-1 sp, ch 2, sk 2 dc. This is Valley 1 (V1).
Point in next ch-2 sp, then rep the valley sequence; rep from * 4 more times. Join to top of beg ch-3. Fasten off and weave in ends.
(24 point sts: 12 dc + 12 tr; 6 picots; 18 sc; 24 ch-2 sps)
Labeling: Points run P1 to P6 in working order, and valleys run V1 to V6. V1 sits between P1 and P2, and V4 sits between P4 and P5. Place a marker on P1 of each star until it is joined.
Why the math works: Round 1 has 24 sts. Round 2 groups them into 6 repeats of 4. Round 3 places one shell on each of the 6 ch-2 sps. Round 4 builds one point on each shell. Every round keeps 6 equal repeats.
Make All Pieces
Quantities:
- Teal: 12 stars (Star 1 complete on its own; Stars 2–12 joined on Round 4)
- Teal: 1 hanging strap
Layout grid, read clockwise from the top like a clock face:
12:00  STAR 1  (TEAL) – strap attached
 1:00  STAR 2  (TEAL)
 2:00  STAR 3  (TEAL)
 3:00  STAR 4  (TEAL)
 4:00  STAR 5  (TEAL)
 5:00  STAR 6  (TEAL)
 6:00  STAR 7  (TEAL)
 7:00  STAR 8  (TEAL)
 8:00  STAR 9  (TEAL)
 9:00  STAR 10 (TEAL)
10:00  STAR 11 (TEAL)
11:00  STAR 12 (TEAL) – joins Star 11 and Star 1
Each star’s orientation in the ring:
- Outer edge: P2, P3 and P4 point outward.
- Inner edge: P6 points toward the center.
- Joins: P1, V1, V4 and P5 are used for joining.
Joining
Method: Join-as-you-go on Round 4. Each seam has two join points:
- Picot join: the new star’s P1 picot joins to the previous star’s P5 picot.
- Valley join: the new star’s V1 center sc joins to the previous star’s V4 center sc.
Stars 2–11: Lay the previous star RS up. Work Rounds 1–3 of the new star, then begin Round 4 as written, with these two changes:
- Point 1: Work (dc, tr), then a joined picot into the previous star’s P5 picot. Finish with (tr, dc).
- Valley 1: Work ch 2, sc in ch-1 sp, then ch 1. Sl st into the previous star’s V4 center sc, from front to back. Ch 1, then sc in the center dc of the new star. Finish the valley as written.
Complete the rest of Round 4 normally. The stitch counts do not change. Each join simply replaces a ch-3 picot or a ch-2 with the same length of chain plus one sl st.
Stitch-to-stitch logic: The two stars’ facing edges run in opposite directions. The new star’s P1 lines up with the previous star’s P5 at the inner edge. The new star’s V1 lines up with the previous star’s V4 in the middle of the seam.
Joining at the inner points draws the inner edge in, while the outer points stay free. This is what curves the line of stars into a circle.
Star 12: Join to Star 11 at P1 and V1 as above. Continue around, and also work V4 and P5 as joined elements:
- Valley 4: Join V4’s center sc to Star 1’s V1 center sc.
- Point 5: Join P5’s picot to Star 1’s P1 picot.
Before working Star 12’s Round 4, check that the ring is not twisted.
Tension advice:
- Keep the join chains the same tension as your regular chains.
- A tight sl st puckers the valleys. A loose one leaves the seam floppy.
- Do not pull the yarn hard between the join and the next sc.
Size checkpoint: After closing the ring and before blocking, lay it flat. The outer diameter should measure 13 to 14 in (33.0 to 35.6 cm). The open center should measure about 6 in (15.2 cm) between inner tips.
Border (Edge Finish and Hanging Strap)
No border rounds are added. An extra round would round off the points and change the silhouette, so Round 4 of each star is the finished edge. Border depth is 0 in (0 cm).
Edge gauge: Round 4 adds about 0.5 in (1.3 cm) to the star’s radius at each tip. The valleys stay at the Round 3 height.
Edge counts per point section (all 12 stars):
- Point: 4 sts (dc, tr, tr, dc) plus 1 picot
- Valley: 3 sc and 4 ch-2 sps
- One star: 6 sections = 24 point sts, 6 picots, 18 sc, 24 ch-2 sps
- Whole ring: 12 × 24 = 288 point sts, and 72 picots (24 of them joined)
Why the math works: Each seam uses 2 picots, one from each star, and 12 seams × 2 = 24 joined picots. That leaves 48 free picots: 36 on outer tips (P2–P4) and 12 on inner tips (P6). The valley joins use 24 center sc out of 72.
Hanging strap:
- Row 1: Ch 5, sc in 2nd ch from hook and in each ch across. (4 sc)
- Rows 2–40: Ch 1, turn, sc in each st across. (4 sc)
Fasten off, leaving a 12 in (30.5 cm) tail.
The strap measures 8 in (20.3 cm) long and about 0.875 in (2.2 cm) wide. Fold it in half to form a loop with a 4 in (10.2 cm) drop. Sew both ends to the back of Star 1, behind Rounds 2–3, centered under P3. Stitch through only the back loops so nothing shows on the front.
Final Blocking
- Wet the wreath thoroughly and gently press out the water in a towel. Do not wring it.
- Draw a 13.5 in (34.3 cm) circle on paper and lay it under the blocking board.
- Place the wreath RS up and center it on the circle.
- Pin the inner tips (P6) at an even distance, so the open center is about 6 in (15.2 cm) across.
- Pin all 36 outer tips (P2–P4) to the circle line, pulling each picot to a crisp point.
- Pin each Round 1 ring open to 0.5 in (1.3 cm).
- Optional: brush on fabric stiffener for extra crisp points.
- Let it dry completely, usually 24 hours, then unpin.
Final Quality-Control Checklist
- 12 stars, each 3.75 in (9.5 cm) tip to tip
- Every star has 6 points, 6 picots and an open center
- 12 seams, each joined at one picot and one valley sc
- Ring is closed and not twisted
- Outer diameter 13 to 14 in (33.0 to 35.6 cm)
- Open center about 6 in (15.2 cm)
- Outer tips (P2–P4) point outward and inner tips (P6) point inward
- Strap is 8 in (20.3 cm), folded and secure at the back of Star 1
- All ends woven in invisibly
- Wreath hangs flat against the door
Troubleshooting
Star cups like a bowl: Your Round 3 or 4 is too tight. Go up 0.5 mm in hook size, or loosen the tr.
Star ruffles: The chains are too loose. Go down 0.5 mm, or tighten the chain spaces.
Center hole closed up: Round 1 dc were pulled too snug. Work them more loosely over the ch-10 ring and block the hole open.
Ring won’t lie flat or buckles: One join may be on the wrong point. Check that each seam pairs P1 with P5 and V1 with V4.
Ring is oval: The stars vary in size. Re-block to the drawn circle, or remake the outlier star.
Points droop: Re-block with fabric stiffener. Cotton holds points better than acrylic.
Wreath tilts when hung: The strap is off-center. Re-sew it directly behind P3 of Star 1.
Care
Spot clean or hand wash cool and lay flat to dry, re-pinning the points if needed. If you used stiffener, spot clean only.
Final Notes
The measurement chain is simple. Round 1 at 1.5 in (3.8 cm) leads to a star of 3.75 in (9.5 cm) tip to tip and 2.5 in (6.4 cm) valley to valley. Twelve stars joined at their inner points and valleys then curve into a 13.5 in (34.3 cm) wreath with a 6 in (15.2 cm) open center.
If your first star hits its checkpoints, the wreath will follow. Optional: for a larger wreath, the same star works in a heavier yarn with a bigger hook. Keep the twelve-star count and recheck the star size first.
Happy crocheting!