

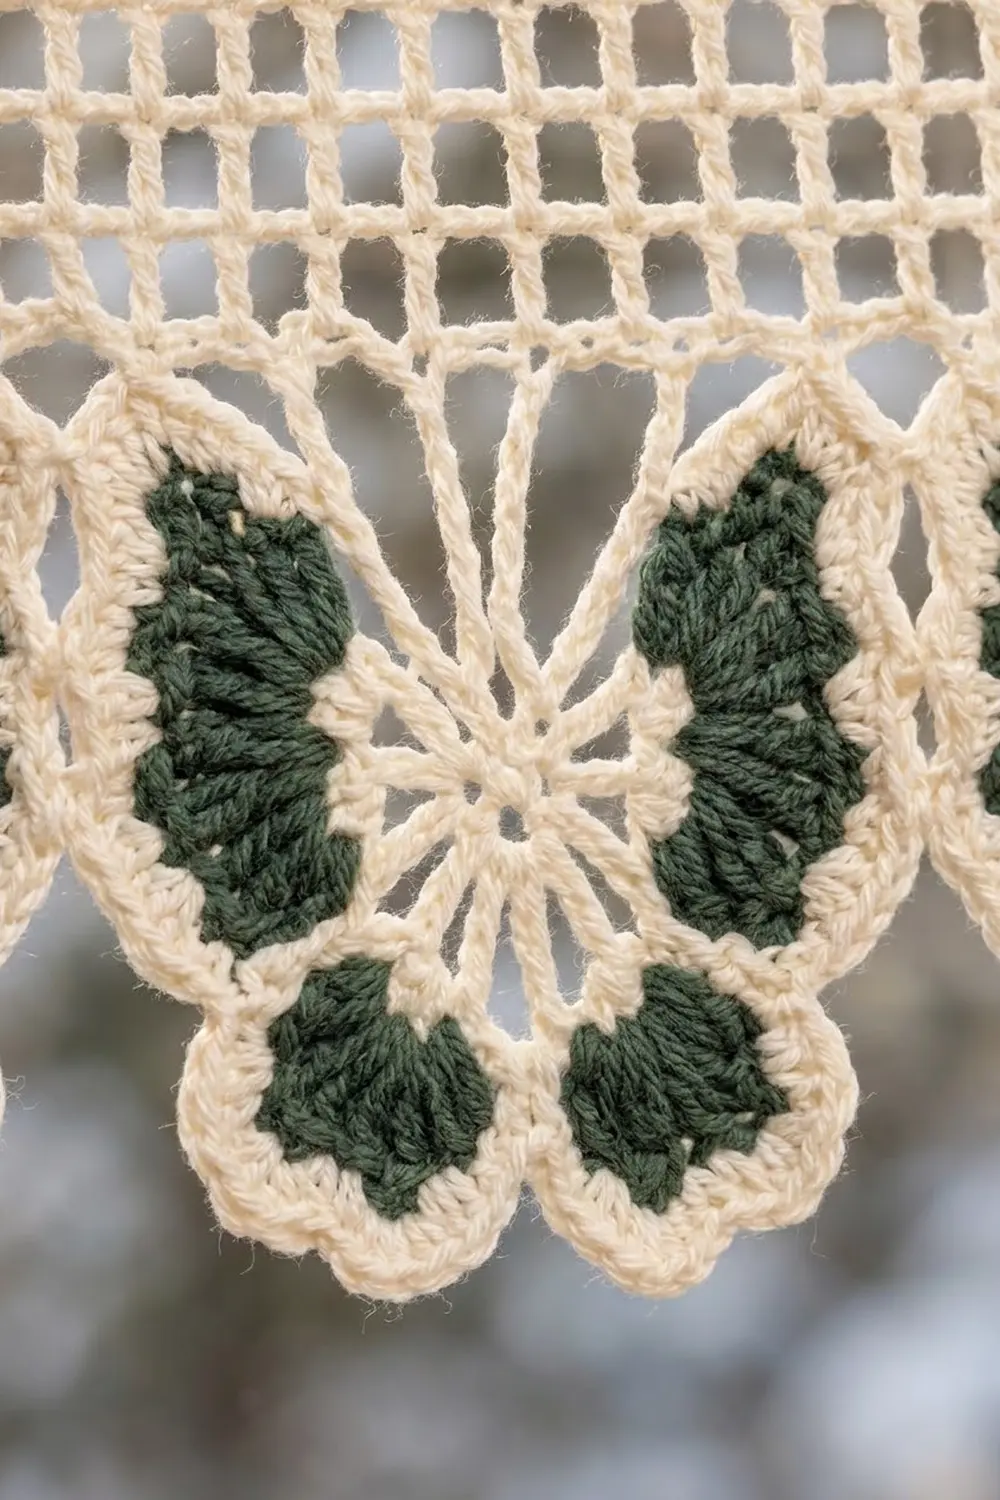
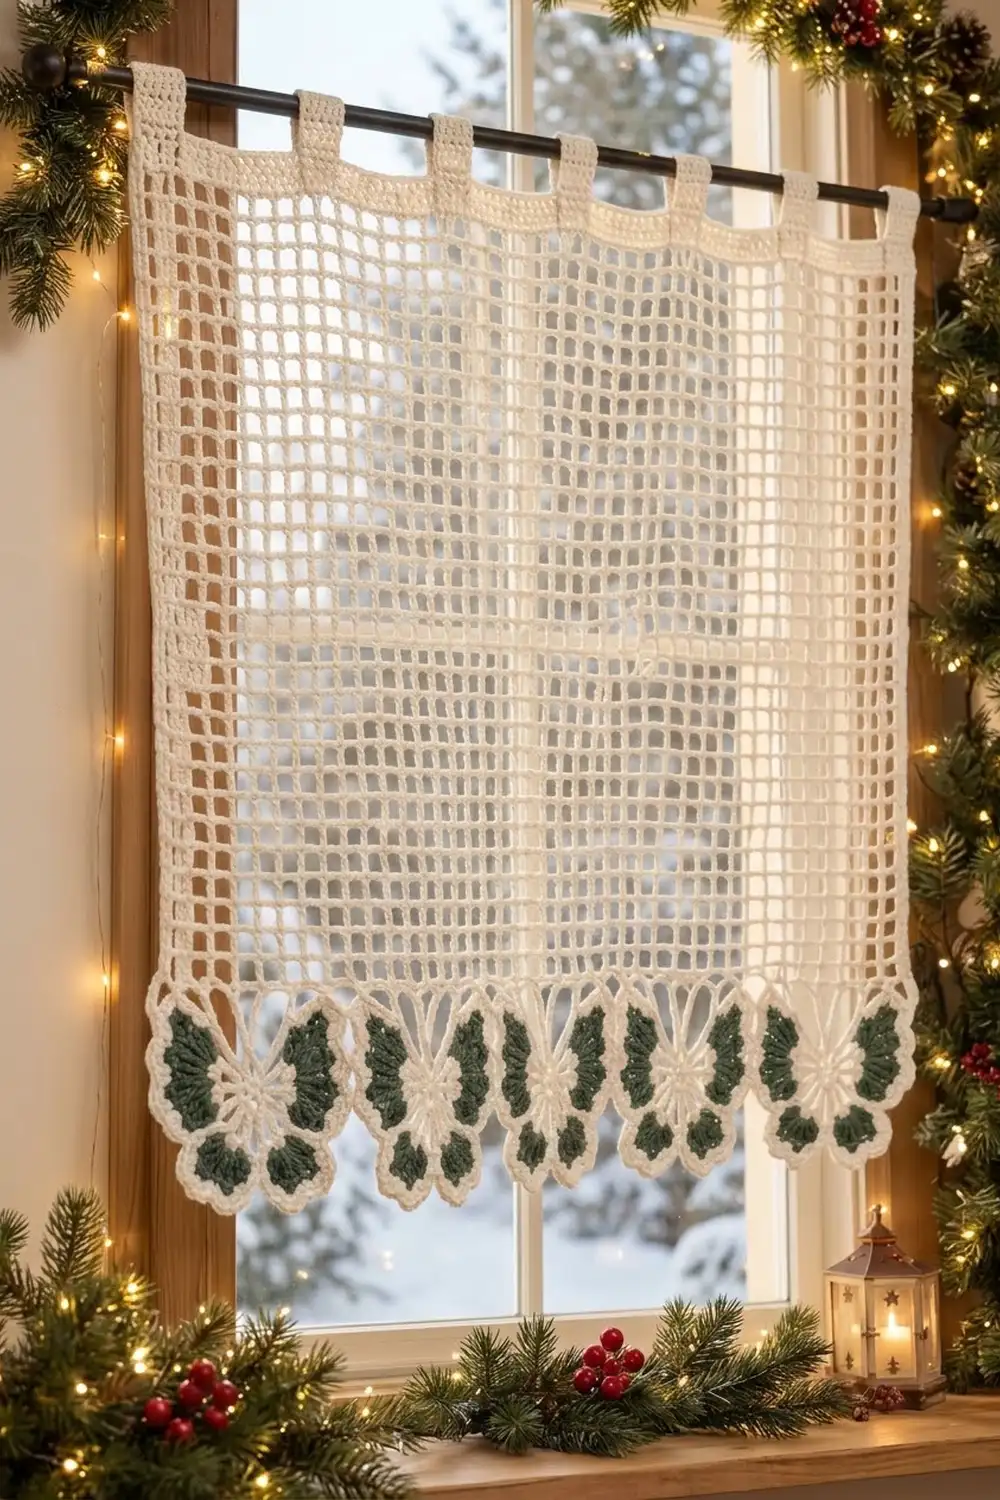
This curtain panel brings a quiet holiday touch to a window. The body is an open cream filet mesh that lets winter light through. The bottom edge ends in a row of rounded shell scallops, and each one holds a small dark green leaf.
The palette is just two colors. Cream is used for the mesh, tab loops and scallop border, and deep evergreen for the leaf appliqués. The look is soft, light and seasonal without being busy, so it works from late November to the end of winter.
The pattern uses US crochet terms. The finished panel measures 26.4 in (67.1 cm) wide and 30 in (76.2 cm) tall from the top edge to the tips of the scallops. The tab loops rise about 2.5 in (6.4 cm) above the top edge.
Construction is simple. You work the mesh body in rows from the bottom up, add two solid rows at the top, and build seven tab loops off the last row. Then you work a four-row scallop border along the foundation edge and sew one green leaf onto each of the 11 scallops.
Finished Size and Construction
- Finished size: 26.4 in (67.1 cm) wide x 30 in (76.2 cm) tall, plus 2.5 in (6.4 cm) tab loops
- Skill level: Easy to intermediate
- Terminology: US crochet terms
- Yarn weight: DK / light (#3) cotton
- Hook: 4.0 mm (US G-6)
- Number of pieces: 1 curtain panel plus 11 small leaf appliqués
- Layout: one panel, 66 mesh squares wide x 70 rows tall
- Piece size (body): 26.4 in (67.1 cm) x 28 in (71.1 cm)
- Size before border: 26.4 in (67.1 cm) x 28 in (71.1 cm)
- Border depth: 2 in (5.1 cm), bottom edge only
Materials
Choose a smooth mercerized or combed cotton in DK weight. Cotton keeps the square mesh crisp, hangs straight, and stands up to sunlight and washing better than acrylic. Avoid fuzzy or very stretchy yarns, because they blur the grid and let the panel sag.
- Cream (main color): 350 g, about 840 m (based on 50 g / 120 m balls)
- Dark green (leaves): 20 g, about 48 m
These amounts include a margin of about 10-15% for the gauge swatch, tails and small tension differences.
Tools:
- 4.0 mm (US G-6) crochet hook
- 4.5 mm (US 7) hook for the foundation chain (optional, keeps it from tightening)
- Tapestry needle
- Stitch markers
- Rust-proof pins and a blocking surface at least 28 x 32 in (71.1 x 81.3 cm)
- Measuring tape and scissors
- Spray bottle
Abbreviations (US Terms)
- ch – chain
- sl st – slip stitch
- sc – single crochet
- hdc – half double crochet
- dc – double crochet
- tr – treble crochet
- sk – skip
- sp – space
- st(s) – stitch(es)
- RS / WS – right side / wrong side
Special stitches:
- Open square (mesh): ch 1, sk 1 st (or the ch-1 sp), dc in next st. Each square is 2 sts wide and shares its posts with the squares beside it.
- Block: 3 sts that fill one square: the two posts plus 1 dc worked in the ch-1 sp or st between them.
- Fan: (tr, ch 1) 6 times in the same st, tr in same st: 7 tr with 6 ch-1 sps.
- Picot: ch 3, sl st in the first of those 3 ch.
Gauge and Checkpoints
Gauge: 10 mesh squares (20 sts) and 10 rows = 4 in (10.2 cm) in filet mesh, after light blocking. Each square measures 0.4 in (1.0 cm) wide and tall. In sc, 20 sts and 20 rows = 4 in (10.2 cm).
Test first: Ch 27 and work Rows 1-2 of the body pattern, but repeat the open square 10 times instead of 64. This gives 12 squares per row: a block, 10 open squares and a block. Work 12 rows and block the swatch. Then measure 10 squares across and 10 rows up in the center. Both should be 4 in (10.2 cm). Also make one test leaf. It should be about 1.75 in (4.4 cm) long.
Checkpoints:
- After Row 1: 26.4 in (67.1 cm) wide, lightly stretched
- After Row 10: 4 in (10.2 cm) tall
- After Row 35: 14 in (35.6 cm) tall
- After Row 70: 28 in (71.1 cm) tall
- Each tab strip: 5 in (12.7 cm) before folding
- After the border: 30 in (76.2 cm) total height
If your swatch is too big (fewer than 10 squares per 4 in), go down a hook size. If it is too small (more than 10 squares per 4 in), go up a hook size. If the width is right but the rows are short, pull up your dc loops a little taller instead of changing hooks.
Mesh Body
The body is 66 squares wide. Every row has a solid block at each side, which makes a neat framed edge, with 64 open squares in between. Each row has 133 sts: 67 dc posts plus 66 fillers or ch-1 sps.
Foundation: With cream and the 4.5 mm hook (if using), ch 135. Switch to the 4.0 mm hook.
Row 1 (RS): Dc in 4th ch from hook (the 3 skipped ch count as the first dc) and in next ch (first block made). [Ch 1, sk next ch, dc in next ch] 64 times. Dc in last 2 ch (last block made). (133 sts: 3 + 128 + 2)
Row 2: Ch 3 (counts as dc throughout), turn. Dc in next 2 dc (block). [Ch 1, sk ch-1 sp, dc in next dc] 64 times. Dc in next dc, then dc in 3rd ch of the turning ch (block). (133 sts)
Rows 3-68: Repeat Row 2. (133 sts in every row)
Check your height at Row 35: it should be 14 in (35.6 cm). At Row 68 the body should measure 27.2 in (69.1 cm).
Top header (solid rows):
Row 69: Ch 3, turn. Dc in each dc and in each ch-1 sp across, ending with dc in 3rd ch of the turning ch. (133 dc)
Row 70: Ch 3, turn. Dc in each dc across, ending in the turning ch. (133 dc)
The body now measures 26.4 in (67.1 cm) x 28 in (71.1 cm). Do not fasten off.
Hanging Tabs
There are 7 tabs of 7 sts each, with 6 gaps of 14 sts between them: 7 x 7 + 6 x 14 = 49 + 84 = 133 sts. Each tab is 1.4 in (3.6 cm) wide and each gap is 2.8 in (7.1 cm).
Tab 1: Ch 1, turn. Sc in first 7 sts. Working on these 7 sts only: [ch 1, turn, sc in each of 7 sc] 24 times. (25 rows, 7 sc each) Fasten off, leaving a 12 in (30.5 cm) tail.
Tabs 2-7: Sk the next 14 sts of Row 70. Join cream in the next st, ch 1, sc in same st and next 6 sts. Work 24 more rows as for Tab 1. Fasten off with a 12 in (30.5 cm) tail.
The last tab ends exactly on the final st of Row 70. Each strip measures 5 in (12.7 cm).
Forming the loops: Fold each strip to the WS. Sew its last row across the WS of Row 69, directly behind the base of the tab. Each loop stands about 2.5 in (6.4 cm) above the top edge and fits a rod up to 1.5 in (3.8 cm) in diameter.
Leaf Motifs (make 11)
With dark green: Ch 9.
Round 1: Sc in 2nd ch from hook, hdc in next ch, dc in next ch, tr in next 2 ch, dc in next ch, hdc in next ch, sc in last ch. (8 sts) Ch 2 for the tip. Working along the opposite side of the foundation ch: sc in first ch, hdc in next ch, dc in next ch, tr in next 2 ch, dc in next ch, hdc in next ch, sc in last ch. (8 sts) Sl st in first sc.
Each leaf has 16 sts plus the ch-2 tip. It measures about 1.75 in (4.4 cm) long and 1 in (2.5 cm) wide. Fasten off, leaving a 10 in (25.4 cm) tail for sewing.
Steam or wet-block the leaves flat before you attach them. Set them aside until the border is done.
Border
Border gauge: The border is worked into the foundation edge at the same stitch density as the mesh: 133 sts over 26.4 in (67.1 cm), or about 5 sts per inch. Each scallop repeat uses 12 sts, about 2.4 in (6.1 cm).
With RS facing, rotate the panel so the foundation chain is at the top.
Row 1 (sc conversion row): Join cream in the first ch at the right corner. Ch 1. Work 1 sc into the base of each st of body Row 1: into the ch under each dc, and into the skipped ch under each ch-1 sp. (133 sc: 133 sts worked 1-for-1, plus 0 extra)
Row 2 (fans): Ch 1, turn. Sc in first sc. Sk 5 sc, fan in next sc, sk 5 sc, sc in next sc; repeat from * 10 more times. (11 fans and 12 sc)*
Stitch check: 1 + (11 x 12) = 133. Each repeat uses 5 skipped sts, 1 fan st, 5 skipped sts and 1 closing sc. The closing sc of each repeat is also the opening sc of the next one.
Row 3 (shells): Ch 1, turn. Sc in first sc. Work 3 dc in each of the next 6 ch-1 sps, sc in next sc; repeat from * 10 more times. (18 dc per scallop: 198 dc plus 12 sc = 210 sts)*
Row 4 (picot edge): Ch 1, turn. Sl st in first sc. [Sc in next 3 dc, picot] 5 times, sc in next 3 dc, sl st in next sc; repeat from * 10 more times. (Per scallop: 18 sc and 5 picots. Total: 198 sc, 55 picots, 12 sl sts)* Fasten off.
Why the math works: The bottom edge holds 133 sts. A 12-st repeat needs 12n + 1 sts, and 12 x 11 + 1 = 133, so 11 scallops fit with nothing left over. Each fan then grows to 18 dc, which makes a rounded shell without ruffling. The border adds 2 in (5.1 cm) at the deepest point of each scallop.
Attaching the leaves: Lay one leaf on each scallop, RS up. Place the stem end on border Row 1, at the base of the fan. Point the tip straight down so it sits just inside the picot edge. Whipstitch around the outer edge of the leaf with the green tail, catching only the front loops of the cream stitches. Weave in the tails on the WS. You now have 11 leaves spaced 2.4 in (6.1 cm) apart.
Final Blocking
- Weave in the remaining cream tails along the solid blocks or the header rows, where they hide best.
- Soak the panel in cool water for 15 minutes. Roll it in a towel and press out the water gently; do not wring.
- Lay it flat, WS up, and pin the top corners 26.4 in (67.1 cm) apart.
- Pin the bottom corners of the mesh 28 in (71.1 cm) below the top edge.
- Pin along both side blocks every 2 in (5.1 cm), keeping the edges straight.
- Pin each scallop into a rounded curve, with a pin in the center picot. The total height should be 30 in (76.2 cm).
- Straighten the mesh rows with your fingers so every square is 0.4 in (1.0 cm).
- Let the panel dry completely before unpinning, then smooth the tab loops flat by hand.
Final Quality-Control Checklist
- Every body row has 133 sts and 66 squares.
- Side edges are solid blocks from Row 1 to Row 68.
- Width is 26.4 in (67.1 cm) at the top, middle and bottom.
- Body height is 28 in (71.1 cm), and total height is 30 in (76.2 cm).
- There are 7 tabs, each 1.4 in (3.6 cm) wide, with 2.8 in (7.1 cm) gaps.
- There are 11 scallops, each with 18 dc and 5 picots.
- There are 11 green leaves, each centered on its scallop and pointing down.
- No loose tails show on the RS when the panel is held up to the light.
Troubleshooting
Panel narrows or widens. You are missing or adding a st at the row ends. Always end with dc in the turning ch, and count to 133 every few rows.
Foundation edge pulls in. The chain is too tight. Remake it with the larger hook.
Squares are rectangles, not squares. Your dc are too short or too tall. If the width is correct, change your loop height, not your hook size.
Scallops ruffle. Your dc in Row 3 are too loose. Use a 3.75 mm hook for Rows 3-4 only.
Scallops cup. Your tension is too tight. Use a 4.5 mm hook for Rows 2-3.
Leaves curl. Block them before sewing, and sew around the whole edge, not just the stem.
Tabs twist on the rod. The fold is uneven. Unpick it and sew the last row straight across Row 69.
Care
Hand wash in cool water with a mild detergent and dry flat, reshaping the scallops while damp. Keep the panel away from direct radiator heat to prevent yellowing.
Final Notes
Everything depends on one measurement: 10 squares and 10 rows equal 4 in (10.2 cm). That gives 66 squares and 133 sts for 26.4 in (67.1 cm) of width, and 70 rows for 28 in (71.1 cm) of height. The 133-st foundation edge divides into 11 scallop repeats of 12 sts, which add 2 in (5.1 cm) for a total of 30 in (76.2 cm). At the top, seven tabs and six gaps use the same 133 sts.
Check your swatch and count your stitches every few rows, and the panel will come out square and even.
Optional: for a wider window, make a second identical panel and hang the two side by side.
Happy crocheting!