

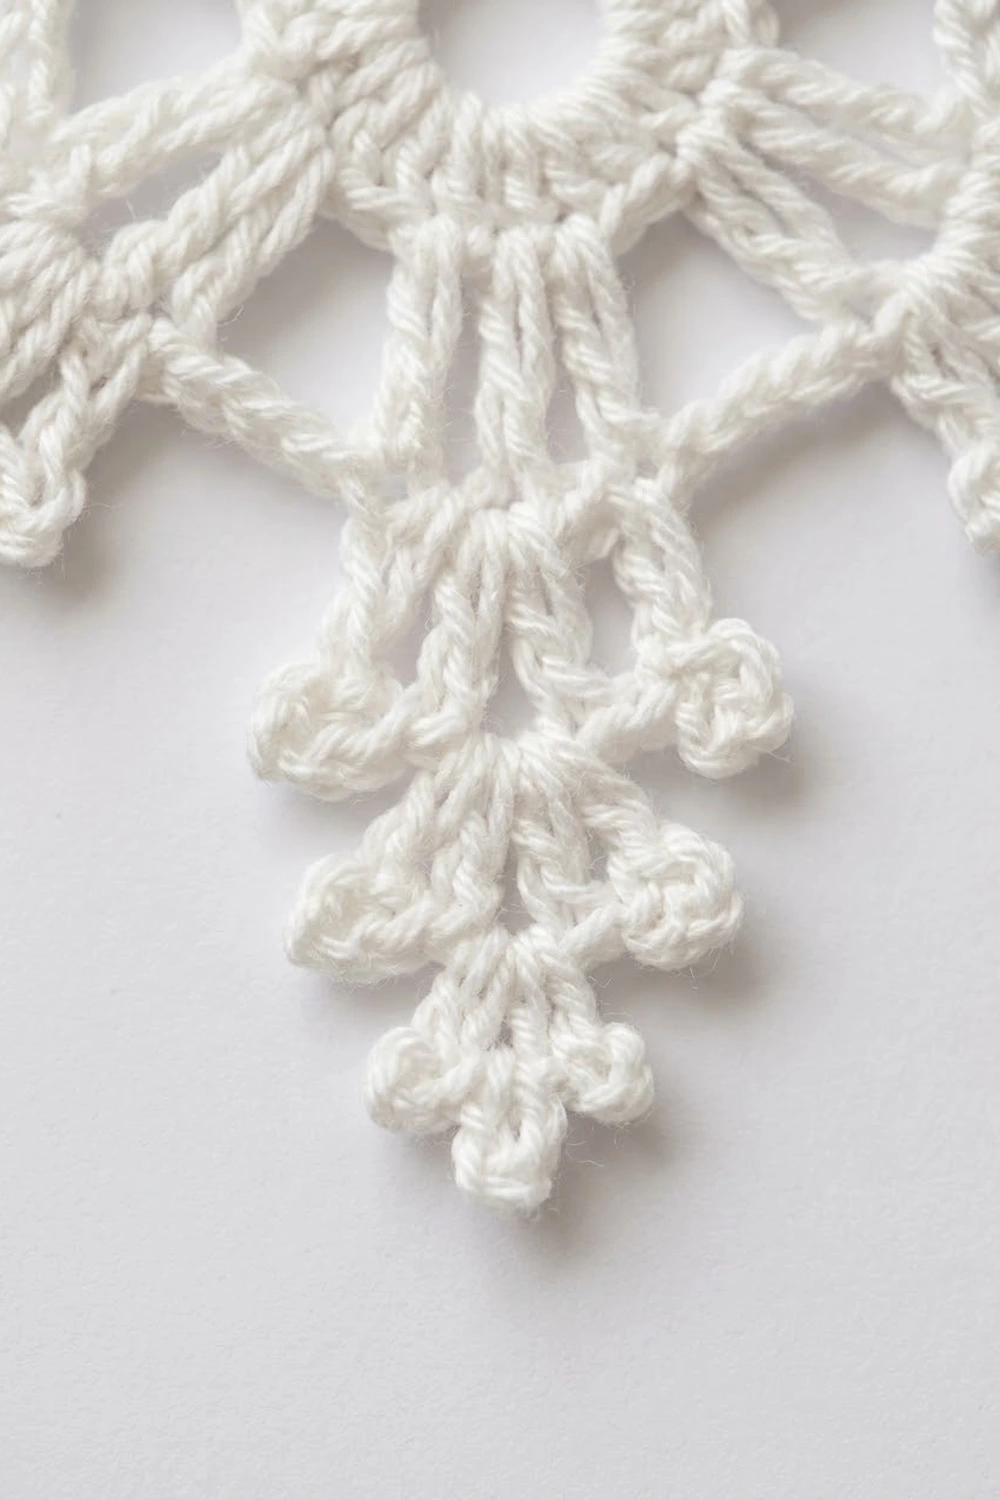
The Frostlace Snowflake is a single six-pointed snowflake motif worked in white or cream thread. It has a small, solid ring at the center and six identical arms. Picots, small bobbles and open chain spaces give it a lacy, crystalline look.
Each arm has a pair of bobbles near the center and another pair along the stem. A picot point sits between each pair of arms, and a flower-like trefoil of three picots finishes every tip. The gaps between stitch groups keep the piece airy and delicate, like a real snowflake.
This pattern uses US crochet terms. After blocking, the snowflake measures 4.5 in (11.4 cm) from tip to tip.
You work six rounds from a chain ring. There is no joining and there are no separate pieces. Rounds 1–2 form the center, Rounds 3–5 build the arms, and Round 6 is the picot edging that finishes every point.
Finished Size and Construction
- Finished size: 4.5 in (11.4 cm) tip to tip, blocked
- Skill level: Easy–Intermediate
- Terminology: US crochet terms
- Yarn weight: Size 3 mercerized cotton crochet thread (lace / weight 0)
- Hook: 2.25 mm (US B-1)
- Number of pieces: 1
- Layout: one radial motif with six identical arms
- Piece size: 4.5 in (11.4 cm) tip to tip
- Size before border (after Round 5): 3.75 in (9.5 cm) tip to tip
- Border depth (Round 6): about 0.375 in (1.0 cm) added at each tip after blocking
Materials
Yarn advice: Choose a smooth, tightly plied mercerized cotton thread. It shows picots and bobbles crisply and keeps its shape after starching. Avoid fuzzy or very soft yarns, because they blur the lace and won’t hold the points.
- White or cream (one color): 5 g, about 14 m
Tools:
- 2.25 mm (US B-1) crochet hook
- Tapestry needle
- Small scissors
- Ruler or tape measure
- Blocking board or foam mat
- 18–24 rustproof pins
- Spray starch or fabric stiffener
The yarn amount includes a margin for a test center and weaving in ends. The snowflake itself uses less.
Abbreviations (US Terms)
- ch: chain
- sl st: slip stitch
- sc: single crochet
- dc: double crochet
- st(s): stitch(es)
- sp(s): space(s)
- rep: repeat
- beg: beginning
- yo: yarn over
Special stitches:
- Bobble: work (yo, insert hook in the st or sp, yo and pull up a loop, yo and pull through 2 loops) 4 times in the same st or sp. Then yo and pull through all 5 loops on the hook.
- Beg bobble: ch 2. Work (yo, insert hook, yo and pull up a loop, yo and pull through 2 loops) 3 times in the same sp. Then yo and pull through all 4 loops. This counts as 1 bobble.
- Picot: ch 3, sl st in 3rd ch from hook.
- Trefoil: ch 3, sl st in 3rd ch from hook; ch 4, sl st in 4th ch from hook; ch 3, sl st in 3rd ch from hook; sl st in top of the last sc made. This makes three picots fanned into a tiny flower.
Gauge and Checkpoints
Gauge is not critical for an ornament, but it controls the final size. Work Rounds 1–2 first and measure before you go on.
Gauge: Rounds 1–2 = 1.5 in (3.8 cm) across, measured flat.
Checkpoints (measured flat and unblocked):
- After Round 1: 1 in (2.5 cm) across
- After Round 2: 1.5 in (3.8 cm) across
- After Round 3: 2.5 in (6.4 cm) tip to tip
- After Round 4: 3 in (7.6 cm) tip to tip
- After Round 5: 3.75 in (9.5 cm) tip to tip
- After Round 6: about 4.25 in (10.8 cm) unblocked, 4.5 in (11.4 cm) blocked
Being off by up to 0.25 in (0.6 cm) at any checkpoint is fine.
If your center is too big: go down to a 2 mm hook, or work your chains tighter.
If your center is too small: go up to a 2.5 mm hook.
If it cups or ruffles: check Troubleshooting before you go past Round 3. Fixing the center early is much easier than blocking out a distorted snowflake.
Pattern
Round 1: Center Ring
Ch 6, sl st in first ch to form a ring.
Ch 3 (counts as dc), work 17 dc in the ring, sl st in top of beg ch-3.
Count: 18 dc. Checkpoint: 1 in (2.5 cm) across.
Round 2: Six Groups
Ch 3 (counts as dc), dc in next 2 dc, ch 3, *dc in next 3 dc, ch 3; rep from * 4 more times, sl st in top of beg ch-3.
Count: 18 dc in 6 groups of 3, plus 6 ch-3 sps. Checkpoint: 1.5 in (3.8 cm) across.
The six ch-3 sps mark where the six arms will grow.
Round 3: First Bobbles
Sl st in next dc, which is the center dc of the first group.
Ch 1, sc in same dc, ch 3, (bobble, ch 3, bobble) in next ch-3 sp, ch 3, *sc in center dc of next group, ch 3, (bobble, ch 3, bobble) in next ch-3 sp, ch 3; rep from * 4 more times, sl st in first sc.
Count: 6 sc, 12 bobbles, 6 tip ch-3 sps (between the bobbles of each pair) and 12 side ch-3 sps.
Checkpoint: 2.5 in (6.4 cm) tip to tip. You should already see a six-pointed star.
Round 4: Arm Stems
Sl st in each of next 3 ch, sl st in top of next bobble, sl st in next tip ch-3 sp.
Ch 3 (counts as dc), (dc, ch 3, 2 dc) in same tip sp, ch 4, sc in next sc, ch 4, *(2 dc, ch 3, 2 dc) in next tip ch-3 sp, ch 4, sc in next sc, ch 4; rep from * 4 more times, sl st in top of beg ch-3.
Count: 24 dc in 6 V-groups, 6 tip ch-3 sps, 6 sc and 12 ch-4 sps.
Checkpoint: 3 in (7.6 cm) tip to tip.
Each V-group makes an arm longer. The ch-4 sps open up the gaps between the arms.
Round 5: Arm Bobbles and Side Points
Sl st in next dc, sl st in next tip ch-3 sp.
Beg bobble in same sp, ch 7, bobble in same sp, ch 3, sc in next ch-4 sp, picot, sc in next ch-4 sp, ch 3, *(bobble, ch 7, bobble) in next tip ch-3 sp, ch 3, sc in next ch-4 sp, picot, sc in next ch-4 sp, ch 3; rep from * 4 more times, sl st in top of beg bobble.
Count: 12 bobbles, 6 ch-7 loops, 12 sc, 6 picots and 12 ch-3 sps.
Checkpoint: 3.75 in (9.5 cm) tip to tip. This is your size before the border.
The two sc go into the ch-4 sps on either side of the Round 4 sc and skip over it. That puts each picot directly above it, forming a small point between the arms.
Border (Round 6: Picot Edging)
The border is a single round. It covers each ch-7 loop with picots and a trefoil tip, and adds a small point between the arms.
Border gauge: each ch-7 loop holds 8 sc, which is 1 sc per chain plus 1 extra. The extra stitch lets the sc follow the curve of the loop without pulling it straight.
Round 6
Sl st in next ch-7 loop.
Ch 1. In the same loop, work 2 sc, picot, 2 sc, trefoil, 2 sc, picot, 2 sc. Sc in top of next bobble, ch 2, (sc, ch 3, sc) in the ch-3 loop of next picot, ch 2, sc in top of next bobble.
*In next ch-7 loop, work 2 sc, picot, 2 sc, trefoil, 2 sc, picot, 2 sc. Sc in top of next bobble, ch 2, (sc, ch 3, sc) in next picot, ch 2, sc in top of next bobble; rep from * 4 more times.
The final “sc in top of next bobble” goes into the beg bobble of Round 5. Sl st in first sc. Fasten off.
Count per arm (one-sixth of the round):
- In the ch-7 loop: 8 sc, 2 picots and 1 trefoil
- Between arms: 4 sc (1 on each bobble and 2 in the picot), 1 ch-3 loop and 2 ch-2 sps
- Total per arm: 12 sc
Count for the full round: 12 sc × 6 = 72 sc, plus 12 picots, 6 trefoils and 6 ch-3 loops.
Why the math works: Rounds 3–5 each repeat one arm unit six times. That leaves Round 6 with exactly 6 ch-7 loops, 12 bobbles and 6 picots to work into, with nothing left over. In each loop, 4 sc go on each side of the trefoil (2 sc, picot, 2 sc), so the tip sits dead center and the side picots mirror each other. Between arms, the ch-2 sps arch over the Round 5 ch-3 sps and sc, which keeps the openwork gaps.
Checkpoint: about 4.25 in (10.8 cm) tip to tip unblocked. Blocking opens the edging to its full 0.375 in (1.0 cm) depth at each tip.
Weave in both ends along the back of the Round 1 dc, where the solid stitches hide them.
Final Blocking
- Make a template. Draw a 4.5 in (11.4 cm) circle on paper and mark six points evenly around it, 60° apart. Lay plastic wrap over it on your blocking board.
- Wet the snowflake. Soak it in cool water for a few minutes, then roll it in a towel to remove excess water.
- Pin the center. Place the ring at the center of the template and pin it lightly at 3 points.
- Pin the tips. Pin each trefoil to one of the six marks so every tip touches the 4.5 in (11.4 cm) circle.
- Open the details. Pin each ch-3 loop between the arms outward. Pin the two side picots of each arm so they spread slightly.
- Stiffen. Spray with starch or brush on fabric stiffener until the piece is fully damp.
- Dry completely. Leave it pinned for at least 12 hours, or until it is fully dry and stiff.
- Unpin and measure. It should measure 4.5 in (11.4 cm) tip to tip across all three axes.
Final Quality-Control Checklist
- Round 1 has 18 dc, and the center hole is small and round.
- Round 2 has 6 groups of 3 dc with 6 ch-3 sps.
- Round 3 has 12 bobbles in 6 pairs.
- Round 4 has 6 V-groups with 6 sc between them.
- Round 5 has 6 ch-7 loops and 6 picots between the arms.
- Round 6 has 72 sc, 12 picots, 6 trefoils and 6 ch-3 loops.
- All six arms are the same length, within 0.125 in (0.3 cm).
- The blocked size is 4.5 in (11.4 cm) tip to tip on all three axes.
- All ends are woven in with no visible tails.
- The snowflake lies flat and holds its shape.
Troubleshooting
The center cups after Round 2. Your dc are too tight for the ring. Redo Rounds 1–2 with a slightly looser hand, or go up one hook size for these rounds only.
The snowflake ruffles after Round 3 or Round 5. Your chains are too loose. Chain more firmly, or use a 2 mm hook for the chain spaces.
The bobbles look flat. Pull each loop up to the full height of a dc before you yarn over, and close the bobble with a firm final pull.
A trefoil leans to one side. Make sure there are exactly 2 sc, picot, 2 sc on each side of it. Uneven counts pull the tip off center.
One arm is longer than the others. Count the chains in that loop. A ch-6 or ch-8 loop in place of a ch-7 changes the arm length noticeably.
The picots disappear into the fabric. Keep the ch-3 of each picot firm, and work the sl st into the 3rd ch from the hook.
The points won’t stay sharp after blocking. Use more stiffener, and let the piece dry completely on the pins before you remove it.
Care
Hand wash in cool water with mild soap, then reshape and starch again while it is damp. Store it flat between sheets of tissue paper so the points don’t bend.

Final Notes
Here is the full measurement chain for the Frostlace Snowflake. The 18-dc center ring measures 1 in (2.5 cm). Round 2 opens it to 1.5 in (3.8 cm) and adds six arm spaces. Round 3 forms the star at 2.5 in (6.4 cm). Round 4 grows the arms to 3 in (7.6 cm), and Round 5 brings them to 3.75 in (9.5 cm). The picot border adds about 0.375 in (1.0 cm) at each tip, and blocking sets the finished snowflake at 4.5 in (11.4 cm).
If you check your size after each round, the finished piece will match.
Optional: to make a set for a tree or for gift tags, crochet several snowflakes in the same thread, each worked exactly as written above.
Happy crocheting!