

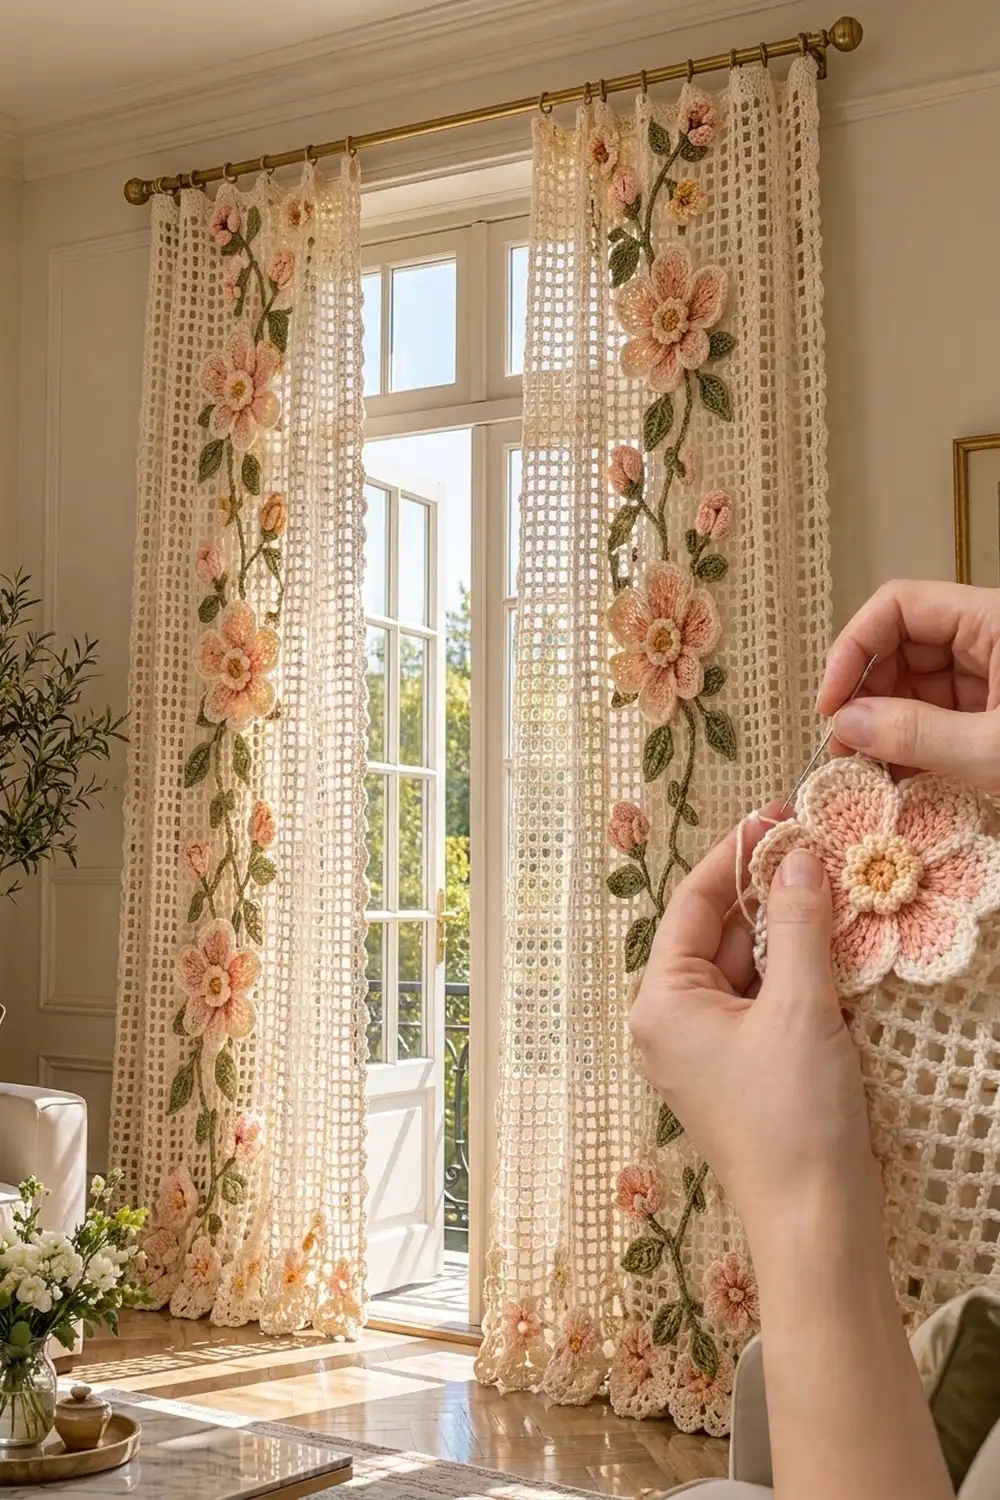
These curtain panels are worked in airy cream filet mesh, with a climbing vine of peach blossoms running down one side. Light comes through the open squares, and the flowers add soft texture and a vintage cottage feel.
The palette uses four colors. The mesh and petal outlines are cream, the blossoms and buds are peach, the flower centers are golden yellow, and the leaves and vines are sage green.
The pattern uses US crochet terms. Each panel finishes at 29 in (73.7 cm) wide by 81.5 in (207.0 cm) long, including the border. The photo shows a matching pair, so the instructions cover one panel and tell you to make two.
Construction is simple. You crochet the mesh panel in rows, add a two-round border with scallops along the bottom, and make the appliqués separately. Then you sew the appliqués onto the mesh following a layout grid and block the finished panel.
Finished Size and Construction
- Finished size (each panel): 29 in x 81.5 in (73.7 cm x 207.0 cm)
- Skill level: Intermediate
- Terminology: US crochet terms
- Yarn weight: Light (#3, DK/sport) mercerized cotton
- Hooks: 4.0 mm (G-6) for the mesh, 3.5 mm (E-4) for the appliqués
- Number of pieces: 2 separate panels, each with 6 large flowers, 6 small flowers, 12 buds, 36 leaves, and 6 vine cords
- Layout: one vertical vine column per panel, made of 6 stacked repeat units, mirrored on the second panel
- Piece size (mesh body): 70 meshes x 200 rows
- Size before border: 28 in x 80 in (71.1 cm x 203.2 cm)
- Border depth: 0.5 in (1.3 cm) on the sides and top, 1 in (2.5 cm) at the bottom
Materials
Use a smooth mercerized cotton in DK/sport weight, about 120 m per 50 g. Cotton gives crisp mesh squares and holds its shape on the rod. Avoid fuzzy yarns, because they blur the squares.
The amounts below cover both panels:
- Cream (mesh, border, petal outlines): 850 g, about 2,040 m
- Peach (petals, buds): 120 g, about 288 m
- Golden yellow (flower centers): 30 g, about 72 m
- Sage green (leaves, vines, sepals): 150 g, about 360 m
The quantities include a margin of roughly 10 to 15 percent for your swatch and any tension differences.
Tools:
- 4.0 mm (G-6) and 3.5 mm (E-4) crochet hooks
- Tapestry needle
- Stitch markers
- Small amount of polyester fiberfill or cream yarn scraps for the buds
- Rust-proof pins
- Blocking surface large enough for a 29 in x 81.5 in (73.7 cm x 207.0 cm) panel, or blocking mats laid out in a long strip
- Measuring tape
- Curtain clip rings (12 per panel) for hanging
Abbreviations (US Terms)
- ch – chain
- sl st – slip stitch
- sc – single crochet
- hdc – half double crochet
- dc – double crochet
- tr – treble crochet
- sc2tog – single crochet 2 together
- FLO / BLO – front loop only / back loop only
- sp – space
- st(s) – stitch(es)
Special stitch – Mesh: ch 2, skip 2 sts (or the next ch-2 sp), dc in the next dc. One mesh is 3 sts wide.
Special stitch – Back-bump cord: chain the stated number, then sl st in the back bump of the 2nd ch from the hook and in each ch across. This makes a firm, rounded cord for the vines and stems.
Gauge and Checkpoints
Mesh gauge (4.0 mm hook): 10 meshes and 10 rows = 4 in (10.2 cm). One mesh is 0.4 in (1.0 cm) square.
Appliqué gauge (3.5 mm hook): a chain of 4 ch = 1 in (2.5 cm).
Make one test piece of each type before you start the full panel.
- Mesh swatch: Ch 48. Dc in the 4th ch from the hook and in each ch across (46 sts). Work 14 mesh rows of 15 meshes each. The swatch should measure 6 in x 6 in (15.2 cm x 15.2 cm).
- Large flower: Make one large flower. It should measure 4.5 in (11.4 cm) across.
Checkpoints on the panel:
- After Row 1: 28 in (71.1 cm) wide
- After Row 25: 10 in (25.4 cm) long
- After Row 100: 40 in (101.6 cm) long
- After Row 200: 80 in (203.2 cm) long
- After the border: 29 in x 81.5 in (73.7 cm x 207.0 cm)
If your swatch is too big, go down a hook size. If it is too small, go up a hook size. Change the hook, not the stitch counts. The border and layout math depend on the panel staying 70 meshes wide.
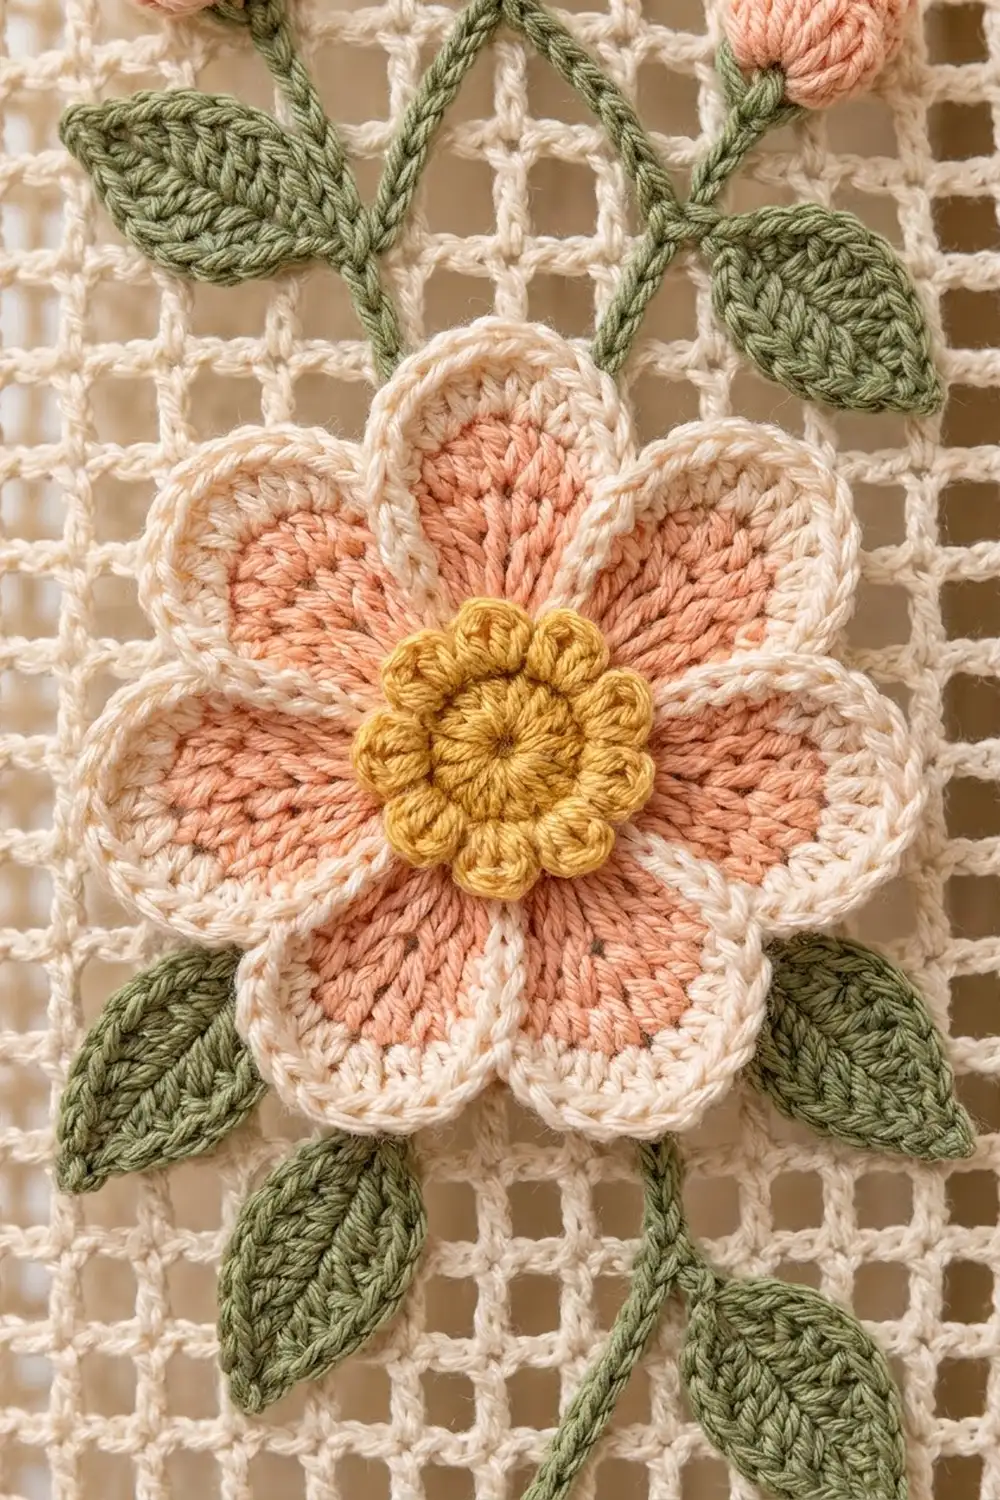
Mesh Panel (Make 2)
Use cream and the 4.0 mm hook.
Foundation: Ch 213.
Row 1 (solid): Dc in the 4th ch from the hook (the skipped 3 ch count as the first dc) and in each ch across. Turn. (211 sts)
Row 2 (first mesh row): Ch 5 (counts as dc + ch 2). Skip the next 2 dc, dc in the next dc. Ch 2, skip 2 dc, dc in the next dc. Repeat from * across, working the last dc in the top of the turning ch. Turn. (70 meshes; 211 sts counted as 71 dc + 70 ch-2 sps)
Rows 3–197: Ch 5 (counts as dc + ch 2). Skip the ch-2 sp, dc in the next dc. Ch 2, skip the ch-2 sp, dc in the next dc. Repeat from * across, working the last dc in the 3rd ch of the turning ch-5. Turn. (70 meshes)
Check the panel at Row 25 and Row 100. The width should stay at 28 in (71.1 cm).
Row 198 (solid): Ch 3 (counts as dc). Work 2 dc in the next ch-2 sp, dc in the next dc. Repeat from * across, ending with the last dc in the 3rd ch of the turning ch-5. Turn. (211 sts: 71 dc worked into posts + 140 dc worked into spaces)
Rows 199–200: Ch 3 (counts as dc), dc in each st across. Turn. (211 sts)
The panel now measures 28 in x 80 in (71.1 cm x 203.2 cm). The three solid rows at the top form a firm band for the clip rings. Do not fasten off. Go straight on to the border.
Large Flower (Make 12)
Use the 3.5 mm hook. The flower is 4.5 in (11.4 cm) across.
Rnd 1 (gold): Magic ring, 8 sc in the ring. Join with a sl st. (8 sc)
Rnd 2 (gold): Ch 1, 2 sc in each st around. Join. (16 sc)
Rnd 3 (gold, FLO): Sl st in the FLO of the next st, ch 3. Repeat around. Join. (16 ch-3 loops) This round makes the raised, looped center.
Rnd 4 (peach, BLO of Rnd 2): Join peach in a back loop of Rnd 2, behind the loops. Ch 1. Sc in the next st, 2 sc in the next st. Repeat around. Join. (24 sc)
Rnd 5 (peach): Sc in the next st, ch 4, skip 2 sts. Repeat around. Join. (8 sc, 8 ch-4 loops)
Rnd 6 (peach): In each ch-4 loop work (sc, hdc, 2 dc, 3 tr, 2 dc, hdc, sc). Join. (8 petals, 11 sts each = 88 sts)
Rnd 7 (cream): Join cream. Sc in each st around, working 3 sc in the center tr of each petal. Join. (104 sts = 88 worked one per stitch + 16 extra at the tips; 13 per petal) Fasten off and leave a 12 in (30.5 cm) tail for sewing.
Small Flower (Make 12)
The small flower is 2.5 in (6.4 cm) across.
Rnd 1 (gold): Magic ring, 10 sc in the ring. Join. (10 sc)
Rnd 2 (peach): Sc in the next st, ch 3, skip 1 st. Repeat around. Join. (5 sc, 5 ch-3 loops)
Rnd 3 (peach): In each ch-3 loop work (sc, hdc, 3 dc, hdc, sc). Join. (5 petals, 7 sts each = 35 sts)
Rnd 4 (cream): Sc in each st around, with 3 sc in the center dc of each petal. Join. (45 sts = 35 worked one per stitch + 10 extra; 9 per petal) Fasten off and leave a tail.
Bud (Make 24)
The bud is 1 in (2.5 cm) across, plus its stem.
Rnd 1 (peach): Magic ring, 6 sc. (6)
Rnd 2: 2 sc in each st. (12)
Rnd 3: Sc in each st. (12)
Rnd 4 (green): Sc2tog around. (6) Stuff the bud lightly.
Rnd 5 (sepals): Sl st in the next st, ch 4, sl st in the 2nd ch from the hook, sc in the next 2 ch, sl st in the next st. Repeat 2 more times. (3 pointed sepals)
Stem: Ch 9 and work a back-bump cord back down the chain. (8 sl st, 2 in / 5.1 cm) Fasten off.
Leaf (Make 72)
Use green. The leaf is 2 in (5.1 cm) long, plus a 1 in (2.5 cm) stem.
Rnd 1: Ch 11. Sc in the 2nd ch from the hook, hdc in the next ch, dc in the next 6 ch, hdc in the next ch, 3 sc in the last ch for the tip. Working along the other side of the chain, hdc in the next ch, dc in the next 6 ch, hdc in the next ch, sc in the last ch. Join to the first sc. (21 sts = 9 + 3 + 9)
Stem: Ch 5 and work a back-bump cord back down the chain. (4 sl st) Fasten off.
Vine Cord (Make 12)
Use green. Ch 53 and work a back-bump cord back down the chain. (52 sl st, 13 in / 33.0 cm) Each cord covers one 32-row unit, plus a little overlap.
Make All Pieces
For both panels:
- Large flowers: 12 (peach, gold, cream)
- Small flowers: 12 (peach, gold, cream)
- Buds: 24 (peach, green)
- Leaves: 72 (green)
- Vine cords: 12 (green)
Each panel has 6 repeat units of 32 rows. Each unit is 12.8 in (32.5 cm) tall. Starting at Row 5, the units sit at rows 5–36, 37–68, 69–100, 101–132, 133–164, and 165–196.
The vine runs along mesh column 10, counting from the inner edge (the edge where the two panels meet). LEFT and RIGHT are positions about 3 meshes, or 1.2 in (3.0 cm), on either side of the vine.
Layout grid (one unit, bottom to top):
- UNIT ROWS 1–8: LEAF · LARGE FLOWER · LEAF
- UNIT ROWS 9–16: BUD · VINE · LEAF
- UNIT ROWS 17–24: LEAF · SMALL FLOWER · BUD
- UNIT ROWS 25–32: LEAF · VINE · LEAF
Each unit uses: 1 large flower, 1 small flower, 2 buds, 6 leaves, and 1 vine cord. Six units per panel gives 6 large flowers, 6 small flowers, 12 buds, 36 leaves, and 6 cords. On the second panel, count the columns from its inner edge so the two vines mirror each other.
Joining: Attaching the Appliqués
Method: Sew the appliqués on with matching yarn and a tapestry needle. Work the border and block the bare panel first (see below), so the mesh is square before you sew.
Order:
- Lay the panel flat. Pin the vine cords first, letting each one curve gently by 1 to 2 meshes left and right. Overlap the ends of neighboring cords by 0.2 in (0.5 cm).
- Pin the flowers over the vine at unit rows 1–8 and 17–24.
- Pin the buds and leaves with their stems touching the vine.
Stitch-to-stitch logic: Attach every piece to the dc posts and ch-2 bars of the mesh, never across an open square. Sew the cords with one stitch every 2 sl sts. Sew each flower at its center ring and at each petal tip, through the middle sc of the 3-sc group. Leave the petal sides free so the flowers stay dimensional. Sew leaves at the stem and tip.
Tension: Keep the panel flat on the table while you sew. Do not lift it. Pull each stitch only until it is snug. Tight stitches pucker the mesh and shorten the panel.
Size checkpoint: After sewing each unit, measure that 32-row section. It should still be 12.8 in (32.5 cm) tall and 28 in (71.1 cm) wide inside the border.
Border
Border gauge: Along the top and bottom, work 1 sc per stitch, which is 211 sc over 28 in (71.1 cm). Along the sides, work 2 sc per dc row end, which is 400 sc over 80 in (203.2 cm). Each rate matches the fabric it sits on, so the edges lie flat.
In this border, the side counts are the stitches between the corner stitches. The 4 corner sc are counted separately.
Round 1 (cream): Continue from Row 200 along the top. Work 3 sc in the first st (this is the corner), then sc in each st across, with 3 sc in the last st. Work 2 sc in each row end down the side. Along the bottom, work 3 sc in the first st, sc in each foundation ch across, and 3 sc in the last ch. Work 2 sc in each row end up the second side. Join.
- Top: 211 · Bottom: 211 · Each long side: 400 · Corners: 4
- Round total: 1,226 sts
Round 2 (cream):
- Top: Ch 1, sc in each sc, with 3 sc in each top corner sc.
- Long sides: Sc in each sc.
- Bottom corners: Sc in each bottom corner sc.
- Bottom edge: Sc in the first sc. Skip 2 sc, 5 dc in the next sc, skip 2 sc, sc in the next sc. Repeat 35 times.
- Join and fasten off.
Counts:
- Top: 213 (211 + 2) · Each long side: 401 (400 + 1) · Bottom: 211 (36 sc + 175 dc) · Corners: 4
- Round total: 1,230 sts (1,226 worked one per stitch + 4 extra at the top corners)
Why the math works: Each scallop uses 6 stitches (skip 2, 5 dc in 1, skip 2, sc in 1), and the bottom edge also needs 1 starting sc. That means the bottom must be a multiple of 6 plus 1. The bottom has 211 stitches, and 6 x 35 + 1 = 211, so you get 35 even scallops with no leftovers. The 211 comes from 70 meshes x 3 + 1, so the scallops line up evenly with the mesh above.
The border adds 0.5 in (1.3 cm) on each side and at the top, and 1 in (2.5 cm) at the bottom. This gives the finished size of 29 in x 81.5 in (73.7 cm x 207.0 cm).
Final Blocking
- Weave in all the tails on the panel and the appliqués.
- Soak the bare bordered panel in cool water for 15 minutes. Press the water out in a towel. Do not wring.
- Lay the panel on the blocking surface. Pin it to 29 in x 81.5 in (73.7 cm x 207.0 cm), placing a pin every 4 in (10.2 cm) along the edges.
- Pin out each scallop point and check that the mesh squares line up straight.
- Let it dry completely.
- Wet the appliqués and pin them flat. Shape the petals and leaf tips, and let them dry.
- Sew on the appliqués, then mist the finished panel lightly and pat everything flat.
Final Quality-Control Checklist
- Both panels measure 29 in x 81.5 in (73.7 cm x 207.0 cm)
- Every mesh row has 70 meshes
- The bottom edge has 35 scallops
- Each panel has 6 large flowers, 6 small flowers, 12 buds, and 36 leaves
- The two vine columns mirror each other
- There is no puckering around any sewn piece
- All ends are woven in securely
Troubleshooting
- The panel gets narrower: You skipped the last dc into the turning ch. Count 70 meshes on every 10th row.
- The squares are taller than they are wide: Use a shorter dc, or try a 3.75 mm hook for the dc while keeping 2 ch per mesh.
- The scallops don’t fit: Recount the bottom edge of Round 1. It must be exactly 211 stitches.
- The petals curl: Re-block them flat, and check that Rnd 7 has exactly 3 sc at each tip.
- The mesh puckers under the flowers: Remove the stitches and sew again more loosely.
Care
Hand wash in cool water with mild soap, then dry flat and re-pin the scallops. Do not tumble dry, because the panels can stretch on the rod.
Final Notes
The measurements build in one chain. One mesh is 0.4 in (1.0 cm), so 70 meshes make 28 in (71.1 cm) and 200 rows make 80 in (203.2 cm). The 211-stitch bottom edge gives 35 scallops. The border brings the panel to 29 in x 81.5 in (73.7 cm x 207.0 cm). Six 32-row units carry the peach blossom vine down each panel. Check your gauge at each stage and the finished pair will hang straight.
Happy crocheting!