

This garland is a row of six identical scalloped seashells in one warm apricot-orange shade. They hang from a crocheted chain cord, with a natural wooden bead between each pair of shells and one more bead at each end. Hung across a window, the shells catch the light, and the open slits between their ribs let it through.
Each shell is a small fan. It starts at a ring at the base point. Eight solid ribs spread out from the ring with long open gaps between them, and a scalloped edge of seven rounded lobes runs along the top. The pattern uses US crochet terms throughout.
Each finished shell measures 4 in (10.2 cm) wide and 3 in (7.6 cm) tall. The decorated section of the garland, from end bead to end bead, is 33.5 in (85.1 cm). Each end also has a 12 in (30.5 cm) tie, which brings the total to about 58.5 in (148.6 cm).
The shells are worked flat in turned rows from a magic ring. A two-part border adds the scallops and an outline, and the finished shells are then joined onto a chain cord with pre-strung beads as you go. You need no sewing to assemble the garland. The only sewing is weaving in ends.
Finished Size and Construction
- Finished garland size: 33.5 in (85.1 cm) decorated section, plus two 12 in (30.5 cm) ties
- Skill level: Easy / advanced beginner
- Terminology: US crochet terms
- Yarn weight: Sport weight (#2) cotton
- Hook: 3 mm (US C/2 or D/3)
- Number of pieces: 6 shell motifs plus 1 chain cord with 7 wooden beads
- Layout: One horizontal row: tie, bead, then shells and beads alternating, ending with a bead and a tie
- Piece size: 4 in (10.2 cm) wide × 3 in (7.6 cm) tall per shell
- Size before border: 3.5 in (8.9 cm) wide × 2.25 in (5.7 cm) tall per shell
- Border depth: 0.5 in (1.3 cm) at the scalloped top, 0.25 in (0.6 cm) at each side and at the base point
Materials
Choose a smooth, mercerized cotton or cotton blend in sport weight. Cotton holds the scallops crisp and shows the open ribs clearly. Fuzzy or very soft yarns blur the slits and make the shells droop.
Yarn:
– Apricot orange: 30 g, about 95 m (104 yd). Each shell takes about 3 g (9 m). The cord takes about 2 g (6 m).
These quantities include a margin of about 50 percent for gauge swatches, the test shell, and weaving in ends.
Tools and notions:
– 3 mm crochet hook
– 7 natural wooden beads, 12 mm, with holes large enough for doubled yarn to pass through
– Large-eye tapestry needle
– A thin beading needle or a short loop of fine wire, for threading beads
– Scissors
– Stitch marker
– Blocking mat, rust-proof pins, and a spray bottle
– Ruler or measuring tape
Abbreviations (US Terms)
- ch – chain
- sl st – slip stitch
- sc – single crochet
- dc – double crochet
- tr – treble crochet
- sk – skip
- sp – space
- st(s) – stitch(es)
- RS – right side
- rep – repeat
Special stitch – Scallop: Work 5 dc into the same stitch. Each shell has 7 scallops.
Anchor sc: The sc in Row 5 that sits between two scallops. Each shell has 8 anchor sc, counting the first and last sc of the row, which are the top corners.
Gauge and Checkpoints
Gauge: 6 sc and 7 sc rows = 1 in (2.5 cm) with a 3 mm hook. Chain gauge: 6 ch = 1 in (2.5 cm).
Make one complete test shell, border included, before you start the rest. It doubles as your gauge swatch. Measure it flat without stretching.
Checkpoints (measure width across the widest point and height straight up the center rib from the base):
– After Row 1: 1 in (2.5 cm) wide × 0.5 in (1.3 cm) tall
– After Row 2: 2.25 in (5.7 cm) wide × 1.25 in (3.2 cm) tall
– After Row 3: 3.25 in (8.3 cm) wide × 2 in (5.1 cm) tall
– After Row 4: 3.5 in (8.9 cm) wide × 2.25 in (5.7 cm) tall
– After the border: 4 in (10.2 cm) wide × 3 in (7.6 cm) tall
If your shell is too big by more than 0.25 in (0.6 cm), go down to a 2.5 mm hook. If it is too small, go up to a 3.5 mm hook. Change hook size, not stitch counts, because the scallop repeat depends on exact counts.
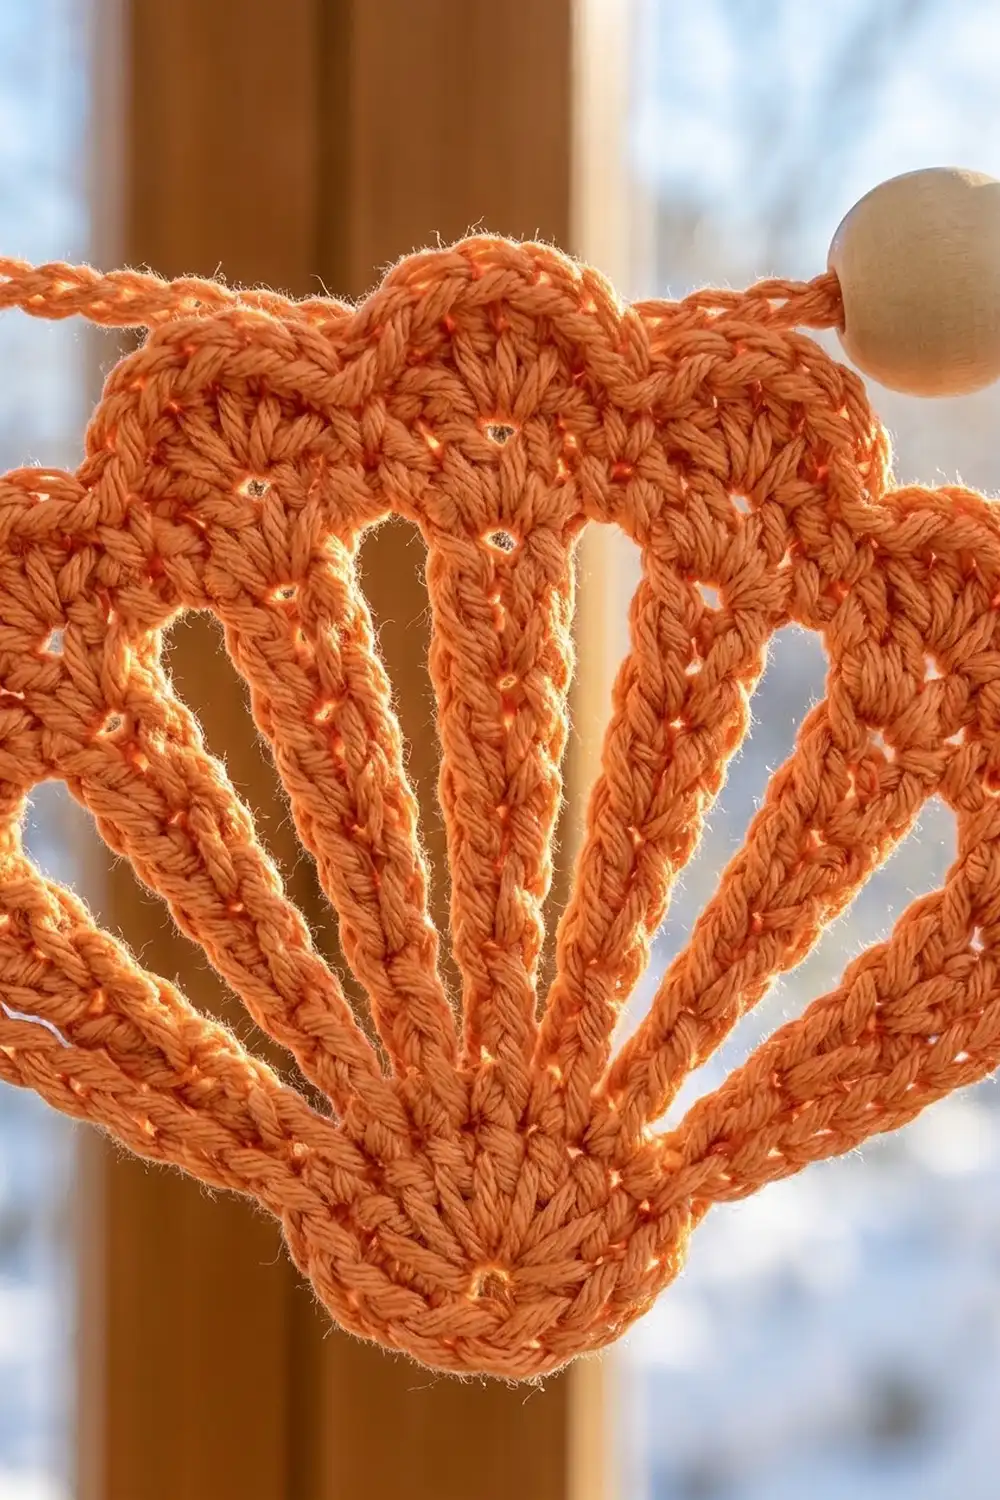
Shell Motif (Make 6)
The body is worked in turned rows. Do not join at the end of the rows. Row 1 is the RS.
Row 1 (RS): Make a magic ring. Ch 3 (counts as dc), work 7 dc into the ring. Pull the ring snug, but leave a small hole about 1/8 in (0.3 cm) wide, because that hole forms the base point. Turn.
Stitch count: 8 dc.
These 8 stitches cover only half of the ring and form a small half-circle fan. The lower half of the ring stays bare and is covered by the border later.
Row 2: Ch 4 (counts as tr), ch 2, tr in next dc, ch 2; rep from * 5 more times, tr in top of beginning ch-3. Turn.
Stitch count: 8 tr and 7 ch-2 sps (22 sts).*
Each tr now stands directly on a Row 1 dc. These stacked stitches are the start of the eight ribs.
Row 3: Ch 4 (counts as tr), ch 3, tr in next tr, ch 3; rep from * 5 more times, tr in 4th ch of turning ch-4. Turn.
Stitch count: 8 tr and 7 ch-3 sps (29 sts).*
Work each tr into the top of a tr, not into the chain spaces. The rib then grows straight up, and the ch-2 and ch-3 spaces stack into the long open slits.
Row 4: Ch 1 (does not count as a st), sc in first tr, 3 sc in next ch-3 sp, sc in next tr; rep from * 6 more times, working the final sc in 4th ch of turning ch-4. Turn.
Stitch count: 1 + (7 × 4) = 29 sc.*
This row closes the top of every slit. Each rib ends in a single sc. Count before moving on: there should be 1 sc above every tr and 3 sc above every space.
Checkpoint: The shell measures 3.5 in (8.9 cm) wide × 2.25 in (5.7 cm) tall, with eight ribs and seven slits. Do not fasten off. Continue straight into the border, Rows 5 and 6 in the Border section below.
Make All Pieces
Make 6 shells in apricot orange, each completed through the border, Rows 5 and 6. Block all six together (see Final Blocking) before joining, so they match in size.
Quantities:
– Apricot orange shells: 6
– Apricot orange chain cord: 1
– Wooden beads: 7 (5 between shells, 1 at each end)
Layout grid (one row, left to right):
ROW 1: TIE – BEAD – SHELL – BEAD – SHELL – BEAD – SHELL – BEAD – SHELL – BEAD – SHELL – BEAD – SHELL – BEAD – TIE
Every shell hangs with its scalloped edge at the top and its base point down. All shells face RS forward.
Joining
The shells are joined by working the hanging cord straight across their tops. Each sl st of the cord goes into one anchor sc.
Before you begin: Using the beading needle or wire loop, thread all 7 beads onto the yarn and slide them about 3 yd (2.7 m) down the strand. You will bring them up one at a time.
Cord:
1. Leaving a 6 in (15.2 cm) tail, ch 72. This is the first tie, 12 in (30.5 cm).
2. Slide 1 bead up against the hook and ch 1 to lock it.
3. Ch 6 for a 1 in (2.5 cm) spacer.
4. Join a shell: Hold the shell with the RS facing you and the scallops up. Sl st into the first anchor sc, which is the top right corner. Ch 2, sl st in next anchor sc; rep from * 6 more times, ending in the top left corner.
5. Between shells:* Ch 4, slide up a bead, ch 1 to lock it, ch 4. This makes a 1.5 in (3.8 cm) gap.
6. Repeat steps 4 and 5 until all 6 shells are joined. Do not work step 5 after the sixth shell.
7. Ch 6, slide up the last bead, ch 1, then ch 72 for the second tie. Fasten off.
Stitch-to-stitch logic: Each shell takes 8 sl sts (one per anchor sc) and 7 ch-2 bridges, for 8 + 14 = 22 cord stitches. Each anchor sc sits directly above a rib, because the Row 4 sc under it was worked into a tr. The weight of the shell therefore hangs straight down each rib, and the scallops stay upright between the anchors.
Tension: Keep the cord chains even and slightly firm, at the same size as your gauge chains. If the ch-2 bridges are loose, the scallops flop forward. If they are tight, the shell cups. The cord across each shell should lie straight, with the scallops touching it.
Size checkpoint: The shells plus the gaps between them measure (6 × 4 in) + (5 × 1.5 in) = 31.5 in (80.0 cm). Adding the two 1 in (2.5 cm) end spacers gives 33.5 in (85.1 cm) between the end beads.
Border (Scalloped Edge and Outline)
The border is worked on each shell straight after Row 4, before joining. It has two rows: the scallop row across the top, then a sc outline down one side, around the base point, and up the other side.
Border gauge: Each scallop is just over 0.5 in (1.3 cm) wide and 0.5 in (1.3 cm) tall. The side outline follows the row-end gauge of about 5.5 sc per 1 in (2.5 cm).
Row 5 (Scallops, top edge, RS): Ch 1, sc in first sc, sk 1 sc, Scallop (5 dc) in next sc, sk 1 sc, sc in next sc; rep from * 6 more times. Do not turn.
Top edge count: 7 scallops of 5 dc each (35 dc) and 8 anchor sc = 43 sts, worked over the 29 sc of Row 4.*
Row 6 (Outline, sides and base): Continue down the side edge you have reached, working into the row ends:
– First side: 1 sc in the end of Row 4, 4 sc in the end of Row 3, 4 sc in the end of Row 2, 3 sc in the end of Row 1. 12 sc.
– Base point: 3 sc around the bare lower half of the magic ring. 3 sc.
– Second side: 3 sc in the end of Row 1, 4 sc in the end of Row 2, 4 sc in the end of Row 3, 1 sc in the end of Row 4. 12 sc.
Sl st into the first sc of Row 5 to close. Fasten off.
Outline count: 12 + 3 + 12 = 27 sc.
Why the math works: Row 4 has 29 sc, and one scallop repeat uses 4 sts (sk, scallop st, sk, sc). The opening sc plus 7 repeats uses 1 + (7 × 4) = 29 sts, so the row ends exactly on the last sc with no leftover stitches. The Row 4 sc sit in a fixed pattern of 1 above each tr and 3 above each space. Each scallop is therefore centered over a slit, and each anchor sc lands over a rib. That is why the shell shows seven rounded lobes between eight ribs. On the sides, 12 sc cover the 2.25 in (5.7 cm) edge from the corner to the ring. The 3 sc at the ring round off the point, so it does not pucker.
Final Blocking
- Weave in all tails on every shell before blocking. Leave the cord tails for later.
- Pin each shell RS up on the blocking mat at 4 in (10.2 cm) wide × 3 in (7.6 cm) tall.
- Put one pin at the base point and one at each of the 8 anchor sc. Then pull each scallop gently into a round lobe.
- Pin the 7 slits open so each rib runs straight from the base ring to its anchor.
- Spray each shell until it is evenly damp. Do not soak it.
- Let the shells dry completely. This usually takes 6 to 12 hours.
- Unpin them, measure each shell again, and then join them onto the cord.
- After joining, hang the garland and steam the cord lightly from 2 in (5.1 cm) away so the ties lie straight.
Final Quality-Control Checklist
- Each shell has 8 ribs, 7 open slits, and 7 scallops.
- Row 4 counts 29 sc and Row 6 counts 27 sc on every shell.
- Every shell measures 4 in (10.2 cm) × 3 in (7.6 cm), within 0.25 in (0.6 cm).
- The base ring hole is small and neat, and the 3 base sc cover it evenly.
- The cord passes through all 8 anchor sc on each shell.
- There are 7 beads in total, each locked in place by a ch 1.
- The gaps between shells all measure 1.5 in (3.8 cm).
- The ties are 12 in (30.5 cm) each, and all tails are woven in securely.
Troubleshooting
The shell cups instead of lying flat. The tr in Rows 2–3 are too tight, or the chain spaces are too short. Loosen your chains or go up a hook size.
The shell ruffles. Your chains are too loose. Go down a hook size, or check that Row 4 has 3 sc per space and no more.
Scallops don’t line up between the ribs. Your Row 4 count is off. Recount to 29 sc before working Row 5.
The base point bunches. You may have worked more than 3 sc into the ring. Work exactly 3 sc, spaced evenly around the bare half.
A bead won’t slide. It was not pre-strung. Cut the cord, thread the bead on, and rejoin at the last shell, or sew the bead on with a tail.
Shells tilt forward on the cord. Your ch-2 bridges are too loose. Redo the shell join with firmer chains.
Care
Hand wash in cool water with mild soap, press the water out in a towel, and lay the garland flat to dry. Pin the shells back to shape if needed.
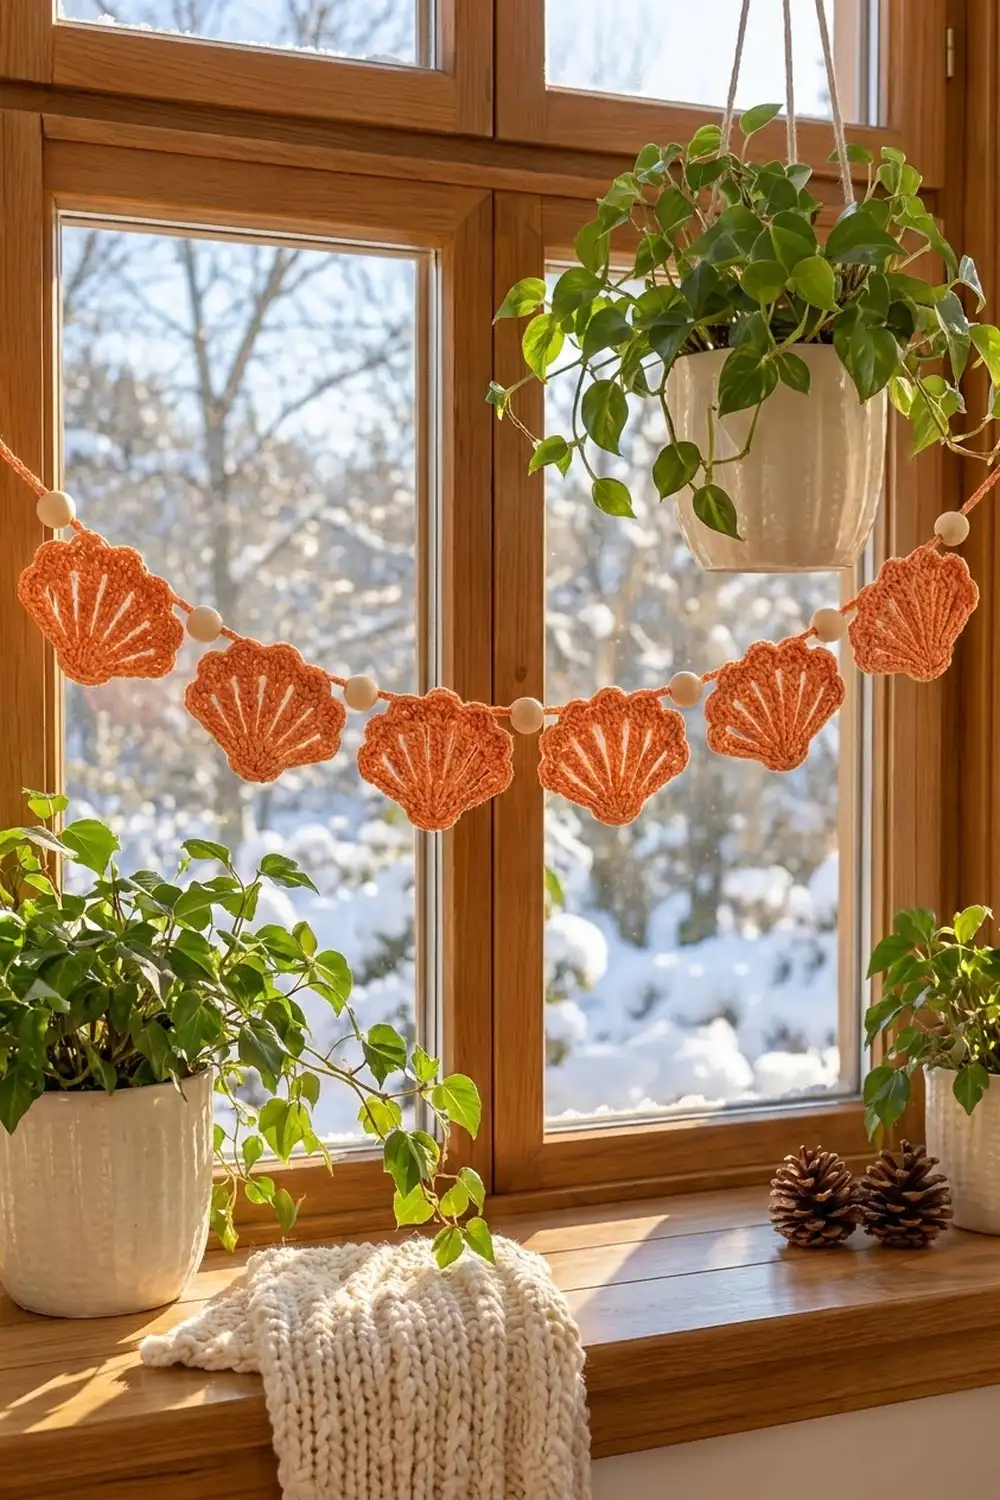
Final Notes
The measurement chain is simple. Rows 1–4 build a 29-sc fan 3.5 in (8.9 cm) wide. The border brings each shell to 4 in (10.2 cm) × 3 in (7.6 cm). Six shells with five 1.5 in (3.8 cm) gaps give 31.5 in (80.0 cm). The end spacers bring the decorated section to 33.5 in (85.1 cm), and the 12 in (30.5 cm) ties complete the garland. If your counts and checkpoints match at each stage, the finished garland will match too.
Happy crocheting!