

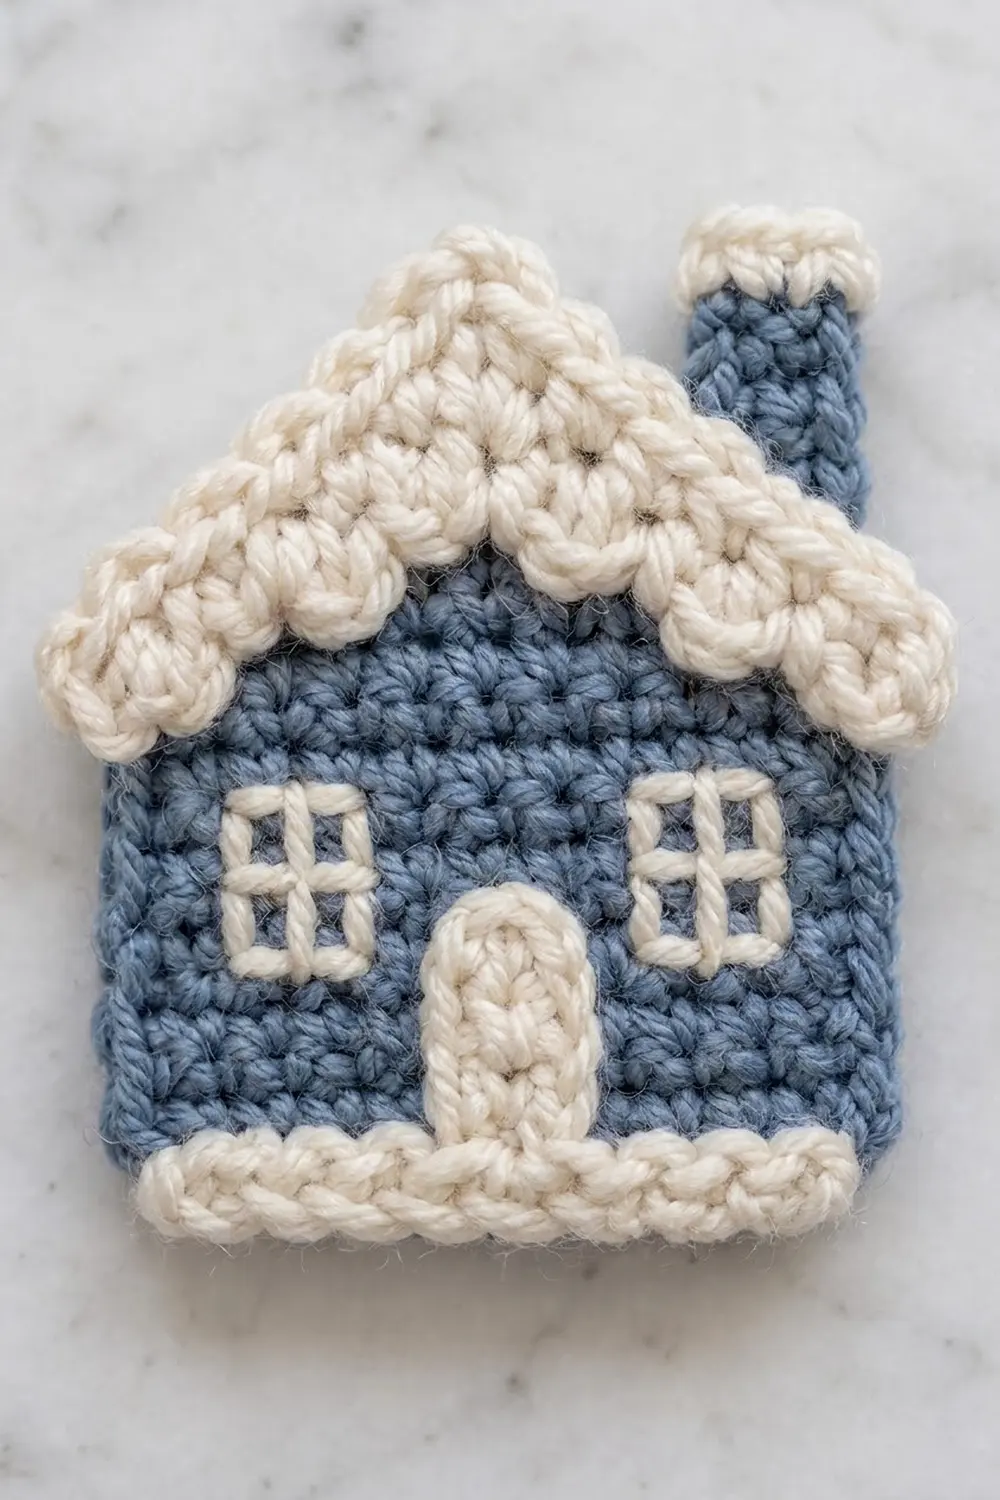
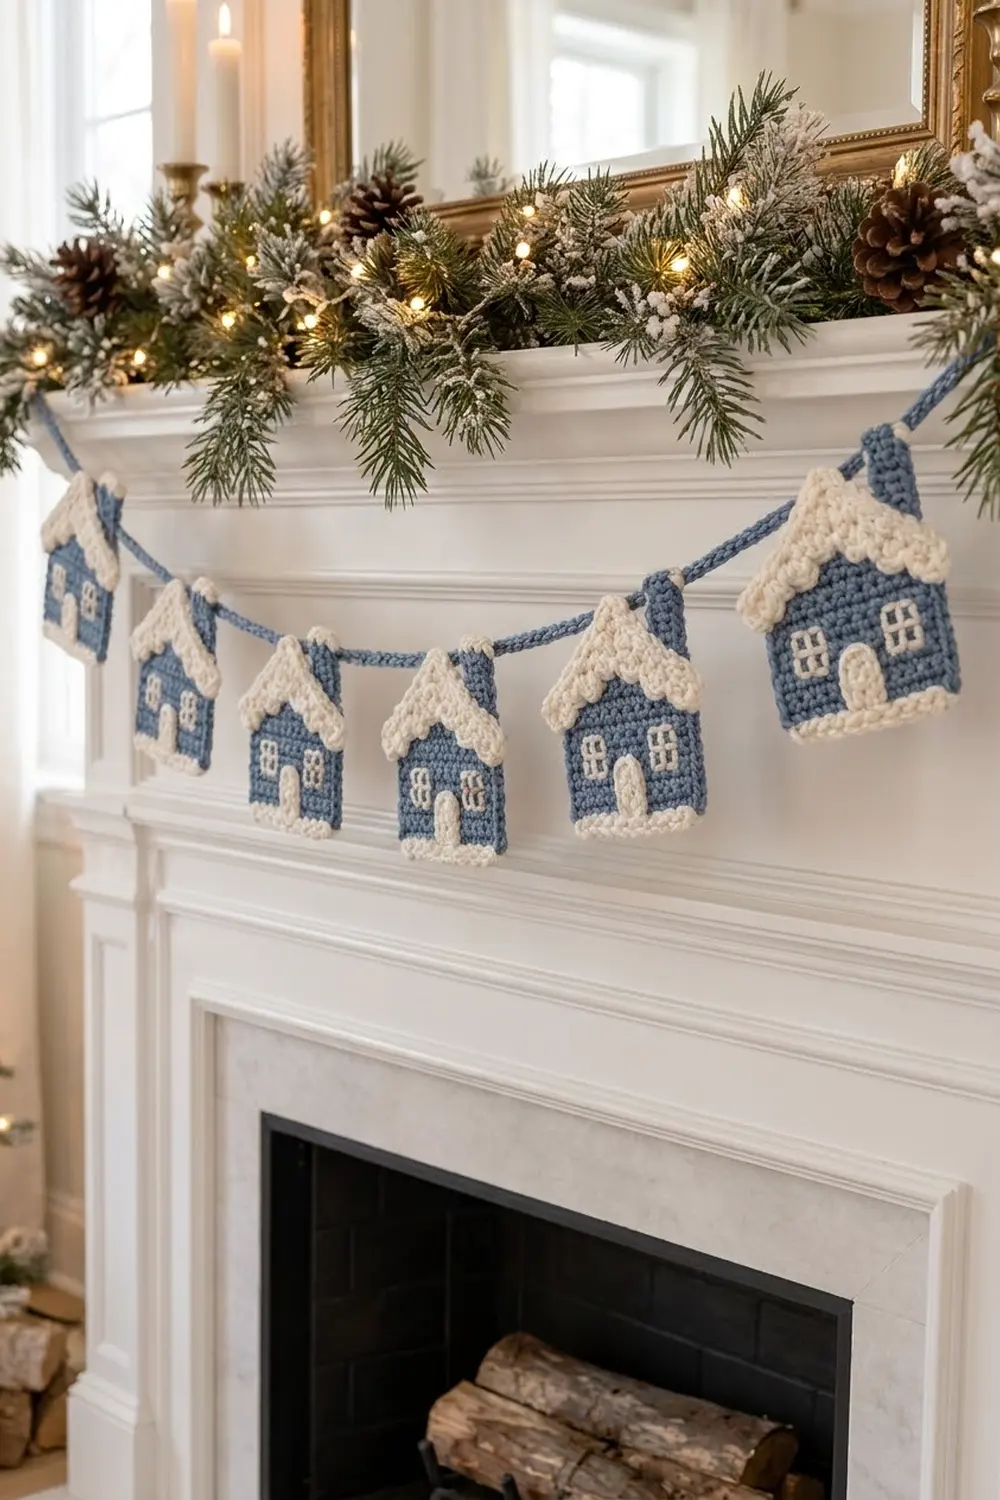
This garland strings six little snow-covered cottages along a soft blue cord. Each house has a denim-blue body, a plump cream roof with scalloped “snow drips,” a snowy bank along the bottom, an arched door, two four-pane windows and a chimney with its own cap of snow.
There are only two colors: dusty denim blue and warm cream. The look is wintry and calm rather than loud, so it suits a white mantel, a bookshelf or a window frame all season long.
The pattern uses US crochet terms. Each finished house is about 4 in (10.2 cm) wide and 5.5 in (14.0 cm) tall including the roof. The complete garland is 78 in (198.1 cm) long, with a 12 in (30.5 cm) tie at each end.
The house is built in simple parts. You work the house body flat in single crochet rows and edge it with one blue round. Then you sew on a roof, chimney, snow bank and door, each crocheted separately, and embroider the windows. Last, a chain cord made with doubled yarn joins all six houses with slip stitches at the eaves.
Finished Size and Construction
- Finished garland length: 78 in (198.1 cm)
- Skill level: Advanced beginner
- Terminology: US crochet terms
- Yarn weight: Worsted (#4)
- Hooks: 4.0 mm (G-6) for the houses; 5.0 mm (H-8) for the cord
- Number of pieces: 6 houses (each made of a body, roof, chimney, snow bank and door) plus 1 cord
- Layout: 1 row of 6 houses, spaced 6 in (15.2 cm) apart
- Piece size (finished house): 4 in (10.2 cm) wide at the walls, about 4.25 in (10.8 cm) at the roof, 5.5 in (14.0 cm) tall
- Body size before border: 3.5 in (8.9 cm) wide × 4.5 in (11.4 cm) tall
- Border depth: 1 sc round, about 0.25 in (0.6 cm) on each edge
Materials
Choose a smooth worsted-weight yarn with good stitch definition, about 183 m per 100 g. Acrylic, a wool blend or a cotton blend all work. Avoid fuzzy yarn, because the backstitched windows need a clean surface.
- Denim blue: 45 g (82 m), for the house bodies, edging, chimneys and cord
- Cream: 30 g (55 m), for the roofs, snow banks, doors, chimney caps and windows
These quantities include about 20% extra for testing your gauge, yarn tails and sewing.
Tools:
- 4.0 mm (G-6) crochet hook
- 5.0 mm (H-8) crochet hook
- Tapestry needle
- 4 stitch markers
- Rust-proof pins and a blocking mat
- Spray bottle
- Measuring tape and scissors
Abbreviations (US Terms)
- ch: chain
- sl st: slip stitch
- sc: single crochet
- hdc: half double crochet
- dc: double crochet
- sc2tog: single crochet 2 together. (Insert hook in next st, yarn over, pull up a loop) twice, yarn over, pull through all 3 loops.
- st(s): stitch(es)
- RS: right side
Special stitch: row-end sc. Insert the hook under the outer 2 strands of the edge stitch at the end of a row, then complete a normal sc.
Gauge and Checkpoints
Gauge: 16 sc × 16 rows = 4 in (10.2 cm) with the 4.0 mm hook. That is 4 sc and 4 rows per inch, so each stitch is 0.25 in (0.6 cm) wide and each row is 0.25 in (0.6 cm) tall.
Make one complete house body first and use it as your gauge swatch. Measure it lying flat, without stretching.
- After Row 12: 3.5 in (8.9 cm) wide × 3 in (7.6 cm) tall
- After Row 18: 3.5 in (8.9 cm) wide × 4.5 in (11.4 cm) tall
- After the edging round: 4 in (10.2 cm) wide × 5 in (12.7 cm) tall
- Roof, Row 1: each arm 2.25 in (5.7 cm), matching one edged gable slope
- Snow bank, Row 1: 4.25 in (10.8 cm)
If your body comes out too big, use a hook 0.5 mm smaller. If it’s too small, use a hook 0.5 mm bigger. Change the hook, not the stitch counts, because the roof and snow bank are sized to fit the body.
Main Pattern
House Body (make 6, blue)
With the 4.0 mm hook and blue, ch 15.
Row 1 (RS): Sc in 2nd ch from hook and in each ch across. (14 sc)
Rows 2–12: Ch 1, turn, sc in each st across. (14 sc)
Checkpoint: 3.5 in (8.9 cm) × 3 in (7.6 cm). This rectangle forms the walls.
Row 13: Ch 1, turn, sc2tog, sc in next 10 sts, sc2tog. (12 sc)
Row 14: Ch 1, turn, sc2tog, sc in next 8 sts, sc2tog. (10 sc)
Row 15: Ch 1, turn, sc2tog, sc in next 6 sts, sc2tog. (8 sc)
Row 16: Ch 1, turn, sc2tog, sc in next 4 sts, sc2tog. (6 sc)
Row 17: Ch 1, turn, sc2tog, sc in next 2 sts, sc2tog. (4 sc)
Row 18: Ch 1, turn, sc2tog twice. (2 sc)
Each gable row loses 1 st at each edge. Over 6 rows, the gable rises 1.5 in (3.8 cm) and narrows by 1.5 in (3.8 cm) on each side, which gives a pointed roofline. Don’t fasten off. Go straight to the Border section and work the edging round on this body.
Roof (make 6, cream)
With the 4.0 mm hook and cream, ch 20.
Row 1: Sc in 2nd ch from hook and in next 8 ch, 3 sc in next ch, sc in last 9 ch. (21 sc: 9 per arm + 3 at the peak)
Row 2: Ch 1, turn, sc in next 10 sts, 3 sc in center st, sc in last 10 sts. (23 sc)
Row 3: Ch 1, turn, sc in next 11 sts, 3 sc in center st, sc in last 11 sts. (25 sc)
Row 4 (scallop edge): Ch 1, then rotate the piece to work along the 19 free loops of the foundation chain. Sc in first loop, *3 dc in next loop, sc in next loop; repeat from * 8 more times. (10 sc + 9 shells of 3 dc = 37 sts)
The shells land on loops 2, 4, 6, 8, 10, 12, 14, 16 and 18. Loop 10 is the peak, so you get 4 scallops on each slope plus 1 centered under the peak. Fasten off, leaving a 12 in (30.5 cm) tail for sewing.
Chimney (make 6, blue and cream)
With the 4.0 mm hook and blue, ch 4.
Row 1: Sc in 2nd ch from hook and in each ch across. (3 sc)
Rows 2–5: Ch 1, turn, sc in each st. (3 sc) Change to cream in the last st of Row 5.
Rows 6–7: With cream, ch 1, turn, sc in each st. (3 sc)
Fasten off. Use the 8 in (20.3 cm) blue starting tail at the bottom for sewing. The chimney is 0.75 in (1.9 cm) wide × 1.75 in (4.4 cm) tall.
Snow Bank (make 6, cream)
With the 4.0 mm hook and cream, ch 18.
Row 1: Sc in 2nd ch from hook and in each ch across. (17 sc)
Row 2: Ch 1, turn, sc in first st, *3 hdc in next st, sc in next st; repeat from * 7 more times. (9 sc + 8 shells of 3 hdc = 33 sts)
Fasten off, leaving a 12 in (30.5 cm) tail. The strip is 4.25 in (10.8 cm) long, so it sticks out just past the edged body at each end, like drifted snow.
Door (make 6, cream)
With the 4.0 mm hook and cream, ch 4.
Row 1: Sc in 2nd ch from hook and in each ch across. (3 sc)
Rows 2–4: Ch 1, turn, sc in each st. (3 sc)
Row 5 (arch): Ch 1, turn, (sc, hdc) in first st, 2 hdc in next st, (hdc, sc) in last st. (2 sc + 4 hdc = 6 sts)
Fasten off, leaving an 8 in (20.3 cm) tail. The door is 0.75 in (1.9 cm) wide × 1.25 in (3.2 cm) tall with a rounded top.
Assembling One House
- Snow bank: Lay Row 1 along the bottom edging with the scallops pointing up. Whipstitch the straight edge to the edging and tack each scallop tip down.
- Door: Center it on the body with its bottom tucked under the middle scallops. Whipstitch around the edge.
- Windows: With a single strand of cream, backstitch a square outline around a block 3 sts wide × 3 rows tall. Place the left window over body Rows 7–9, sts 2–4, and the right window over Rows 7–9, sts 11–13. Add one vertical line through the center st and one horizontal line through the center row to make 4 panes. Each window is 0.75 in (1.9 cm) square.
- Chimney: On the wrong side, sew the bottom 3 rows behind the right gable slope, about 0.75 in (1.9 cm) in from the right eave, so the top 4 rows stick up above the roofline.
- Roof: Center the roof peak over the body peak. Lay the scallop edge just inside the slope edging so the scallops hang over the blue, with Row 3 extending past the edge. Sew along the Row 1 line with a running stitch, leaving the scallops free.
Make All Pieces
Make each house in this order, 6 times: body, border edging, roof, chimney, snow bank, door, assembly.
- Blue: 6 bodies with edging, 6 chimney bases (Rows 1–5), 1 cord
- Cream: 6 roofs, 6 snow banks, 6 doors, 6 chimney caps (Rows 6–7), 12 embroidered windows
Block each assembled house before joining (see Final Blocking) so all six match.
Layout grid (left to right):
ROW 1: HOUSE HOUSE HOUSE HOUSE HOUSE HOUSE
CORD:  TIE 36 | H1 12 | GAP 18 | H2 12 | GAP 18 | H3 12 | GAP 18 | H4 12 | GAP 18 | H5 12 | GAP 18 | H6 12 | TIE 36
All the houses are identical, so every position uses the same colors.
Joining
Each house joins to the cord with slip stitches at two hang points. The hang points are the top wall sc of the edging on each side (the eave corners). Work through the roof too, where it overlaps. The hang points sit exactly 4 in (10.2 cm) apart because the edged body is 16 sts wide.
Cord gauge: 12 ch = 4 in (10.2 cm) with blue held double and the 5.0 mm hook. That’s 3 ch per inch.
Lay the houses face up in a line. With blue held double and the 5.0 mm hook:
- Ch 36 for the first tie, 12 in (30.5 cm).
- Insert the hook from front to back through the left hang point of House 1 and sl st.
- Ch 12, 4 in (10.2 cm), letting the chain lie behind the house.
- Sl st through the right hang point of House 1.
- Ch 18 for the gap, 6 in (15.2 cm).
- Repeat steps 2–5 for Houses 2–5, then steps 2–4 for House 6.
- Ch 36 for the final tie. Fasten off.
Total: 36 + (6 × 12) + (5 × 18) + 36 = 234 ch, plus 12 sl sts. Each sl st sits right on its hang point and adds no free length, so 234 ÷ 3 = 78 in (198.1 cm).
Tension: Keep the chain relaxed. The 12 ch behind each house should lie flat between the eaves without pulling them inward. If the eaves pull together, undo that span and add 1 ch.
Size checkpoint: Lay the joined garland straight. The house section should measure 54 in (137.2 cm) from House 1’s left hang point to House 6’s right hang point: 6 houses × 4 in + 5 gaps × 6 in.
Border
The border is one blue sc round around each house body. Work it right after Row 18, before adding any appliqués. Border gauge matches the body: 4 sc per inch.
Edging round: Don’t turn. Work down the first gable slope: 9 row-end sc over the row-ends of Rows 18–13, with 2 sc in the row-ends of Rows 17, 15 and 13. Work 12 row-end sc down the wall (Rows 12–1). Work 3 sc in the first foundation loop (corner), sc in the next 12 loops, then 3 sc in the last loop (corner). Work 12 row-end sc up the second wall. Work 9 row-end sc up the second slope, with 2 sc in the row-ends of Rows 13, 15 and 17. Across the top of Row 18: sc in first st, ch 1, sc in last st. Join with a sl st to the first sc. Fasten off.
Counts per side:
- First slope: 9 sc
- First wall: 12 sc
- Bottom: 18 sc (12 + two 3-sc corners)
- Second wall: 12 sc
- Second slope: 9 sc
- Peak: 2 sc + ch-1
- Total: 62 sc + 1 ch
Why the math works:
- Width: The body is 14 sts wide. One edge st on each side makes 16 sts, and 16 ÷ 4 = 4 in (10.2 cm).
- Walls: They are 12 rows tall at 4 rows per inch, so 12 sc fit exactly.
- Slopes: Once the edge stitch is added, each edged slope measures about 2.25 in (5.7 cm) from eave corner to peak. That’s room for 9 sc at 0.25 in (0.6 cm) each. It also matches one roof arm, so the roof fits the gable.
- Height: It becomes 18 rows + 2 edge rows = 20 × 0.25 in = 5 in (12.7 cm).
Final Blocking
- Spray each assembled house until it is damp, not soaked.
- Pin it face up on the mat to 4 in (10.2 cm) wide at the walls and 5 in (12.7 cm) tall from the bottom edge to the body peak.
- Open the roof angle to match the gable. Pin each scallop and snow-bank bump so they sit evenly.
- Let the houses dry completely, about 12 hours.
- Join the houses to the cord.
- Lay the finished garland straight, mist the cord lightly and gently ease it to 78 in (198.1 cm). Let it dry.
Final Quality-Control Checklist
- Every body has 14 sc in Row 1 and 2 sc in Row 18.
- Every edging round has 62 sc + 1 ch.
- All six houses measure 4 in (10.2 cm) wide at the walls.
- Each roof has 9 scallops, with one centered under the peak.
- Each snow bank has 8 upward scallops.
- The windows are level and equal, each 0.75 in (1.9 cm).
- All chimneys sit on the right slope at the same height.
- Hang points are 4 in (10.2 cm) apart and gaps are 6 in (15.2 cm).
- The total length is 78 in (198.1 cm).
- All tails are woven in on the wrong side.
Troubleshooting
Gable leans to one side: You probably missed an sc2tog. Count each gable row; it must drop by exactly 2.
Roof won’t lie flat on the slope: Block it with the peak angle opened wider, then sew it back on along Row 1 only.
Edging ruffles on the slopes: Your row-ends are shorter than gauge. Work 8 sc per slope by skipping one 2-sc increase, on both sides.
Windows pucker: Your backstitches are too tight. Let each stitch rest on the surface instead of pulling it in.
Houses tilt on the cord: One hang point is off. Both sl sts must go through the top wall sc of the edging.
Cord too short or too long: Check your cord gauge again. Change the hook size rather than the chain counts so the spacing stays even.
Care
Hand wash in cool water, press out the water in a towel and dry flat, pinning the houses back into shape. Store the garland loosely coiled, without folding through the houses.
Final Notes
Here is how the measurements build on each other. 14 sc at 4 sc per inch gives a 3.5 in (8.9 cm) body. The border adds one stitch per side, for 4 in (10.2 cm). Each 2.25 in (5.7 cm) roof arm matches a 9-sc edged slope. On the cord, 3 ch per inch makes each 12-ch span 4 in (10.2 cm) and each 18-ch gap 6 in (15.2 cm). That’s 234 ch and 78 in (198.1 cm) overall. Check your gauge once, and every piece will fit the next.
Happy crocheting!