

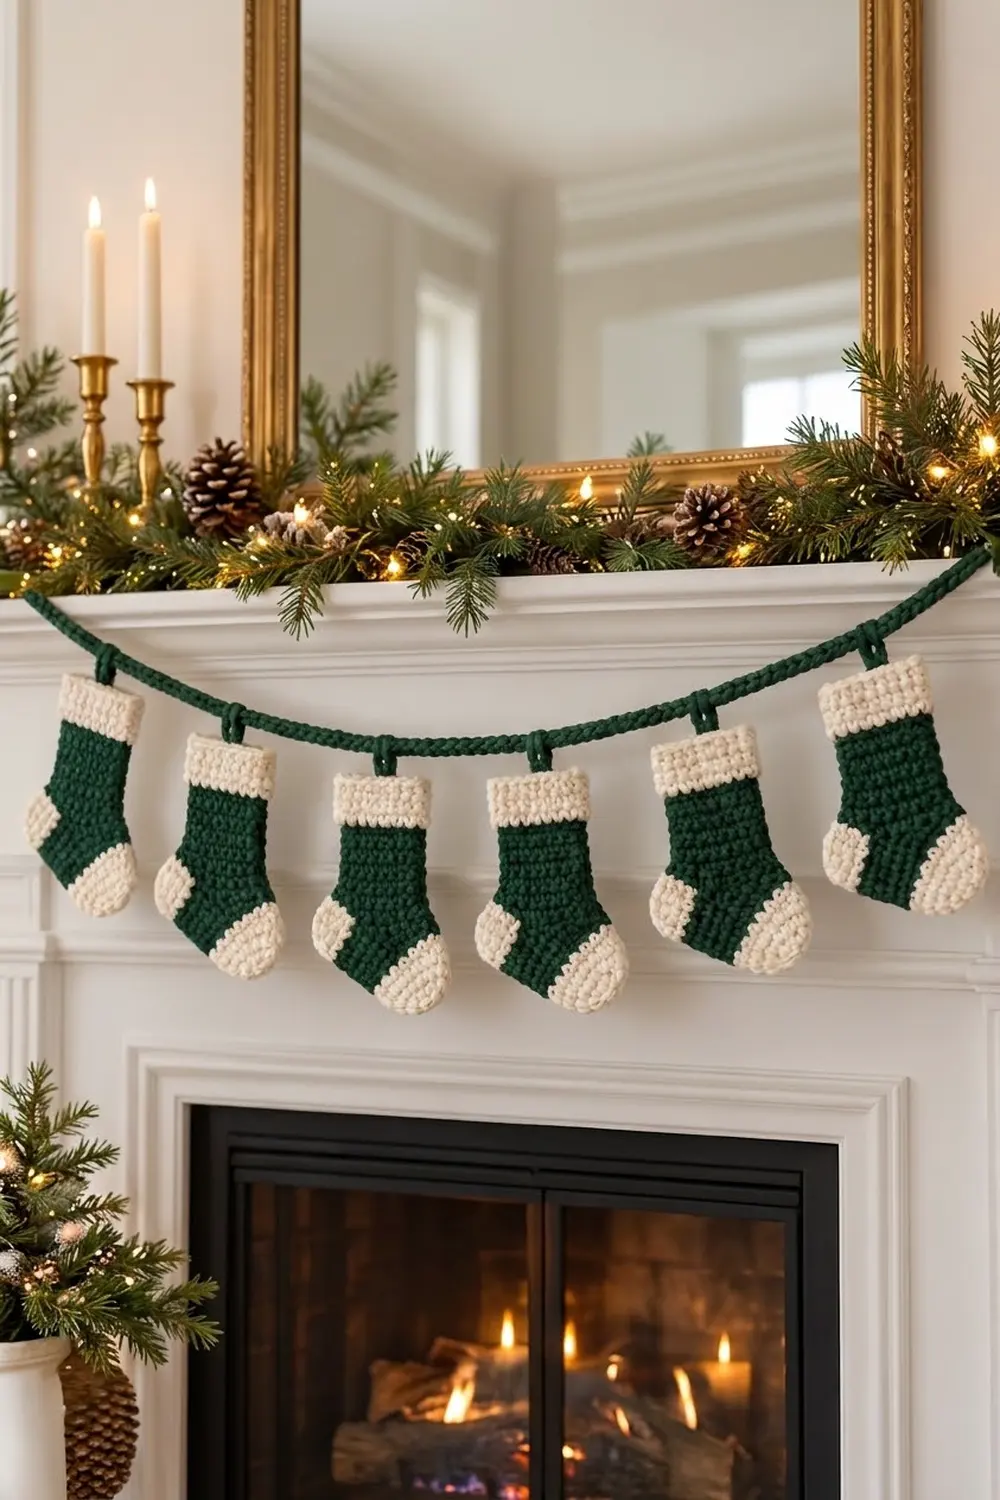
The Hearthside Mini Stocking Garland is a row of six small, flat stockings hanging from a thick green cord. Each stocking has a deep forest-green body, with a cream cuff across the top and cream patches on the heel and toe. It’s simple and traditional, and it looks just right draped over a mantel, a shelf edge, or a doorway.
This pattern uses US crochet terms throughout. Each finished stocking measures 3.9 in (9.9 cm) wide at the foot and 4.4 in (11.2 cm) tall. The cord is 54 in (137.2 cm) long, and the stockings are spaced 6 in (15.2 cm) apart, center to center.
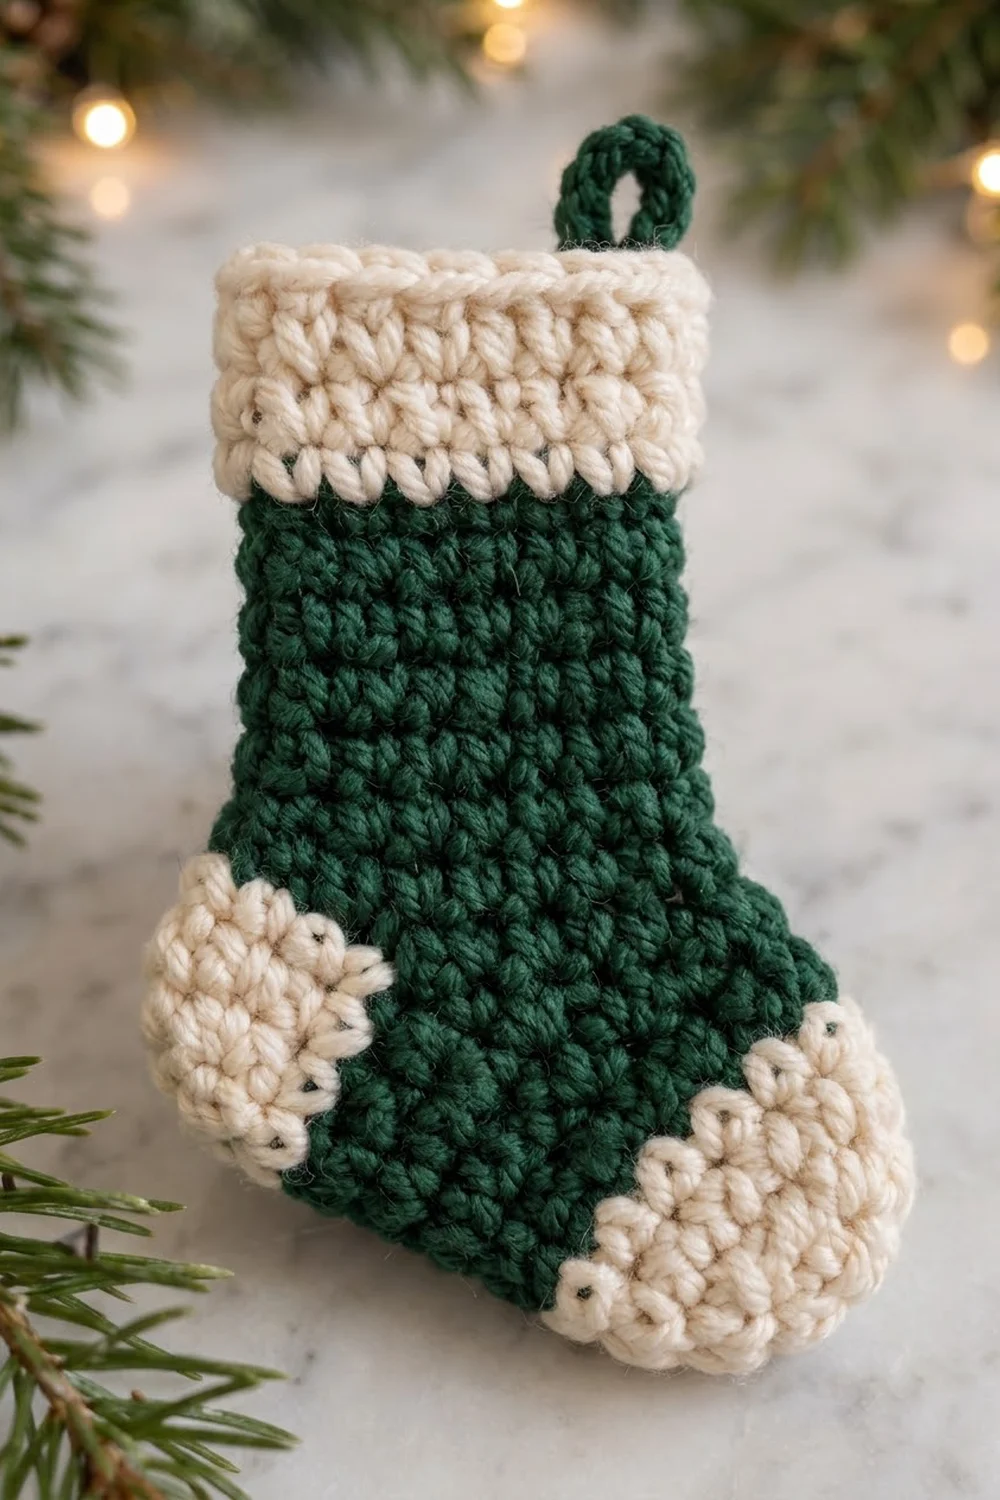
Every stocking is a flat, single-layer piece worked in single crochet rows from the top of the leg down to the toe. A single green edging round smooths the outline. Then a cream cuff rectangle and two cream half-circle patches are sewn on as appliqués, and a green chain loop is added at the top.
The cord is a two-strand slip-stitch chain. The stockings are threaded onto it through their loops and tacked in place so they stay evenly spaced.
Finished Size and Construction
- Finished garland: 54 in (137.2 cm) cord with six stockings
- Finished stocking: 3.9 in (9.9 cm) wide at foot, 2.9 in (7.4 cm) wide at leg, 4.4 in (11.2 cm) tall
- Skill level: Easy
- Terminology: US
- Yarn weight: Worsted (#4), cotton
- Hooks: 4.0 mm (G-6) for stockings; 6.0 mm (J-10) for cord
- Number of pieces: 6 stockings (each built from 1 body, 1 cuff, 1 heel patch, 1 toe patch) + 1 cord
- Layout: 6 stockings in one row, 6 in (15.2 cm) apart center to center
- Body size before border: 3.5 in (8.9 cm) wide at foot × 4 in (10.2 cm) tall
- Border depth: 1 round of sc, 0.2 in (0.5 cm) on every edge
Materials
Use a smooth, mercerized or matte worsted-weight cotton. Cotton keeps the outlines crisp and stops the stockings from stretching on the cord. The amounts below assume about 1.9 m per gram (a typical 50 g / 95 m cotton ball).
- Forest green: 120 g / 228 m (bodies, borders, loops, cord)
- Cream: 50 g / 95 m (cuffs, heels, toes)
These amounts include about a 20% margin for your gauge swatch and tails.
Tools:
– 4.0 mm (G-6) crochet hook
– 6.0 mm (J-10) crochet hook
– Tapestry needle
– 2 locking stitch markers
– Rust-proof pins
– Ruler or tape measure
– Blocking mat and spray bottle
Abbreviations (US Terms)
- ch – chain
- sc – single crochet
- sl st – slip stitch
- st(s) – stitch(es)
- sc2tog – single crochet 2 together: insert hook in next st, yarn over, pull up a loop; insert hook in following st, yarn over, pull up a loop; yarn over, pull through all 3 loops (decreases 1 st)
- MR – magic ring
- back bump – the horizontal ridge of loops on the back of a chain
The turning ch-1 never counts as a stitch.
Gauge and Checkpoints
Gauge: 16 sc and 20 rows = 4 in (10.2 cm) on a 4.0 mm hook. That works out to 4 sts and 5 rows per inch.
Make one complete stocking body first and treat it as your gauge swatch. Check it at each of these points:
- After Row 11 (leg): 2.5 in (6.4 cm) wide × 2.2 in (5.6 cm) tall
- After Row 20 (body): 3.5 in (8.9 cm) at the widest part of the foot × 4 in (10.2 cm) tall
- After the border: 3.9 in (9.9 cm) × 4.4 in (11.2 cm), with the leg at 2.9 in (7.4 cm)
- Cuff: 3 in (7.6 cm) × 1 in (2.5 cm)
- Heel patch: 1.6 in (4.1 cm) across the straight edge
- Toe patch: 2 in (5.1 cm) across the straight edge
If the leg comes out wider than 2.5 in (6.4 cm), go down half a hook size. If it comes out narrower, go up half a hook size. Don’t add or remove stitches, because the cuff and patches are sized to fit these exact counts.
Pattern
Work each stocking in this order: Body → Border (see the Border section below) → Cuff, Heel and Toe → Assembly.
Part 1: Stocking Body (make 6, green)
You’ll work it flat from the top of the leg down. One side edge stays straight: this is the heel edge. The other side edge grows outward: this is the toe edge.
With a 4.0 mm hook, ch 11.
Row 1: Sc in 2nd ch from hook and in each ch across, turn. (10 sc)
Row 2: Ch 1, sc in each st across, turn. (10 sc) Place a marker in the last st of this row. This is the toe edge. Every even row ends at the toe edge, and every odd row begins there.
Rows 3–11: Ch 1, sc in each st across, turn. (10 sc)
Checkpoint: 2.5 in (6.4 cm) × 2.2 in (5.6 cm).
Row 12: Ch 1, sc in next 9 sts, 2 sc in last st, turn. (11 sc)
Row 13: Ch 1, 2 sc in first st, sc in next 10 sts, turn. (12 sc)
Row 14: Ch 1, sc in next 11 sts, 2 sc in last st, turn. (13 sc)
Row 15: Ch 1, 2 sc in first st, sc in next 12 sts, turn. (14 sc)
Rows 16–17: Ch 1, sc in each st across, turn. (14 sc)
Row 18: Ch 1, sc2tog, sc in next 10 sts, sc2tog, turn. (12 sc)
Row 19: Ch 1, sc2tog, sc in next 8 sts, sc2tog, turn. (10 sc)
Row 20: Ch 1, sc2tog, sc in next 6 sts, sc2tog. (8 sc) Don’t fasten off. Go straight on to the Border round.
The increases in Rows 12–15 push the foot out toward the toe. The decreases in Rows 18–20 round off both the heel and toe corners, which gives the softly curved sole.
Checkpoint: 3.5 in (8.9 cm) × 4 in (10.2 cm).
Part 2: Cuff (make 6, cream)
With a 4.0 mm hook, ch 13.
Row 1: Sc in 2nd ch from hook and in each ch across, turn. (12 sc)
Rows 2–5: Ch 1, sc in each st across, turn. (12 sc)
Fasten off, leaving a 12 in (30.5 cm) tail. The cuff measures 3 in (7.6 cm) × 1 in (2.5 cm). It’s 0.1 in (0.3 cm) wider than the bordered leg, so it overhangs each side by 0.05 in (0.1 cm), just like the photo.
Part 3: Heel Patch (make 6, cream)
This is a flat half circle worked in turned rows.
Row 1: MR, ch 1, 3 sc in ring, pull the ring closed, turn. (3 sc)
Row 2: Ch 1, 2 sc in each st, turn. (6 sc)
Row 3: Ch 1, sc in next st, 2 sc in next st 3 times, turn. (9 sc)
Row 4: Ch 1, sc in next 2 sts, 2 sc in next st 3 times. (12 sc)
Fasten off, leaving a 10 in (25.4 cm) tail. The straight edge is 1.6 in (4.1 cm) across and the patch is 0.8 in (2.0 cm) deep.
Part 4: Toe Patch (make 6, cream)
Work Rows 1–4 as for the Heel Patch, turning at the end of Row 4.
Row 5: Ch 1, sc in next 3 sts, 2 sc in next st 3 times. (15 sc)
Fasten off, leaving a 10 in (25.4 cm) tail. The straight edge is 2 in (5.1 cm) across and the patch is 1 in (2.5 cm) deep.
Each half circle gains 3 sts per row. That’s half of the 6-per-round increase a flat circle needs, so the patches lie flat.
Part 5: Assembly (after the Border)
- Toe: Pin the toe patch over the toe corner, curve outward. Line the curve up with the outer edge of the border, so the straight edge runs diagonally from the toe edge down to the sole. Whipstitch all the way around.
- Heel: Pin the heel patch over the heel corner the same way. Leave a small green wedge on the sole between the heel and toe patches, about 0.3 in (0.8 cm) wide. Whipstitch in place.
- Cuff: Line the cuff’s top edge up with the top of the border. It covers the top 1 in (2.5 cm) of the leg. Whipstitch all four edges.
- Loop: With a 4.0 mm hook and green, insert the hook through the top edge of the cuff and the body together, between cuff sts 6 and 7. Pull up a loop, ch 8, then sl st in the same place. Fasten off and weave in the ends. The loop has a circumference of about 2 in (5.1 cm).
Sew the patches onto the same face of all six bodies (the face that was toward you during the border round) so every toe points the same way.
Make All Pieces
Green: 6 bodies, 6 border rounds, 6 hanging loops, 1 cord.
Cream: 6 cuffs, 6 heel patches, 6 toe patches.
Layout grid (left to right, stockings centered on cord):
CORD:  [12 in tail] S1 - S2 - S3 - S4 - S5 - S6 [12 in tail]
ROW 1: STOCKING STOCKING STOCKING STOCKING STOCKING STOCKING
TOES:  all pointing the same direction
Stocking centers, measured from the left end of the cord: 12 in (30.5 cm), 18 in (45.7 cm), 24 in (61.0 cm), 30 in (76.2 cm), 36 in (91.4 cm), 42 in (106.7 cm).
Joining
Cord: Hold two strands of green together and use the 6.0 mm hook. Ch 162, which is about 54 in (137.2 cm) at 3 ch per inch. Sl st in the back bump of the 2nd ch from the hook and in each back bump across. (161 sl st) Fasten off and weave in the ends.
The slip-stitch pass turns the flat chain into a firm, rounded cord about 0.4 in (1.0 cm) thick.
Checkpoint: 52–54 in (132.1–137.2 cm). If it comes out shorter, loosen the sl sts. Don’t add chains, or your spacing marks will move.
Attaching the stockings: Place locking markers or pins on the cord at the six center points from the layout grid. Thread the cord through the hanging loops one at a time, from S1 to S6. Line each loop up with its mark, then tack the base of the loop to the underside of the cord with 2–3 small green stitches. The loop is attached at only one point, and the cord passes right through it.
Stitch logic: 6 in (15.2 cm) between centers × 5 gaps = 30 in (76.2 cm) from S1 to S6. Add 12 in (30.5 cm) of tail at each end: 12 + 30 + 12 = 54 in (137.2 cm). The gap between neighboring feet is 6 − 3.9 = 2.1 in (5.3 cm).
Tension: Tack loosely enough that the stocking hangs straight down without twisting. Pulling the tacking tight makes the stocking tilt.
Size checkpoint: Lay the garland flat. Measure 30 in (76.2 cm) from the center of S1 to the center of S6.
Border
Border gauge: Same as the body, 4 sc per inch. Work 1 sc into the end of each sc row. In this tight cotton fabric, that lies flat.
Border Round (green, on each body): Continue from the end of Row 20. Ch 1 and turn. Work around the body in this order:
- Bottom edge (Row 20): 2 sc in first st, sc in next 6 sts, 2 sc in last st. (10 sc)
- Heel edge: 1 sc in the end of each row, Rows 20 to 1. (20 sc)
- Top edge (foundation ch): Work into the free loops of the foundation chain: 2 sc in first loop, sc in next 8 loops, 2 sc in last loop. (12 sc)
- Toe edge: 1 sc in the end of each row, Rows 1 to 20. (20 sc)
Sl st to the first sc. Fasten off. Total: 62 sc.
Why the math works: The bottom edge has 8 sts plus 2 corner increases, which makes 10. The top edge has 10 foundation loops plus 2 corner increases, which makes 12. Each side has exactly one row-end per row, so 20 each. Each corner is counted once, inside its top or bottom total: 10 + 20 + 12 + 20 = 62.
The round adds 0.2 in (0.5 cm) on every edge. So the foot goes from 3.5 to 3.9 in (8.9 to 9.9 cm), the leg goes from 2.5 to 2.9 in (6.4 to 7.4 cm), and the height goes from 4 to 4.4 in (10.2 to 11.2 cm).
Final Blocking
- Weave in all the ends before blocking.
- Lightly mist each stocking with water until it’s damp but not soaked.
- Pin it flat, appliqué side up. Use pins to shape the leg to 2.9 in (7.4 cm) wide, the foot to 3.9 in (9.9 cm), and the height to 4.4 in (11.2 cm).
- Smooth the cuff so it’s square and the heel and toe curves so they’re even.
- Let it dry completely, about 6–8 hours.
- Unpin, rehang the garland, and check that all six stockings are level.
Final Quality-Control Checklist
- [ ] Every body has 8 sts on Row 20 and 62 sts in the border round
- [ ] All six stockings measure 3.9 × 4.4 in (9.9 × 11.2 cm)
- [ ] Cuffs are 12 sts × 5 rows and square
- [ ] Heels have 12 sts and toes have 15 sts on the last row
- [ ] All toes point the same direction
- [ ] A green wedge shows between the heel and toe on every sole
- [ ] Loops are centered and firmly tacked
- [ ] Stocking centers are 6 in (15.2 cm) apart
- [ ] No loose ends showing on the front
Troubleshooting
The foot curls. Your tension is too tight on the increase rows. Work those stitches a little more loosely, then block.
The border ruffles along the sides. Your hook is too big for the border. Work the round with a hook half a size smaller.
The cuff is narrower than the leg. Your cuff gauge is tighter than your body gauge. Go up half a hook size for the cuff only.
The patches cup. Make sure you’re turning every row. Working in a spiral with no turns throws off a half circle.
The stockings twist on the cord. Tack the loop at its base, not on its side.
The cord stretches. Steam it lightly and let it hang to dry. Cotton holds its length once it’s set.
Care
Hand wash in cool water with mild soap, press out the water in a towel, and dry flat. Reshape the stockings while they’re damp and store the garland coiled loosely.
Final Notes
Here’s the measurement chain at a glance:
- Gauge: 16 sc × 20 rows = 4 in (10.2 cm)
- Body: 10 sts gives a 2.5 in (6.4 cm) leg, 14 sts gives a 3.5 in (8.9 cm) foot, and 20 rows give a 4 in (10.2 cm) height
- Border: a 62-sc round brings the stocking to 3.9 × 4.4 in (9.9 × 11.2 cm)
- Cuff: 12 sts makes it 3 in (7.6 cm) wide
- Patches: 12 and 15 sts give 1.6 in (4.1 cm) and 2 in (5.1 cm) straight edges
- Cord: 162 ch gives 54 in (137.2 cm)
- Spacing: 6 in (15.2 cm) × 5 gaps = 30 in (76.2 cm) between the outer stocking centers
Check your gauge on the first body and every other number will fall into place.
Happy crocheting!