

The Copper Oak Leaf Garland is a string of seven crocheted oak leaves hanging from a simple chain cord, with a natural wooden bead between each leaf. Every leaf has rounded, wavy lobes, a raised center vein, and short side veins that run out toward each lobe.
The whole garland is worked in one warm rust-copper yarn. The beads are plain, unfinished light wood. The look is cozy and seasonal. It suits a window frame, a mantel, or a bookshelf from early autumn right through winter.
This pattern uses US crochet terms. The finished garland measures 44.8 in (113.8 cm) end to end, including two 8 in (20.3 cm) ties. The decorated span is 28.8 in (73.2 cm). Each leaf is 4.4 in (11.2 cm) long and 2.75 in (7.0 cm) wide.
Construction is simple. Each leaf is worked in the round around a foundation chain, so the chain becomes the center line. A shaping round builds the lobes, a slip-stitch round sharpens the edge, and surface slip stitches add the veins. Then you chain the cord with the beads already threaded on and join each leaf by its hanging loop as you go.
Finished Size and Construction
- Finished size: 44.8 in (113.8 cm) long with ties; decorated span 28.8 in (73.2 cm)
- Skill level: Easy+ (confident beginner)
- Terminology: US crochet terms
- Yarn weight: DK (#3, light)
- Hook: 4.0 mm (US G-6)
- Number of pieces: 7 leaves plus 1 cord
- Layout: 1 row of 7 leaves, with beads between the leaves and at both ends
- Piece size: 4.4 in x 2.75 in (11.2 cm x 7.0 cm) per leaf; 5.15 in (13.1 cm) drop including the loop
- Size before border: 44.8 in (113.8 cm) cord after joining
- Border depth: adds no length; the cord finishing row adds only about 1/8 in (0.3 cm) of thickness
Materials
Choose a smooth DK yarn with good stitch definition. Cotton or a cotton blend gives crisp lobes and veins. A soft acrylic also works but needs firmer blocking. Avoid fuzzy or very splitty yarns, because the surface veins will disappear.
- Rust/copper: 50 g (115 m) of DK yarn. You need about 28 g (63 m) for the leaves and 4 g (9 m) for the cord.
These quantities include a generous margin for your gauge swatch and any leaves you need to rework.
Tools and notions:
- 4.0 mm (US G-6) crochet hook
- 8 natural wooden beads, 5/8 in (1.6 cm) wide, with holes large enough for DK yarn to pass through easily
- Tapestry needle
- Scissors
- 2 stitch markers
- Blocking mat and rust-proof pins
- Spray bottle with water
- Ruler or tape measure
Abbreviations (US Terms)
- ch – chain
- sl st – slip stitch
- sc – single crochet
- hdc – half double crochet
- dc – double crochet
- tr – treble crochet
- st(s) – stitch(es)
- Rnd – round
Special stitch – surface slip stitch: Hold the working yarn behind the leaf. Insert the hook from front to back through the fabric and pull up a loop. Insert the hook at the next point along your line, pull up a loop, and draw it through the loop on the hook. This makes a raised chain line on the front.
Gauge and Checkpoints
Gauge: 11 sc = 2 in (5.1 cm), worked in rows with a 4.0 mm hook. Cord gauge: 5 ch = 1 in (2.5 cm), measured relaxed.
Make one complete leaf and check it before you make the rest. Measure at each stage:
- After Rnd 1: oval about 3.75 in x 0.75 in (9.5 cm x 1.9 cm)
- After Rnd 2: about 4.25 in x 2.6 in (10.8 cm x 6.6 cm)
- After Rnd 3 and blocking: 4.4 in x 2.75 in (11.2 cm x 7.0 cm)
- Cord: 10 ch = 2 in (5.1 cm)
If your leaf is more than 1/4 in (0.6 cm) too long, go down to a 3.75 mm hook. If it is too small, go up to a 4.5 mm hook. Small size differences are fine for a garland, but all seven leaves must match each other. Use the same hook and tension for every leaf.
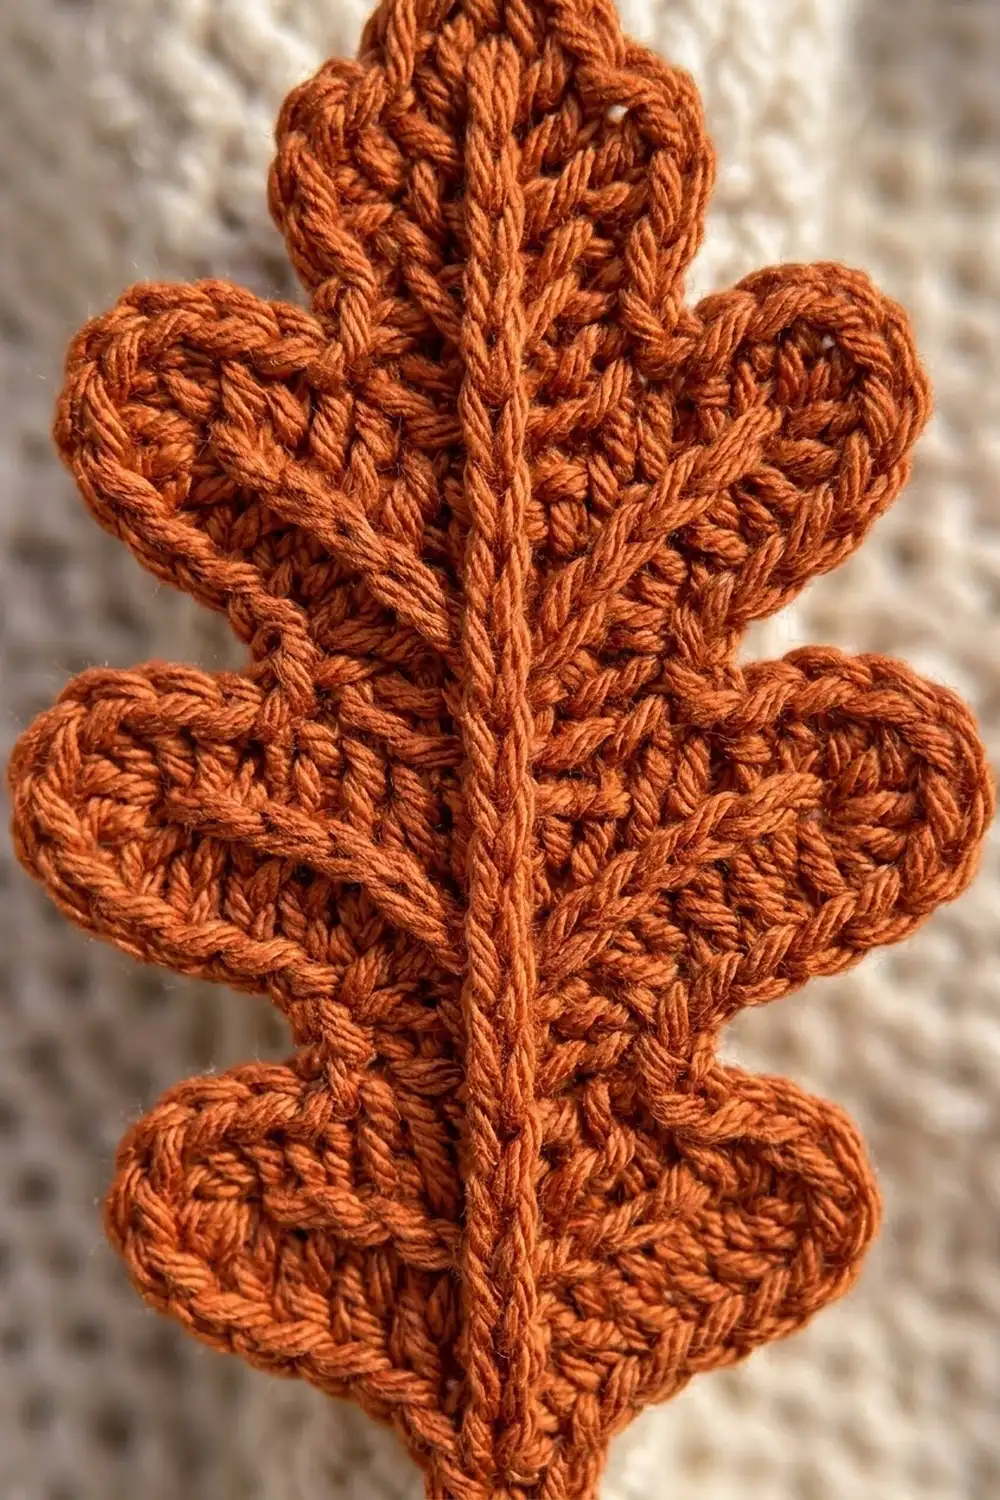
Leaf Pattern (Make 7)
Each leaf is worked in joined rounds. The end of the foundation chain nearest the hook is the tip. The far end is the stem.
Foundation and Rnd 1
Ch 21.
Rnd 1: Sc in 2nd ch from hook (tip end), sc in next 18 ch, 3 sc in last ch (stem end). Rotate the work and continue along the free loops on the other side of the chain: sc in next 18 ch, 2 sc in the same ch as the first sc. Join with sl st to first sc. (42 sts)
Rnd 1 breakdown: 1 + 18 + 3 + 18 + 2 = 42.
For Rnd 2, number the stitches S1 to S42 in order, starting with the stitch you joined into. S1 to S20 are side A, S21 is the stem center, S22 to S41 are side B, and S42 is the tip center. Place a marker in S21 and another in S42.
Rnd 2: Lobe Shaping
Ch 2 (does not count as a st).
Side A (tip to stem):
- Hdc in S1.
- Sl st in S2 (notch).
- Lobe 1: hdc in S3, 3 dc in S4, hdc in S5.
- Sl st in S6 (notch).
- Lobe 2: hdc in S7, 2 dc in S8, 2 dc in S9, hdc in S10.
- Sl st in S11 (notch).
- Lobe 3: hdc in S12, 2 dc in S13, 3 tr in S14, 2 dc in S15, hdc in S16.
- Sl st in S17 (notch).
- Lobe 4: hdc in S18, 3 dc in S19, hdc in S20.
Side A count: 30 sts.
Stem and hanging loop: Sl st in S21, ch 8, sl st in the same st (S21). The ch-8 loop is not counted.
Side B (stem to tip, mirror of side A):
- Lobe 4: hdc in S22, 3 dc in S23, hdc in S24.
- Sl st in S25 (notch).
- Lobe 3: hdc in S26, 2 dc in S27, 3 tr in S28, 2 dc in S29, hdc in S30.
- Sl st in S31 (notch).
- Lobe 2: hdc in S32, 2 dc in S33, 2 dc in S34, hdc in S35.
- Sl st in S36 (notch).
- Lobe 1: hdc in S37, 3 dc in S38, hdc in S39.
- Sl st in S40 (notch).
- Hdc in S41.
Side B count: 30 sts.
Tip: 5 dc in S42. Join with sl st to first hdc.
Rnd 2 total: 66 sts (30 + 1 + 30 + 5), plus the ch-8 loop.
Check by stitch type: 18 hdc, 33 dc, 6 tr, and 9 sl st = 66. Each side is worked into exactly 20 stitches of Rnd 1 (S1–S20 and S22–S41), so the leaf is evenly matched on both sides of the line from stem to tip.
Rnd 3: Crisp Outline
Working loosely, sl st in each st around, skipping the ch-8 loop. At the stem, sl st into the S21 sl st beside the loop. Join to the first sl st. (66 sl st) Fasten off, leaving a 6 in (15.2 cm) tail.
This round sharpens the lobes without making the leaf noticeably bigger. If the edge puckers, your sl sts are too tight. Rework the round with a 4.5 mm hook.
Veins
Join a new length of yarn on the front of the leaf, at the base of the hanging loop.
Center vein: Work 20 surface sl st straight down the center of the leaf, directly over the foundation chain, ending at the tip. Fasten off on the back.
Side veins: On each side, start each vein at the center vein and work out toward the matching lobe, angling toward the tip:
- Lobe 4 vein: 3 surface sl st
- Lobe 3 vein: 4 surface sl st
- Lobe 2 vein: 3 surface sl st
- Lobe 1 vein: 2 surface sl st
That is 12 per side and 24 for both sides. With the 20 in the center vein, each leaf has 44 surface sl st. Stop each side vein about 1/4 in (0.6 cm) short of the edge so the lobe stays rounded.
Weave in all ends on the back, through the vein stitches where possible.
Make All Pieces
- Leaves: 7 in rust/copper (about 4 g / 9 m each)
- Cord: 1 in rust/copper, made during joining
- Beads: 8 natural wood
Lightly block all seven leaves before joining (see Final Blocking) so they hang flat.
Layout grid, left to right:
ROW 1: TIE – BEAD – LEAF – BEAD – LEAF – BEAD – LEAF – BEAD – LEAF – BEAD – LEAF – BEAD – LEAF – BEAD – LEAF – BEAD – TIE
That is 7 leaves and 8 beads: one bead between each pair of leaves and one bead at each outer end.
Joining: Building the Cord
Each leaf is joined to the cord with a slip stitch through its hanging loop as you chain. This locks every leaf in place so it cannot slide.
Setup: Before you begin, thread all 8 beads onto the yarn and push them well down toward the ball.
Cord:
- Ch 40 for the first tie.
- Slide bead 1 up to the hook. Ch 8 (the first ch locks the bead in place).
- Join Leaf 1: Hold the leaf behind the cord with its hanging loop at the top. Insert the hook through the ch-8 loop, yarn over, and pull through both the hanging loop and the loop on your hook. This join counts as 1 cord st.
- Repeat 6 times: ch 8, slide the next bead up, ch 8, join the next leaf.
- Ch 8, slide bead 8 up, then ch 40 for the second tie. Do not fasten off.
Stitch-to-stitch logic:
- Tie: 40 ch
- Bead 1 to Leaf 1: 8 ch + 1 join = 9 sts
- Each leaf-to-leaf section: 8 + 8 + 1 = 17 sts, worked 6 times = 102 sts
- Leaf 7 to bead 8: 8 ch
- Tie: 40 ch
Total: 40 + 9 + 102 + 8 + 40 = 199 cord sts.
Tension: Keep the chain relaxed and even at 5 ch per inch. Tight chains curl and shorten the garland. Pull each join snug but not tight, so the loop sits flush against the cord.
Size checkpoint: Leaf centers sit 4.0 in (10.2 cm) apart: 17 sts at 5 per inch is 3.4 in (8.6 cm), plus one 5/8 in (1.6 cm) bead. The gap between leaf edges is 1.25 in (3.2 cm). The decorated span from bead 1 to bead 8 is 119 sts (23.8 in / 60.5 cm) plus 8 beads (5 in / 12.7 cm), for 28.8 in (73.2 cm).
Border: Cord Finishing Row
The garland’s border is one slip-stitch row worked back along the cord. It firms up the chain, stops the cord from twisting, and leaves a clean chain on the front.
Border gauge: 5 sl st = 1 in (2.5 cm), the same as the cord.
Return row: Turn. Sl st into the back bump of the 2nd ch from the hook. Then sl st into the back bump of each ch and each join, all the way back to the start. Slide past each bead without working into it. Counts per section, in working order:
- Far tie: 39 sl st (the turning ch is skipped)
- Bead 8 to Leaf 7 section: 8 sl st
- Each leaf-to-leaf section: 17 sl st (1 into the join + 8 + 8), 6 times = 102 sl st
- Leaf 1 to bead 1 section: 9 sl st (1 into the join + 8)
- Starting tie: 40 sl st
Total: 198 sl st. Fasten off and weave the end into the cord.
Why the math works: The return row puts exactly one sl st into each of the 199 cord sts except the turning ch, so 199 − 1 = 198. Because the border is worked one-for-one, it adds no length. The cord stays 44.8 in (113.8 cm), and the leaves stay 4.0 in (10.2 cm) apart.
Final Blocking
- Mist each leaf lightly with water until it is damp, not wet.
- Lay the leaf face up on the blocking mat.
- Pin the stem and the tip so the center vein is straight and 4.4 in (11.2 cm) long.
- Pin the outer point of each Lobe 3 so the leaf is 2.75 in (7.0 cm) wide.
- Shape each lobe into a rounded curve and press each notch inward with a fingertip.
- Let the leaves dry completely, about 2–4 hours.
- After joining, lay the garland flat, straighten the cord, and mist it lightly. Let it dry before hanging.
Final Quality-Control Checklist
- Each leaf is 4.4 in x 2.75 in (11.2 cm x 7.0 cm) after blocking.
- Rnd 1 has 42 sts, Rnd 2 has 66 sts, and Rnd 3 has 66 sl st.
- Every leaf has 4 lobes per side plus a rounded tip.
- The center vein and all 8 side veins are raised and straight.
- All 7 hanging loops are ch 8 and the same size.
- The cord has 199 sts and the border row has 198 sl st.
- All 8 beads are in place: one between each pair of leaves and one at each end.
- Leaf centers are 4.0 in (10.2 cm) apart.
- The total length is 44.8 in (113.8 cm).
- All ends are woven in and cannot be seen from the front.
Troubleshooting
Leaf curls or cups: Rnd 3 is too tight. Rework it more loosely or with a larger hook, then block.
Lobes look uneven: Count Rnd 2 one side at a time. Each side must have 30 sts and be worked into exactly 20 Rnd 1 sts.
Leaf twists on the cord: The join went through only one strand of the loop. Rework it through the whole ch-8 loop.
Beads slide around: Work the first ch after each bead snugly so it locks the bead in place.
Cord is too short: Your chain is too tight. Remake it with a 4.5 mm hook so you get 5 ch per inch.
Veins disappear: The yarn is too fuzzy, or the surface sl sts are too loose. Work them firmly, about one per stitch.
Missed a bead: Undo the cord back to that point, add the bead from the cut end, and rework.
Care
Hand wash in cool water and gently press out the water. Reshape the leaves and dry the garland flat. Do not tumble dry.
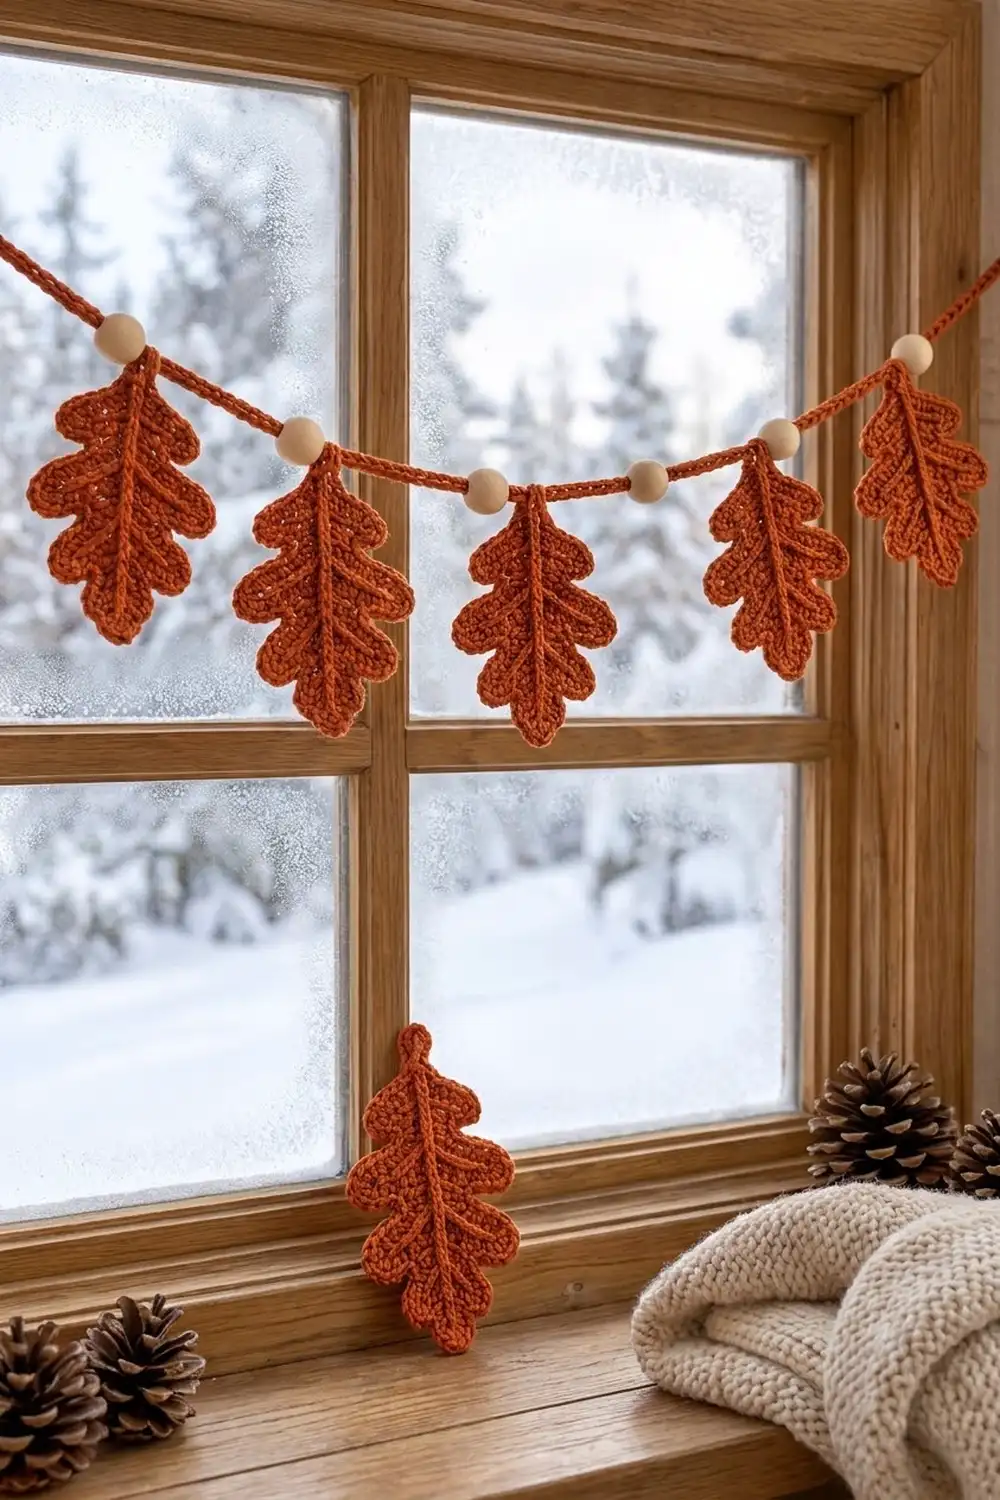
Final Notes
The measurements are short and easy to check. Rnd 1 gives a 42-st oval 3.75 in (9.5 cm) long. Rnd 2 builds the lobes with 66 sts, and Rnd 3 sharpens the edge for a finished 4.4 in x 2.75 in (11.2 cm x 7.0 cm) leaf.
Seven leaves join to a 199-st cord. Each leaf-to-leaf section has 17 sts and one bead, which puts the leaves 4.0 in (10.2 cm) apart. The 198-sl-st border keeps the cord at 44.8 in (113.8 cm) with a 28.8 in (73.2 cm) decorated span.
Check your first leaf against the checkpoints and keep your tension steady, and your Copper Oak garland will hang straight and even.
Happy crocheting!