

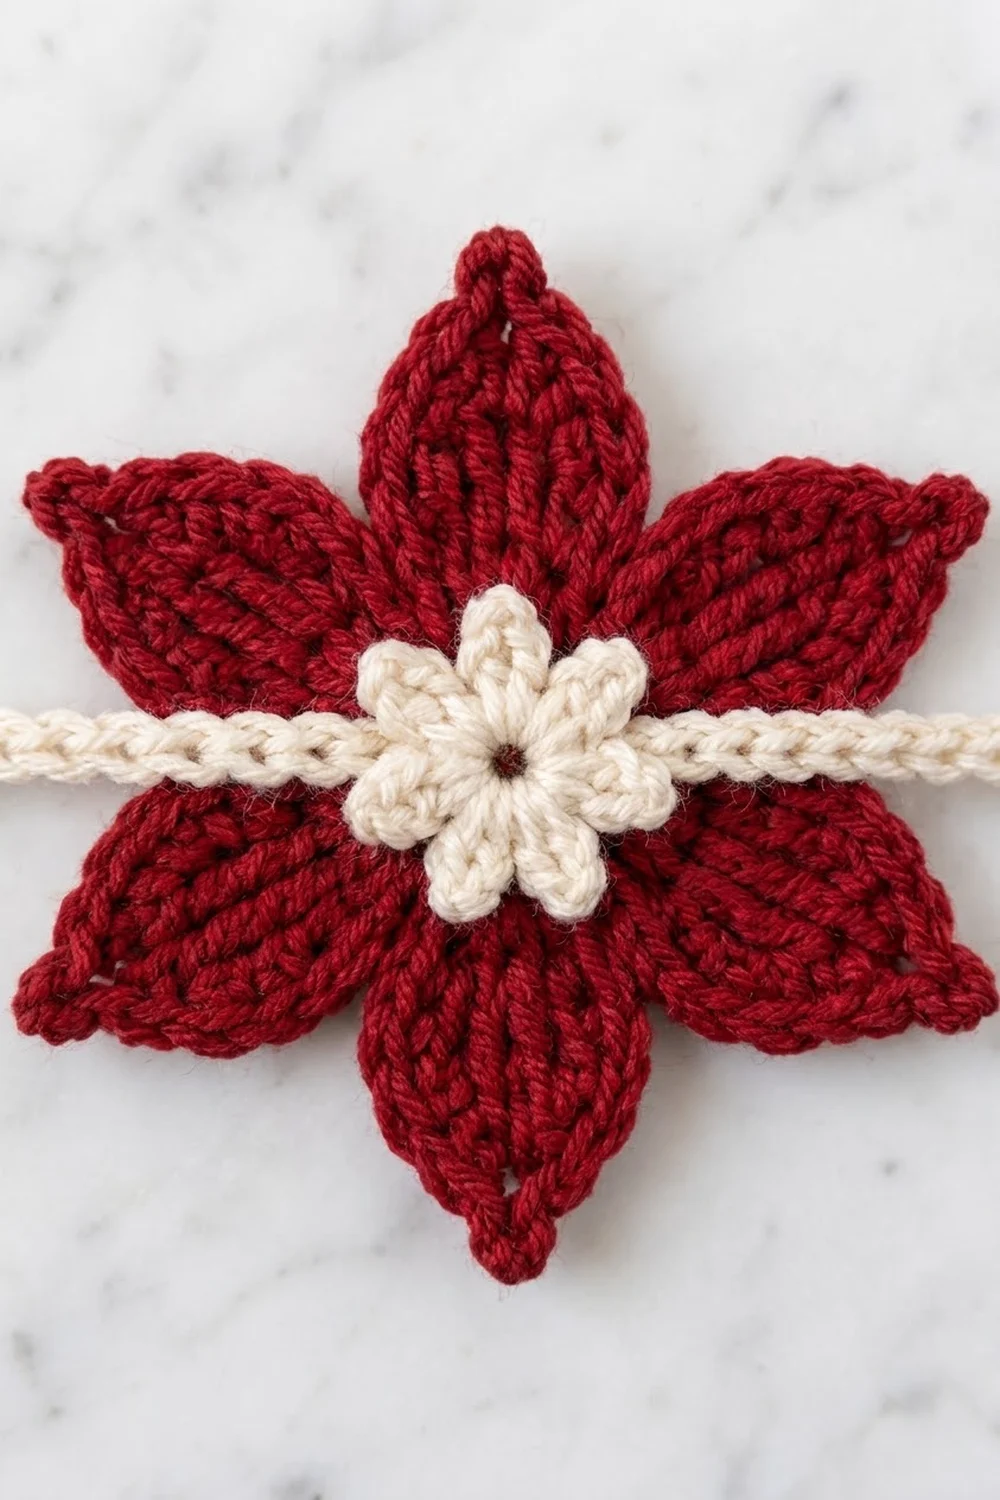
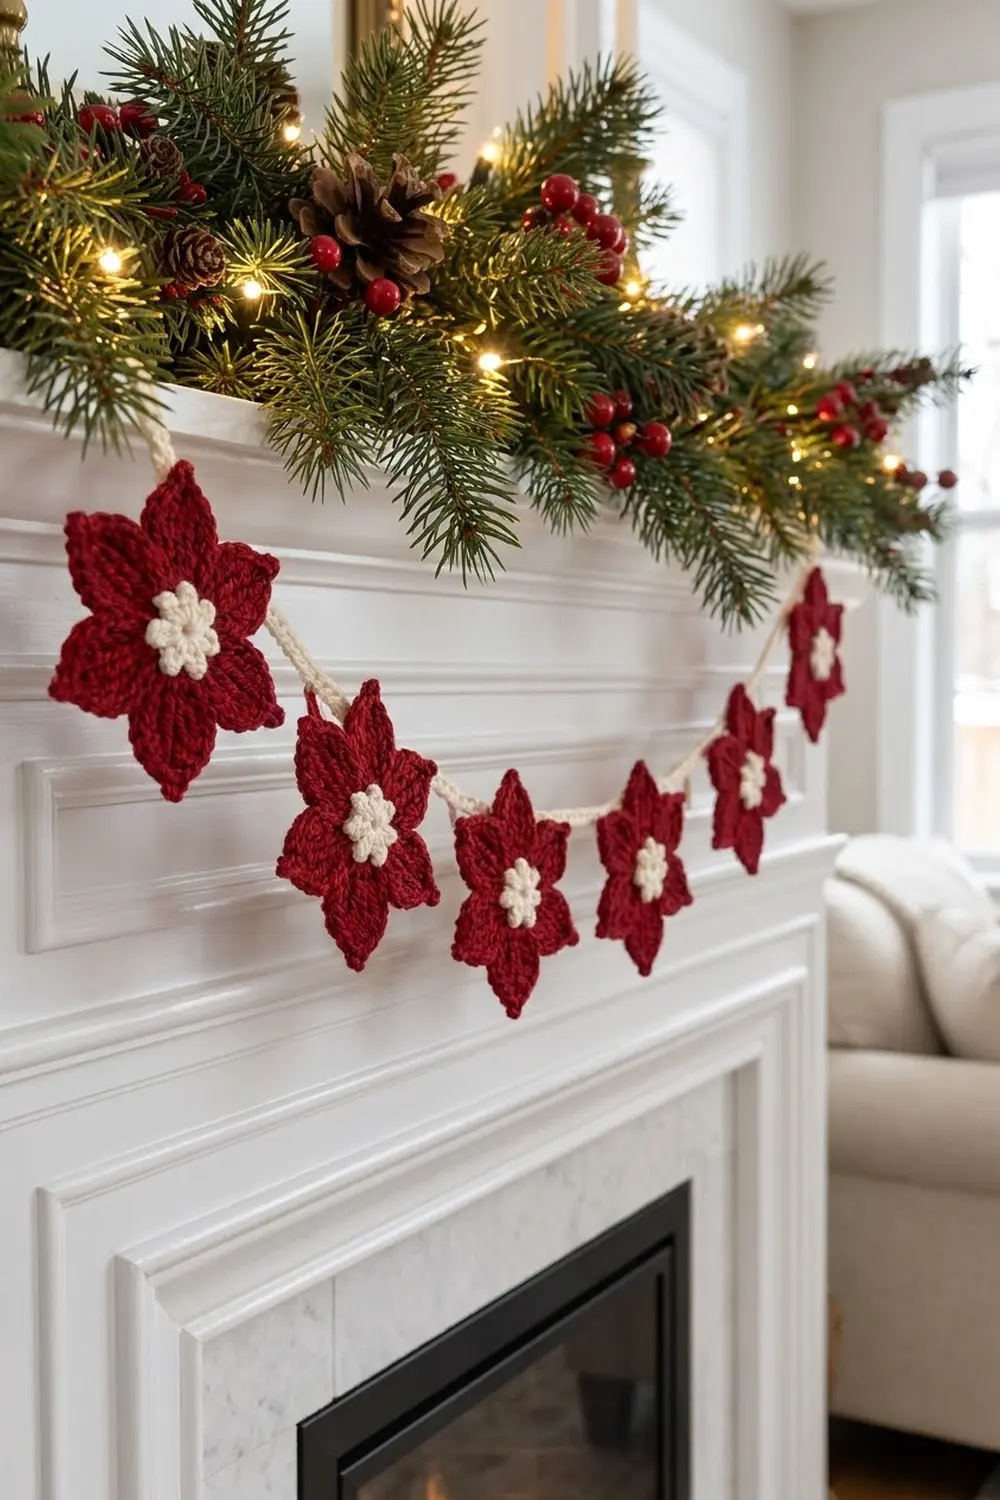
The Hearthside Poinsettia Garland is a classic holiday piece: seven deep cranberry-red poinsettias hang along a chunky cream cord. Each flower has six pointed petals with a raised center vein, and a small cream flower sits on top in the middle.
The look is clean and traditional. With only two colors, it sits well with pine boughs, brass candlesticks, and white mantels. The flowers lie flat, so the garland drapes neatly without curling.
This pattern uses US crochet terms. The finished garland is 72 in (182.9 cm) from loop to loop. Each poinsettia measures 4.5 in (11.4 cm) from tip to tip, and the flower centers are spaced 7 in (17.8 cm) apart.
You will make seven red flower bases, seven cream centers, and one cream cord worked with two strands held together. The cord is laid across each red flower and locked in place when the cream center is sewn on top, so the cord ends up between the two layers. A small hanging loop at each end finishes the garland.
Finished Size and Construction
- Finished garland length: 72 in (182.9 cm), including hanging loops
- Skill level: Easy+ (working both sides of a foundation chain)
- Terminology: US crochet terms
- Yarn weight: Worsted (#4)
- Hooks: 4.0 mm (G-6) for the flowers; 5.0 mm (H-8) for the cord
- Number of pieces: 15 (7 red bases, 7 cream centers, 1 cord)
- Layout: 7 flowers in a single row, one petal pointing up on each
- Piece size: red flower 4.5 in (11.4 cm); cream center 1.5 in (3.8 cm)
- Size before border: cord 70.5 in (179.1 cm)
- Border depth: 0.75 in (1.9 cm) hanging loop at each end
Materials
Use a smooth worsted-weight yarn with good stitch definition. Cotton or a cotton-acrylic blend works best, because the petal points stay crisp. Very fuzzy yarn hides the center veins.
- Cranberry red: 60 g / 120 m (7 flower bases)
- Cream: 35 g / 70 m (7 centers plus the doubled cord)
These amounts include a margin of roughly 20% over what the garland actually uses.
Tools:
- 4.0 mm (G-6) crochet hook
- 5.0 mm (H-8) crochet hook
- 8 locking stitch markers
- Tapestry needle
- Scissors
- Measuring tape
- Blocking mat, rust-proof pins, and a spray bottle
Abbreviations (US Terms)
- ch – chain
- sl st – slip stitch
- sc – single crochet
- hdc – half double crochet
- dc – double crochet
- tr – treble crochet
- sk – skip
- st(s) – stitch(es)
- sp – space
- rep – repeat
Special technique: Two-sided petal. You chain a spine, work stitches back down one side of it into the back bumps (Side A), then turn the work and go up the other side into the remaining top loops (Side B). Because the chain stays in the middle, it forms a raised vein down the center of the petal.
Gauge and Checkpoints
Make one complete red flower and one cream center before anything else. Measure them before you make the rest.
- Red Rounds 1–2: 1 in (2.5 cm) across
- One petal: 1.75 in (4.4 cm) long from the edge of Round 2 to the tip; 1.25 in (3.2 cm) wide at the widest point
- Finished red flower: 4.5 in (11.4 cm) from tip to opposite tip
- Cream center: 1.5 in (3.8 cm) across
- Cord gauge: 4 sts = 1 in (2.5 cm) with two strands held together and the slip-stitch row completed
Cord swatch: Ch 21 with doubled yarn on the 5.0 mm hook, then sl st in the back bump of each ch from the 2nd ch from the hook (20 sl sts). The swatch should measure 5 in (12.7 cm).
If your pieces are too big: go down 0.5 mm in hook size. If they are too small: go up 0.5 mm. Change the hook for the flowers and the cord separately, because they use different hooks and strand counts.
Part 1: Red Poinsettia Base (Make 7)
Use the 4.0 mm hook and cranberry red.
Round 1: Make a magic ring, ch 1, 6 sc in the ring. Pull the ring closed and sl st to the first sc. (6 sc)
Round 2: Ch 1, 2 sc in each st around. Sl st to the first sc. (12 sc)
Checkpoint: the disc measures 1 in (2.5 cm).
Round 3 (petals): Sl st in the first sc. This is the base of Petal 1.
Work the petal as follows:
- Spine: Ch 9.
- Side A: Skip the first ch from the hook; this is the tip ch. Working in the back bumps toward the center: sc in next ch, hdc in next ch, dc in next ch, tr in each of the next 2 ch, dc in next ch, hdc in next ch, sc in last ch. (8 sts)
- Side B: Turn the petal so the remaining top loops of the chain face up. Working in those loops from the center out to the tip: sc in first ch, hdc in next ch, dc in next ch, tr in each of the next 2 ch, dc in next ch, hdc in next ch, sc in next ch. (8 sts)
- Tip: Work (sc, ch 2, sc) in the tip ch.
- Return: Sl st loosely in each of the 8 Side A sts, working back toward the center. (8 sl sts)
- Sk the next sc of Round 2 and sl st in the following sc. This sl st is the base of the next petal.
Rep steps 1–6 five more times. On the final repeat, the step 6 sl st lands in the first sc of Round 2, which closes the round.
Round 3 count: 6 petals. Each petal has 16 shaping sts (8 on Side A + 8 on Side B), a tip of 2 sc around a ch-2 sp, and 8 return sl sts. The petals sit on Round 2 sts 1, 3, 5, 7, 9, and 11, so 6 petals × 2 sts = 12 sts, which matches Round 2.
The chain spine stays between Side A and Side B, which gives the raised vein. The (sc, ch 2, sc) tip makes the sharp point, and the return slip stitches firm up the outer edge.
Checkpoint: the flower measures 4.5 in (11.4 cm) from tip to tip.
Fasten off and weave in the ends.
Part 2: Cream Center (Make 7)
Use the 4.0 mm hook and cream.
Foundation: Ch 4 and sl st to the first ch to form a ring. This leaves the small open hole in the middle.
Round 1: Ch 1, 12 sc in the ring, sl st to the first sc. (12 sc)
Round 2: (hdc, 2 dc, hdc) in next st, sl st in next st; rep from * 5 more times. The last sl st lands in the joining st. (6 petals; 30 sts = 6 × 4 petal sts + 6 sl sts)*
Checkpoint: the center measures 1.5 in (3.8 cm).
Fasten off and leave a 12 in (30.5 cm) tail for sewing.
Part 3: Cream Cord (Make 1)
Use the 5.0 mm hook with two strands of cream held together.
Row 1: Ch 282, keeping your tension even. Place locking markers in chains 57, 85, 113, 141, 169, 197, and 225, counting from the slip knot. These seven markers show where the flower centers go.
Row 2: Sl st in the back bump of the 2nd ch from the hook and in each ch across. (281 sl sts) Do not fasten off. Leave the loop on a spare marker for the border.
Checkpoint: the cord measures 70.5 in (179.1 cm).
Cord math:
- End tie: 48 ch = 12 in (30.5 cm)
- From the end of the tie to the first flower center: 9 ch = 2.25 in (5.7 cm), which is half a flower
- Between flower centers: 6 spaces × 28 ch = 168 ch = 42 in (106.7 cm)
- From the last flower center to the other tie: 9 ch
- Other end tie: 48 ch
- Total: 48 + 9 + 168 + 9 + 48 = 282 ch
Make All Pieces
- Cranberry red: 7 poinsettia bases
- Cream: 7 centers and 1 cord
Layout along the cord:
TIE (48 ch) | F1 | F2 | F3 | F4 | F5 | F6 | F7 | TIE (48 ch)
MARKERS:      57   85  113  141  169  197  225
ALL FLOWERS: RED BASE + CREAM CENTER, ONE PETAL POINTING UP
Joining
Method: sandwich join. The cord lies across the front of each red center, and sewing the cream center on top holds it there.
- Lay the cord flat with the right side up. Put Flower 1 face up under the marker at ch 57.
- Turn the flower so one petal points straight up and one points straight down. The cord should cross the red center horizontally, passing between petals. The marked ch sits right over the magic ring.
- Place a cream center on top. Turn it so each cream petal points toward a red petal.
- Sew stitch to stitch with the cream tail: each of the 12 cream Round 1 sc goes to the matching red Round 2 sc, for 12 tacks per flower. Where the cord passes under the cream center, take the needle through the cord as well, at 2 points on each side.
- Remove the marker and repeat with the other six flowers.
Tension: Pull each tack just snug. Pulling too hard cups the red flower and makes the cord dip. If the tacks are too loose, the cord can slide.
Size checkpoint: the flower centers are 7 in (17.8 cm) apart, and the gaps between neighboring petal tips are 2.5 in (6.4 cm). The span from the outer petal tip of Flower 1 to the outer tip of Flower 7 is 46.5 in (118.1 cm).
Border
The border for this garland is a hanging loop worked at each end of the cord. Use the 5.0 mm hook with two strands of cream.
Border gauge: same as the cord, 4 ch = 1 in (2.5 cm).
End 1 (slip-knot end): Put the live loop from Row 2 back on the hook. Ch 6 and sl st in the last sl st made. (1 loop of 6 ch) Fasten off.
End 2 (starting end): Join the doubled cream with a sl st in the first sl st of Row 2. Ch 6 and sl st in the same st. (1 loop of 6 ch) Fasten off.
Why the math works: A 6-ch loop is 1.5 in (3.8 cm) around, and it folds in half to 0.75 in (1.9 cm) of extra length. So the total is 70.5 in + 0.75 in + 0.75 in = 72 in (182.9 cm). The loops add the same length at both ends, so the flower span stays centered.
Final Blocking
- Weave in all the remaining ends, hiding the red ends behind the petals.
- Pin the garland flat on the blocking mat, with the cord straight but not stretched.
- Pin each petal tip so every flower measures 4.5 in (11.4 cm) from tip to tip.
- Smooth each center vein with your fingertip.
- Mist everything until it is damp, not soaked.
- Check that the flower centers are still 7 in (17.8 cm) apart.
- Let it dry completely, usually 12–24 hours, before unpinning.
Final Quality-Control Checklist
- Seven red flowers, each with six petals
- Each flower measures 4.5 in (11.4 cm) from tip to tip
- Every petal has a visible center vein and a sharp tip
- Seven cream centers, 1.5 in (3.8 cm) each, with the open hole visible
- One red petal points straight up on every flower
- The cord crosses every flower between the red and cream layers
- The flower centers are spaced 7 in (17.8 cm) apart
- Each tie is 12 in (30.5 cm), with a 0.75 in (1.9 cm) loop
- The total length is 72 in (182.9 cm)
- No loose tails show from the front
Troubleshooting
Petals curl: Your Side B tension is tighter than Side A. Loosen up on Side B, or block with more pins.
The vein disappears: You worked Side A into the top loops. Work it into the back bumps instead.
Blunt tips: Make sure you work (sc, ch 2, sc) into the tip ch, not into the last Side B st.
The flower cups: Your Round 2 is too tight, or the cream tacks are pulled too hard. Re-sew more gently.
The cord is too short: Your chain is tight. Go up to a 5.5 mm hook, or check your gauge against the cord swatch.
Flowers tilt on the cord: Re-center the marked ch over the magic ring before sewing.
Care
Spot clean or hand wash cool, then lay flat and pin to dry. Store the garland flat or loosely rolled in tissue so the petal tips stay crisp.
Final Notes
The measurement chain is simple. Rounds 1–2 make a 1 in (2.5 cm) center. Six 1.75 in (4.4 cm) petals bring the flower to 4.5 in (11.4 cm), and the cream center adds a 1.5 in (3.8 cm) top layer. The 282-ch cord measures 70.5 in (179.1 cm), with the flower centers 7 in (17.8 cm) apart. The two hanging loops bring the finished garland to 72 in (182.9 cm).
If your first flower and your cord swatch hit gauge, everything else follows.
Happy crocheting!