

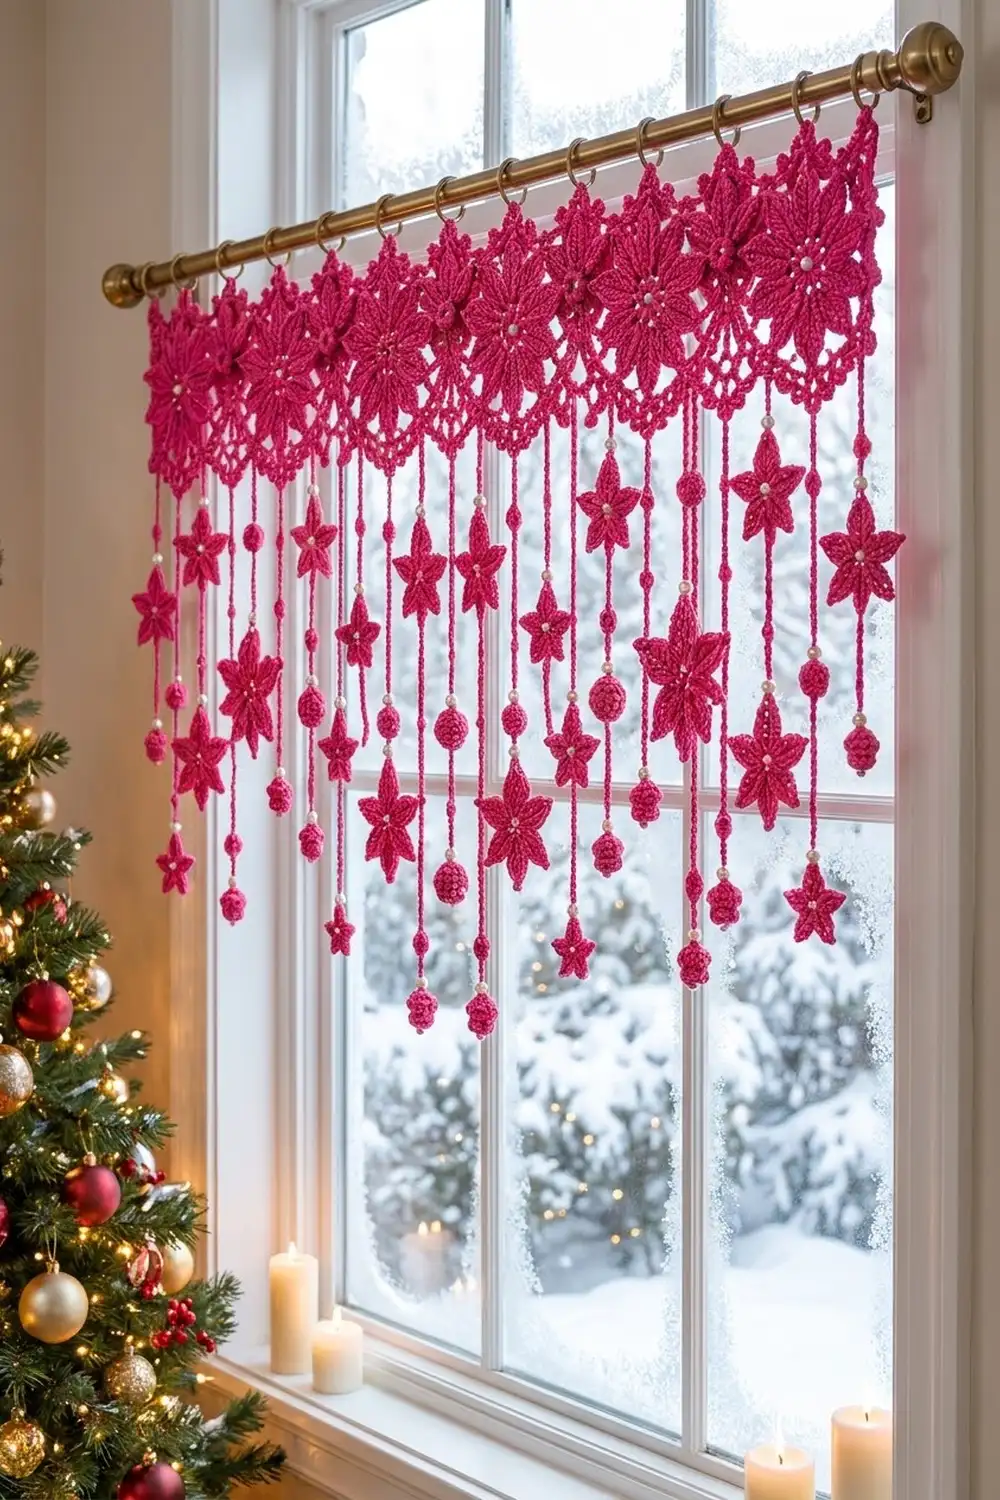
This valance turns a plain winter window into a festive display. A lace band of large eight-petal flowers runs across the top of the window. Below it hang strands of small stars, round crocheted balls, and pearl beads that catch the light.
The whole piece is worked in one color: a deep fuchsia, sometimes sold as raspberry. Small white pearls in the flower centers and along the strands add a soft shine. The style is somewhere between vintage lace and modern holiday decor, so it works with Christmas greenery and also on its own through the winter.
The pattern uses US crochet terms. The finished band measures 40 in (101.6 cm) wide and 5.25 in (13.3 cm) deep. The longest strands hang 10.5 in (26.7 cm) below the band, so the total drop is 15.75 in (40.0 cm).
Construction is modular. You make 10 square flower motifs and join them into one strip. Then you add a dc heading with picots along the top and a sc picot edging along the bottom. Finally, you make 21 chain-cord strands, sew stars and balls onto them, and attach them along the bottom edge.
Finished Size and Construction
- Finished size: 40 in x 5.25 in (101.6 cm x 13.3 cm) band; 15.75 in (40.0 cm) total drop
- Skill level: Intermediate
- Terminology: US crochet terms
- Yarn weight: Sport (#2), mercerized cotton
- Hook: 3.25 mm (US D-3)
- Number of pieces: 10 band motifs, 21 stars, 31 balls, 21 strands
- Layout: 10 motifs in 1 row
- Piece size: 4 in (10.2 cm) square motif
- Size before border: 40 in x 4 in (101.6 cm x 10.2 cm)
- Border depth: 0.75 in (1.9 cm) top heading; 0.5 in (1.3 cm) bottom edging
Materials
Use a smooth mercerized cotton in sport weight. Mercerized cotton shows stitch definition clearly, holds the pointed petals crisply after blocking, and doesn’t sag when it hangs. Avoid fuzzy or very stretchy acrylics: the strands would stretch over time.
Yarn (one color):
- Fuchsia: 250 g, about 775 m (based on 155 m per 50 g)
- Motifs: about 90 g
- Border: about 15 g
- Stars: about 42 g
- Balls: about 31 g
- Cords: about 10 g
These quantities include a margin of roughly 30% over what the pattern actually uses.
Tools and notions:
- 3.25 mm (US D-3) crochet hook
- 90 white pearl beads, 4 mm, with holes at least 1.5 mm wide
- Big-eye beading needle or a dental floss threader, for stringing the beads
- Tapestry needle
- Stitch markers
- 11 clip-on curtain rings
- Blocking mats, rust-proof pins, and a spray bottle
- Measuring tape and scissors
Abbreviations (US Terms)
- ch – chain
- sl st – slip stitch
- sc – single crochet
- hdc – half double crochet
- dc – double crochet
- tr – treble crochet
- sc2tog – single crochet 2 together
- sp(s) – space(s)
- st(s) – stitch(es)
- RS / WS – right side / wrong side
Special stitch: picot. Ch 3, then sl st in the 3rd ch from the hook (the first ch you made).
Special technique: placing a pearl. Before starting a cord, string all of that cord’s pearls onto the yarn. When the pattern says “place pearl,” slide one pearl up against the hook, then ch 1 around it so the bead is locked in place.
Gauge and Checkpoints
Make one complete motif before anything else. Gauge in lace depends on the stitches you work into the chain spaces, so a plain sc swatch won’t tell you enough.
Checkpoints:
- After Round 1: the circle is 1 in (2.5 cm) across.
- After Round 3: the flower is 3 in (7.6 cm) from petal tip to opposite petal tip.
- After Round 6, blocked: the motif is 4 in (10.2 cm) square, with 21 sts per side.
If your motif is too big, go down to a 3.0 mm hook. If it is too small, go up to a 3.5 mm hook. A difference of 0.25 in (0.6 cm) per motif adds up to 2.5 in (6.4 cm) across the whole band, so take the time to check now.
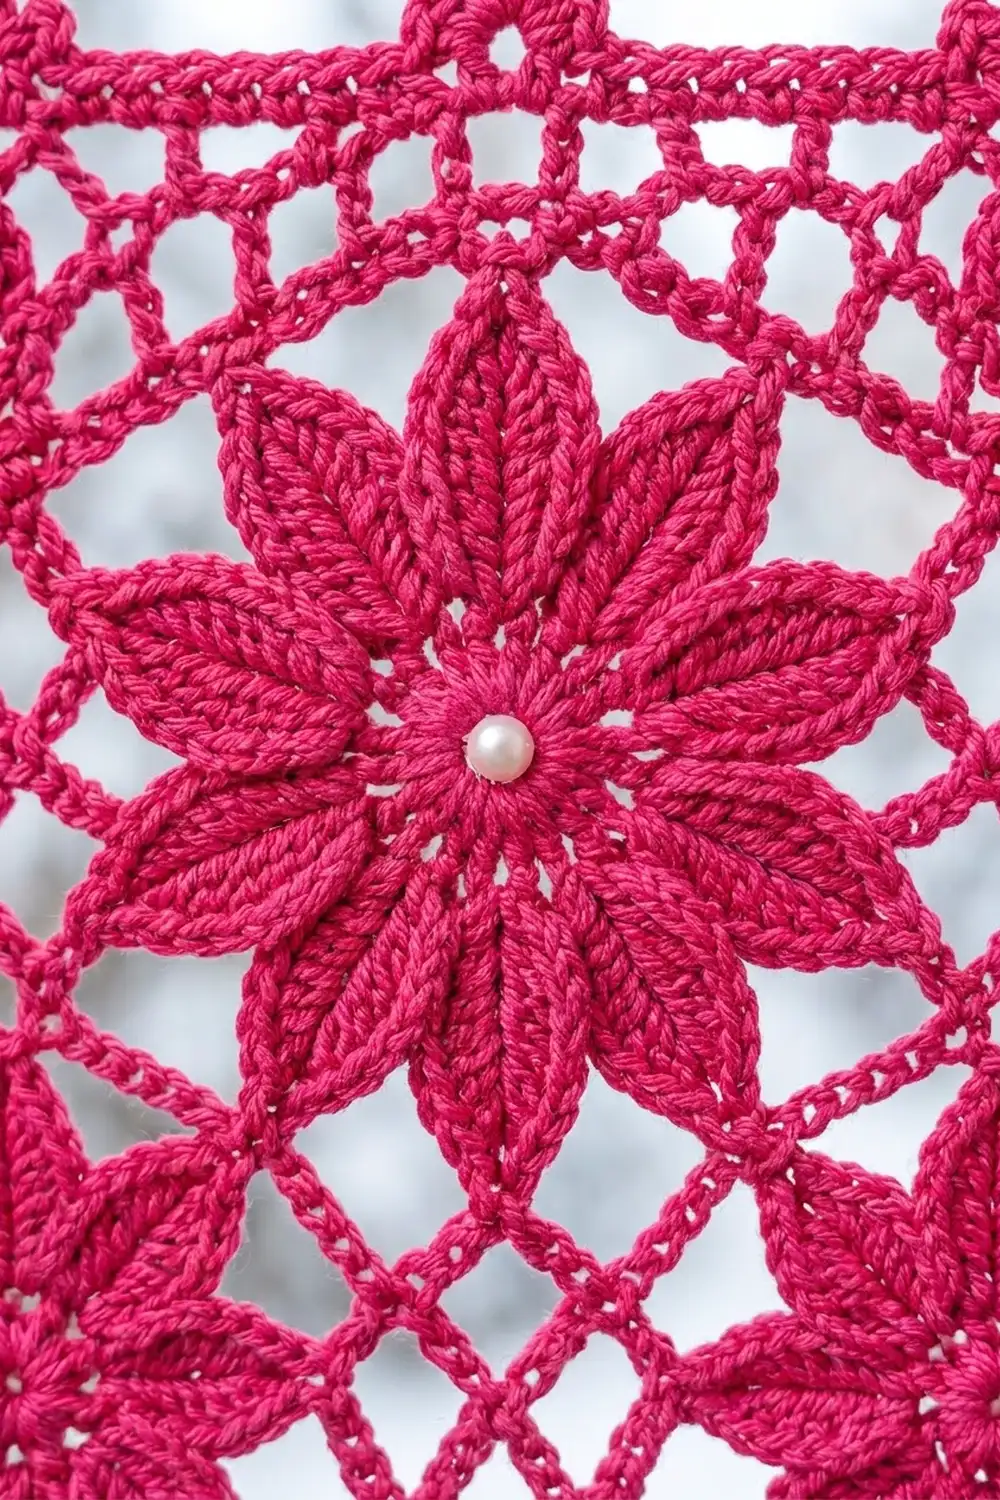
Flower Motif (Make 10)
Round 1: Make a magic ring. Ch 3 (counts as the first dc), then work 15 dc in the ring. Join with a sl st to the top of the ch-3. (16 dc)
Round 2: Ch 1. Sc in the same st, ch 5, skip 1 st. Sc in the next st, ch 5, skip 1 st. Repeat from * to * 6 more times. Join to the first sc. (8 sc, 8 ch-5 sps)
Round 3 (petals): In each ch-5 sp, work (sc, hdc, 2 dc, tr, ch 2, tr, 2 dc, hdc, sc). Join to the first sc. (8 petals: 80 sts and 8 ch-2 tips)
Each petal rises gradually from sc to tr and ends in a sharp ch-2 point. This is what gives the flower its eight textured, pointed petals.
Round 4 (flower ring): Sl st in the next 5 sts, then sl st into the ch-2 tip. Ch 1, sc in the same tip, ch 7. Sc in the next ch-2 tip, ch 7. Repeat from * to * 6 more times. Join to the first sc. (8 sc, 8 ch-7 loops)
These loops form the open chain ring around the flower.
Round 5 (mesh): Sl st into the first ch-7 loop and ch 1. Then work the following 4 times: (sc, ch 7, sc) in this loop for a corner, ch 5, sc in the next loop, ch 5, and move to the next loop. Join to the first sc. (12 sc, 4 ch-7 corner sps, 8 ch-5 sps)
Round 6 (squaring): Sl st into the corner ch-7 sp and ch 1. Then work the following 4 times: (3 sc, dc, 3 sc) in the corner sp, sc in the next sc, 5 sc in the ch-5 sp, sc in the next sc, 5 sc in the next ch-5 sp, sc in the next sc. Join and fasten off, leaving a 12 in (30.5 cm) tail.
- Each repeat is 7 + 1 + 5 + 1 + 5 + 1 = 20 sts, so the round has 80 sts.
- The dc in the middle of each corner is the corner stitch.
- Each side has 21 sts, counting both corner dc: 4 + 1 + 5 + 1 + 5 + 1 + 4.
- Check: 4 sides x 21 = 84, minus the 4 corners counted twice = 80.
Finishing each motif: Sew one pearl to the center of the magic ring with a strand of yarn.
Hanging Elements
Star (make 21):
- Round 1: Make a magic ring and work 12 sc in it. Join. (12 sc)
- Round 2: Ch 1. Sc in the next st, ch 4, skip 1 st. Repeat 6 times in total. Join. (6 sc, 6 ch-4 sps)
- Round 3: In each ch-4 sp, work (sc, hdc, dc, ch 2, dc, hdc, sc). Join and fasten off. (6 petals: 36 sts and 6 ch-2 tips)
The finished star is about 2 in (5.1 cm) across. Sew a pearl to its center.
Ball (make 31):
- Round 1: Work 6 sc in a magic ring. (6)
- Round 2: Work 2 sc in each st. (12)
- Round 3: Sc in each st. (12)
- Round 4: Stuff the ball firmly with yarn clippings, then sc2tog 6 times. (6)
Fasten off, close the opening, and leave a 6 in (15.2 cm) tail for sewing. The ball is about 0.6 in (1.5 cm) across.
Make All Pieces
All pieces are Fuchsia:
- 10 flower motifs
- 21 stars (11 for strand A, 10 for strand B)
- 31 balls (11 for strand A, 20 for strand B)
Band layout:
ROW 1: PINK PINK PINK PINK PINK PINK PINK PINK PINK PINK
Strand layout along the bottom edge (left to right):
A B A B A B A B A B A B A B A B A B A B A
Joining
Place two motifs with right sides together. Working through the back loops only of both layers, sl st across one side. Start in the corner dc of each motif and end in the opposite corner dc. That is 21 sts matched to 21 sts, one to one, with nothing skipped and nothing added.
Add the motifs one at a time until all 10 are in one row. Keep the sl sts loose enough to match the stretch of the motif edge. If the seams pucker, rip back and use a 3.5 mm hook just for the joining.
Size checkpoint: Lay the strip flat without stretching it. It should measure 40 in x 4 in (101.6 cm x 10.2 cm).
Border
Border gauge: 21 sts per 4 in (10.2 cm), the same as the motif edges. The border is worked only along the two long edges.
Starting count for each long edge: 10 motifs x 21 sts = 210 sts. This already includes both corner dc of every motif, so do not add any stitches at the seams.
Top heading
Row T1: With the RS facing, join the yarn in the first corner dc of the top edge. Ch 3 (counts as dc), then dc in each remaining st. (210 dc: 210 worked 1-per-st + 0 added) Turn.
Row T2: Ch 1. Sc in the first st. Sc in the next st, picot, sc in the next 2 sts. Repeat from * to * 69 times in total. Then sc in the next st, picot, and sc in the last st. Fasten off. (210 sc, 70 picots)
This heading is 0.75 in (1.9 cm) deep.
Bottom edging
Row B1: With the RS facing, join the yarn in the first corner dc of the bottom edge. Ch 1, then sc in each st across. (210 sc: 210 worked 1-per-st + 0 added) Turn.
Row B2: Work exactly as Row T2. (210 sc, 70 picots) Fasten off.
This edging is 0.5 in (1.3 cm) deep.
Why the math works:
- Picots sit on stitches 2, 5, 8, and so on up to stitch 209. That gives (209 − 2) ÷ 3 + 1 = 70 picots.
- One plain stitch is left at each end, so the edge is symmetrical.
- Every row is worked one stitch into each stitch, so the band stays 40 in (101.6 cm) wide.
- Height: 4 + 0.75 + 0.5 = 5.25 in (13.3 cm).
Strands
Each strand is a chain cord. Work it straight down from a sc in Row B2.
Where to attach the strands: Count the 210 sts of Row B2 from left to right.
- A strands: at sts 1, 21, 42, 63, 84, 105, 126, 147, 168, 189, and 210. These sit at the two ends and next to each seam.
- B strands: at sts 11, 32, 53, 74, 95, 116, 137, 158, 179, and 200. These sit under the flower centers.
Strand A (make 11):
- String 2 pearls onto the yarn.
- Join the yarn at an A stitch.
- Ch 8, place a pearl, ch 11, place a pearl, ch 9. (30 ch including the 2 pearl ch: 6 in / 15.2 cm)
- Fasten off.
- Sew a ball to the cord at ch 14.
- Sew a star to the end of the cord by one petal tip.
Strand B (make 10):
- String 3 pearls onto the yarn.
- Join the yarn at a B stitch.
- Ch 10, place a pearl, ch 11, place a pearl, ch 15, place a pearl, ch 11. (50 ch including the 3 pearl ch: 10 in / 25.4 cm)
- Fasten off.
- Sew a ball to the cord at ch 15.
- Sew a star to the cord at ch 30, stitching through its top and bottom petal tips.
- Sew a ball to the end of the cord.
With the ball at the end, a B strand hangs 10.5 in (26.7 cm) below the band. An A strand with its star hangs about 8 in (20.3 cm).
Final Blocking
- Weave in all ends except the cords’ sewing tails, which you can bury inside the balls.
- Mist the band until it is evenly damp.
- Pin it to 40 in x 5.25 in (101.6 cm x 13.3 cm).
- Pin each of the 8 petal tips on every flower. Pin each picot along both edges.
- Pin the corners of the mesh loops open so the lace reads clearly.
- Lay the strands out straight and pin each star point flat.
- Let everything dry completely, about 24 hours.
Final Quality-Control Checklist
- [ ] All 10 motifs measure 4 in (10.2 cm) square, with 21 sts per side.
- [ ] Every flower has 8 pointed petals and a pearl center.
- [ ] Rows T1, T2, B1, and B2 each have 210 sts, and T2 and B2 each have 70 picots.
- [ ] There are 21 strands in the A–B pattern, starting and ending with A.
- [ ] There are 21 stars and 31 balls, all sewn on securely.
- [ ] The band measures 40 in x 5.25 in (101.6 cm x 13.3 cm).
- [ ] The total drop is 15.75 in (40.0 cm).
Troubleshooting
- Petals curl forward: Your tension is tight in Round 3. Block firmly, or work the tr more loosely.
- The motif is wavy: The Round 5 chains are too long for your tension. Try ch 6 corners and ch 4 sides.
- Seams pucker: Rejoin with a larger hook.
- The band comes out shorter than 40 in (101.6 cm): Check each motif against the 4 in (10.2 cm) checkpoint before you join more.
- Pearls slide along the cord: Make sure you ch 1 around each bead to lock it.
- Strands twist: Mist them and hang the valance with a light weight clipped to each strand overnight.
Care
Hand wash in cool water with mild soap and press out the water in a towel; don’t wring it. Reblock flat and remove the pearls’ strain by drying fully before rehanging.
Final Notes
The measurements build on each other in a simple chain:
- One motif is 4 in (10.2 cm) square, with 21 sts per side.
- Ten motifs make a strip 40 in (101.6 cm) wide, with 210 sts along each long edge.
- The 0.75 in (1.9 cm) heading and 0.5 in (1.3 cm) edging bring the band to 5.25 in (13.3 cm) deep.
- 21 strands, the longest hanging 10.5 in (26.7 cm), complete a 15.75 in (40.0 cm) drop.
If the first motif is right, everything after it falls into place. Clip the 11 rings to the heading at the ends and seams, slide them onto your rod, and enjoy the light coming through.
Happy crocheting!