

The Tulip Noel Window Valance turns a plain window into a festive focal point. A row of lacy half-round scallops runs across the top, each with a solid ribbed tulip. Below it hangs a fringe of chain strands with little Christmas trees, berry clusters, gold beads and tiny wrapped gift boxes.
The whole valance is worked in one bright red cotton, with small gold beads as the only accent. Using a single color keeps the lace crisp and graphic and lets the shapes stand out, much like a Scandinavian paper cutout.
This pattern uses US crochet terms. The finished lace band measures 50 in (127.0 cm) wide and 3.25 in (8.3 cm) deep. The longest strands reach about 16.5 in (41.9 cm) from the top edge.
You make 10 scallop motifs and sew a tulip to each one. Then you join the scallops along the top, work a 3-row top band with rod loops, and hang 21 decorated strands from the scallops and seams.
Finished Size and Construction
- Finished size: 50 in (127.0 cm) wide; band 3.25 in (8.3 cm) deep; longest drop about 16.5 in (41.9 cm)
- Skill level: Intermediate
- Terminology: US
- Yarn weight: Sport (#2) mercerized cotton
- Hook: 3.5 mm (E-4)
- Number of pieces: 10 scallops, 10 tulips, 21 trees, 21 berry clusters, 10 gift boxes, plus 21 strands
- Layout: 1 row of 10 scallops
- Piece size: each scallop is 5 in (12.7 cm) wide and 2.5 in (6.4 cm) deep
- Size before border: 50 x 2.5 in (127.0 x 6.4 cm)
- Border depth: 0.75 in (1.9 cm), plus rod loops
Materials
Choose a smooth mercerized cotton with about 155 m per 50 g (about 3.1 m per gram). Cotton holds the lace open, keeps the trees flat and blocks well. Avoid fuzzy or stretchy yarn, because the strands will sag.
Yarn (one color):
– Red: 220 g (about 682 m)
Approximate use by part:
– Scallops and tulips: 60 g
– Top band: 15 g
– Strands: 12 g
– Trees: 32 g
– Gift boxes: 30 g
– Berry clusters: 21 g
That comes to 170 g. The 220 g figure includes a margin for gauge differences and sewing tails.
Tools and notions:
– 3.5 mm (E-4) hook
– 21 gold round beads, 8 mm, with holes large enough for the yarn
– Beading needle or dental-floss threader
– Tapestry needle
– Small amount of fiberfill
– Stitch markers
– Blocking mats, rust-proof pins and a spray bottle
– Optional: light spray starch
Abbreviations (US Terms)
- ch – chain
- sl st – slip stitch
- sc – single crochet
- dc – double crochet
- tr – treble crochet
- st(s) – stitch(es)
- sp – space
- RS / WS – right side / wrong side
Special stitch: bobble (4-dc bobble). Yarn over, insert hook in the ring, pull up a loop, yarn over, pull through 2 loops; repeat from * 3 more times (5 loops on hook). Yarn over and pull through all 5 loops.
Gauge and Checkpoints
Gauge: 20 sc and 24 sc rows = 4 in (10.2 cm). 9 dc rows = 4 in (10.2 cm). For chains, 5 ch = 1 in (2.5 cm).
Make one complete scallop first and use it as your gauge swatch. Check these measurements:
- After Row 4: the solid fan is 3.5 in (8.9 cm) across the straight edge.
- After Row 7, blocked: the scallop is 5 in (12.7 cm) wide and 2.5 in (6.4 cm) deep.
- Tree: about 2.6 in (6.6 cm) wide at the base and 2 in (5.1 cm) tall.
- Gift box: a 1.2 in (3.0 cm) cube.
If your scallop is larger than 5 in (12.7 cm), go down 0.25 mm in hook size. If it is smaller, go up 0.25 mm. Being off by 0.25 in (0.6 cm) per scallop adds up to 2.5 in (6.4 cm) across the whole valance.
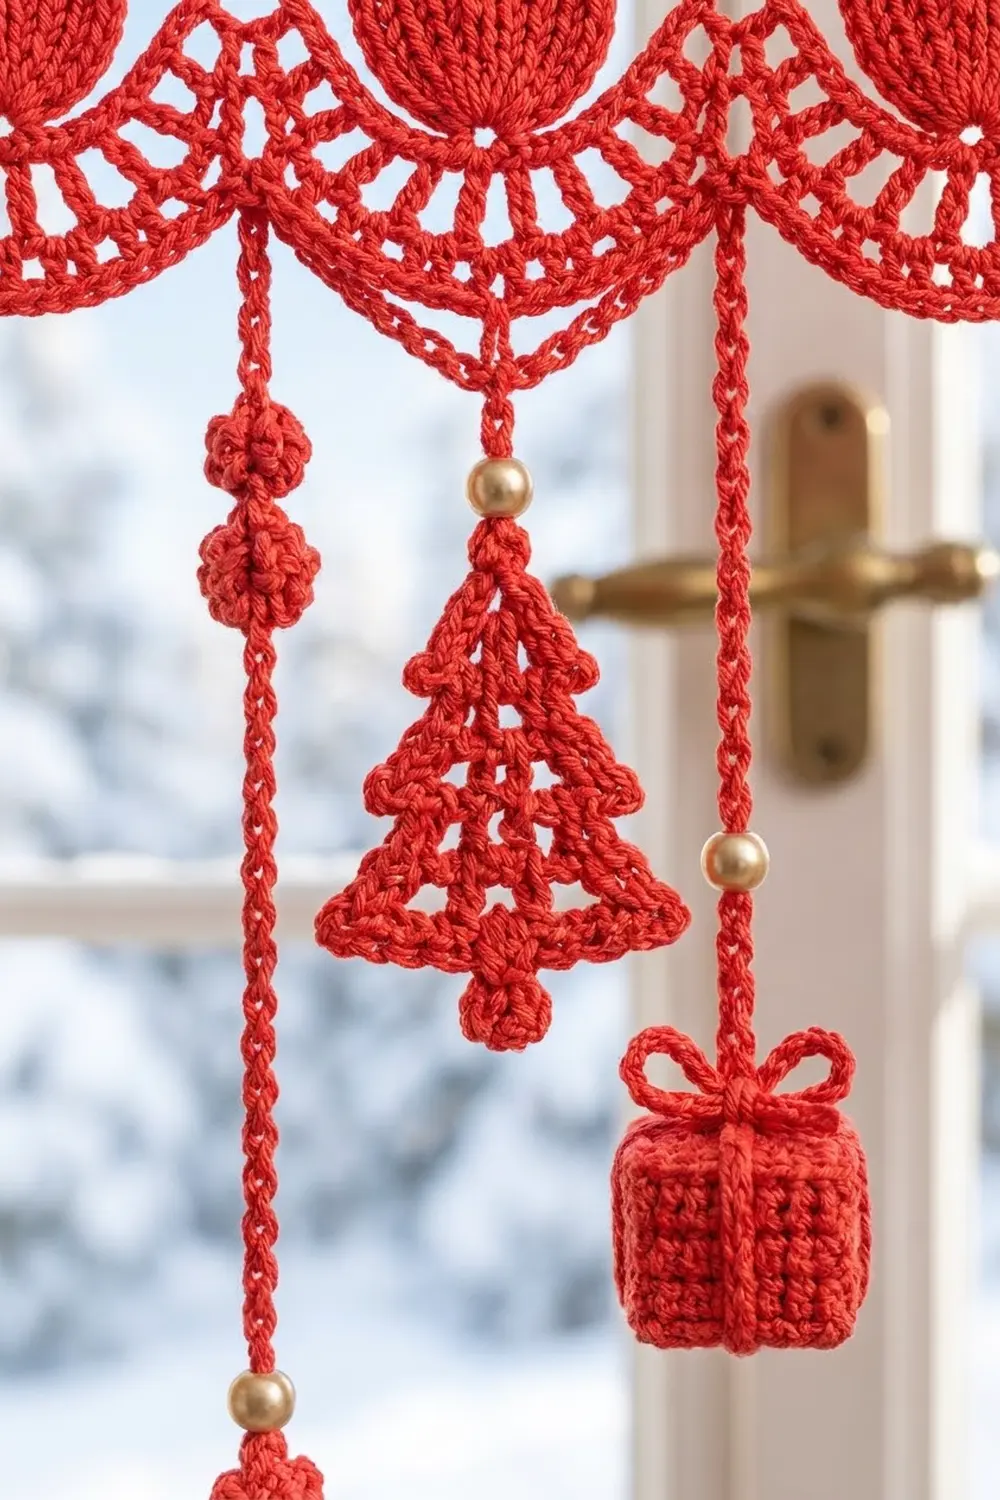
Scallop Motif (make 10)
The scallop is worked in turned rows. It starts at the center of the straight top edge and grows downward into a half circle. A ch-3 at the start of a row counts as a dc.
Row 1: Ch 4, 5 dc in 4th ch from hook. Turn. (6 dc)
Row 2: Ch 3, dc in same st, 2 dc in each st across. Turn. (12 dc)
Row 3: Ch 3, dc in same st, dc in next st, 2 dc in next st 5 times, dc in last st. Turn. (18 dc)
Row 4: Ch 3, dc in same st, dc in next 2 sts, 2 dc in next st 5 times, dc in next st, 2 dc in last st. Turn. (25 dc)
Rows 1–4 form the solid fan that the tulip sits on.
Row 5 (mesh): Ch 4 (counts as dc and ch 1), dc in next st, ch 1, dc in next st across. Turn. (25 dc, 24 ch-1 sps)
Row 6 (shell edge): Ch 1, sc in first dc, skip next dc, 7 dc in next dc, skip next dc, sc in next dc 6 times. Work into the dc only and skip the ch-1 sps. Do not turn. (7 sc, 6 shells = 49 sts)
The 4th sc of Row 6 sits on the 13th dc, which is the exact center of the scallop. Mark it, because a long strand hangs from this stitch.
Row 7 (top edge): Rotate to work across the straight edge.
– Sc in the Row 6 row end (1 sc).
– 2 sc in each dc row end of Rows 5, 4, 3, 2 and 1 (10 sc).
– 3 sc around the base of Row 1.
– 2 sc in each dc row end of Rows 1, 2, 3, 4 and 5 (10 sc).
– Sc in the last Row 6 row end (1 sc).
Fasten off. (25 sc: 11 + 3 + 11)
Tulip Appliqué (make 10)
Row 1: Ch 4, 4 dc in 4th ch from hook. Turn. (5 dc)
Row 2: Ch 3, dc in same st, dc in next 3 sts, 2 dc in last st. Turn. (7 dc)
Row 3: Ch 3, dc in same st, dc in next 5 sts, 2 dc in last st. Turn. (9 dc)
Row 4 (petals): Ch 1, sc in next st, (dc, tr, dc) in next st, sc in next st 3 times. (15 sts: 3 petals)
Stem: Do not fasten off. Sl st down the side to the base of Row 1. Ch 4, then sl st in 2nd ch from hook and in next 2 ch. Fasten off and leave a 12 in (30.5 cm) tail. (3 sl st)
The tulip is about 1.8 in (4.6 cm) wide and 1.75 in (4.4 cm) tall, plus a 0.6 in (1.5 cm) stem.
Attach: Place the tulip RS up on the RS of the scallop, centered over the solid fan. The petals point up and sit 0.25 in (0.6 cm) below the straight edge. The stem points down toward the mesh. Whipstitch around the outer edge with the tail.
Christmas Tree (make 21)
The tree is worked from the tip down.
Row 1: Ch 2, 3 sc in 2nd ch from hook. Turn. (3 sc)
Row 2: Ch 1, 2 sc in first st, sc in next st, 2 sc in last st. Turn. (5 sc)
Row 3: Ch 3, dc in same st, ch 1, skip next st, dc in next st, ch 1, skip next st, 2 dc in last st. Turn. (5 dc, 2 ch-1 sps = 7 sts)
Row 4: Ch 1, 2 sc in first st, sc in each dc and ch-1 sp to last st, 2 sc in last st. Turn. (9 sc)
Row 5: Ch 3, dc in same st, ch 1, skip next st, dc in next st 3 times, ch 1, skip next st, 2 dc in last st. Turn. (7 dc, 4 ch-1 sps = 11 sts)
Row 6: Ch 1, 2 sc in first st, sc in each st and sp to last st, 2 sc in last st. Fasten off. (13 sc)
Trunk: Skip the first 5 sts of Row 6 and join yarn in the 6th st. Ch 1, sc in the 6th, 7th and 8th sts, turn. Ch 1, sc in each of the 3 sts. Fasten off. (3 sc, 2 rows)
Berry Cluster (make 21)
Ch 4, sl st in first ch to form a ring. Ch 3, bobble in ring, ch 3, sl st in ring; repeat from * 2 more times. Fasten off and leave a 10 in (25.4 cm) tail. (3 bobbles) The cluster is about 0.75 in (1.9 cm) across.
Gift Box (make 10)
Sides:
– Rnd 1: Ch 24 and sl st to the first ch without twisting. Ch 1, sc in each ch around, sl st to first sc. (24 sc)
– Rnds 2–7: Ch 1, sc in each st around, sl st to first sc. (24 sc)
The tube has 4 faces of 6 sc each.
Top and bottom (make 2 per box):
– Row 1: Ch 7, sc in 2nd ch from hook and in each ch across. Turn. (6 sc)
– Rows 2–7: Ch 1, sc across. Turn. (6 sc)
Assembly: Sew the bottom square to one edge of the tube, matching each side of the square to one 6-sc face. Stuff lightly, then sew on the top.
Ribbon and bow: Ch 45, wrap the chain crosswise around the box and tack it in place on top. For the bow, ch 25, tie the chain into a bow and sew it to the center of the top.
Make All Pieces
Everything is made in red:
- 10 scallops with tulips
- 21 trees
- 21 berry clusters
- 10 gift boxes
- 21 gold beads
There are two strand types:
- Strand A (make 10): 12 in (30.5 cm) long, 60 ch. Bead at 3 in (7.6 cm), berry cluster at 5 in (12.7 cm), tree starting at 9 in (22.9 cm), gift box at the end.
- Strand B (make 11): 8 in (20.3 cm) long, 40 ch. Bead at 2 in (5.1 cm), tree starting at 4 in (10.2 cm), berry cluster at the end.
Layout grid, from left to right:
SCALLOPS: S1  S2  S3  S4  S5  S6  S7  S8  S9  S10
STRANDS:  B A B A B A B A B A B A B A B A B A B A B
Each A strand hangs from a scallop’s center marker. Each B strand hangs from a seam or an outer corner.
Joining
Lay the 10 scallops RS up in a row, with their straight edges lined up along a ruler.
Method: Whipstitch neighboring scallops together through the back loops, one stitch to one stitch:
- Join the last sc of Row 7 on the left scallop to the first sc of Row 7 on the right scallop.
- Join the matching Row 6 row ends.
These 2 pairs lock the top corners together. Below them, the curves separate to form the valleys between scallops.
No stitches are added at a seam, so each scallop still adds exactly 25 sc to the top edge.
Tension: Pull each stitch snug but not tight. A tight seam puckers the edge, and a loose seam leaves a gap.
Size checkpoint: The joined strip measures 50 in (127.0 cm) along the straight edge, ±0.5 in (1.3 cm).
Border (Top Band with Rod Loops)
Border gauge: 5 sc = 1 in (2.5 cm), so 250 sc = 50 in (127.0 cm).
The border runs along the top edge only. The scallops form the lower edge.
Row 1 (RS): Join yarn in the first top-edge sc at the right end. Ch 1, sc in each sc across. Turn. (10 scallops x 25 sc = 250 sc)
Row 2: Ch 3 (counts as dc), dc in each st across. Turn. (250 dc)
Row 3 (rod loops): Ch 1, sc in first 4 sts, ch 8, skip 2 sts, sc in next 8 sts 24 times, ch 8, skip 2 sts, sc in last 4 sts. Fasten off. (200 sc, 25 ch-8 loops)
Why the math works: Row 3 uses 4 + (24 x 10) + 2 + 4 = 250 sts, exactly the stitch count of Row 2. Each loop repeat covers 10 sts, which is 2 in (5.1 cm), so the 25 loops are evenly spaced.
The loops fit a rod up to 0.5 in (1.3 cm) across. For a thicker rod, change the loops to ch 12. The stitch count stays the same.
The band adds 0.75 in (1.9 cm), so the total band depth is 2.5 + 0.75 = 3.25 in (8.3 cm).
Strands
Thread one bead onto the yarn before you start each strand.
Strand A: Join yarn at a center marker. Ch 60, sliding the bead up to the hook at ch 15. Sl st in the back bump of each ch back to the scallop. Fasten off. (60 ch, 60 sl st)
Strand B: Join yarn in Row 1 of the band at a seam or an outer corner. Ch 40, sliding the bead up at ch 10. Sl st back along the back bumps and fasten off. (40 ch, 40 sl st)
Sew each tree to its strand at the tip, with the chain running down behind the tree to the trunk. Sew the berry clusters and gift boxes in the positions listed above.
Final Blocking
- Wet-block the band and scallops only. Leave the ornaments unblocked.
- Pin the top edge straight to 50 in (127.0 cm).
- Pin each scallop to 2.5 in (6.4 cm) deep, opening the shells and squaring the mesh.
- Flatten each tulip with your fingers.
- Mist with starch if you like, then let it dry completely.
- Hang the valance for a day, then check the strand lengths.
Final Quality-Control Checklist
- 10 scallops, each with 25 top-edge sc
- Joined width of 50 in (127.0 cm)
- Border rows of 250 sc, 250 dc and 25 even loops
- Tulips centered with the petals pointing up
- 21 strands in B-A order
- Strand A drops 12 in (30.5 cm) and Strand B drops 8 in (20.3 cm)
- All ends woven in, and the boxes are firm
Troubleshooting
- The scallop ruffles: Go down one hook size.
- The scallop cups: Recount Row 4. It should have 25 dc.
- The top edge waves: Rework Row 7 with the exact counts, and snug up the seams.
- The loops are uneven: Recount the 8 sc between loops.
- The strands twist: Make sure you sl st into the back bumps, then steam lightly.
- The tree curls: Pin it flat and steam or starch it.
Care
Hand wash in cool water with mild soap, roll in a towel and dry flat. Keep the gift boxes as dry as possible, because fiberfill dries slowly.
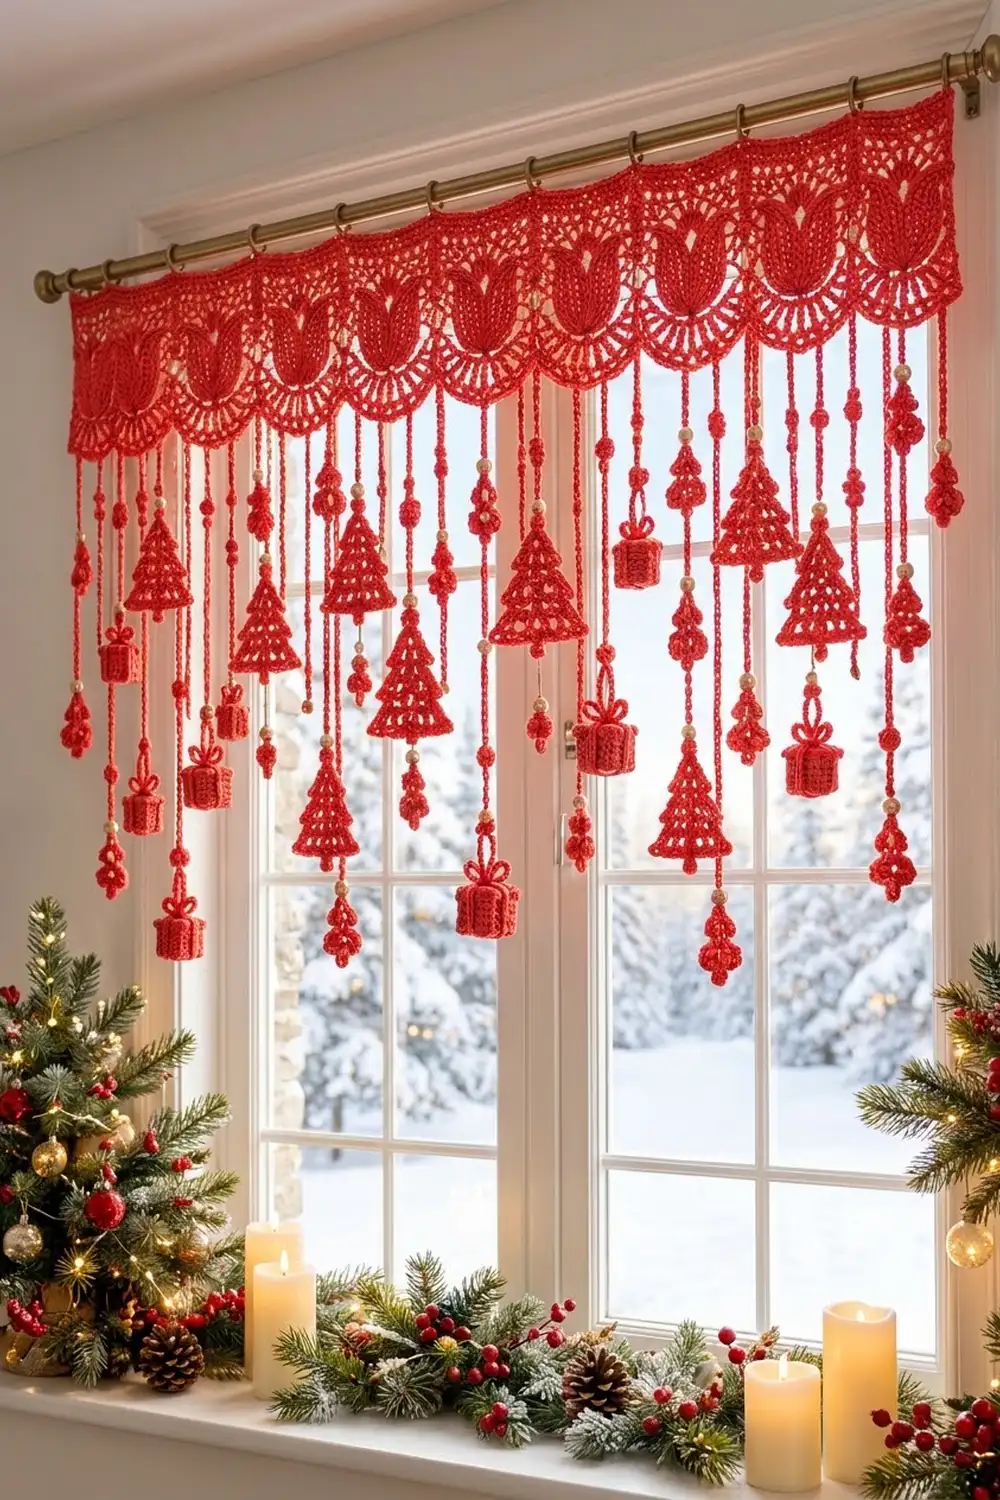
Final Notes
Here is the measurement chain from start to finish:
- One scallop is 25 sc, or 5 in (12.7 cm) wide and 2.5 in (6.4 cm) deep.
- Ten scallops join to 250 sc, or 50 in (127.0 cm).
- The band adds 0.75 in (1.9 cm), for a total depth of 3.25 in (8.3 cm).
- The strands drop up to about 16.5 in (41.9 cm).
Check each stage, and the valance will hang straight and even.
Happy crocheting!