

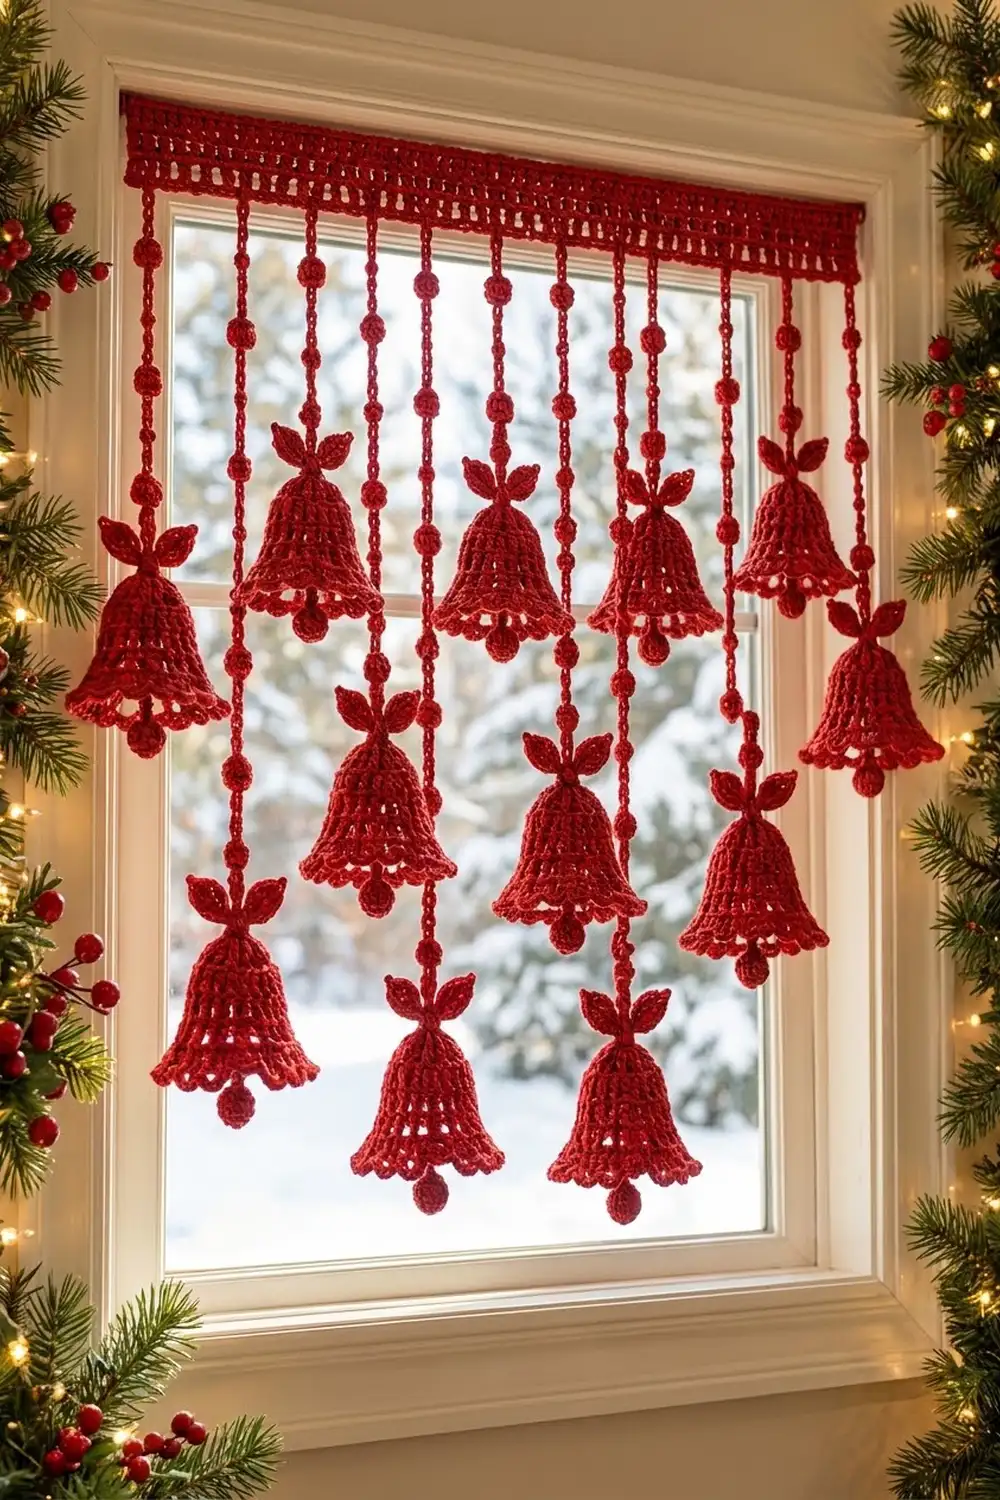
This window curtain is a red cascade of little crochet bells. A slim mesh header runs across the top of the window. Eleven beaded chain cords hang from it, and each one ends in a lacy bell with two leaves at the crown and a round ball clapper below.
Everything is worked in one shade of Christmas red cotton, so the look is all about texture. You get solid double crochet bands, open ladder rows, beaded cords and scalloped hems. The cords come in three lengths, so the bells fall in staggered tiers and let the light through.
The pattern uses US crochet terms. The finished header measures 30.2 in (76.7 cm) wide by 2.8 in (7.1 cm) tall. The drops are 19.0 in (48.3 cm), 25.4 in (64.5 cm) and 31.8 in (80.8 cm) long, measured from the top of the header to the bottom of each clapper.
Construction is simple. You crochet the header flat in rows and add a two-round border. Then you make 11 bells and 11 beaded cords separately and join everything on a flat surface, following a fixed layout.
Finished Size and Construction
- Finished header: 30.2 in × 2.8 in (76.7 × 7.1 cm)
- Header before border: 29.4 in × 2.0 in (74.7 × 5.1 cm)
- Border depth: 0.4 in (1.0 cm) on every edge
- Bell size: about 3.6 in (9.1 cm) tall and 4.0 in (10.2 cm) wide at the hem; 5.6 in (14.2 cm) tall including leaves and clapper
- Skill level: Advanced beginner to intermediate
- Terminology: US
- Yarn weight: DK (#3) cotton
- Hook: 3.5 mm (E-4)
- Number of pieces: 1 header, 11 cords, 11 bells (each bell has 2 leaves and 1 clapper)
- Layout: 11 cords spaced 2.8 in (7.1 cm) apart, in three lengths
Materials
Use a smooth, mercerized DK cotton. It shows the stitch definition clearly and blocks crisply, and it won’t fuzz up in window light. Stay away from acrylic: it makes the bells floppy.
- Christmas red DK cotton: 150 g, about 345 m (377 yd)
- 3.5 mm (E-4) crochet hook
- Tapestry needle
- Scissors and stitch markers
- Rustproof pins and a foam blocking mat
- Spray bottle and a little spray starch (optional)
- A tension rod or small clip rings for hanging
The yarn quantity includes about a 15% margin for your gauge swatch and weaving in ends.
Abbreviations (US Terms)
- ch – chain
- sl st – slip stitch
- sc – single crochet
- hdc – half double crochet
- dc – double crochet
- sk – skip
- sp – space
- st(s) – stitch(es)
- sc2tog – single crochet 2 together
- RS – right side
Special stitch: Bead. Ch 3. Yarn over, insert your hook in the 3rd ch from the hook and pull up a loop, then yarn over and pull through 2 loops. Repeat 3 more times (5 loops on the hook). Yarn over and pull through all 5 loops. The little cluster folds onto the chain to make a round bead about 0.4 in (1.0 cm) across.
Gauge and Checkpoints
Gauge: 20 dc and 10 rows = 4 in (10.2 cm). Chains: 5 ch = 1 in (2.5 cm).
Make one bell and one short cord before anything else. They are your real gauge test.
Bell checkpoints:
– After Row 2: 1.8 in (4.6 cm) wide
– After Row 6: 2.6 in (6.6 cm) wide
– After Row 8: 3.2 in (8.1 cm) tall
– After Row 9: 3.6 in (9.1 cm) tall
Cord checkpoint: one unit (Bead plus ch 6) = 1.6 in (4.1 cm).
Header checkpoints:
– After Row 1: 29.4 in (74.7 cm) wide
– After Row 5: 2.0 in (5.1 cm) tall
If your pieces come out too big, go down 0.5 mm in hook size. If they’re too small, go up 0.5 mm. If your chains run long but your dc rows are on gauge, use a hook 0.5 mm smaller for the cords only.
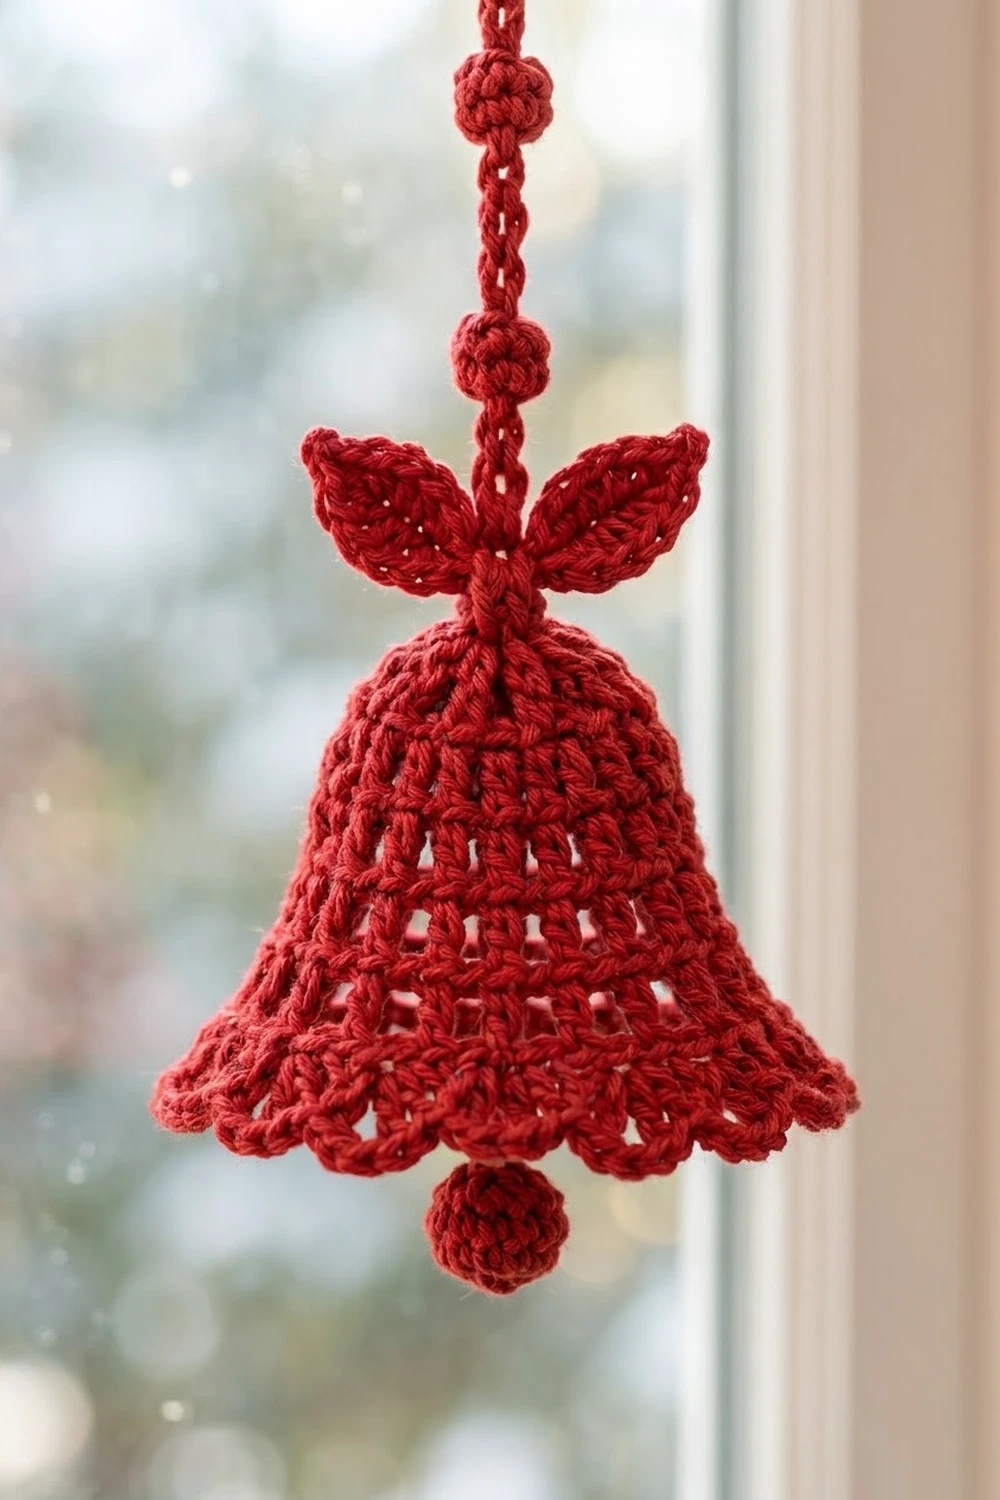
Bell (Make 11)
Each bell is worked flat, top down, in turned rows. It starts with a small crown fan and alternates solid rows with open ladder rows. The ch-3 or ch-4 at the start of a row counts as the first st. The last st of every row is worked into the top of the previous turning chain.
Row 1 (RS): Make a magic ring. Ch 3, then work 6 dc in the ring. Pull the ring snug but leave a small hole. Turn. (7 dc)
Row 2: Ch 3, dc in the same st, dc in the next 5 sts, 2 dc in the last st. Turn. (9 dc)
Row 3 (open): Ch 4 (counts as dc + ch 1), sk the next st, dc in the next st. Ch 1, sk 1, dc in the next st; repeat from * 2 more times. Turn. (5 dc + 4 ch-1 sps = 9 sts)
Row 4: Ch 3, dc in the same st. Dc in each ch-1 sp and each dc across to the last st, then work 2 dc in the 3rd ch of the turning ch. Turn. (11 dc)
Row 5 (open): Ch 4, sk 1, dc in the next st. Ch 1, sk 1, dc in the next st; repeat from * 3 more times. Turn. (6 dc + 5 sps = 11 sts)
Row 6: Work as Row 4. (13 dc)
Row 7 (open): Ch 4, sk 1, dc in the next st. Ch 1, sk 1, dc in the next st; repeat from * 4 more times. Turn. (7 dc + 6 sps = 13 sts)
Row 8 (flare): Ch 3, dc in the same st. 2 dc in the next ch-1 sp, dc in the next dc; repeat from * 4 more times. Then 2 dc in the last ch-1 sp and 2 dc in the last st. Turn.
Stitch count: 2 + (5 × 3) + 2 + 2 = 21 dc. The increases mirror each other from both ends, so the flare stays symmetrical.
Row 9 (scallops): Ch 1, sc in the first st. Sk 1, 5 dc in the next st, sk 1, sc in the next st; repeat from * 4 more times. This uses 1 + (5 × 4) = 21 sts and gives 5 scallops (6 sc + 25 dc). Fasten off.
Hanging loop: Join yarn at the top of the crown, at the center of the ring. Ch 6, then sl st into the same spot. This makes a ch-6 loop about 0.6 in (1.5 cm) long. Fasten off.
Leaf (make 2 per bell):
1. Ch 7. Working in the chs from the 2nd ch from the hook, work: sl st, sc, hdc, dc, hdc.
2. In the last ch, work (sc, ch 2, sc) to make the pointed tip.
3. Rotate and work along the other side of the foundation ch: hdc, dc, hdc, sc, sl st.
4. Fasten off, leaving a 6 in (15.2 cm) tail.
Each leaf has 12 sts plus the ch-2 tip and measures about 1.2 in × 0.5 in (3.0 × 1.3 cm).
Sew one leaf to each side of the hanging loop with the bases meeting at the crown. Angle the tips up and outward at about 45 degrees, like a small bow.
Clapper:
1. Rnd 1: Make a magic ring and work 6 sc in it. (6)
2. Rnd 2: 2 sc in each st. (12)
3. Rnd 3: Sc in each st. (12)
4. Stuff the ball firmly with scrap red yarn.
5. Rnd 4: Sc2tog 6 times. (6)
6. Ch 3 and fasten off.
The ball measures about 0.6 in (1.5 cm). Sew the end of the ch-3 to the center dc of the 3rd (middle) scallop so the clapper hangs below the center of the hem.
Beaded Cords (Make 11)
Leave an 8 in (20.3 cm) tail at the start of each cord for joining.
- Lead: Ch 5. This is 1.0 in (2.5 cm).
- Units: Bead, ch 6; repeat from * the number of times your cord length needs. Each unit is 1.6 in (4.1 cm).
- Fasten off with an 8 in (20.3 cm) tail.
| Cord | Units | Beads | Length |
|---|---|---|---|
| Short (S) | 6 | 6 | 10.6 in (26.9 cm) |
| Medium (M) | 10 | 10 | 17.0 in (43.2 cm) |
| Long (L) | 14 | 14 | 23.4 in (59.4 cm) |
Each length is 1.0 in plus 1.6 in per unit. Each tier is 4 units, or 6.4 in (16.3 cm), longer than the one above it. That is more than one full bell height of 5.6 in (14.2 cm), so bells on neighboring cords never collide.
Header
Row 1 (RS): Ch 149. Dc in the 4th ch from the hook and in each ch across. The skipped 3 chs count as the first dc. Turn. (147 dc)
Row 2 (mesh): Ch 4 (counts as dc + ch 1), sk the next st, dc in the next st. Ch 1, sk 1, dc in the next st; repeat from * 72 more times. Turn. (74 dc + 73 ch-1 sps = 147 sts)
Row 3: Ch 3, then dc in each ch-1 sp and each dc across. Turn. (147 dc)
Row 4: Work as Row 2. (147 sts)
Row 5: Work as Row 3. (147 dc) Do not fasten off.
The mesh pattern needs an odd stitch count (1 + 2 × 73), and 147 fits exactly.
Make All Pieces
All pieces are Christmas red.
- Header: 1
- Bells: 11, each with 2 leaves (22 in total) and 1 clapper (11 in total)
- Cords: 5 Short, 3 Medium, 3 Long, with 102 beads in total (30 + 30 + 42)
Layout, left to right:
CORD:   1  2  3  4  5  6  7  8  9  10  11
DROP:   S  L  S  M  L  S  M  L  S  M   S
No two neighboring cords are the same length. Cords 1, 3, 6, 9 and 11 are Short. They’re spaced 5.6 in (14.2 cm) apart at the closest, so the 4.0 in (10.2 cm) bells have room.
Border
Work the border first, then join the cords to it.
Border gauge: sc at 5 sts per inch. Each round adds 0.2 in (0.5 cm) to every edge.
Rnd 1: Ch 1. Work along the top edge: 3 sc in the first st, sc in the next 145 sts, 3 sc in the last st. On the short end, work 2 sc around each of the 5 row-ends (10 sc). Along the bottom edge, working into the foundation ch: 3 sc in the first ch, sc in the next 145, 3 sc in the last ch. On the second short end, work 10 sc. Join with a sl st.
Stitch count: 322 sc.
– Each long side: 149 sc, including both corner center sts
– Each short side: 14 sc, including both corner center sts
Rnd 2: Ch 1. Sc in each st, with 3 sc in each corner center st. Join.
Stitch count: 330 sc.
– Each long side: 151 sc
– Each short side: 16 sc
– Check: 2 × 151 + 2 × 16 − 4 shared corners = 330.
Fasten off.
Why the math works: Each corner round adds 2 sts per side, so 147 becomes 149 and then 151. With 151 sts on the bottom edge, the middle st is #76, exactly at the center. Cords placed every 14 sts, starting at st 6, land on sts 6, 20, 34, 48, 62, 76, 90, 104, 118, 132 and 146.
There are 5 sts between each end cord and its corner center, so the spacing is symmetrical. Fourteen sts is 2.8 in (7.1 cm). The full cord span is 140 sts, or 28.0 in (71.1 cm).
Joining
- Lay the header RS up on a flat surface. Place a marker in each of the 11 cord sts along the bottom edge.
- Attach the cords. Thread each cord’s starting tail onto a needle. Bring it through the marked st from front to back, then back through the base ch of the lead. Do this twice and knot securely. Work strictly one cord per marked st: no skipped or shared sts.
- Attach the bells. Bring each cord’s ending tail through its bell’s ch-6 hanging loop. Sew it back into the last 2 chs of the cord, so the bell hangs right below the final ch-6.
- Tension. Keep your sewing snug but not tight. If you pull too hard, the header puckers and the cord tops twist.
Size checkpoint: Hang the curtain for a moment and measure from the top of the header:
– Short drops: 19.0 in (48.3 cm)
– Medium drops: 25.4 in (64.5 cm)
– Long drops: 31.8 in (80.8 cm)
Each drop should be within 0.5 in (1.3 cm) of these numbers.
Final Blocking
- Mist the header and all the bells until damp. Add a light spray of starch if you want crisp bells.
- Pin the header to 30.2 in × 2.8 in (76.7 × 7.1 cm), keeping the bottom edge perfectly straight.
- Pin each bell flat to 3.6 in (9.1 cm) tall and 4.0 in (10.2 cm) wide at the hem. Put one pin at each scallop tip.
- Pin the leaves at their 45-degree angle.
- Hang the cords straight from the pinned header with the bells resting flat, so the cords dry without twists.
- Let everything dry completely before you hang the curtain.
Final Quality-Control Checklist
- Header is 147 sts wide before the border, with 73 open spaces in each mesh row
- Border Rnd 2 has 151 sts on each long side
- Cords are in sts 6 through 146, 14 sts apart
- Layout reads S L S M L S M L S M S
- All 11 bells have 5 scallops and 31 sts in Row 9
- Leaves are angled evenly and clappers are centered
- All ends are woven in at least 1.0 in (2.5 cm)
Troubleshooting
- Bell curls into a cup. Your Row 8 increases are too tight. Re-block with starch, or go up 0.5 mm in hook size for Rows 8–9 only.
- Scallops look flat. Make sure you skip exactly 1 st on each side of every shell.
- Header ripples. Your foundation chain is too tight. Redo it with a hook one size larger.
- Beads slide or flatten. Pull the 5-loop closing stitch firmly.
- Cords too long. Remove one unit and you take off 1.6 in (4.1 cm).
- Header hangs crooked. Recount the cord sts from the corner center on both ends.
Care
Hand wash in cool water with mild soap, roll it in a towel to remove excess water, and dry it flat, re-pinning the bells. Store it rolled loosely around a cardboard tube so the cords don’t tangle.
Final Notes
The measurement chain runs like this:
1. Gauge: 20 dc and 10 rows = 4 in (10.2 cm)
2. Header: 147 sts, 29.4 in × 2.0 in (74.7 × 5.1 cm)
3. Border: two rounds, 0.4 in (1.0 cm) deep, for a finished header of 30.2 in × 2.8 in (76.7 × 7.1 cm)
4. Cords: 11, every 14 sts, or 2.8 in (7.1 cm) apart
5. Cord lengths: 10.6 in, 17.0 in and 23.4 in (26.9, 43.2 and 59.4 cm)
6. Bells: 5.6 in (14.2 cm) tall overall
7. Finished drops: 19.0 in, 25.4 in and 31.8 in (48.3, 64.5 and 80.8 cm)
If each stage measures true, the whole curtain hangs straight and evenly tiered.
Happy crocheting!