

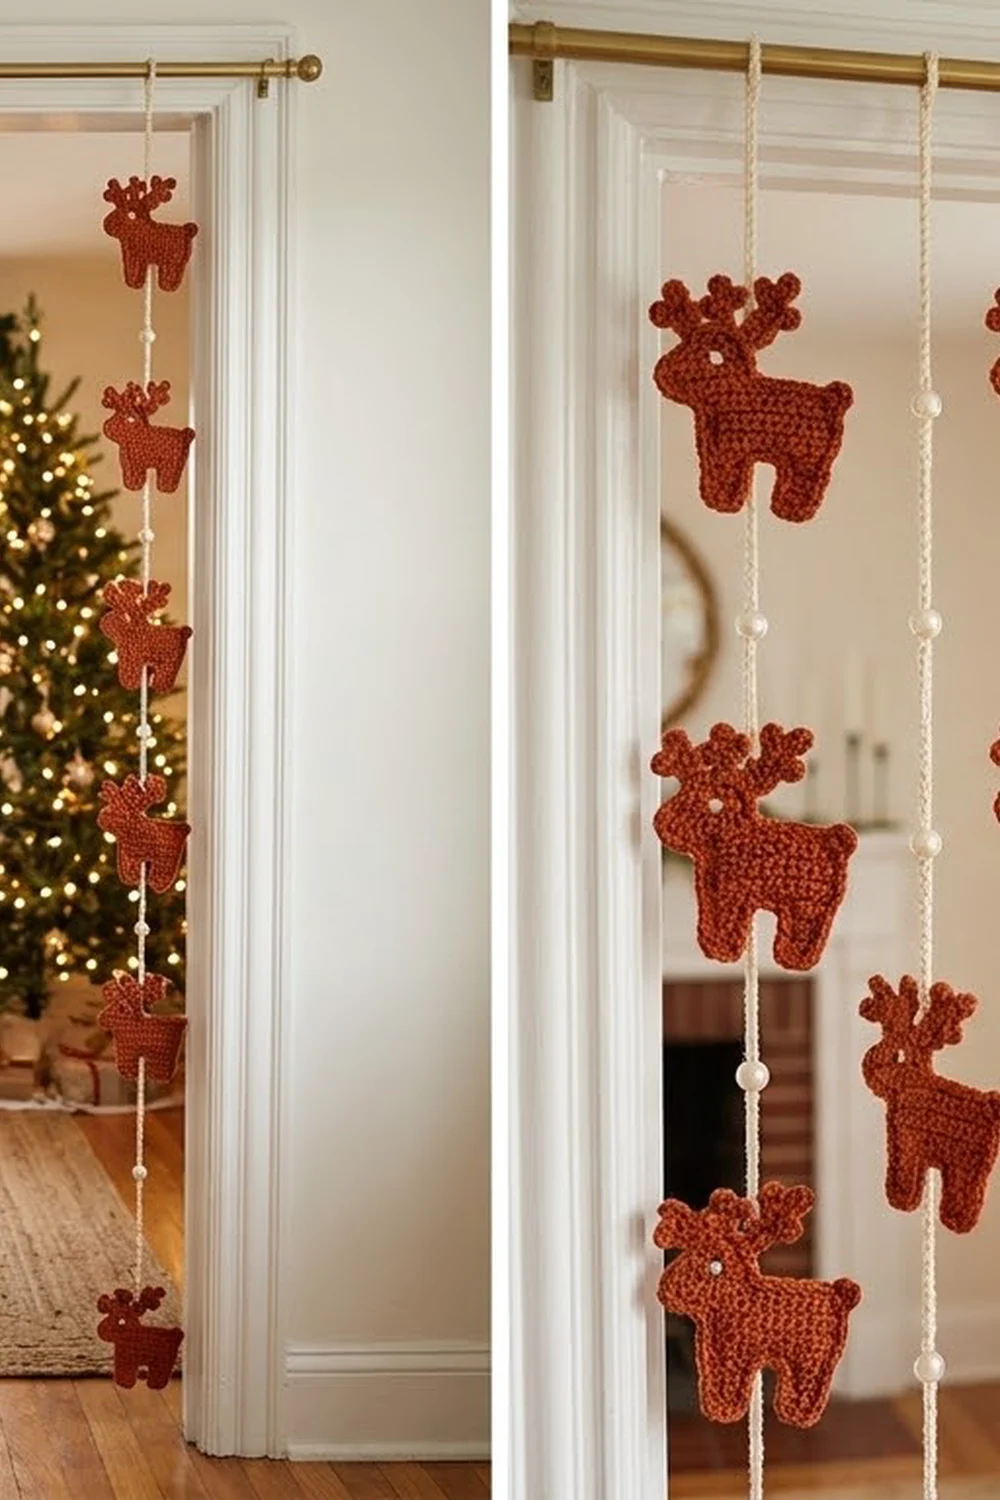
This curtain is a parade of little rust-colored reindeer hanging on cream cords, with glossy pearl beads between them. Each reindeer is a flat, solid single crochet silhouette facing left. It has branched antlers, a tiny ear, an upturned tail and a small eyelet eye.
The palette is simple: warm rust (burnt orange) for every reindeer, cream for the cords, and ivory faux pearls. Hung from a brass rod in a doorway, it looks festive but calm and suits a neutral holiday room.
The pattern uses US crochet terms. Each reindeer is about 4 in (10.2 cm) wide and 5.5 in (14.0 cm) tall including antlers. The full curtain has 6 strands of 7 reindeer. It spans 36 in (91.4 cm) on the rod and drops about 62 in (157.5 cm) from the rod top.
The construction is modular. You crochet two legs, join them with a chain to form the body, then work the neck and head in rows. One outline round sharpens the silhouette, and the antlers, ear and tail go on last. Finished reindeer and pearls are then fixed to slip-stitch cords.
Finished Size and Construction
- Finished size: 36 in (91.4 cm) wide × about 62 in (157.5 cm) drop
- Skill level: Intermediate
- Terminology: US
- Yarn weight: DK (weight 3) cotton
- Hook: 3.5 mm (E-4)
- Number of pieces: 42 reindeer + 6 cords + 48 pearls
- Layout: 6 strands × 7 reindeer, strands 6 in (15.2 cm) apart
- Piece size: 4 in (10.2 cm) wide × 5.5 in (14.0 cm) tall with antlers
- Size before border: 3.4 in (8.6 cm) wide × 3.6 in (9.1 cm) tall
- Border depth: 1 sc round, about 0.2 in (0.5 cm) per edge
Materials
Choose a smooth DK cotton. Cotton keeps the antlers and legs crisp and doesn’t stretch much on a hanging piece. Avoid fuzzy yarns, which blur the silhouette.
- Rust (burnt orange) DK cotton: 250 g / about 575 m (629 yd). Each reindeer uses about 4 g / 9.5 m.
- Cream DK cotton: 50 g / about 115 m (126 yd) for the 6 cords.
- Faux pearl beads: 48, 12 mm, ivory, with a large 4 mm hole, plus a few spares.
These quantities include extra yarn for swatches, yarn tails and the tacking stitches.
Tools:
- 3.5 mm (E-4) crochet hook
- Tapestry needle
- Sewing needle and cream thread
- Locking stitch markers
- Brass curtain rod or tension rod, at least 36 in (91.4 cm)
- Blocking mat, rust-proof pins, spray bottle
- Measuring tape
Abbreviations (US Terms)
- ch – chain
- sc – single crochet
- sl st – slip stitch
- sk – skip
- st(s) – stitch(es)
- sp – space
- RS / WS – right side / wrong side
Slip-stitch cord: make a chain, then work 1 sl st into the back bump of each chain. This makes a firm, rope-like cord that doesn’t stretch.
Tine: ch 3, sc in 2nd ch from hook and in next ch (2 sc).
Gauge and Checkpoints
Gauge: 20 sc and 22 rows = 4 in (10.2 cm) in sc rows. That works out to 5 sts and 5.5 rows per 1 in (2.5 cm).
Cord gauge: 5 sl st = 1 in (2.5 cm), so 40 sts = 8 in (20.3 cm).
Make one complete reindeer first and check it at each stage:
- Leg, Row 6: 0.6 in (1.5 cm) wide × 1.1 in (2.8 cm) tall.
- Body, Row 6: 3 in (7.6 cm) wide; legs plus body 2.2 in (5.6 cm) tall.
- Head, Row 4: 3.4 in (8.6 cm) wide × 3.6 in (9.1 cm) tall.
- After border: 3.8 in (9.7 cm) wide × 4 in (10.2 cm) tall.
- With antlers: about 5.5 in (14.0 cm) tall.
Too big? Go down to a 3.25 mm hook. Too small? Go up to a 3.75 mm hook. Check the cord gauge separately, because the cord stitch counts set all the spacing.
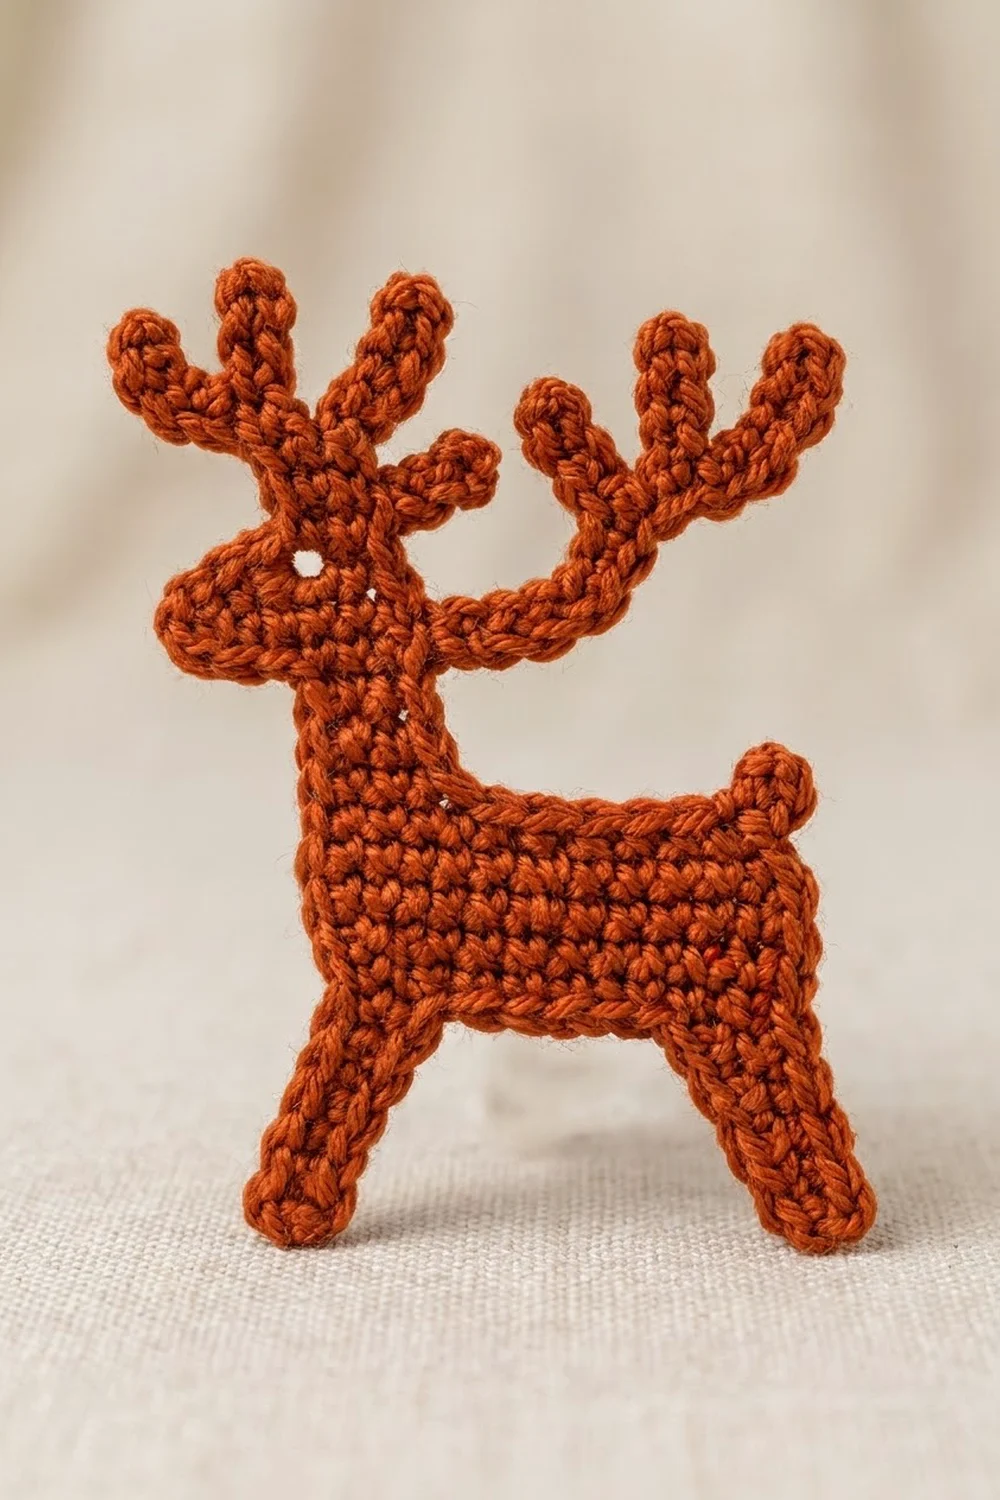
Reindeer Pattern (Make 42)
Work every reindeer in this order: Legs → Body → Neck → Head → Outline Border (Border section) → Antlers, Ear and Tail.
Sc fabric looks the same on both sides, so the directions say “chest edge” and “rear edge” instead of left and right. When you start the border, turn the piece so the reindeer faces left. That side becomes the RS.
Part 1: Legs (make 2)
Ch 4.
Row 1: Sc in 2nd ch from hook and in next 2 ch. (3 sc)
Rows 2–6: Ch 1, turn, sc in each st across. (3 sc)
Fasten off the first leg (the back leg). Keep the second leg (the front leg) on the hook.
Part 2: Body
Hold the front leg so the working yarn sits at its chest edge. Lay the back leg next to it on the rear side, top edge up.
Row 1: Ch 1, turn, sc in 3 sts of front leg, ch 9, sc in 3 sts of back leg. (6 sc + 9 ch = 15 sts)
Row 2: Ch 1, turn, sc in 3 sc, sc in each of 9 ch, sc in 3 sc. (15 sc)
Rows 3–6: Ch 1, turn, sc in each st across. (15 sc)
Row 6 ends at the chest edge. The body is 3 in (7.6 cm) wide, and the belly gap between the legs is 1.8 in (4.6 cm).
Part 3: Neck
Row 1: Ch 1, turn, sc in first 4 sts; leave remaining 11 sts unworked. (4 sc)
Rows 2–4: Ch 1, turn, sc in each st across. (4 sc)
Row 4 ends at the chest edge. The neck is 0.8 in (2.0 cm) wide.
Part 4: Head
Row 1: Ch 3, sc in 2nd ch from hook and in next ch (snout), sc in 4 neck sts. (6 sc)
Row 2: Ch 1, turn, sc in each st across. (6 sc)
Row 3 (eye row): Ch 1, turn, sc in 3 sts, ch 1, sk 1 st, sc in 2 sts. (5 sc + 1 ch-1 sp)
Row 4: Ch 1, turn, sc in 2 sts, sc in ch-1 sp, sc in 3 sts. (6 sc)
Fasten off. The eyelet sits 4 sts back from the nose. The reindeer is now 20 rows tall, or 3.6 in (9.1 cm). It is 15 body sts + 2 snout sts = 17 sts wide, or 3.4 in (8.6 cm).
Now work the Outline Border (see the Border section), then come back here.
Part 5: Antlers, Ear and Tail
Work into the border stitches with the RS facing you. Number the 6 head-top sc starting from the nose side.
Front antler: Join rust in head-top sc 2. Ch 9. Sc in 2nd ch from hook and next ch, [tine, sc in next 2 beam ch] 3 times. Sl st in joining sc. Fasten off. (8 beam sc + 3 tines = 14 sc)
Back antler: Join in head-top sc 5. Ch 11. Sc in 2nd ch from hook and next ch, [tine, sc in next 2 beam ch] 4 times. Sl st in joining sc. Fasten off. (10 beam sc + 4 tines = 18 sc)
The main stems of the antlers (the beams) measure 1.6 in (4.1 cm) and 2 in (5.1 cm). Angled outward, both tips sit about 1.5 in (3.8 cm) above the head.
Ear: Join in the rear head corner sc. Ch 3, sc in 2nd ch from hook and next ch, sl st in same corner sc. (2 sc)
Tail: Join in the rump corner sc and work as for the ear. (2 sc)
Weave in all ends on the WS.
Make All Pieces
- Reindeer: 42 in rust, 7 per strand, each bordered and finished
- Cords: 6 in cream
- Pearls: 48, 8 per strand
Cord (make 6): With cream, ch 326. Sl st in back bump of 2nd ch from hook and each ch across. (325 sl st) Fasten off. Place marker A in st 30 from the starting end. All cord positions below are counted downward from marker A, so the cord ends at st 295.
Layout (front view, P = pearl):
STRANDS:  1     2     3     4     5     6
TOP:      P     P     P     P     P     P
ROW 1:    RUST  RUST  RUST  RUST  RUST  RUST
          P     P     P     P     P     P
ROW 2:    RUST  RUST  RUST  RUST  RUST  RUST
          ...repeat pearl row + reindeer row...
ROW 7:    RUST  RUST  RUST  RUST  RUST  RUST
END:      P     P     P     P     P     P
Joining (Assembly)
The reindeer are not joined to each other. Each one is fixed to a cord with a few small stitches (tacks), and the rows line up straight across all 6 strands.
Pearls first. Thread all 8 pearls onto a cord from the bottom end. Slide them to sts 8, 48, 88, 128, 168, 208, 248 and 290 below marker A. Secure each pearl with 3–4 small thread stitches through the cord just below it.
Reindeer positions. Each reindeer gets 2 tacks on the WS. Place both on the stitch column at the rear edge of the neck, which is the 5th st from the chest edge:
- Upper tack, behind Head Row 1: cord sts 25, 65, 105, 145, 185, 225, 265.
- Lower tack, behind Body Row 2: 8 sts lower, at sts 33, 73, 113, 153, 193, 233, 273.
Why 8 sts? Head Row 1 and Body Row 2 are 9 rows apart, or 1.6 in (4.1 cm), and 8 cord sts also measure 1.6 in (4.1 cm). That way the reindeer lies flat without puckering.
A new reindeer starts every 40 cord sts, or 8 in (20.3 cm). That is 5.5 in (14.0 cm) of reindeer plus a 2.5 in (6.4 cm) gap that holds one pearl.
Tension. Tack with a rust yarn tail. Pass it 3 times through the cord and through the back loops only of the reindeer. Keep the stitches snug but not tight, so nothing shows or dents the RS.
Hanging. Fold the top 30 sts, 6 in (15.2 cm), over the rod and sew the cord end to the back of the cord at marker A. Space the strands 6 in (15.2 cm) apart, with the outer strands 3 in (7.6 cm) from each rod end: 3 + (5 × 6) + 3 = 36 in (91.4 cm).
Size checkpoint: Each strand measures 59 in (149.9 cm) below marker A. With the loop, the drop from the rod top is about 62 in (157.5 cm). To make it longer, add 40 cord sts, 1 reindeer and 1 pearl for every 8 in (20.3 cm).
Border: Outline Round
Work this on every reindeer after Head Row 4 and before the antlers. The curtain itself has no outer border.
Border gauge: Work 1 sc per st along the top and foundation edges and 1 sc per row-end along the sides. One round adds 0.2 in (0.5 cm) to each edge. The silhouette grows from 3.4 × 3.6 in (8.6 × 9.1 cm) to 3.8 × 4 in (9.7 × 10.2 cm).
With RS facing, join rust at the rear bottom corner of the back leg. Work 1 round of sc in the order below. The counts for each segment do not include the corner sc.
- Back foot: 3 sc. Corner: 1 extra sc.
- Back leg, chest-side edge: 6 sc. Inner corner: none.
- Belly (underside of the 9 ch): 9 sc. Inner corner: none.
- Front leg, rear-side edge: 6 sc. Corner: 1 extra sc.
- Front foot: 3 sc. Corner: 1 extra sc.
- Chest edge (front leg 6 + body 6 + neck 4): 16 sc. Inner corner: none.
- Under snout: 2 sc. Chin corner: 1 extra sc.
- Nose (head row-ends): 4 sc. Corner: 1 extra sc.
- Head top: 6 sc. Rear head corner: 1 extra sc.
- Back of head and neck (4 + 4): 8 sc. Inner corner: none.
- Back (unworked sts of Body Row 6): 11 sc. Rump corner: 1 extra sc.
- Rear edge (body 6 + back leg 6): 12 sc. Corner: 1 extra sc.
Sl st to first sc. Fasten off.
Totals: 3 + 6 + 9 + 6 + 3 + 16 + 2 + 4 + 6 + 8 + 11 + 12 = 86 sc, plus 8 corner sc = 94 sc.
Why the math works: Each segment matches the exact stitches or row-ends it covers. For example, 15 − 4 = 11 sts remain along the back. At 5 sts and 5.5 rows per inch, 1 sc per row-end lies flat. Each of the 8 outward corners gets 1 extra sc so it turns without cupping. The inner corners get none, so they stay sharp instead of rippling.
Final Blocking
- Lightly mist each finished reindeer.
- Pin it RS up to 3.8 in (9.7 cm) wide × 4 in (10.2 cm) tall, not counting the antlers.
- Pin each antler beam angled outward and each tine pointing up, with the tips about 1.5 in (3.8 cm) above the head.
- Pin the legs straight and the tail tipped up.
- Let dry completely, about 6–8 hours.
- After assembly, hang the curtain and steam the cords from 2 in (5.1 cm) away to relax any twists.
Final Quality-Control Checklist
- All 42 reindeer face left and measure 3.8 × 4 in (9.7 × 10.2 cm) before antlers.
- Every border has 94 sc with sharp inner corners.
- Front antlers have 3 tines and back antlers have 4.
- Every eyelet is open and in the same spot.
- Pearls sit at sts 8, 48, 88, 128, 168, 208, 248 and 290.
- Reindeer rows line up across all 6 strands.
- No tacks show on the RS, and the strands hang without twisting.
Troubleshooting
- Legs splay: The 9-ch belly is too tight. Chain more loosely.
- Border ruffles: An extra sc went into an inner corner. Recount all 12 segments.
- Border cups: A corner sc or a row-end was skipped.
- Antlers droop: Re-block with light starch, or chain the beams more tightly.
- Reindeer tilt: The tacks are off the neck column. Re-tack on the 5th st from the chest edge.
- Rows don’t line up: Count cord positions from marker A instead of measuring.
- Strand twists: Steam it and let it hang for a day.
Care
Spot clean with cool water and mild soap, then reshape and dry flat. Between seasons, store the curtain flat and wrapped in tissue so the antlers don’t get crushed.
Final Notes
Here is how the measurements build on each other. A gauge of 20 sc and 22 rows per 4 in (10.2 cm) gives a 3.4 × 3.6 in (8.6 × 9.1 cm) silhouette. The 94-sc border brings it to 3.8 × 4 in (9.7 × 10.2 cm), and the antlers bring it to 5.5 in (14.0 cm) tall.
On the cord, each reindeer takes 40 sts, or 8 in (20.3 cm). Seven reindeer make a 59 in (149.9 cm) strand and about 62 in (157.5 cm) of drop. Six strands, 6 in (15.2 cm) apart, fill a 36 in (91.4 cm) rod.
Check each of these measurements as you go, and the curtain will hang straight and even.
Happy crocheting!