

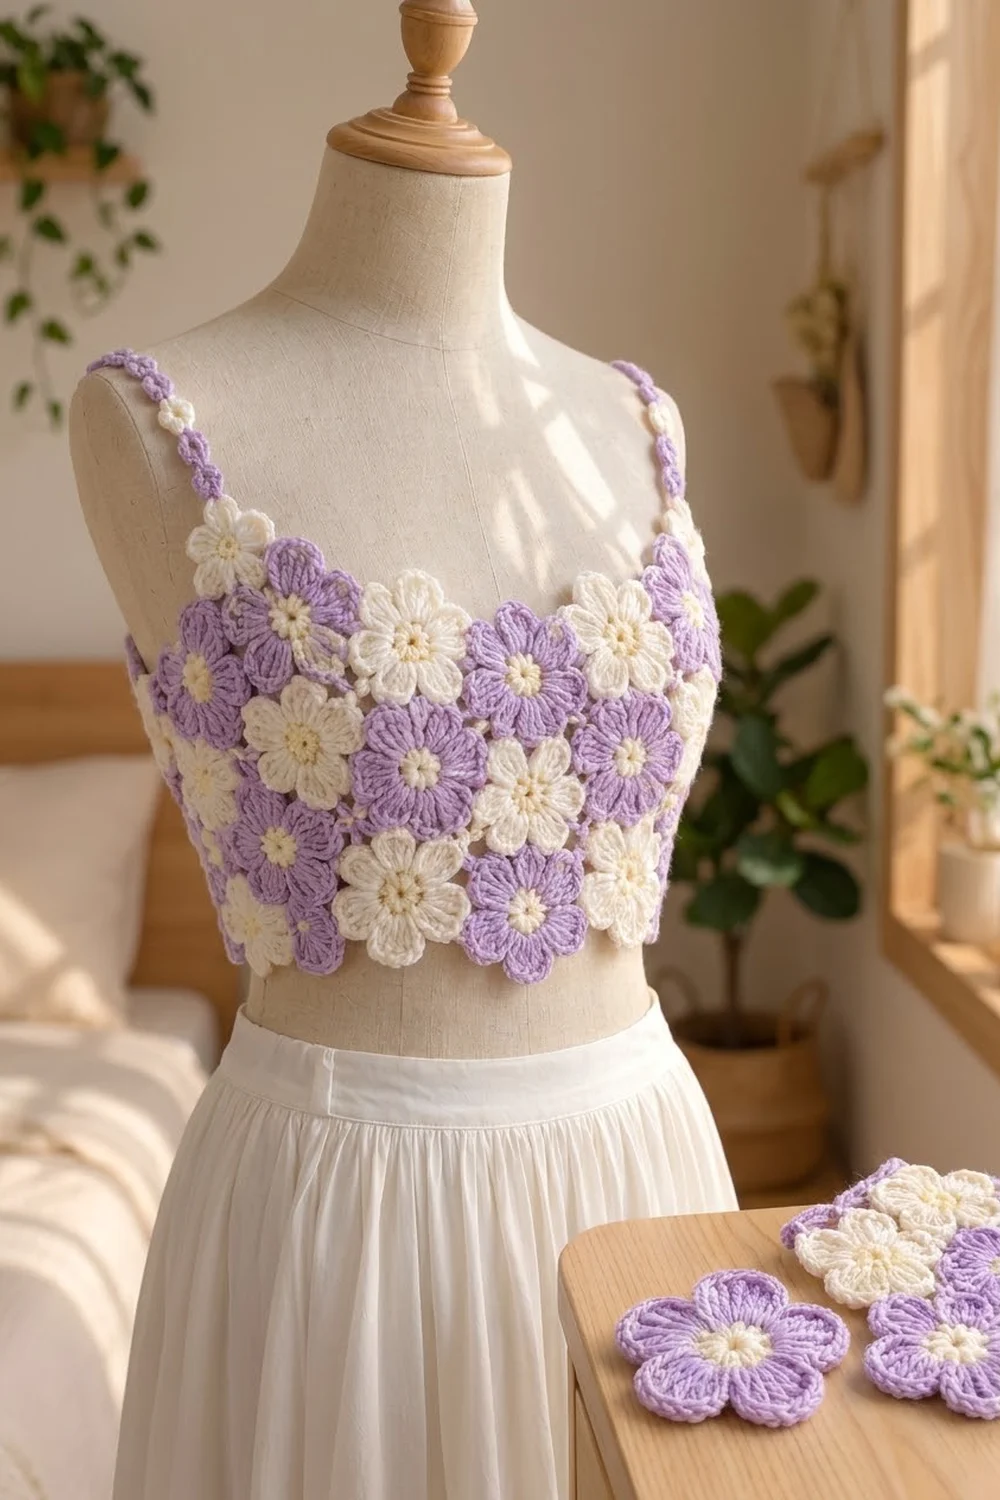
The Lavender Meadow Flower Crop Top is a soft, airy bodice made entirely from six-petal flower motifs. Lavender flowers with cream centers alternate with cream flowers with butter-yellow centers. The rows are offset, so the colors run diagonally around the body.
Every petal is a fan of double crochet with a single crochet outline, so each one stands out like a pressed flower. Two straps of tiny alternating flowers finish the look. The style is romantic and summery. It works over a cami or with a high-waisted skirt.
This pattern uses US crochet terms. The finished top measures 35 in (88.9 cm) around and about 9.8 in (24.9 cm) tall including the edging. It fits a bust of 32–34 in (81.3–86.4 cm), and the lacy joins give a little stretch.
Here’s how it’s built. You make 30 large flowers and join them as you go into a tube of 3 offset rows of 10. Then you work a slim two-round edging along the top and bottom. Finally, you make two straps of 11 mini flowers each and sew them on.
Finished Size and Construction
- Finished size: 35 in (88.9 cm) circumference × 9.8 in (24.9 cm) tall
- Fits bust: 32–34 in (81.3–86.4 cm)
- Skill level: Intermediate
- Terminology: US
- Yarn weight: DK (#3)
- Hook: 3.5 mm (E-4)
- Number of pieces: 30 large flowers + 22 mini flowers
- Layout: 3 offset rows of 10 large flowers, joined in a ring
- Large flower size: 3.5 in (8.9 cm) from petal tip to opposite petal tip
- Mini flower size: 1.25 in (3.2 cm) across
- Size before border: 35 in (88.9 cm) around × about 9 in (22.9 cm) tall
- Border depth: 0.4 in (1.0 cm) on the top edge and 0.4 in (1.0 cm) on the bottom edge
Materials
Choose a smooth DK cotton or cotton-acrylic blend with a matte finish. Cotton shows the petal outlines crisply and keeps the top breathable. Avoid fuzzy yarns, because they blur the stitch definition.
- Lavender: 120 g / approx. 276 m (large petals, mini petals, edging)
- Cream: 130 g / approx. 299 m (large petals, lavender-flower centers, mini petals)
- Butter yellow: 30 g / approx. 69 m (cream-flower centers, mini centers)
These amounts include a margin of about 15–20% for differences in gauge and for your test motif.
Tools:
– 3.5 mm (E-4) crochet hook
– Tapestry needle
– Scissors
– Locking stitch markers
– Blocking mat, rustproof pins, and a spray bottle
– Measuring tape
Abbreviations (US Terms)
- ch – chain
- sl st – slip stitch
- sc – single crochet
- hdc – half double crochet
- dc – double crochet
- sc3tog – single crochet 3 together
- sp – space
- MR – magic ring
- st(s) – stitch(es)
Special stitch – Joining tip: When the pattern says “joining tip,” work (sc, ch 1, sl st in the tip ch-2 sp of the neighboring flower, ch 1, sc) instead of the usual (sc, ch 2, sc).
Petal positions: Hold a finished flower with one petal pointing right. The petals are named by direction: E (right), NE, NW, W (left), SW, and SE.
Gauge and Checkpoints
Before you start the top, make one complete large flower and measure it. Gauge is measured on the motif itself, so there’s no separate swatch.
- After Rnd 2 (center): 1.5 in (3.8 cm) across
- After Rnd 4 (petals): 3 in (7.6 cm) tip to tip
- After Rnd 5 (outline): 3.5 in (8.9 cm) tip to tip
- Mini flower: 1.25 in (3.2 cm) across
- After joining Row 2: about 6 in (15.2 cm) tall from the lowest tips
- After joining Row 3: about 9 in (22.9 cm) tall, 35 in (88.9 cm) around
If your flower is larger than 3.5 in (8.9 cm), go down half a hook size. If it is smaller, go up half a hook size. Being off by just 0.25 in (0.6 cm) per flower changes the circumference by 2.5 in (6.4 cm).
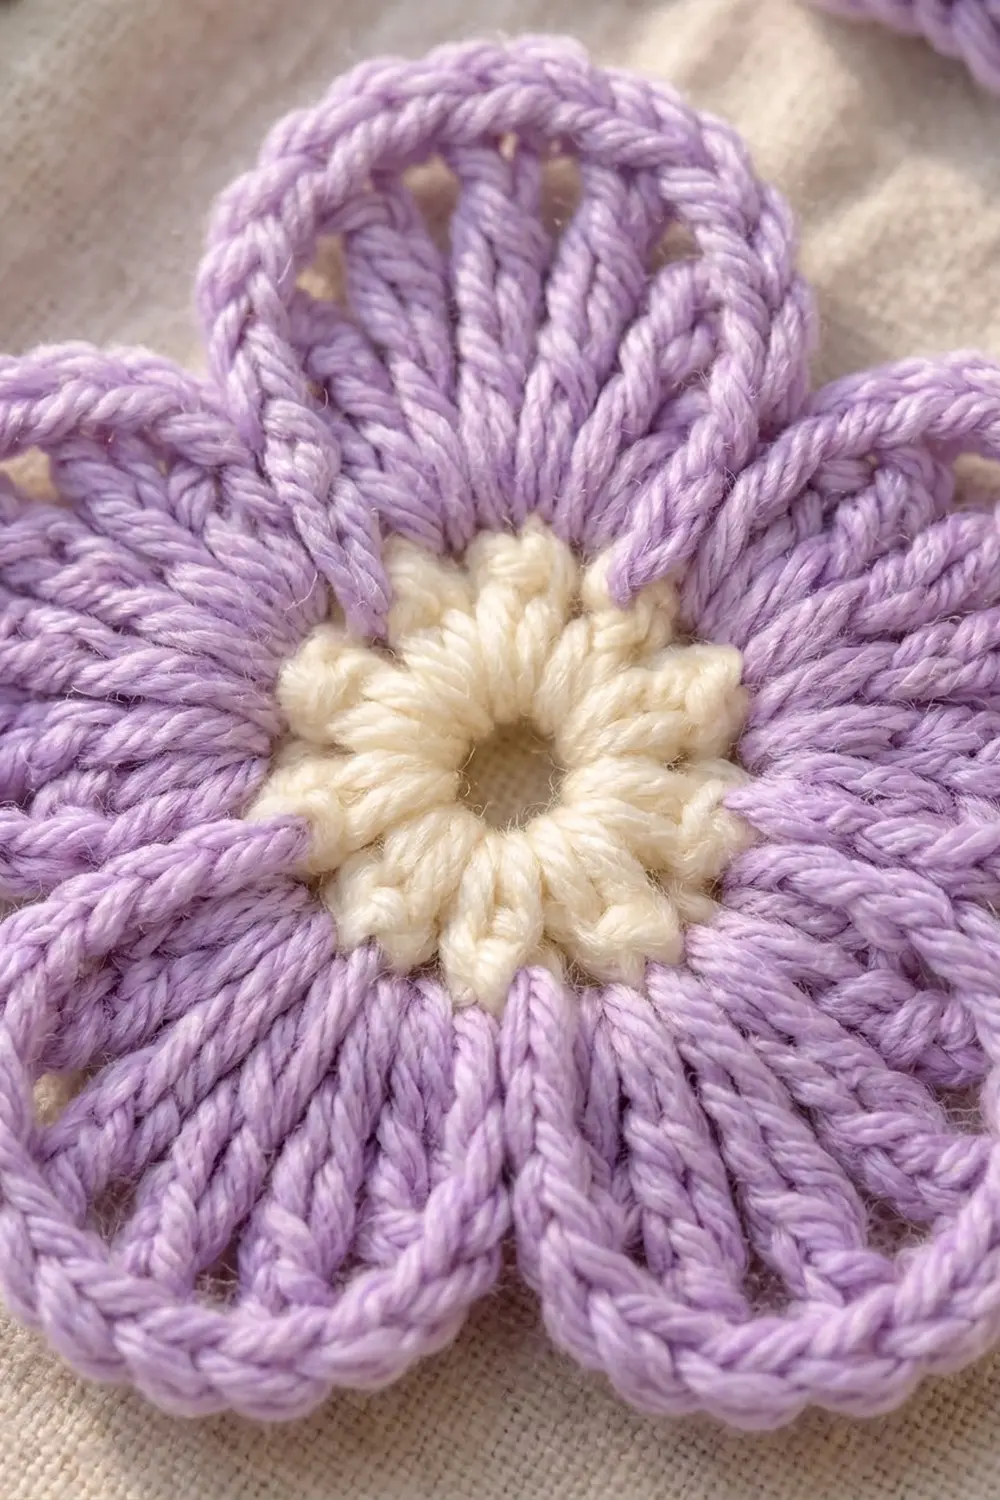
Large Flower (make 30)
Make 15 lavender flowers (cream center, lavender petals) and 15 cream flowers (butter-yellow center, cream petals).
Center
Rnd 1 (center color): Make a MR. Ch 3 (counts as dc), then work 11 dc into the ring. Pull the ring closed and join with a sl st to the top of the beginning ch-3. (12 dc)
Rnd 2: Ch 1, 2 sc in each st around. Join with sl st to first sc. (24 sc)
Fasten off the center color. The center should lie flat with a small hole in the middle.
Petals
Rnd 3 (petal color): Join the petal color with a standing sc in any st. Ch 5, skip next 3 sts, sc in next st. Repeat from * 4 more times. Then ch 5, skip the last 3 sts, and join with sl st to first sc. (6 sc and 6 ch-5 sps)
Each repeat uses 4 sts of Rnd 2, and 6 × 4 = 24, so the loops are evenly spaced.
Rnd 4: Sl st into the first ch-5 sp. In each ch-5 sp, work (sc, hdc, 7 dc, hdc, sc). Do not work into the sc of Rnd 3. Join with sl st to first sc. (6 petals × 11 sts = 66 sts)
The 7 dc fan out from the center and make the ribbed body of each petal.
Rnd 5 (outline): Ch 1. For each petal: sc in sc, sc in hdc, sc in next 3 dc, (sc, ch 2, sc) in the next dc (the 4th dc, at the center of the petal), sc in next 3 dc, sc in hdc, sc in sc. Repeat for all 6 petals. Join with sl st to first sc. (6 petals × 12 sc = 72 sc, plus 6 tip ch-2 sps)
This is a conversion round. The 11 sts of each petal are worked 1 per stitch, and 1 extra sc at the tip makes 12 sc per petal. Fasten off and weave in the ends.
For the first flower only, work Rnd 5 exactly as written. For every other flower, use the joining tip on the petals listed in the Joining section.
Mini Flower (make 22)
Make 12 with cream petals and 10 with lavender petals. All mini centers are butter yellow.
Rnd 1 (butter yellow): Make a MR, ch 1, and work 6 sc into the ring. Join with sl st to first sc. (6 sc) Fasten off.
Rnd 2 (petal color): Join with sl st in any sc. In each sc, work (ch 2, dc, ch 1, dc, ch 2, sl st). (6 petals, each with a ch-1 tip sp) Join and fasten off.
Each mini should measure 1.25 in (3.2 cm) across.
Make All Pieces
Large flowers: 15 lavender-petal (cream center) + 15 cream-petal (butter-yellow center) = 30. Work all 30 through Rnd 4 first. Work Rnd 5 only as you join each flower.
Mini flowers: 12 cream-petal + 10 lavender-petal = 22, all with butter-yellow centers.
Layout grid (L = lavender flower, C = cream flower). The rows wrap around the body, so flower 10 sits next to flower 1:
ROW 3:   L  C  L  C  L  C  L  C  L  C
ROW 2:     C  L  C  L  C  L  C  L  C  L
ROW 1:   L  C  L  C  L  C  L  C  L  C
Row 2 is shifted half a flower to the right. Each Row 2 flower sits in the dip between two Row 1 flowers. Each Row 3 flower sits directly above a Row 1 flower.
Joining
You make every join at a petal tip while working Rnd 5, using the joining tip. Only two petals ever meet at a join point, so each join is one sl st into one neighbor’s ch-2 sp.
Row 1:
– Flower 1: work Rnd 5 as written.
– Flowers 2–9: join W to the E tip of the previous flower.
– Flower 10: join W to flower 9’s E tip, and join E to flower 1’s W tip. This closes the ring.
Row 2 (flower n sits above Row 1 flowers n and n+1):
– Join SW to the NE tip of Row 1 flower n.
– Join SE to the NW tip of Row 1 flower n+1. For Row 2 flower 10, use Row 1 flower 1.
– From flower 2 on, join W to the previous Row 2 flower’s E tip. Flower 10 also joins E to Row 2 flower 1’s W tip.
Row 3 (flower n sits above Row 1 flower n):
– Join SW to the NE tip of Row 2 flower n–1. For Row 3 flower 1, use Row 2 flower 10.
– Join SE to the NW tip of Row 2 flower n.
– Join W and E to the side neighbors, then close the ring with flower 10.
Tension: Keep the ch 1 on each side of the joining sl st snug, so the join sits at the same length as a ch-2 tip. If the joins look gappy, chain more tightly rather than skipping chains.
Size checkpoint: After Row 1, the ring should measure 35 in (88.9 cm) around. After Row 3, the tube should be about 9 in (22.9 cm) tall and still 35 in (88.9 cm) around. It should lie without twisting.
Border
The border is worked in lavender, once along the top edge and once along the bottom edge. It firms up the edges and keeps the soft points of the outer petals.
Border gauge: 2 rounds of sc = 0.4 in (1.0 cm) deep.
Each Row 3 flower has 2 free tips (NW and NE) and a join point to its right. Each Row 1 flower has the same at the bottom (SW and SE).
Rnd 1: Join lavender with a standing sc in the NW tip ch-2 sp of Row 3 flower 1. Ch 5, sc in the NE tip sp of the same flower, ch 3, sc into the join point between this flower and the next (through the joining sl st), ch 3, sc in the NW tip sp of the next flower. Repeat from * around. End with ch 3 and a sl st to first sc.
Per flower: sc + 5 ch + sc + 3 ch + sc + 3 ch = 14 sts. All the way around: 10 × 14 = 140 sts.
Rnd 2: Ch 1. Sc in the NW tip sc, sc in each of the next 5 ch, sc in the NE tip sc, sc in the next 2 ch, sc3tog over the next ch, the join-point sc, and the first ch of the next ch-3, sc in the next 2 ch. Repeat from * around. Join with sl st to first sc.
This is a decrease round. Per flower: 14 sts worked 1 per stitch, minus 2 from the sc3tog = 12 sts. All the way around: 10 × 12 = 120 sts.
Fasten off. Repeat Rnds 1–2 on the bottom edge, using SW in place of NW and SE in place of NE. The counts are the same: 140, then 120.
Why the math works: Every flower contributes the same 14-st repeat. No stitches are added at the seams, because the join-point sc is already counted inside each repeat. The sc3tog pulls the dip down between flowers, so the edge keeps its petal points instead of flaring.
Straps
Join the minis to each other as you work their Rnd 2. On each new mini, at the first petal, replace the ch 1 at the tip with a sl st into the tip ch-1 sp of the previous mini’s 4th petal. Petals 1 and 4 sit opposite each other, so the strap runs straight.
Each strap has 11 minis in this order: C L C L C L C L C L C. Each strap measures 11 × 1.25 in = 13.75 in (34.9 cm).
Attach: On the front (Row 3 flowers 1–5), sew one strap to the border at the NW tip of flower 2, and the other strap to the border at the NE tip of flower 4. These points are about 8.75 in (22.2 cm) apart. On the back, sew the other strap ends at the NW tip of flower 7 and the NE tip of flower 9. Try the top on before sewing firmly. Add or remove one mini (1.25 in / 3.2 cm) per strap to adjust the fit.
Final Blocking
- Weave in any remaining ends along the petal outlines.
- Spray the top evenly until it’s damp but not dripping.
- Lay it flat on the mat as a doubled tube, with the folds at the sides.
- Check that the circumference is 35 in (88.9 cm) by measuring the flat width and doubling it.
- Pin the top and bottom edges straight, then pin each free petal tip outward.
- Pin the straps out straight at 13.75 in (34.9 cm).
- Let the top dry completely before unpinning.
Final Quality-Control Checklist
- Every large flower measures 3.5 in (8.9 cm) tip to tip.
- Every flower has 6 petals of 12 sc, each with a ch-2 tip.
- Colors alternate L/C in every row, and Rows 1 and 3 match.
- No join is missed, and no join point holds more than two petals.
- Each edge has 140 sts in border Rnd 1 and 120 sts in Rnd 2.
- Circumference is 35 in (88.9 cm) and height is 9.8 in (24.9 cm).
- The straps are the same length and sewn at matching points front and back.
- All ends are woven in securely.
Troubleshooting
Petals cup forward: The dc are too tight. Work Rnd 4 more loosely or go up half a hook size.
Petals ruffle: Rnd 4 is too loose. Go down half a hook size.
Center hole is too large: Pull the magic ring tighter before joining Rnd 1, and weave the tail through the base of the dc.
The ring twists: Check that flower 10 joins to flower 1 without a twist. If it doesn’t, undo those joins and work them again.
The edge flares: Check that you worked the sc3tog at every dip in border Rnd 2.
The straps stretch: Cotton can grow with wear. Remove one mini from each strap.
Care
Hand wash in cool water with a mild soap, gently press out the water, and dry flat. Don’t hang the top while it’s wet.
Final Notes
Each measurement builds on the one before it. The 1.5 in (3.8 cm) center grows into a 3.5 in (8.9 cm) flower, and 10 flowers make a 35 in (88.9 cm) ring. Three offset rows reach about 9 in (22.9 cm), and the edging brings the height to 9.8 in (24.9 cm). Check each stage, and the top will fit as planned.
Happy crocheting!