

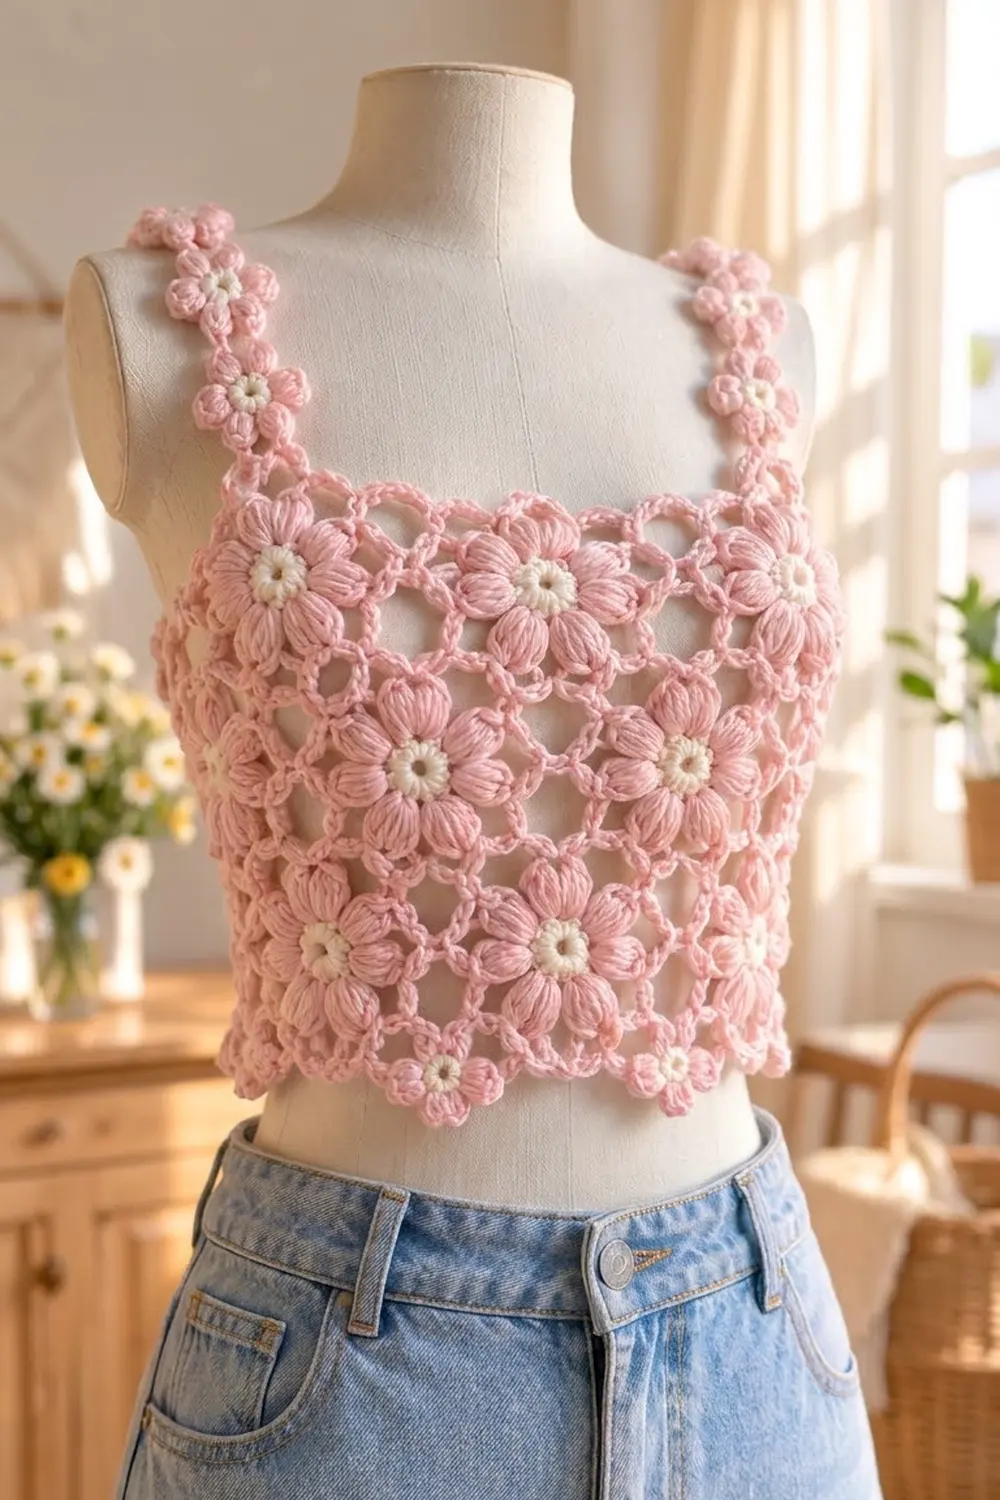
The Blossom Puff Crop Top is a soft, openwork summer top made entirely from flower motifs. Each large flower has a cream center ring, six plump pink puff-stitch petals, and a lacy chain-and-single-crochet frame that turns the flower into a scalloped hexagon.
The palette is just two colors: blush pink for the petals, frames, border, and straps, and cream for every flower center. The motifs join into an airy honeycomb mesh, so the top looks delicate. It is open lace, so wear it over a camisole or bralette.
This pattern uses US crochet terms. The finished body measures 35 in (88.9 cm) around and 11.5 in (29.2 cm) long from the top edge to the tips of the hem flowers. Each strap is 14 in (35.6 cm) long.
Construction is simple and has no seams. You make 30 large puff flowers and join them as you go into a tube 3 rows tall and 10 flowers around. Ten small flowers fill the lower edge for a scalloped hem, a 3-round border straightens the neckline, and two straps of 7 small flowers each finish the top.
Finished Size and Construction
- Finished size: 35 in (88.9 cm) around, 17.5 in (44.5 cm) wide laid flat, 11.5 in (29.2 cm) long
- Fits: bust 32–34 in (81.3–86.4 cm) with light ease
- Skill level: Intermediate
- Terminology: US
- Yarn weight: worsted (#4), cotton or cotton blend
- Hook: 5 mm (H-8)
- Number of pieces: 30 large flowers, 24 small flowers (10 hem, 14 strap)
- Layout: a tube of 3 offset rows × 10 large flowers
- Large flower size: 3.5 in (8.9 cm) flat side to flat side, 4 in (10.2 cm) tip to tip
- Small flower size: 2 in (5.1 cm) tip to tip
- Size before border: 35 in (88.9 cm) around × 10 in (25.4 cm) from top tips to bottom tips
- Border depth: 0.5 in (1.3 cm) above the top flower tips
Materials
Choose a smooth worsted-weight cotton or cotton blend at about 190 m per 100 g. Cotton gives crisp puffs and clear lace, and it does not pill. Avoid fuzzy yarns, because they hide the ribs on the petals.
- Pink: 250 g (475 m)
- Cream: 50 g (95 m)
These amounts include about 20% extra for swatching and tails.
Tools
- 5 mm (H-8) hook
- 4.5 mm (7) and 5.5 mm (I-9) hooks, in case you need to adjust gauge
- Tapestry needle
- Locking stitch markers
- Rust-proof pins and a blocking mat
- Measuring tape
Abbreviations (US Terms)
- ch – chain
- sl st – slip stitch
- sc – single crochet
- hdc – half double crochet
- dc – double crochet
- tr – treble crochet
- dtr – double treble crochet (yo 3 times, insert hook, pull up a loop, [yo, pull through 2] 4 times)
- sk – skip
- sp – space
- st(s) – stitch(es)
- yo – yarn over
- JAYGO – join as you go
Puff stitch (puff): (yo, insert hook in st, yo, pull up a loop to 0.75 in / 1.9 cm) 5 times, yo, pull through all 11 loops, ch 1 to close. The ch 1 does not count as a stitch.
Petal (small flower): (hdc, dc, ch 2, dc, hdc) all in the same st.
Tip join: instead of a ch-3 tip (large flower) or ch-2 tip (small flower), work ch 1, sl st into the target sp, ch 1.
Gauge and Checkpoints
Make one complete large flower before anything else. Block it lightly and measure it.
- After Rnd 1: cream ring 1.25 in (3.2 cm) across
- After Rnd 2: puff flower 2.75 in (7.0 cm) across
- After Rnd 3: 3.25 in (8.3 cm) across
- After Rnd 4: 3.5 in (8.9 cm) flat to flat, 4 in (10.2 cm) tip to tip
A small flower should measure 2 in (5.1 cm) tip to tip.
If your flower is larger than 3.5 in (8.9 cm), switch to a 4.5 mm hook. If it is smaller, switch to a 5.5 mm hook. An error of 0.25 in (0.6 cm) per flower adds up to 2.5 in (6.4 cm) around the body, so match this size before you go on.
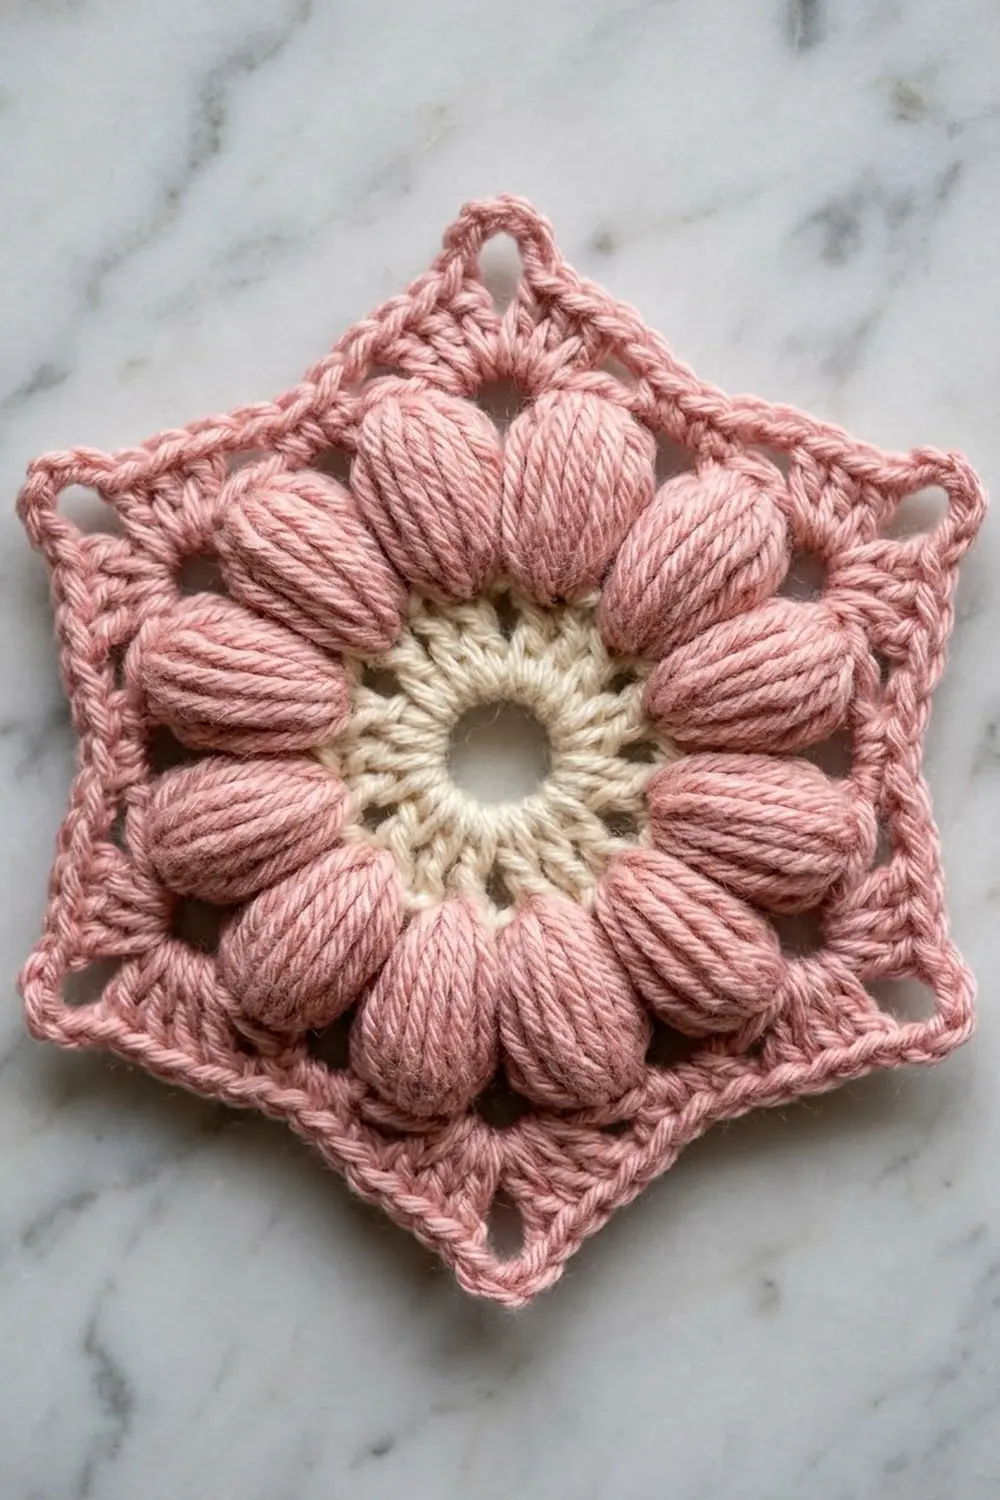
Large Puff Flower
Rnd 1 (cream): Magic ring, ch 2 (does not count as a st), 12 hdc in ring, sl st to first hdc. Fasten off. (12 hdc)
Rnd 2 (pink): Join pink in any hdc. Ch 1, puff in same st, ch 3, sk next hdc, puff in next hdc, ch 3, sk next hdc; rep from * 4 more times, sl st to top of first puff. (6 puffs, 6 ch-3 sps)
The puffs are the six ribbed petals. Pull every loop to the same 0.75 in (1.9 cm) height so the petals match.
Rnd 3: Sl st into next ch-3 sp, ch 1, sc in same sp, ch 7, sc in next ch-3 sp, ch 7; rep from * 4 more times, sl st to first sc. (6 sc, 6 ch-7 arches)
Each ch-7 arch passes over one puff and frames it. The 6 sc sit in the valleys between petals.
Rnd 4: Sl st into first ch-7 arch, ch 1, (4 sc, ch 3, 4 sc) in arch; rep from * 5 more times, sl st to first sc. Fasten off. (48 sc, 6 ch-3 tips)
The ch-3 tips sit above the centers of the petals and form the six corners of the hexagon. Each side runs from one tip to the next and holds 8 sc: 4 from one arch and 4 from the next. The tips are corners, not stitches, so 6 sides × 8 sc = 48 sc.
Small Flower
Rnd 1 (cream): Magic ring, ch 1, 12 sc in ring, sl st to first sc. Fasten off. (12 sc, 0.75 in / 1.9 cm across)
Rnd 2 (pink): Join pink in any sc. Ch 1, sc in same st, petal in next sc, sc in next sc, petal in next sc; rep from * 4 more times, sl st to first sc. Fasten off. (6 sc + 6 petals of 4 sts each = 30 sts, plus 6 ch-2 tips)
Make All Pieces
- Large flowers: 30. Work Rnd 1 in cream and Rnds 2–3 in pink on all 30. Work Rnd 4 only on the first flower; you’ll finish the others as you join them.
- Small flowers: 24. Work Rnd 1 in cream on all 24. Finish Rnd 2 on 14 of them now for the straps. Finish Rnd 2 on the other 10 as you join them to the hem.
Layout (L = large flower, s = small hem flower). The tube has no side seam, so each row wraps all the way around:
ROW 1 (top):   L  L  L  L  L  L  L  L  L  L
ROW 2:           L  L  L  L  L  L  L  L  L  L
ROW 3:         L  L  L  L  L  L  L  L  L  L
HEM:              s  s  s  s  s  s  s  s  s  s
Row 2 is shifted by half a flower, so each flower sits in the dip between two flowers in the rows above and below it.
Joining
Hold each flower with one tip pointing straight up. Name its tips clockwise: top, upper right, lower right, bottom, lower left, upper left.
Method: Join as you go on Rnd 4. Two neighbors are joined at the 2 tips of their shared side. When you reach a tip that touches a flower already in place, work a tip join into that flower’s matching ch-3 sp. Work the 8 sc between tips as usual.
Row 1: Flower 1 is already complete. Join flower 2’s upper left and lower left tips to flower 1’s upper right and lower right tips. Continue this way through flower 10. Join flower 10 to flower 9 on its left and to flower 1 on its right; this closes the tube. (10 flowers, 20 joined tips)
Check that the tube is not twisted before you join flower 10.
Rows 2 and 3: Join each new flower’s upper left and top tips to the flower above and to the left. Join its top and upper right tips to the flower above and to the right. Then join it to the flower beside it. Where three flowers meet at one tip, sl st into the existing join, not into a ch-3 sp. This keeps the corners flat.
Stitch logic: Flowers join only at their tips. The 8 sc on each side never connect, which leaves the open lens-shaped gaps of the honeycomb mesh.
Tension: Keep the ch 1 on each side of a join the same size as your other chains. Tight joins make the mesh pucker, and loose joins let the tips sag.
Hem flowers: Along the bottom edge, each pair of row 3 flowers meets at a V point. Work Rnd 2 of a small flower until 3 petals remain. Join the tip of petal 4 to the valley in the middle of the left flower’s lower side: insert the hook into the gap between its two arches, around the Rnd 3 sc. Join the tip of petal 5 to the V point. Join the tip of petal 6 to the matching valley on the right flower. Finish the round. Repeat at all 10 V points. (10 hem flowers)
Size checkpoint: Lay the tube flat. It should be 17.5 in (44.5 cm) wide and 10 in (25.4 cm) from top tips to bottom tips. The hem flowers should hang 1 in (2.5 cm) below the bottom tips.
Border (Top Edge)
Border gauge: 4 sc = 1 in (2.5 cm), which is 14 sc across each 3.5 in (8.9 cm) flower.
The top edge zigzags: each row 1 flower rises to a top tip, and neighbors meet at V points 1 in (2.5 cm) lower. Rnd 1 fills in these dips.
Rnd 1: Join pink in the top-tip ch-3 sp of any row 1 flower. Ch 1, sc in same sp, ch 6, dtr into next V point (insert hook through the join), ch 6, sc in top-tip sp of next flower, ch 6, dtr into next V point, ch 6; rep from * 8 more times, sl st to first sc. (10 sc, 10 dtr, 20 ch-6 sps)
Rnd 2: Ch 1, sc in sc, 6 sc in ch-6 sp, sc in dtr, 6 sc in ch-6 sp; rep from * 9 more times, sl st to first sc. (14 sc per flower × 10 flowers = 140 sc)
Rnd 3: Ch 1, sc in each sc around, sl st to first sc. Fasten off. (140 sc)
Why the math works: Each row 1 flower adds exactly 1 + 6 + 1 + 6 = 14 sc, so 10 flowers × 14 sc = 140 sc. At 4 sc per inch, 140 sc = 35 in (88.9 cm), the same as the body. The edge will not ruffle or pull in. The front and back get 70 sc each.
Straps: For each strap, join 7 strap flowers in a straight line by sewing the bottom tip of one to the top tip of the next with pink yarn. Each strap is 7 × 2 in (5.1 cm) = 14 in (35.6 cm). Number the Rnd 3 sts, starting with sc 1 above the top tip where Rnd 1 began. Center the front strap ends over sc 15 and sc 43, and the back ends over sc 85 and sc 113. Sew each end tip across 3 sts. The straps sit above the tips of flowers 2, 4, 7, and 9, and the two front straps are 7 in (17.8 cm) apart.
Try the top on before you sew the back ends. Adding or removing one strap flower changes the strap length by 2 in (5.1 cm).
Final Blocking
- Weave in all ends along the chain arches, not through the puffs.
- Soak the top in cool water for 15 minutes, then roll it in a towel and press out the water. Do not wring it.
- Lay it flat on the mat and pin the width to 17.5 in (44.5 cm).
- Pin the length to 11.5 in (29.2 cm), from the top edge to the hem flower tips.
- Pin each top tip and each hem flower tip so the scallops are even.
- Gently pinch each puff back into a rounded petal shape.
- Pin the straps straight at 14 in (35.6 cm).
- Let the top dry completely, then turn it over and let the other side dry.
Final Quality-Control Checklist
- Every large flower has 6 puffs, 48 sc, and 6 tips.
- Each large flower measures 3.5 in (8.9 cm) flat to flat.
- All three-way joins go into the existing join.
- The tube is not twisted, and the rows are evenly offset.
- There are 10 hem flowers, each joined at 3 tips.
- Border Rnds 2 and 3 both have 140 sc.
- The top edge lies straight without ruffling.
- Both straps are 14 in (35.6 cm) long and sit at the same height.
- All ends are woven in securely.
Troubleshooting
- Uneven puffs: Pull all loops to the same height before you close each puff.
- Flower cups: The Rnd 3 chains are too tight. Loosen them or work ch 8 for each arch.
- Flower ruffles: The Rnd 3 chains are too loose. Work ch 6 instead of ch 7.
- Gaps at three-way corners: You probably joined into a ch-3 sp instead of the existing join. Redo that tip.
- Top edge flares: The dtr are too tall. Work tr into the V points instead.
- Top edge pulls in: On Rnd 2, work 7 sc in each ch-6 sp, for 160 sc. Then work 160 sc on Rnd 3.
- Straps stretch: Cotton relaxes as you wear it. Remove one strap flower.
Care
Hand wash in cool water with a mild detergent and dry flat. Do not tumble dry the top or hang it while wet, because the weight will stretch the straps.
Final Notes
Each measurement builds on the one before. A 12-hdc ring plus 6 puffs, 6 arches, and 48 sc makes a 3.5 in (8.9 cm) flower. Ten flowers around give 35 in (88.9 cm), and three rows give 10 in (25.4 cm) of height. Add 10 hem flowers and a 140-sc border at 4 sc per inch, and you have an 11.5 in (29.2 cm) top with two 14 in (35.6 cm) straps. If your first flower is the right size, everything after it will be too.
Happy crocheting!