

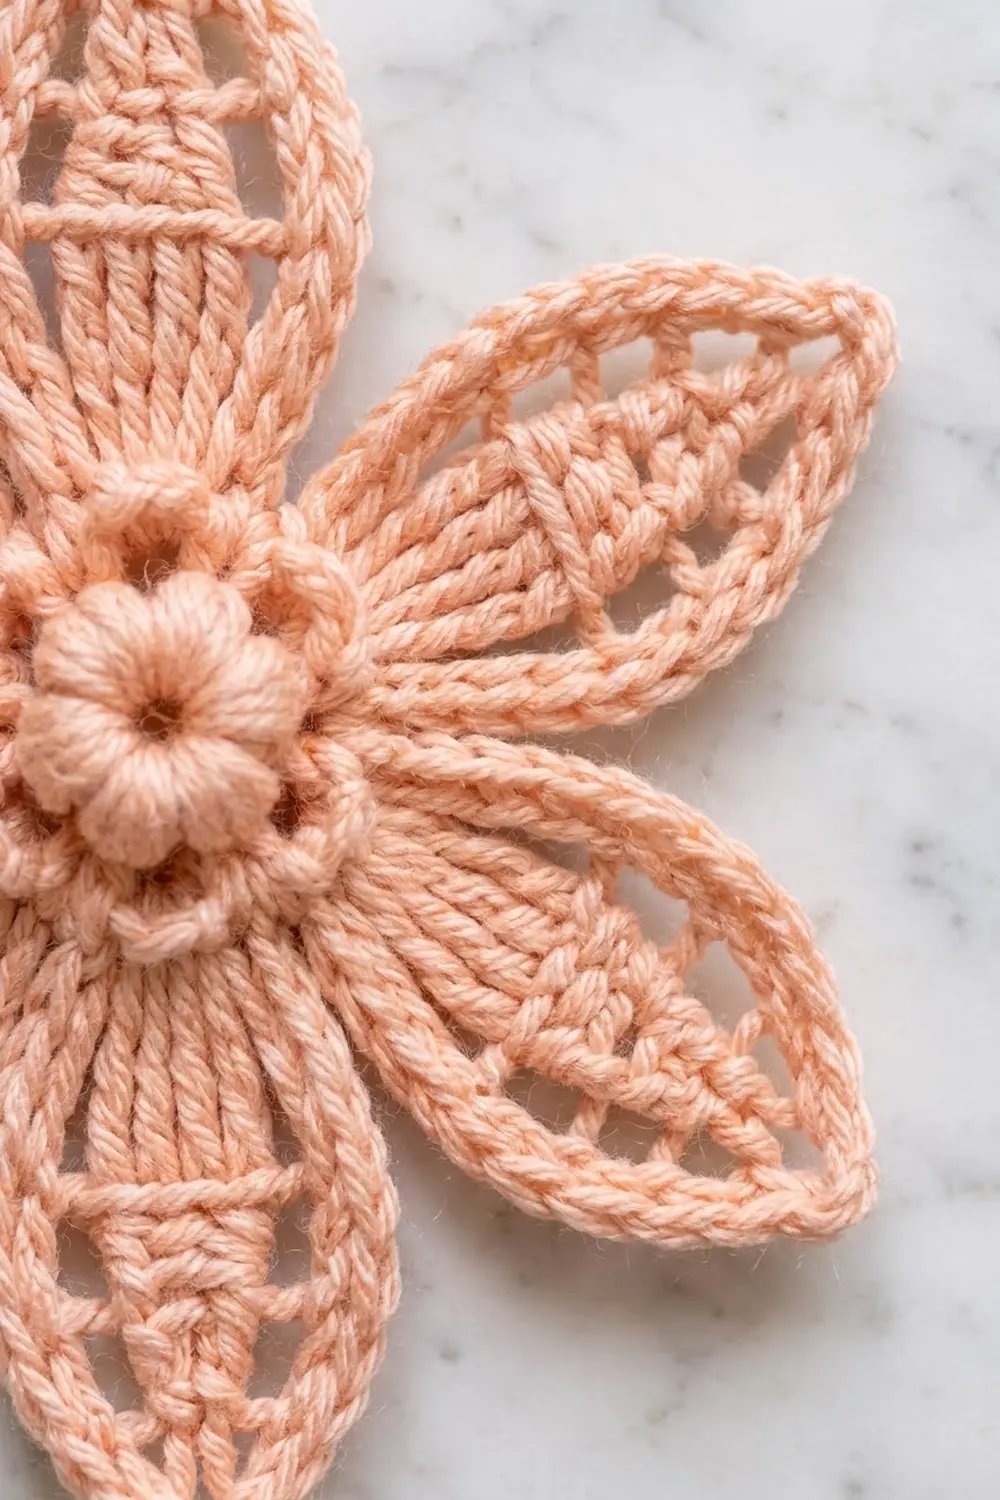
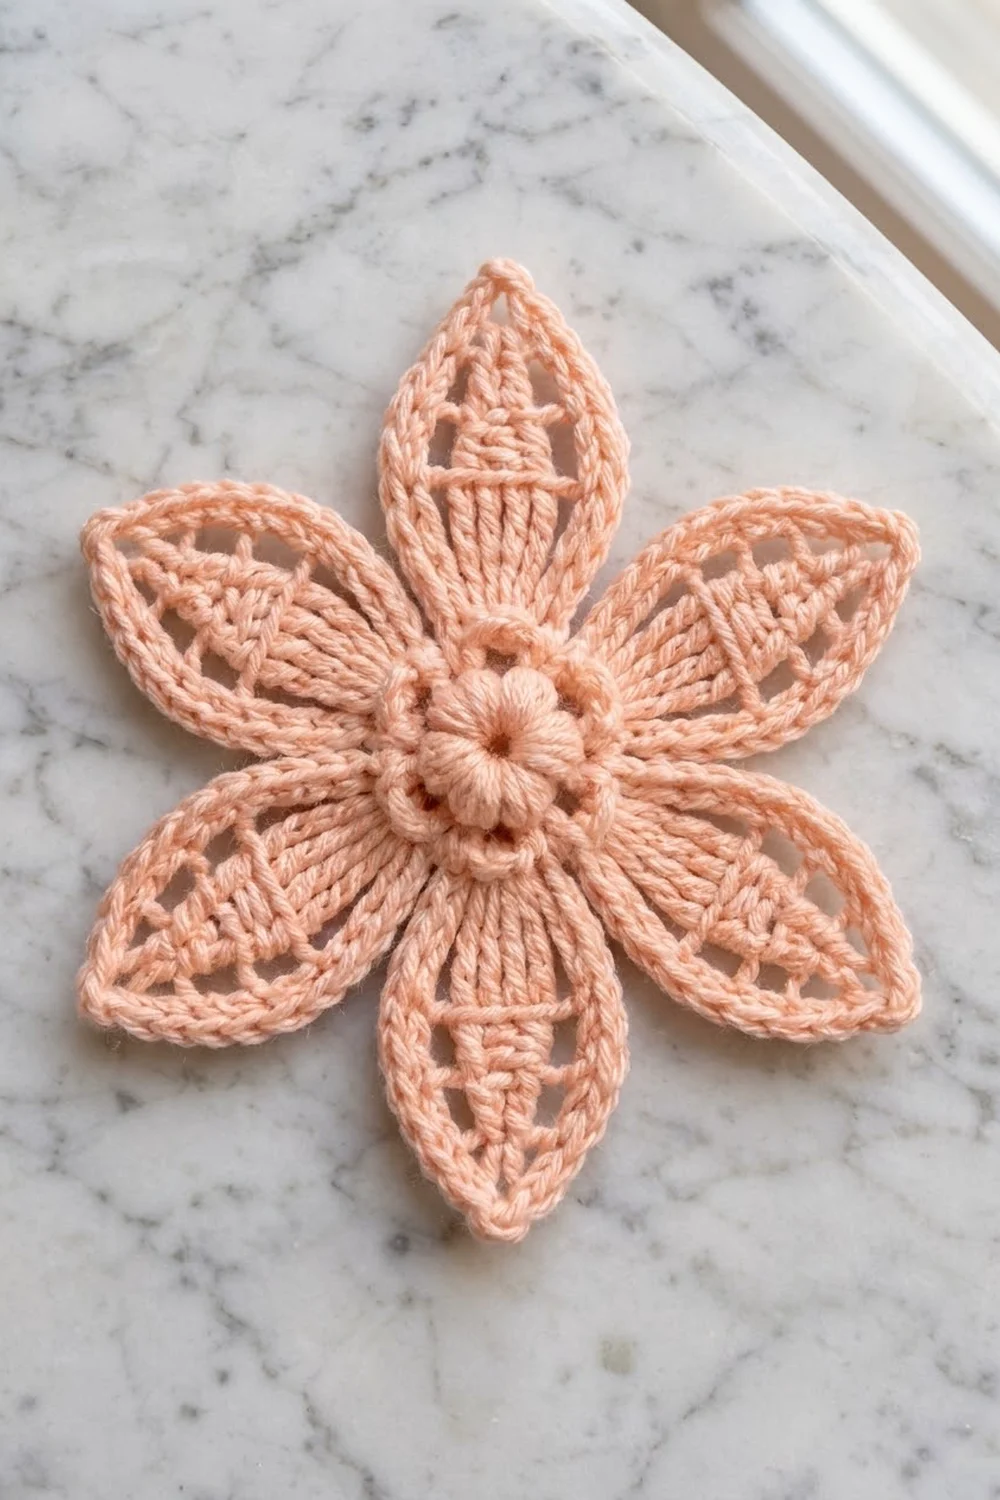
This six-petal lace flower is soft, airy, and a little bit vintage. A puffy rosette sits in the middle, wrapped in a ridged ring, and six pointed petals open out around it like a star-shaped blossom.
The sample is worked in a single warm peach shade. One color keeps the focus on the texture: the solid spines, the small open windows, and the crisp outline around every petal. It works just as well in ivory, blush, or pale gold.
The pattern uses US crochet terms throughout. The finished motif measures about 6.25 in (15.9 cm) from petal tip to petal tip after blocking.
Construction is simple. You work the center in joined rounds, then build each petal in short rows directly off the center ring, then finish with one outline round that travels around all six petals in one go.
Finished Size and Construction
- Finished size: 6.25 in (15.9 cm) tip to tip
- Skill level: Easy-intermediate
- Terminology: US crochet terms
- Yarn weight: DK (#3, light)
- Hook: 3.5 mm (E-4)
- Number of pieces: 1 single motif
- Layout: 1 center + 6 petals, worked as one piece
- Center size (after Rnd 4): 1.75 in (4.4 cm) across
- Petal length before outline: 2 in (5.1 cm)
- Size before border: 5.75 in (14.6 cm) tip to tip
- Border depth: 0.25 in (0.6 cm) at each tip
Materials
Yarn advice: Choose a smooth DK yarn with good stitch definition. A cotton or cotton-acrylic blend shows the open windows best and blocks flat. Very fuzzy yarns will blur the lace.
- Peach (main and only color): 12 g, about 30 m (33 yd)
Tools:
- 3.5 mm (E-4) crochet hook
- Tapestry needle
- Scissors
- 6 locking stitch markers
- Blocking mat and rust-proof pins
- Spray bottle with cool water
- Ruler or tape measure
The yarn quantity includes a margin of roughly 30% over what the sample used. That covers your gauge swatch, 12 petal tails, and one or two restarts.
Abbreviations (US Terms)
- ch – chain
- sl st – slip stitch
- sc – single crochet
- dc – double crochet
- dc3tog – double crochet 3 together
- BLO – back loop only
- sp – space
- st(s) – stitch(es)
- tch – turning chain
- RS – right side
- MR – magic ring
Special stitches:
Puff stitch (puff): (Yarn over, insert hook in stitch, yarn over, pull up a loop to about 0.5 in / 1.3 cm tall) 4 times in the same stitch. You now have 9 loops on the hook. Yarn over and pull through all 9 loops.
dc3tog: (Yarn over, insert hook in next st, yarn over, pull up a loop, yarn over, pull through 2 loops) 3 times, working once into each of the next 3 sts. Yarn over and pull through all 4 loops on the hook.
Standing sc: Start with a slip knot on the hook. Insert hook in the indicated place, yarn over, pull up a loop, yarn over, pull through both loops.
Gauge and Checkpoints
Basic gauge: 20 sc = 4 in (10.2 cm) with a 3.5 mm hook.
Make the center first and treat it as your test piece. Measure flat, without stretching, at each checkpoint below.
- After Rnd 1: 0.75 in (1.9 cm) across
- After Rnd 2: 1.25 in (3.2 cm) across
- After Rnd 3: 1.5 in (3.8 cm) across
- After Rnd 4: 1.75 in (4.4 cm) across
- After Petal Row 4: petal is 1.25 in (3.2 cm) tall from Rnd 4
- After Petal Row 6: petal is 2 in (5.1 cm) tall, 1.75 in (4.4 cm) at its widest
- After outline: 6.25 in (15.9 cm) tip to tip
If your center is too big (over 1.875 in / 4.8 cm after Rnd 4), go down to a 3.25 mm hook. Puffs pulled too tall are another common cause, so keep each loop about 0.5 in (1.3 cm).
If your center is too small (under 1.625 in / 4.1 cm), go up to a 3.75 mm hook. A tight center makes the petals crowd and cup.
Main Pattern: Center
Work in joined rounds with the RS facing you. Do not turn.
Rnd 1: MR, ch 1, 8 sc in ring. Pull the ring closed, leaving a small hole about 0.125 in (0.3 cm) wide. Sl st to first sc to join. (8 sc)
Rnd 2: Ch 2 (does not count as a st), puff in same st as join, ch 1, puff in next sc, ch 1; repeat from * 6 more times. Sl st to top of first puff to join. (8 puffs, 8 ch-1 sps)
Rnd 3: This is a conversion round. Ch 1, sc in top of same puff, 2 sc in next ch-1 sp, sc in top of next puff, 2 sc in next ch-1 sp; repeat from * 6 more times. Sl st to first sc to join. (8 sc worked 1 per puff + 16 sc worked 2 per ch-1 sp = 24 sc)
Rnd 4: Working in BLO only, ch 1, 2 sc in next st, sc in next 3 sts; repeat from * 5 more times. Sl st to first sc to join. (30 sc)
The unused front loops of Rnd 3 form the raised ridge that frames the puff rosette. Fasten off.
Place a marker in every 5th stitch of Rnd 4, starting with any stitch. You now have 6 sections of 5 sts each, one per petal.
Main Pattern: Petals
Each petal is worked in 6 rows on 5 stitches of Rnd 4. Make 6 petals, one per section, and fasten off after each, leaving a 6 in (15.2 cm) tail.
Row 1 (RS): With RS facing, join yarn with a sl st in the first stitch of a section. Ch 3 (counts as dc), dc in next 4 sts. Turn. (5 dc)
Row 2: Ch 3 (counts as dc), dc in same st, ch 1, dc in next 3 dc, ch 1, 2 dc in top of tch. Turn. (7 dc, 2 ch-1 sps)
Row 3: Ch 3 (counts as dc), dc in next dc, ch 2, skip ch-1 sp, dc in next 3 dc, ch 2, skip ch-1 sp, dc in next dc, dc in top of tch. Turn. (7 dc, 2 ch-2 sps)
The 3 center dc stacked through Rows 1–3 form the solid spine. The ch-2 spaces open the first pair of windows.
Row 4 (bar row): This is a conversion row. Ch 1, sc in first 2 dc, sc in ch-2 sp, sc in next 3 dc, sc in ch-2 sp, sc in next dc, sc in top of tch. Turn. (7 sc worked 1 per dc + 2 sc worked 1 per ch-2 sp = 9 sc)
This solid row is the horizontal bar across the middle of the petal.
Row 5: Ch 3 (counts as dc), ch 2, skip next 2 sc, dc in next 3 sc, ch 2, skip next 2 sc, dc in last sc. Turn. (5 dc, 2 ch-2 sps)
The 3 dc land on sc 4, 5, and 6, directly above the spine, so the spine continues past the bar.
Row 6: Ch 3 (counts as dc), ch 1, skip ch-2 sp, dc3tog over next 3 dc, ch 1, skip ch-2 sp, dc in top of tch. (2 dc + 1 dc3tog = 3 sts, 2 ch-1 sps)
Fasten off. The dc3tog gathers the spine into the point of the petal.
Petals 2–6: Join yarn in the first stitch of the next unworked section of Rnd 4 and repeat Rows 1–6. The six sections use all 30 sts of Rnd 4, so the petals sit side by side with no gaps at their bases.
Weave in all petal tails along the solid spines and bars before the outline. Tails hidden there disappear completely.
Checkpoint: Lay the motif flat. It should measure 5.75 in (14.6 cm) from tip to tip across opposite petals.
Border: Petal Outline
The outline is one round of sc worked into the row ends and tops of each petal. It firms the edges, sharpens the almond shape, and adds the small pointed loop at each tip.
Border gauge: Work 2 sc into the side of each dc row and 1 sc into the side of each sc row. Each petal side then holds 11 sc over about 2 in (5.1 cm), roughly 5.5 sc per inch. That is slightly denser than the base gauge, which is right for a curved edge that needs to lie flat.
Outline Rnd (RS): With RS facing, join with a standing sc in the side of Row 1 on the right-hand edge of any petal.
Up the first side: Work 1 more sc in the side of Row 1, 2 sc in the side of Row 2, 2 sc in the side of Row 3, 1 sc in the side of Row 4, 2 sc in the side of Row 5, and 2 sc in the side of Row 6. (11 sc on this side, including the standing sc)
Across the tip: Sc in ch-1 sp, (sc, ch 3, sc) in top of dc3tog, sc in next ch-1 sp. (4 sc + 1 ch-3 tip loop)
Down the second side: 2 sc in the side of Row 6, 2 sc in the side of Row 5, 1 sc in the side of Row 4, 2 sc in the side of Row 3, 2 sc in the side of Row 2, 2 sc in the side of Row 1. (11 sc)
Next petal: Move straight to the side of Row 1 of the next petal. Do not add stitches in the valley. Work its first side as 2 sc in Row 1, 2 sc in Row 2, 2 sc in Row 3, 1 sc in Row 4, 2 sc in Row 5, 2 sc in Row 6 (11 sc), then the tip and second side as above.
Repeat around all 6 petals. Sl st to the standing sc to join. Fasten off and weave in.
Counts:
- Per petal side: 11 sc (2 + 2 + 2 + 1 + 2 + 2)
- Per petal tip: 4 sc + 1 ch-3 loop
- Per petal: 11 + 4 + 11 = 26 sc + 1 ch-3 loop
- Full round: 6 × 26 = 156 sc + 6 ch-3 loops
Why the math works: Every dc row is about twice as tall as an sc is wide, so 2 sc per dc row end keeps the edge flat. The sc bar row needs only 1. The tip count of 4 sc plus a ch-3 loop gives the point enough room to turn sharply without flaring. Because the petals share no stitches at their bases, the last sc of one petal sits right beside the first sc of the next, which pulls each valley in neatly with no extra stitches needed.
Final Blocking
- Weave in any remaining tails before blocking.
- Pin the motif RS up on a blocking mat.
- Pin the center first, keeping it 1.75 in (4.4 cm) across and round.
- Pin the 6 tips through their ch-3 loops, spaced evenly, so opposite tips measure 6.25 in (15.9 cm) apart.
- Add a pin at the widest point of each petal side so each petal is 1.75 in (4.4 cm) wide at Row 4.
- Gently open each window with a fingertip so the spaces read clearly.
- Mist with cool water until damp, not soaked.
- Let it dry completely, at least 4 hours, before unpinning.
For a crisper hanging ornament, use a light spray starch at step 7.
Final Quality-Control Checklist
- Center hole is small and neat, about 0.125 in (0.3 cm).
- 8 puffs, evenly spaced, with a clear ridge around them.
- Rnd 4 has 30 sc, and every petal starts on its own 5 sts.
- Each petal has a straight 3-dc spine leading into the dc3tog point.
- Windows are open and matched on both sides of each spine.
- The solid bar sits at the same height on all 6 petals.
- Outline has 26 sc per petal and a ch-3 loop at every tip.
- Motif measures 6.25 in (15.9 cm) tip to tip after blocking.
- No tails visible from the RS.
Troubleshooting
Center cups or bowls. Puffs are too tall or Rnd 3 is too tight. Keep puff loops at 0.5 in (1.3 cm) and work Rnd 3 loosely.
Center ruffles. Rnd 4 has extra stitches. Recount for 30 sc.
Petals overlap at the base. Rnd 4 is too small for the petals. Go up a hook size for the center only.
Spine looks crooked. You likely shifted a stitch in Row 5. The 3 dc must sit on sc 4, 5, and 6 of Row 4.
Petal edge waves. Too many sc in the outline. Check that Row 4 gets only 1 sc per side.
Petal edge pulls in or curls. Too few outline sc, or tight tension. Work 2 sc into every dc row end.
Tips look round instead of pointed. Make sure the (sc, ch 3, sc) goes into the top of the dc3tog, not into a ch-1 sp, and pin the tip loops firmly when blocking.
Petals differ in size. Tension drifted between petals. Hold the first petal against each new one before fastening off.
Care
Hand wash in cool water with mild soap, press out water in a towel, and dry flat, pinning the tips if needed. Do not tumble dry or iron directly on the stitches.
Final Notes
The measurement chain is short and easy to track. Rnd 4 gives a 1.75 in (4.4 cm) center with 30 sc. Six petals of 5 sts each grow 2 in (5.1 cm) each, bringing the motif to 5.75 in (14.6 cm). The outline adds 0.25 in (0.6 cm) at each tip, with 26 sc per petal and 156 sc in total, for a finished size of 6.25 in (15.9 cm).
If the center checkpoint is right, the rest of the motif will follow. Make one, block it well, and enjoy how the windows open up once it dries flat. A single blossom makes a lovely ornament, gift topper, or hanging window decoration.
Happy crocheting!