

The Rosy Petal Lattice Crop Top is a light, airy summer top. An open cream lattice of chain arches frames rows of plump dusty-rose fans. The fans sit in neat vertical columns, so the top reads as a tidy grid of little petals from a distance.
Only two colors are used: a warm cream for the lattice, edges and straps, and a soft dusty rose for the fans. The style is romantic and vintage, but the construction is simple and modern. All instructions use US crochet terms.
The finished top measures 32 in (81.3 cm) around and 12.75 in (32.4 cm) long, not counting the straps. It fits a bust of about 31–34 in (78.7–86.4 cm), because the lace stretches gently.
The body is one seamless tube worked in joined rounds from the bottom up, with the right side always facing. Net rounds in cream alternate with fan rounds in rose. A two-round scalloped border finishes the top and bottom edges, and two chain-and-single-crochet straps are worked straight onto the top edge. There is nothing to sew together.
Finished Size and Construction
- Finished size: 32 in (81.3 cm) circumference × 12.75 in (32.4 cm) length
- Skill level: Intermediate (two-color rounds, carried yarn)
- Terminology: US crochet terms
- Yarn weight: DK (#3), cotton or cotton blend
- Hook: 4.0 mm (US G-6)
- Number of pieces: 1 (body tube with straps worked on)
- Layout: 16 motif repeats around: 8 on the front, 8 on the back; 7 fan rows high
- Motif repeat size: 2 in (5.1 cm) wide
- Size before border: 32 in (81.3 cm) × 11.25 in (28.6 cm)
- Border depth: 0.75 in (1.9 cm) at the top edge and 0.75 in (1.9 cm) at the bottom edge
- Straps: 14 in (35.6 cm) long × 0.5 in (1.3 cm) wide
Materials
Choose a smooth, mercerized or combed cotton DK. Its crisp stitch definition makes the fans look full and keeps the lattice open. Pick a rose shade that clearly contrasts with the cream. The amounts below assume about 120 m per 50 g.
- Cream (main color): 200 g, about 480 m
- Dusty rose (fan color): 50 g, about 120 m
Tools:
- 4.0 mm (US G-6) crochet hook
- Tapestry needle
- 5 locking stitch markers
- Scissors and a tape measure
- Blocking mats, rust-proof pins and a spray bottle
The yarn amounts include a safety margin of about 20%. If you add extra motifs or make longer straps, buy one more ball of cream.
Abbreviations (US Terms)
- ch – chain
- sl st – slip stitch
- sc – single crochet
- dc – double crochet
- sk – skip
- sp(s) – space(s)
- st(s) – stitch(es)
- rnd(s) – round(s)
- rep – repeat
- BLO – back loop only
- RS / WS – right side / wrong side
Special stitch – Fan: Work 5 dc in the same stitch. The 3rd dc is the center dc of the fan.
Color change: To switch colors, work the last yarn-over of the final stitch in the old color using the new color. To begin a fan right after a cream chain, keep the cream loop on the hook, then yarn over with rose and work the first dc. The cream loop closes inside the base of the fan.
Carrying yarn: Work rose fans over the cream strand, and work each cream sc over the rose strand. That way the unused color is hidden inside the stitches and never forms a long float.
Gauge and Checkpoints
- Pattern gauge: 1 motif repeat (10 foundation ch) = 2 in (5.1 cm) wide
- Height: 2 rnds (1 fan rnd + 1 net rnd) = 1.5 in (3.8 cm); each rnd is about 0.75 in (1.9 cm)
- Border gauge: 20 sc = 4 in (10.2 cm)
Test first: Because this is a single piece, the first three rounds of the body work as your gauge test. Work Rnds 1–3 and lay the tube flat without stretching it.
- After Rnd 1: the flat tube measures 16 in (40.6 cm) across, which is 32 in (81.3 cm) around.
- After Rnd 3: the height is 2.25 in (5.7 cm). 4 motifs measure 8 in (20.3 cm).
- After Rnd 7: the height is 5.25 in (13.3 cm).
- After Rnd 15: the height is 11.25 in (28.6 cm).
- After both borders: the length is 12.75 in (32.4 cm).
Too big: If 4 motifs measure more than 8 in (20.3 cm), rip back and go down 0.5 mm in hook size. Too small: If they measure less, go up 0.5 mm.
Changing size: Each motif adds 2 in (5.1 cm). Add or remove motifs in pairs (one front, one back) to keep the top balanced: 14 motifs = 28 in (71.1 cm), 18 motifs = 36 in (91.4 cm). Each motif needs 10 foundation ch, so add or remove 20 ch per pair.
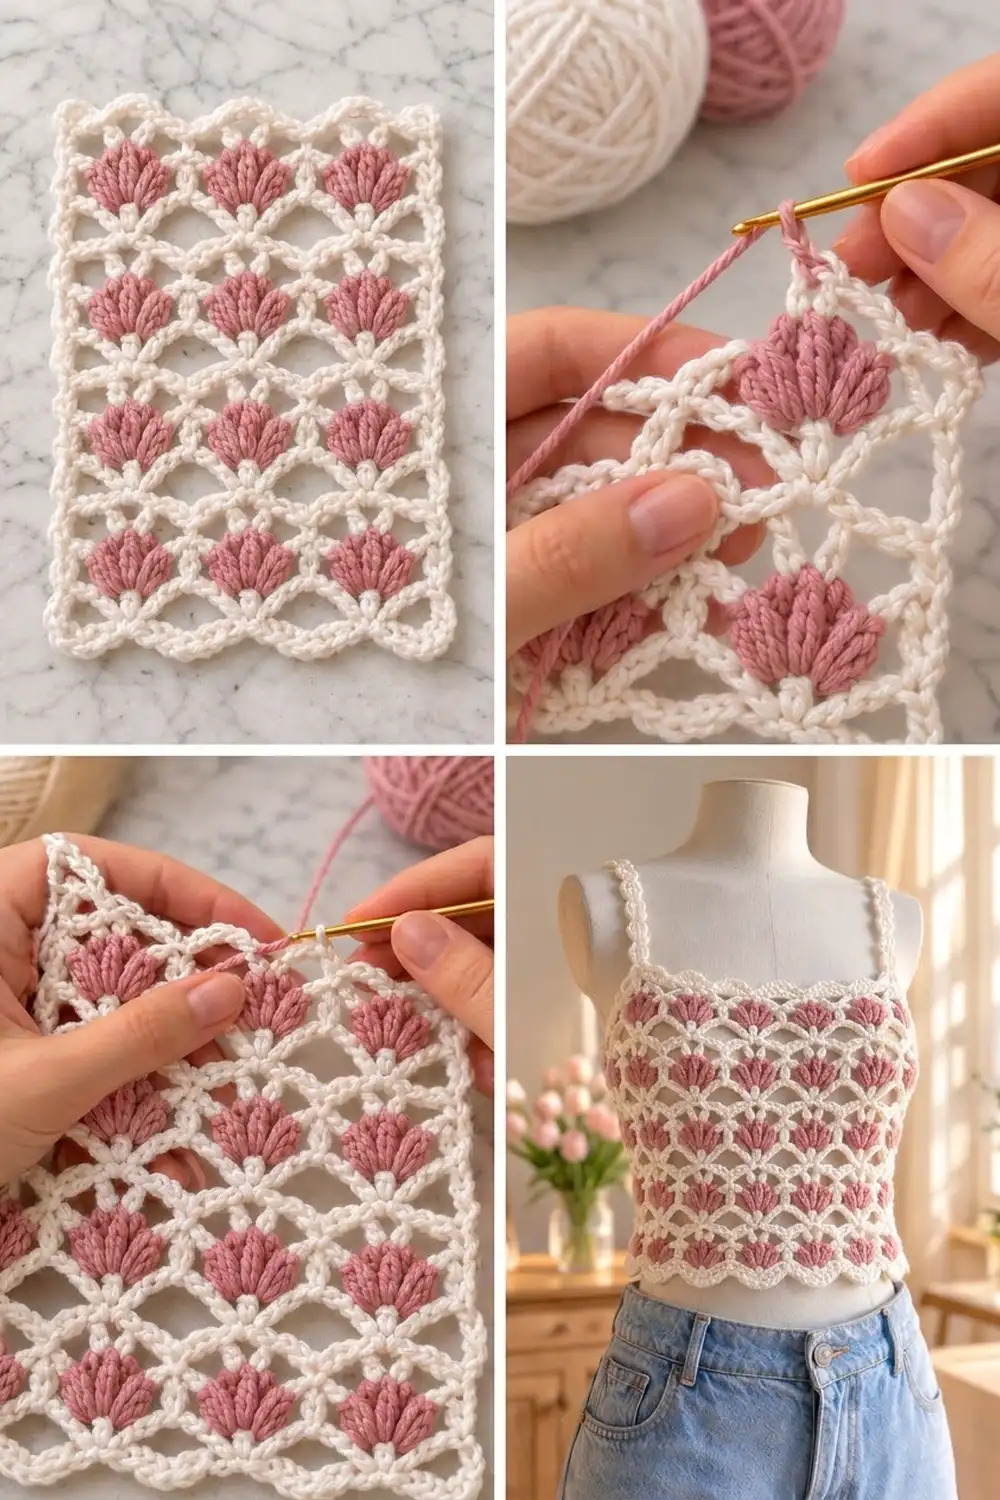
Body Pattern
Leave 6-in (15.2 cm) tails at every join of new yarn.
Foundation: With cream, ch 160. Join with a sl st to the first ch, taking care not to twist the chain. (160 ch, 16 motifs × 10 ch)
Rnd 1 (net, cream): Ch 1, sc in the same ch as the join, [ch 4, sk 4 ch, sc in next ch] 31 times, ch 4, sk last 4 ch. Join to the first sc, working the final yarn-over of the sl st with rose. (32 sc, 32 ch-4 sps)
The sc stitches alternate between fan points (the 1st, 3rd, 5th and so on) and between points (the 2nd, 4th, 6th and so on). Place a marker in the first sc to mark the start of the round. It also marks the left side of the top.
Rnd 2 (fan, rose and cream): With rose, ch 3 (counts as dc). Work 4 dc in the same sc, working over the cream strand. This makes the first Fan. Change to cream on the last dc.
*Ch 2, sk next ch-4 sp, sc in next sc while working over the rose strand, ch 2, sk next ch-4 sp. Change to rose and work a Fan in the next sc, over the cream strand. Change to cream.* Rep from * to * 14 more times.
Ch 2, sk next ch-4 sp, sc in next sc over rose, ch 2, sk last ch-4 sp. Join with a sl st in cream to the top of the beginning ch-3. (16 Fans = 80 dc, 16 sc, 32 ch-2 sps)
Each fan opens upward from a single cream point. Each cream sc forms the low point of a V between two fans.
Rnd 3 (net, cream): Let the rose yarn hang on the WS at the join. Sl st in the next 2 dc to reach the center dc. Ch 1, sc in the same dc.
*Ch 7, sk (2 dc, ch-2 sp, sc, ch-2 sp, 2 dc), sc in the center dc of the next Fan.* Rep from * to * 14 more times. Ch 7, then join to the first sc, working the final yarn-over with rose. (16 sc, 16 ch-7 sps)
Each ch-7 arch runs from the top of one fan to the top of the next. The arch and the V below it together form the open diamond.
Rnd 4 (fan, rose and cream): Ch 3 in rose (counts as dc). Work 4 dc in the same sc, over cream, then change to cream.
*Ch 2, sc in the 4th ch of the next ch-7 arch, over rose, ch 2. Change to rose and work a Fan in the next sc, over cream. Change to cream.* Rep from * to * 14 more times.
Ch 2, sc in the 4th ch of the last arch, over rose, ch 2. Join with a sl st in cream to the top of the beginning ch-3. (16 Fans = 80 dc, 16 sc, 32 ch-2 sps)
Each new fan sits directly over the fan below it, so the fans stack in straight columns.
Rnds 5–15: Rep Rnds 3 and 4 five more times (Rnds 5–14), then work Rnd 3 once more as Rnd 15. On Rnd 15, join with cream only. Cut the rose yarn and weave the end into the last fan.
After Rnd 15: 7 fan rounds, 8 net rounds, 16 sc, 16 ch-7 sps. Height 11.25 in (28.6 cm).
Border
Both edges use the same two-round border. Each edge ends up with 160 sc, which is the same as the 160 foundation ch. Laid flat, each edge has two sides, front and back, with 80 sc and 16 scallops per side.
Border gauge: 20 sc = 4 in (10.2 cm), so 160 sc = 32 in (81.3 cm). The border lies flat against the body without flaring or pulling in.
Bottom Edge
Turn the tube upside down. Join cream in the free loop of the foundation ch below the first sc.
Border Rnd 1: Ch 1, sc in each free loop of the foundation ch around. Join. (160 sc: 80 per side)
Border Rnd 2: Ch 1, sc in the first sc. *Sk 1 sc, 5 dc in next sc, sk 1 sc, sc in next 2 sc.* Rep from * to * 31 more times. On the final repeat, leave out the last sc, because the first sc of the round takes its place. Join. (32 scallops: 16 per side; 160 dc, 64 sc)
Fasten off.
Top Edge
Join cream in the first sc of Rnd 15, which is the center of the marked fan.
Border Rnd 1 (conversion round): Ch 1. *Sc in the sc, then work 9 sc in the next ch-7 sp.* Rep from * to * around. Join. The count is 16 sc (1 in each existing sc) + 144 sc (9 in each of the 16 ch-7 sps) = 160 sc: 80 per side.
Border Rnd 2: Work as Bottom Border Rnd 2. (32 scallops: 16 per side)
Do not fasten off if you are going straight on to the straps. Otherwise, fasten off.
Why the math works: 16 motifs × 10 sts = 160 sts on every edge. The scallop repeat is 5 sts, and 160 ÷ 5 = 32 scallops, so there are exactly 2 scallops per motif. The front has 16 scallops and the back has 16, so the straps can be placed symmetrically.
Straps
Number the top scallops 1–32, starting at the marker and going in the direction you worked the round. Scallops 1–16 are the front and 17–32 are the back. Between every two scallops there is a pair of sc. Mark these sc pairs:
- Front left: between scallops 2 and 3
- Front right: between scallops 14 and 15
- Back right: between scallops 18 and 19
- Back left: between scallops 30 and 31
Strap Row 1: Join cream with a sl st in the front-left sc pair. Ch 70, which is 14 in (35.6 cm). Without twisting the chain, sl st in the back-left sc pair. Turn.
Strap Row 2: Sc in each ch across (70 sc). Sl st in the front-left sc pair. Turn.
Strap Row 3: Sl st in the BLO of each sc across (70 sl st). This gives a corded, braided-looking edge. Sl st in the back-left pair and fasten off.
Rep Strap Rows 1–3 between the front-right and back-right pairs.
To fit the straps, try the top on after Row 1. Add or remove 5 ch for every 1 in (2.5 cm) of change.
Final Blocking
- Weave in all ends, hiding cream ends in cream stitches and rose ends inside the fans.
- Soak the top in cool water for 10 minutes, then gently press out the water. Do not wring it.
- Roll the top in a towel to remove extra moisture.
- Lay it flat on blocking mats, with the side marker on one folded edge.
- Pin it to 16 in (40.6 cm) wide × 12.75 in (32.4 cm) long.
- Open each diamond with your fingers and fluff each fan so it stands up.
- Pin out each scallop point along both edges.
- Lay the straps straight at 14 in (35.6 cm) and pin them lightly.
- Let the top dry completely, then unpin it.
Final Quality-Control Checklist
- 16 fans in every fan round, with all 7 rows stacked in straight columns
- The flat width measures 16 in (40.6 cm) at the bottom, middle and top
- The length is 12.75 in (32.4 cm), not counting the straps
- No rose floats are visible on the RS, and no cream shows through the fans
- 32 scallops on each edge, with 16 on the front and 16 on the back
- The straps are 14 in (35.6 cm) long, untwisted, and placed symmetrically
- All ends are woven in securely
Troubleshooting
The body is spiraling. The foundation was twisted when you joined it. You will need to start again, and this time lay the chain flat before joining.
The fans lean or look flat. Keep the dc tension loose and even, and do not pull the carried cream strand tight inside the fan.
The rose shows through the cream sc. Hold the carried strand at the back of the stitch and keep the rose under gentle tension.
The diamonds pucker. The ch-7 arches are too tight. Chain more loosely or go up 0.5 mm in hook size for net rounds only.
The border ripples. You have more than 160 sc. Count again, putting exactly 9 sc in each ch-7 sp.
The border pulls in. Use a hook 0.5 mm larger for Border Rnd 1.
The straps slip off your shoulders. Move each strap one scallop closer to the center.
Care
Hand wash in cool water with a mild detergent, then dry flat in the blocked shape. Do not hang the top while it is wet, because the weight of the water will stretch the lace.
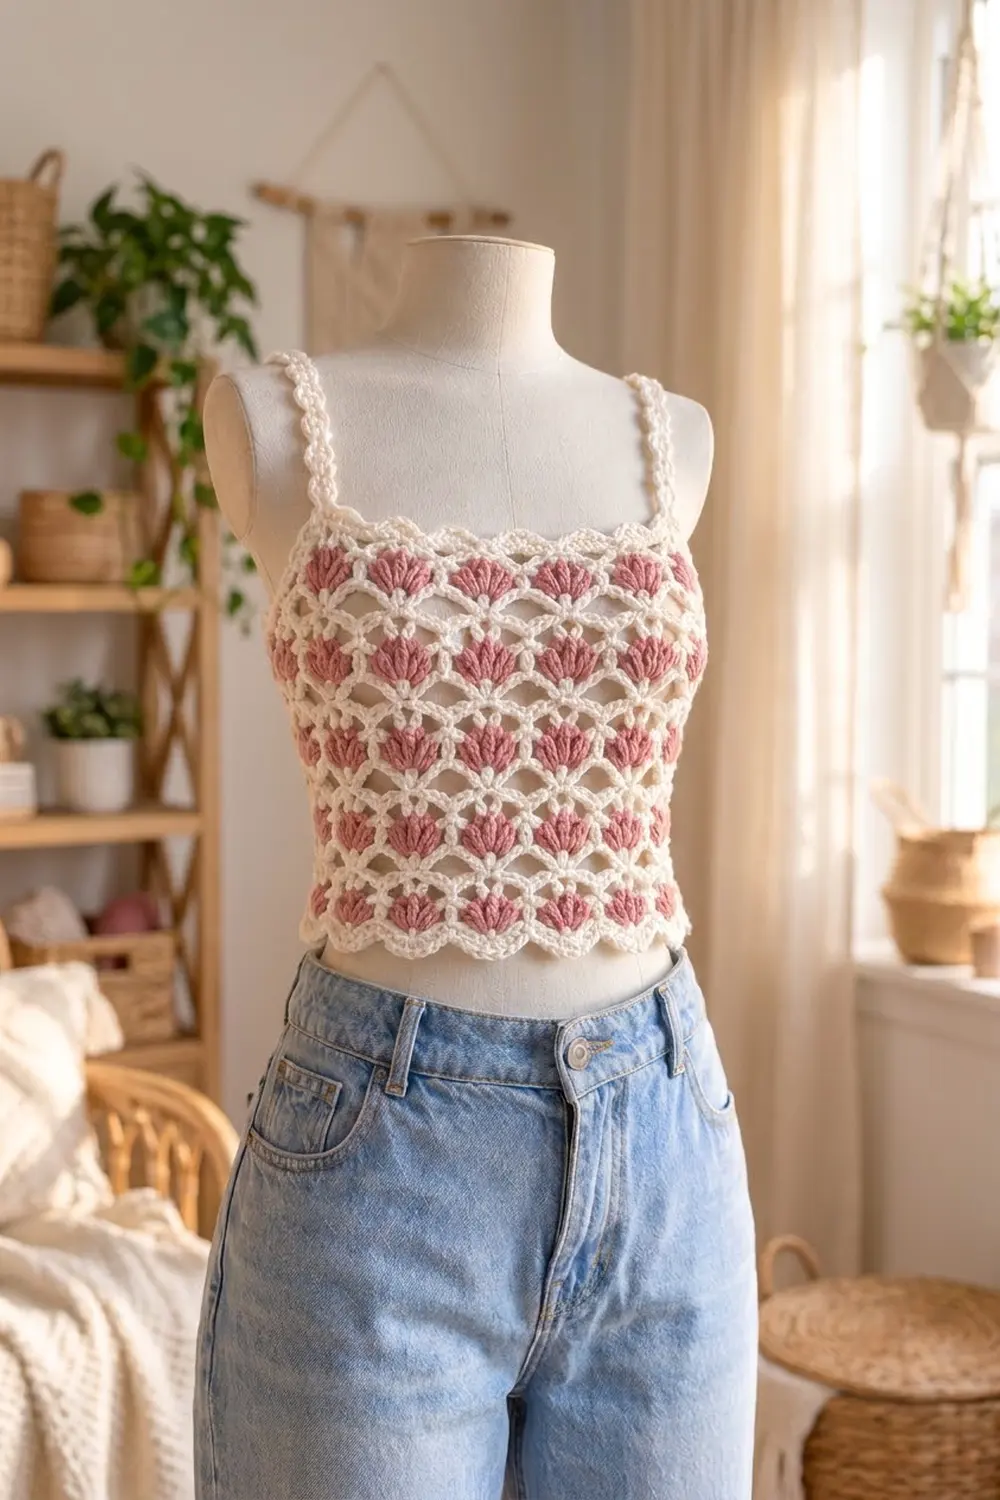
Final Notes
The measurement chain is simple. 10 foundation ch make 1 motif of 2 in (5.1 cm). 16 motifs make 160 ch, which is 32 in (81.3 cm) around. Fifteen rounds at 0.75 in (1.9 cm) each give 11.25 in (28.6 cm) of body. Each border adds 0.75 in (1.9 cm), for a total length of 12.75 in (32.4 cm). Each border round 1 brings both edges back to 160 sc, and the 5-stitch scallop divides into this evenly, giving 32 scallops. If your first three rounds match the gauge, every later measurement will follow.
Happy crocheting!