

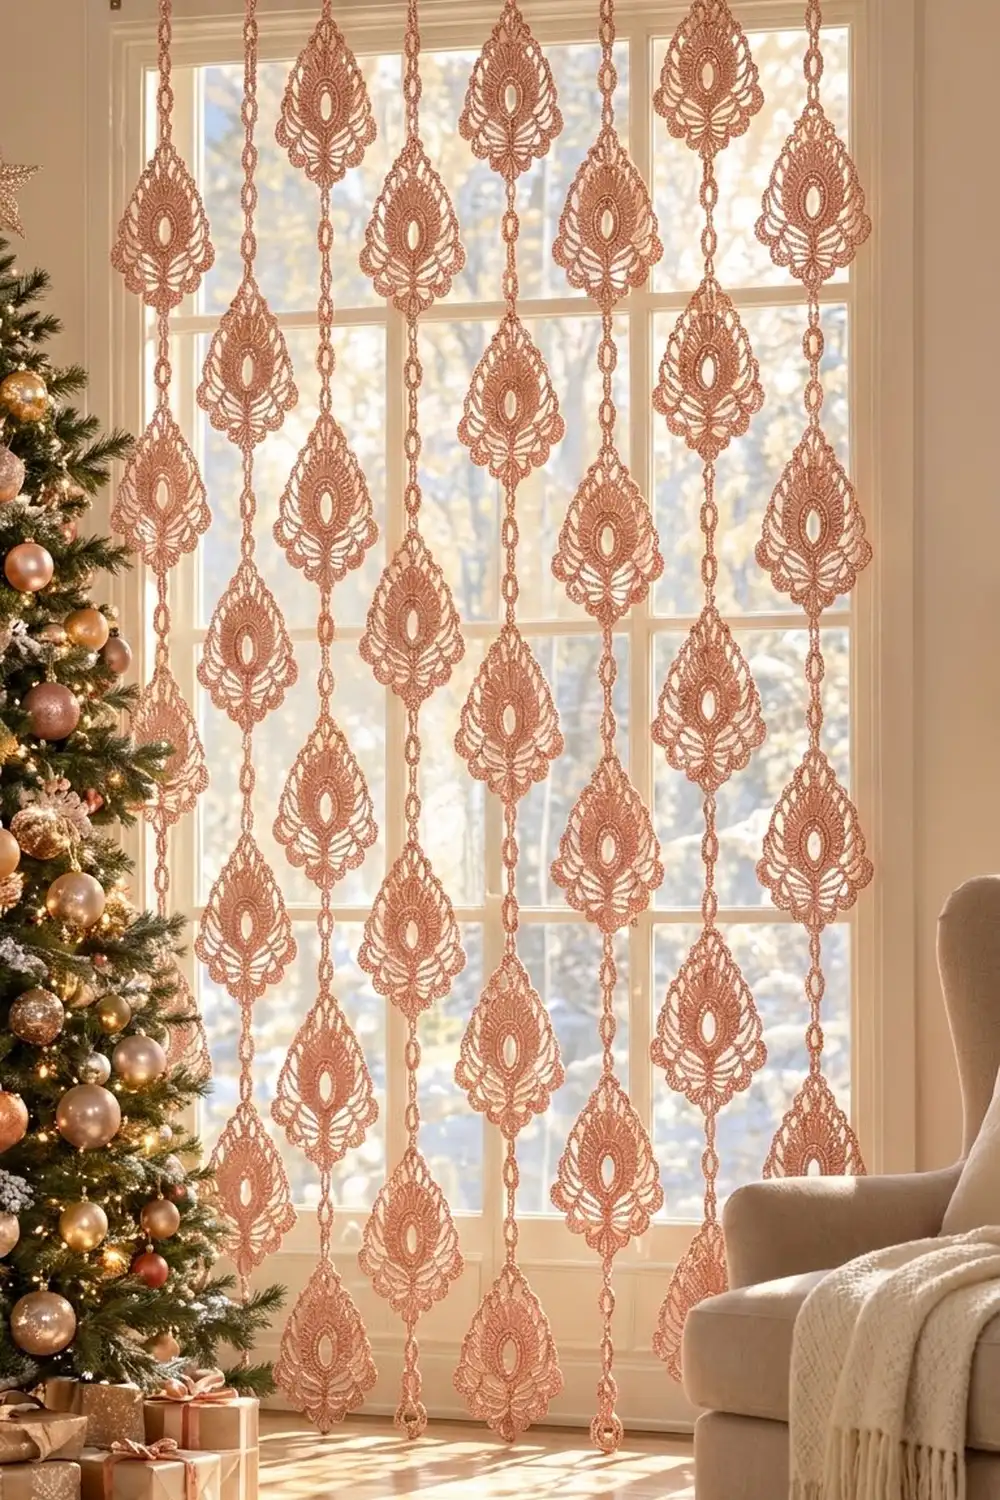
This lace curtain hangs in seven strands of teardrop motifs that look like peacock feathers. Each motif has an open oval “eye,” a sunburst of tall stitches, chain arches that radiate like feather veins, and a scalloped lower edge. Short chains of small rings link the motifs, and the strands hang from a crocheted tube that slides over a curtain rod.
The whole curtain uses one color, a rose-gold peach mercerized cotton thread. The sheen of the cotton makes the lace glow when light comes through a window. The style is light and romantic, and it suits a holiday window or a doorway all year round.
The pattern uses US crochet terms. The finished curtain measures 42.2 in (107.2 cm) wide and 61.7 in (156.7 cm) long from the top of the band to the bottom of the longest strand. Each blocked motif is 5 in (12.7 cm) wide and 7 in (17.8 cm) tall from ring tip to ring tip.
You work each motif in 8 rounds around a center ring. Then you connect the motifs into strands with linked chain rings. Last, you crochet a flat single-crochet band, fold it into a rod tube, and hang the strands from marked stitches along its seam.
Finished Size and Construction
- Finished size: 42.2 in (107.2 cm) wide × 61.7 in (156.7 cm) long
- Skill level: Intermediate
- Terminology: US crochet terms
- Yarn weight: Size 3 mercerized cotton crochet thread (lace/fingering range)
- Hook: 2.25 mm (US B-1)
- Number of pieces: 39 motifs + 1 top band
- Layout: 7 strands. Strands 1, 3, 5 and 7 have 6 motifs each, and strands 2, 4 and 6 have 5 motifs each, staggered by half a step.
- Piece size: body 5 in (12.7 cm) wide × 5.5 in (14.0 cm) tall; 7 in (17.8 cm) tip to tip including both rings
- Size before border: longest strand 60 in (152.4 cm); shorter strands 55 in (139.7 cm)
- Border (top band) depth: 1.7 in (4.3 cm) when folded
Materials
Choose a smooth, tightly twisted mercerized cotton. It keeps the stitches crisp and holds a blocked shape. Avoid fuzzy or splitty fibers, because they blur the chain arches.
- Rose-gold peach thread: about 450 g, which is about 1,190 m (1,300 yd)
This total includes a margin of roughly 15% for gauge swatches, tails and small tension differences. The estimate breaks down like this:
- Each motif uses about 25 yd (22.9 m).
- The links use about 26 yd (23.8 m) in total.
- The band uses about 123 yd (112.5 m).
Tools:
– 2.25 mm (US B-1) hook
– Tapestry needle
– Stitch markers (at least 10)
– Rust-proof pins and a blocking board
– Light spray starch (optional)
– Tape measure
– Curtain rod no thicker than 1 in (2.5 cm)
Abbreviations (US Terms)
- ch: chain
- sl st: slip stitch
- sc: single crochet
- dc: double crochet
- tr: treble crochet
- sp(s): space(s)
- st(s): stitch(es)
- beg: beginning
- rnd: round
Special stitch: Link. Ch 14, then sl st in the 10th ch from the hook. This makes a 10-ch ring on a 4-ch stem. One Link measures about 1 in (2.5 cm) when it hangs.
Linked Link (for the last Link of a connector):
1. Ch 4, then ch 5.
2. Take the hook out of the loop. Pass the loop from front to back through the ring of the next motif, then put the hook back in.
3. Ch 5, then sl st in the first of the last 10 ch.
The ring now passes through the next motif’s ring.
Gauge and Checkpoints
Make one motif and block it before you start the rest.
- Gauge: Rnds 1–4 measure 3 in (7.6 cm) across, laid flat and unblocked.
- Band gauge: 5 sc and 6 rows = 1 in (2.5 cm).
Checkpoints:
– After Rnd 2: 2 in (5.1 cm) across
– After Rnd 4: 3 in (7.6 cm) across
– After Rnd 6: 4.5 in (11.4 cm) across
– After blocking: body 5 in (12.7 cm) × 5.5 in (14.0 cm), and 7 in (17.8 cm) tip to tip
If Rnd 4 is more than 0.25 in (0.6 cm) too big, go down to a 2.0 mm hook. If it is too small, go up to a 2.5 mm hook. The motif size controls the strand length, so check gauge before you make all 39.
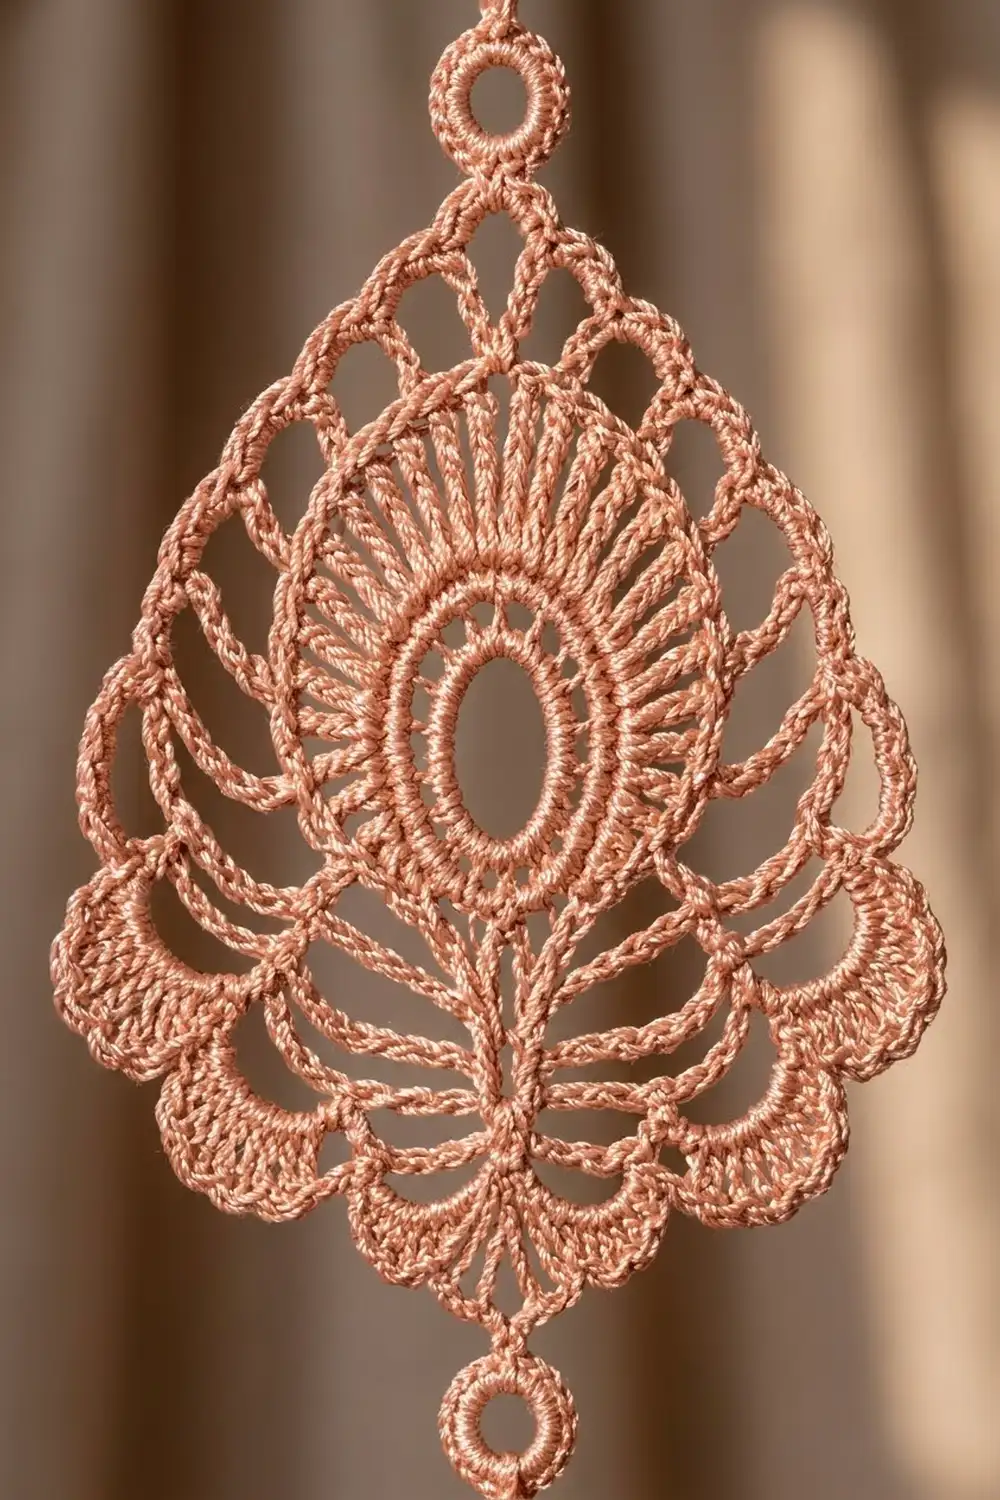
Motif (Make 39)
Note: The Rnd 1 join marks the bottom center of the motif. Keep every join stacked in line with it, and place a marker there.
Rnd 1: Ch 20 and sl st in the first ch to form a ring. Ch 1, then work 40 sc in the ring. Join with a sl st to the first sc. (40 sc)
Rnd 2:
– Ch 4 (counts as dc + ch 1).
– Dc in next sc, ch 1; repeat from * 39 times.
– Join to the 3rd ch of the beg ch-4.
(40 dc, 40 ch-1 sps)
Rnd 3:
– Ch 5 (counts as tr + ch 1).
– Tr in next dc, ch 1; repeat from * 39 times.
– Join to the 4th ch of the beg ch-5.
(40 tr, 40 ch-1 sps) These are the sunburst rays.
Rnd 4: Ch 1. Sc in tr, sc in ch-1 sp; repeat from * 40 times. Join. (80 sc) This is the solid outline around the sunburst.
Rnd 5:
– Ch 1, sc in the first sc.
– Ch 5, skip 3 sc, sc in next sc; repeat from * 19 times.
– Ch 5, skip 3 sc, and join to the first sc.
(20 sc, 20 ch-5 arches)
Check: 20 repeats × 4 sts = 80 sts. The first sc sits at bottom center, and the 11th sc sits exactly at top center.
Rnd 6:
– Sl st in the first 3 ch to reach the center of arch 1. Ch 1, sc in the same arch.
– Ch 7, sc in next arch; repeat from * 19 times.
– Ch 7 and join.
(20 sc, 20 ch-7 arches)
Number the sc in Rnd 6 as 1 to 20. Sc 10 is at top center, and sc 20 is at bottom center.
Rnd 7 (frame and rings):
1. Sl st in the first 4 ch to reach the center of arch 1. Ch 1, sc in the same arch.
2. [Ch 9, sc in next arch] 5 times.
3. [Ch 7, sc in next arch] 4 times. You are now at arch 10, top center.
4. Top ring: Ch 14, sl st in the 10th ch from the hook, ch 4, then sc again in the same arch.
5. [Ch 7, sc in next arch] 4 times.
6. [Ch 9, sc in next arch] 6 times. You are now at arch 20, bottom center.
7. Bottom ring: Ch 8, sl st in the 6th ch from the hook, ch 2, then sc again in the same arch.
8. Ch 9 and join to the first sc.
(22 sc, 12 ch-9 arches, 8 ch-7 arches, 2 rings)
Number the Rnd 7 arches 1–20 in working order. Arches 1–5 and 14–20 are ch-9, and arches 6–13 are ch-7. The pattern is mirror-symmetric around the line from top to bottom.
Rnd 8 (edging):
1. Sl st in arch 1. Ch 3 (counts as dc), then 10 dc in the same arch to make a scallop.
2. Arch 2: sc, ch 3, sc.
3. Arch 3: 11 dc.
4. Arch 4: sc, ch 3, sc.
5. Arch 5: 11 dc.
6. Arches 6–9: (3 sc, ch 3, 3 sc) in each.
7. Top point: 4 sc over the first ch-4 stem, 18 sc in the top ring, 4 sc over the second ch-4 stem.
8. Arches 10–13: (3 sc, ch 3, 3 sc) in each.
9. Arch 14: 11 dc.
10. Arch 15: sc, ch 3, sc.
11. Arch 16: 11 dc.
12. Arch 17: sc, ch 3, sc.
13. Arch 18: 11 dc.
14. Arch 19: 5 sc.
15. Bottom point: 2 sc over the first ch-2 stem, 12 sc in the bottom ring, 2 sc over the second ch-2 stem.
16. Arch 20: 5 sc.
17. Join to the top of the beg ch-3 and fasten off.
(66 dc in 6 scallops, 108 sc, 12 ch-3 picots)
Scallops in arches 1, 3, 5, 14, 16 and 18 give three fans on each side of the lower edge. The picot arches give the lacy upper edge.
Weave in the ends invisibly along Rnd 4.
Make All Pieces
Make 39 motifs, all in rose-gold peach:
– 24 motifs for strands 1, 3, 5 and 7
– 15 motifs for strands 2, 4 and 6
Block every motif (see Final Blocking) before you join them. In the grid below, the strands run left to right, M means a motif, and the heights are measured below the band seam.
ROW 1  (3–10 in):   M  -  M  -  M  -  M
ROW 2  (8–15 in):   -  M  -  M  -  M  -
ROW 3  (13–20 in):  M  -  M  -  M  -  M
ROW 4  (18–25 in):  -  M  -  M  -  M  -
ROW 5  (23–30 in):  M  -  M  -  M  -  M
ROW 6  (28–35 in):  -  M  -  M  -  M  -
ROW 7  (33–40 in):  M  -  M  -  M  -  M
ROW 8  (38–45 in):  -  M  -  M  -  M  -
ROW 9  (43–50 in):  M  -  M  -  M  -  M
ROW 10 (48–55 in):  -  M  -  M  -  M  -
ROW 11 (53–60 in):  M  -  M  -  M  -  M
Joining
Method: Connect each pair of motifs with 3 Links. That makes a 3 in (7.6 cm) connector.
Stitch-to-stitch logic:
1. Join the thread with a sl st through the covered bottom ring of motif A.
2. Work 2 Links. Turn the strand over after each Link so the rings alternate left and right.
3. Work a Linked Link through the covered top ring of motif B. Fasten off.
Each motif is 7 in (17.8 cm) from tip to tip. With one 3 in (7.6 cm) connector, the step from one motif to the next is 10 in (25.4 cm).
Strands:
– Strands 1, 3, 5 and 7: 6 motifs and 5 connectors = 42 + 15 = 57 in (144.8 cm). A 3-Link hanger adds 3 in (7.6 cm), for 60 in (152.4 cm) in total.
– Strands 2, 4 and 6: 5 motifs and 4 connectors = 35 + 12 = 47 in (119.4 cm). An 8-Link hanger adds 8 in (20.3 cm), for 55 in (139.7 cm) in total.
The 5 in (12.7 cm) longer hanger lowers the even strands by half a step, which creates the stagger.
Tension: Keep every chain the same size. Tight Links shorten a strand, and loose ones sag. Lay a finished strand next to the tape measure after every second connector.
Size checkpoint: Hang each strand. Odd strands should measure 60 in (152.4 cm) and even strands 55 in (139.7 cm), give or take 0.5 in (1.3 cm).
Leave each hanger’s top Link open for now. You will join it to the band after you finish the band.
Border: Top Band
Border gauge: 5 sc and 6 rows = 1 in (2.5 cm).
Row 1: Ch 212. Sc in the 2nd ch from the hook and in each ch across. (211 sc)
Rows 2–20: Ch 1, turn, sc in each sc across. (211 sc per row) The flat band now measures 42.2 in (107.2 cm) × 3.3 in (8.4 cm).
Row 21 (seam): Fold the band in half lengthwise so Row 20 lies on the foundation chain. Ch 1. Sl st through each Row 20 st and the matching foundation loop. (211 sl st) Fasten off. The tube is now 1.7 in (4.3 cm) deep and fits a rod up to 1 in (2.5 cm) thick.
Strand points: Place markers at seam stitches 16, 46, 76, 106, 136, 166 and 196.
Attach the hangers in order, strands 1–7. To attach each one, finish its top Link as a Linked Link that passes around the marked seam stitch.
Why the math works:
– There are 15 margin sts on each side, plus 7 strand sts, plus 6 gaps of 29 sts. That gives 15 + 7 + 174 + 15 = 211 sts.
– Stitch 106 is the exact center stitch, so strand 4 hangs at the center.
– Strand points are 30 sts apart, which is 6 in (15.2 cm).
– Each motif is 5 in (12.7 cm) wide, so neighboring strands keep a 1 in (2.5 cm) gap.
– The 15-st margins are 3 in (7.6 cm) each, so the outer motifs fit inside the band’s width.
Final Blocking
- Soak each motif in cool water for 10 minutes. Press out the water in a towel without wringing.
- Draw a template on paper: a teardrop 5 in (12.7 cm) wide × 5.5 in (14.0 cm) tall, plus 0.75 in (1.9 cm) for each ring.
- Pin the top ring and the bottom ring first, on the center line.
- Pin the center opening into an oval 1 in (2.5 cm) wide × 1.5 in (3.8 cm) tall.
- Pin each of the six scallops and each picot outward, keeping the two sides mirrored.
- Mist with light starch if you like, then let the motif dry completely.
- After joining, hang the curtain and steam it lightly from 4 in (10.2 cm) away so the Links settle.
Final Quality-Control Checklist
- [ ] All 39 motifs measure 5 in (12.7 cm) wide and 7 in (17.8 cm) tip to tip.
- [ ] Every motif has 6 scallops of 11 dc each.
- [ ] Rings are fully covered: 18 sc on top rings, 12 sc on bottom rings.
- [ ] Every connector has exactly 3 Links.
- [ ] Odd strands measure 60 in (152.4 cm) and even strands 55 in (139.7 cm).
- [ ] The band has 211 sts, and the strands hang from sts 16, 46, 76, 106, 136, 166 and 196.
- [ ] All ends are woven in and trimmed.
Troubleshooting
- Motif cups: Rnd 6 or Rnd 7 chains are too short. Chain more loosely, or go up a hook size for those rounds only.
- Motif ruffles: The chains are too loose. Go down a hook size for Rnds 5–7.
- Lopsided teardrop: A Rnd 7 arch has the wrong length. Recount the 5 / 4 / 4 / 6 arch groups.
- Strand too long: Your Links are loose. Rework the connectors with tighter chains.
- Stagger looks uneven: An even strand’s hanger is not 8 Links. Count again.
- Band too wide: Your sc gauge is loose. Rework the band with a 2.0 mm hook.
Care
Hand wash in cool water with a mild soap. Pin each motif flat to dry, and re-block if it loses its shape.
Final Notes
Here is the measurement chain in short:
– Rnd 4 measures 3 in (7.6 cm), so the blocked motif is 5 in (12.7 cm) wide and 7 in (17.8 cm) tall.
– 3-Link connectors make a 10 in (25.4 cm) step from motif to motif.
– Strands are 60 in (152.4 cm) and 55 in (139.7 cm) long.
– They hang 6 in (15.2 cm) apart from a 211-stitch band that is 42.2 in (107.2 cm) wide.
The finished curtain measures 42.2 in (107.2 cm) × 61.7 in (156.7 cm). If you check gauge on the first motif, every later measurement will come out right.
Happy crocheting!