

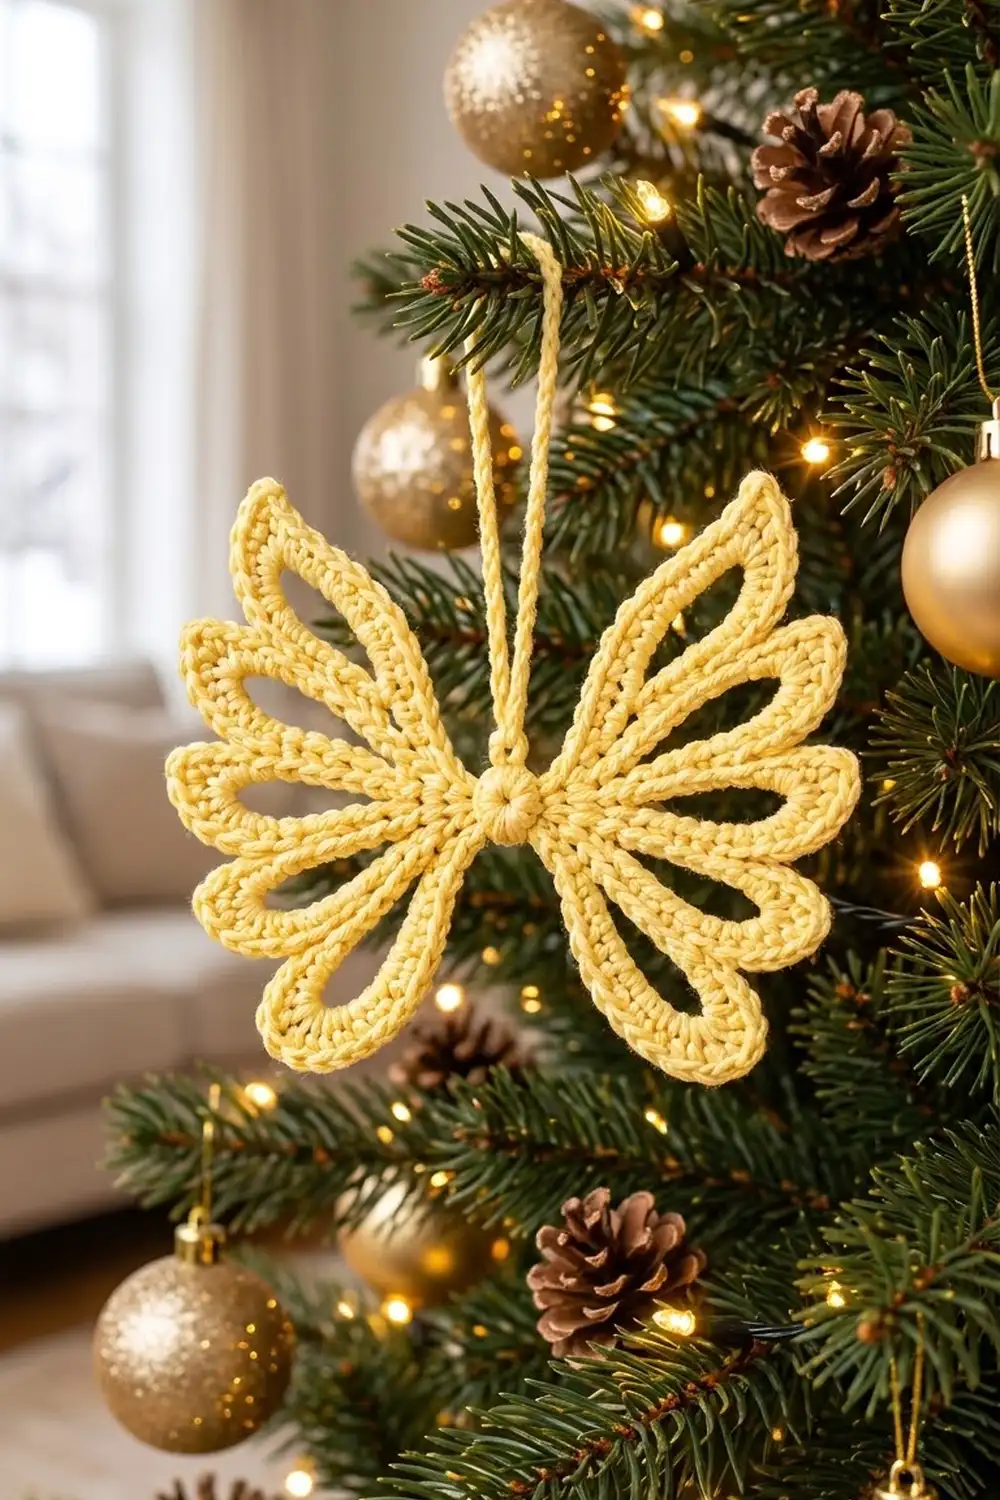
This angel wing ornament is light and lacy. A pair of open, feather-like wings fans out from a small round center, with a slim hanging loop at the top. Each wing has four open teardrop loops, with the longest at the top and the shortest at the bottom, so the shape reads as a wing at a glance.
The sample is worked in one soft butter-yellow cotton, which looks warm and golden on a lit tree. It also works well in white, cream, metallic gold, or pale silver for a more classic angel look.
The pattern uses US crochet terms throughout. The finished ornament is about 6 in (15.2 cm) wide and 4 in (10.2 cm) tall, plus a 3 in (7.6 cm) hanging loop.
Construction is simple and has no sewing. You work a small center ring, then make eight chain loops around it and cover each one with single crochet. A single edging round outlines both wings, and a covered hanging loop finishes the top. The whole ornament is one continuous piece.
Finished Size and Construction
- Finished size: 6 in (15.2 cm) wide × 4 in (10.2 cm) tall, not counting the hanging loop
- Hanging loop: 3 in (7.6 cm) tall
- Skill level: Easy to intermediate
- Terminology: US crochet terms
- Yarn weight: DK (#3), cotton or cotton blend
- Hook: 3.5 mm (E-4)
- Number of pieces: 1 (one single ornament)
- Layout: Center ring with 4 loops per wing (8 loops total), symmetrical left and right
- Piece size before edging (after Round 2): about 5.6 in (14.2 cm) × 3.6 in (9.1 cm)
- Edging depth: 1 round of sc, about 0.2 in (0.5 cm)
Materials
Yarn: Use a smooth, mercerized or combed cotton DK. Cotton gives crisp stitch definition and holds the loop shapes well. Acrylic works too, but it is softer and may need light starch.
- Butter Yellow: 15 g, about 36 m (39 yd)
This quantity includes a margin of about 20% for gauge differences and a gauge swatch. One 50 g ball makes three ornaments with yarn to spare.
Tools:
– 3.5 mm (E-4) crochet hook
– Tapestry needle
– Scissors
– 2 locking stitch markers
– Blocking mat and rust-proof pins
– Spray bottle with water
– Optional: fabric stiffener or light spray starch
Abbreviations (US Terms)
- ch – chain
- sl st – slip stitch
- sc – single crochet
- st(s) – stitch(es)
- sk – skip
- MR – magic ring
- ch-2 sp – chain-2 space
Special stitch – Covered Loop: Ch the stated number, then sl st into the same base st to close the chain into a ring. Ch 1 (does not count), then work 1 sc into each ch of the ring, all the way around. Sl st into the same base st again. The finished loop has the same number of sc as the chains you made, with an open center.
Gauge and Checkpoints
Gauge: 5 sc = 1 in (2.5 cm) when you work them into a chain. Gauge matters because each wing loop’s length comes straight from its stitch count.
Test one piece first. Before you make the full ornament, work Round 1 and only the first loop (Loop A, 28 sts). Lay it flat without stretching it and measure.
Checkpoints:
– After Round 1: the center ring is about 0.6 in (1.5 cm) across.
– After Loop A (Round 2): it is about 2.8 in (7.1 cm) long from the center edge to the tip.
– After Round 2 (all loops): the piece is about 5.6 in (14.2 cm) × 3.6 in (9.1 cm).
– After Round 3 (edging): the piece is about 6 in (15.2 cm) × 4 in (10.2 cm).
Too big? If Loop A is longer than 3 in (7.6 cm), go down to a 3.25 mm (D-3) hook. Too small? If it is shorter than 2.6 in (6.6 cm), go up to a 3.75 mm (F-5) hook.
Keep the chains for each loop even. Tight chains make the loops curl, and loose chains make them floppy.
Main Pattern: Center and Wing Loops
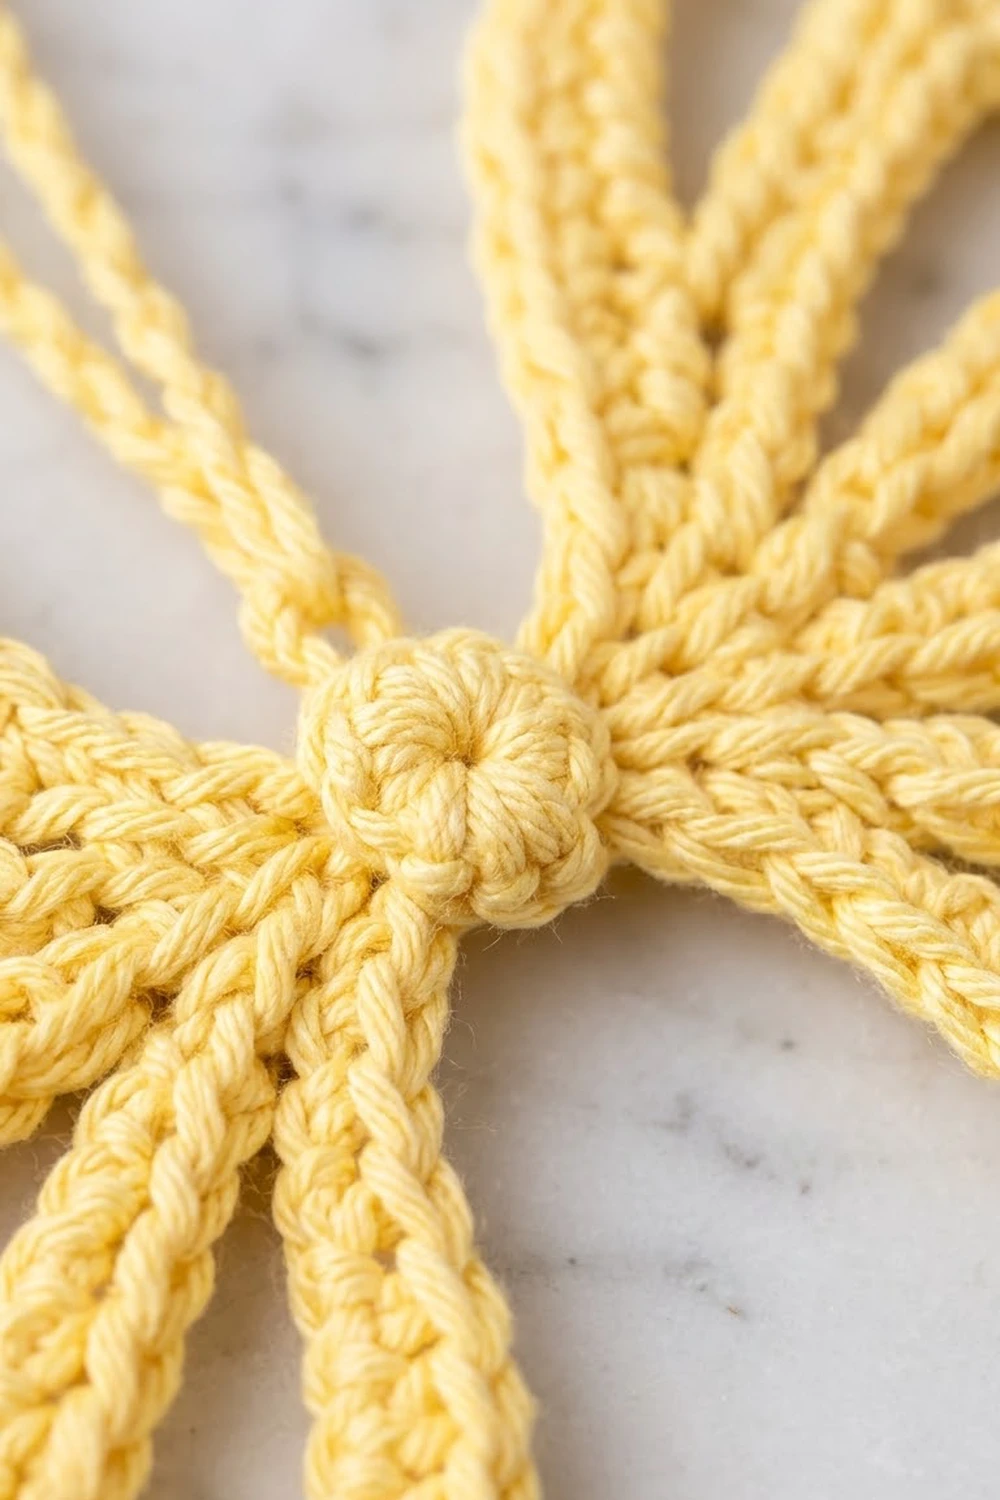
Round 1 – Center Ring
Make a MR.
Ch 1, then work 10 sc into the ring. Pull the tail tight to close the center fully. Sl st into the first sc to join. (10 sts)
Number the sts 1 to 10 in your working direction:
- St 1 = top center. Place a marker here for the hanging loop.
- Sts 2–5 = right wing anchors.
- St 6 = bottom center. Place a marker here.
- Sts 7–10 = left wing anchors.
Pull the tail firmly. That gives the center its raised, button-like look.
Round 2 – Wing Loops
Every loop below is a Covered Loop (see Special Stitch). Each loop begins and ends at its own anchor st. Between loops, you move to the next anchor with 1 sl st.
Right wing:
- Sl st in st 2. Loop A: ch 28, close and cover it. (28 sc)
- Sl st in st 3. Loop B: ch 26, close and cover it. (26 sc)
- Sl st in st 4. Loop C: ch 22, close and cover it. (22 sc)
- Sl st in st 5. Loop D: ch 18, close and cover it. (18 sc)
Sl st in st 6 (bottom center). This st gets no loop. It creates the small gap between the wings at the bottom.
Left wing (mirrored):
- Sl st in st 7. Loop D: ch 18, close and cover it. (18 sc)
- Sl st in st 8. Loop C: ch 22, close and cover it. (22 sc)
- Sl st in st 9. Loop B: ch 26, close and cover it. (26 sc)
- Sl st in st 10. Loop A: ch 28, close and cover it. (28 sc)
Sl st in st 1 (top center). Do not fasten off.
Stitch count after Round 2:
– Each wing: 28 + 26 + 22 + 18 = 94 sc
– Both wings: 188 sc in loops, plus the 10 center sts
Shaping tip: As you finish each loop, pinch it flat so it points in the right direction. On each wing, Loop A angles upward and outward, Loop B points almost straight out, and Loops C and D angle downward. The loops overlap slightly at the center and then fan apart.
Checkpoint: Each loop’s flattened length should be about half its stitch count divided by 5:
| Loop | Stitches | Flattened length |
|---|---|---|
| A | 28 | 2.8 in (7.1 cm) |
| B | 26 | 2.6 in (6.6 cm) |
| C | 22 | 2.2 in (5.6 cm) |
| D | 18 | 1.8 in (4.6 cm) |
Border: Wing Edging and Hanging Loop
The edging round runs once around the outside of every loop. It thickens the frames and defines the pointed top tips.
Border gauge: same as the main gauge, 5 sc = 1 in (2.5 cm). One round adds about 0.2 in (0.5 cm) all around.
Numbering each loop: Number every loop’s sts 1 to N in your working direction. St 1 and st N sit at the base, against the center ring. You skip them in this round, so the base of each loop stays tight and the gaps between loops stay open.
Round 3 – Edging
Ch 1. Sc in st 1 of Round 1 (top center). (1 sc)
Right wing:
– Loop A (pointed tip): Sk st 1. Sc in sts 2–14 (13 sc), ch 2, sc in sts 15–27 (13 sc). Sk st 28. (26 sc + 1 ch-2 sp)
– Loop B: Sk st 1. Sc in sts 2–12, 2 sc in st 13, 2 sc in st 14, sc in sts 15–25. Sk st 26. (26 sc)
– Loop C: Sk st 1. Sc in sts 2–10, 2 sc in st 11, 2 sc in st 12, sc in sts 13–21. Sk st 22. (22 sc)
– Loop D: Sk st 1. Sc in sts 2–8, 2 sc in st 9, 2 sc in st 10, sc in sts 11–17. Sk st 18. (18 sc)
Sc in st 6 of Round 1 (bottom center). (1 sc)
Left wing: Work Loop D, then Loop C, then Loop B, then Loop A exactly as on the right wing.
Sl st into the first sc to join.
Stitch count after Round 3:
– Each wing: 26 + 26 + 22 + 18 = 92 sc, plus 1 ch-2 tip
– Center: 1 sc at the top + 1 sc at the bottom = 2 sc
– Total: 92 + 92 + 2 = 186 sc, plus 2 ch-2 sps
Why the math works:
– Rounded loops (B, C, D): you work into sts 2 through N−1, which is N−2 sts. Then you add 1 extra sc in each of the 2 tip sts. So N−2 + 2 = N, and the loop ends with the same count it started with. The 2 skipped base sts are exactly replaced by 2 tip increases. That keeps the base snug while the tip gets a little rounder.
– Loop A: you also work into N−2 = 26 sts. Instead of adding 2 sc at the tip, you place a ch-2 between the two center sts (14 and 15). The chain gives a clean point without bunching. Each side of the point has 13 sc, so the tip sits exactly at the center of the loop.
Hanging Loop
From the joining sl st, ch 30. Sl st into the top center sc to close the chain into a ring.
Ch 1, then work 1 sc into each ch around. (30 sc) Sl st into the top center sc.
Flattened, the loop is 30 ÷ 5 ÷ 2 = 3 in (7.6 cm) tall. Fasten off, leaving a 6 in (15.2 cm) tail.
Weave in both ends through the back of the center ring. The extra yarn also helps the center sit slightly raised.
Final Blocking
- Lightly mist the ornament with water until it feels damp, not soaked. If you use stiffener, apply it now and blot off the excess.
- Lay it right side up on the blocking mat.
- Pin the center first, so the top and bottom center sts line up on a vertical line.
- Pin the tip of each Loop A, up and out. The two tips should be 6 in (15.2 cm) apart.
- Fan out Loops B, C, and D below each Loop A. Pin each tip so the gaps between neighboring loops are even. The gaps should be about 0.25 in (0.6 cm) wide at the tips and should close toward the center.
- Check the height: about 4 in (10.2 cm) from the highest wing tip to the lowest.
- Put a pin inside each open loop to hold it open as a smooth teardrop.
- Lay the hanging loop straight up.
- Let the ornament dry completely, usually 12–24 hours, before you unpin it.
Final Quality-Control Checklist
- Center ring is fully closed with no hole, and is slightly raised.
- Round 1 has 10 sts. Top center (st 1) and bottom center (st 6) have no wing loops.
- Each wing has 4 loops of 28, 26, 22, and 18 sts.
- Loop A has a clear point at the ch-2 tip on both wings.
- Loops B, C, and D have smooth, rounded tips.
- Both wings mirror each other in loop size and angle.
- All loops are open, with no twisted chains.
- After Round 3, each wing has 92 sc plus 1 ch-2 sp, for 186 sc in total.
- Finished size is 6 in (15.2 cm) × 4 in (10.2 cm), within 0.25 in (0.6 cm).
- Hanging loop is 3 in (7.6 cm) tall and centered at the top.
- All ends are woven in, with nothing showing on the front.
Troubleshooting
The loops twist into a figure 8. You twisted the chain before closing it. Before you sl st into the anchor st, check that the chain lies flat without twisting.
The loops curl or cup. Your chains are tighter than your sc. Make the chains slightly looser, or use a hook one size larger for the chains only.
The wings look uneven. Count the chains for each loop again. A difference of even 2 chains changes the length by 0.2 in (0.5 cm).
The gaps between loops are too wide at the center. Make sure you skipped only st 1 and st N of each loop in Round 3. Do not skip extra sts.
The Loop A tip is blunt. Check that the ch-2 falls exactly between sts 14 and 15. Pin the point firmly while blocking.
There is a hole at the center. Pull the MR tail tight before joining Round 1. Then use the tail to stitch the hole closed from the back.
The ornament is floppy. Block it with fabric stiffener or spray starch, or switch to a firm mercerized cotton.
Care
Hand wash cold with mild soap, press out the water in a towel, and lay flat to dry, pinning back into shape if needed. If you used stiffener, reapply it after washing.
Final Notes
The size of this ornament comes from one simple chain of measurements:
- The 10-st center ring measures 0.6 in (1.5 cm).
- The loops of 28, 26, 22, and 18 sts flatten to 2.8 in (7.1 cm), 2.6 in (6.6 cm), 2.2 in (5.6 cm), and 1.8 in (4.6 cm).
- After Round 2, the piece measures 5.6 in (14.2 cm) × 3.6 in (9.1 cm).
- The edging round keeps every loop’s stitch count the same and adds 0.2 in (0.5 cm) all around, for a finished size of 6 in (15.2 cm) × 4 in (10.2 cm).
- The 30-sc hanging loop stands 3 in (7.6 cm) tall.
If your test loop matches gauge, every later stage will match too. Make one for the top of a gift, a handful for the tree, or a matching set in white and gold.
Happy crocheting!