

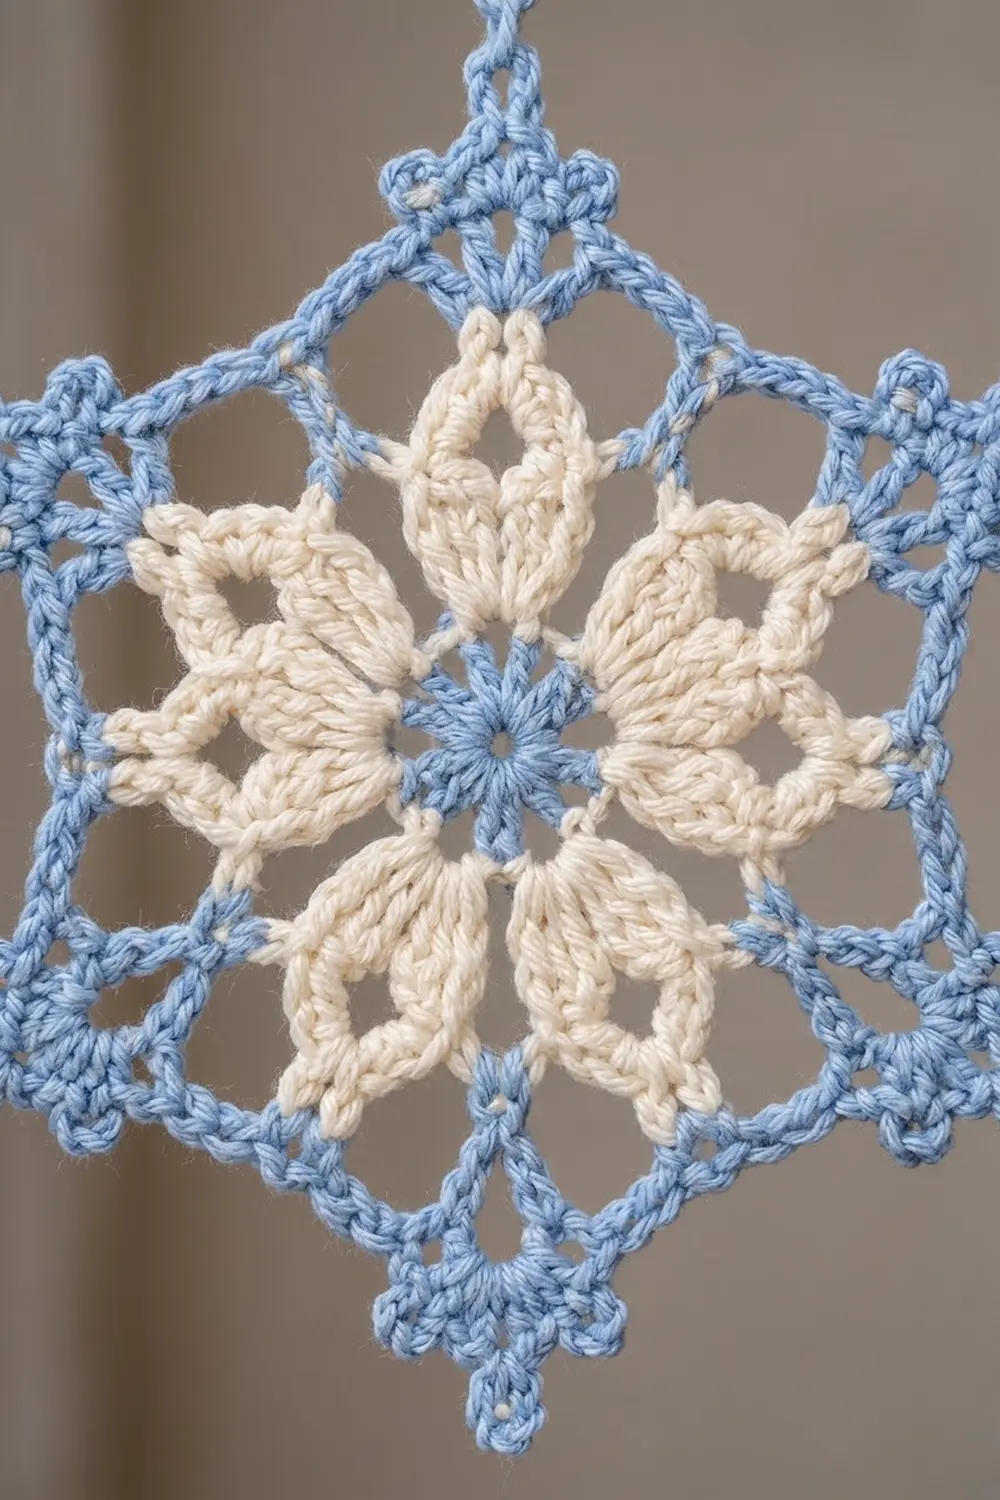
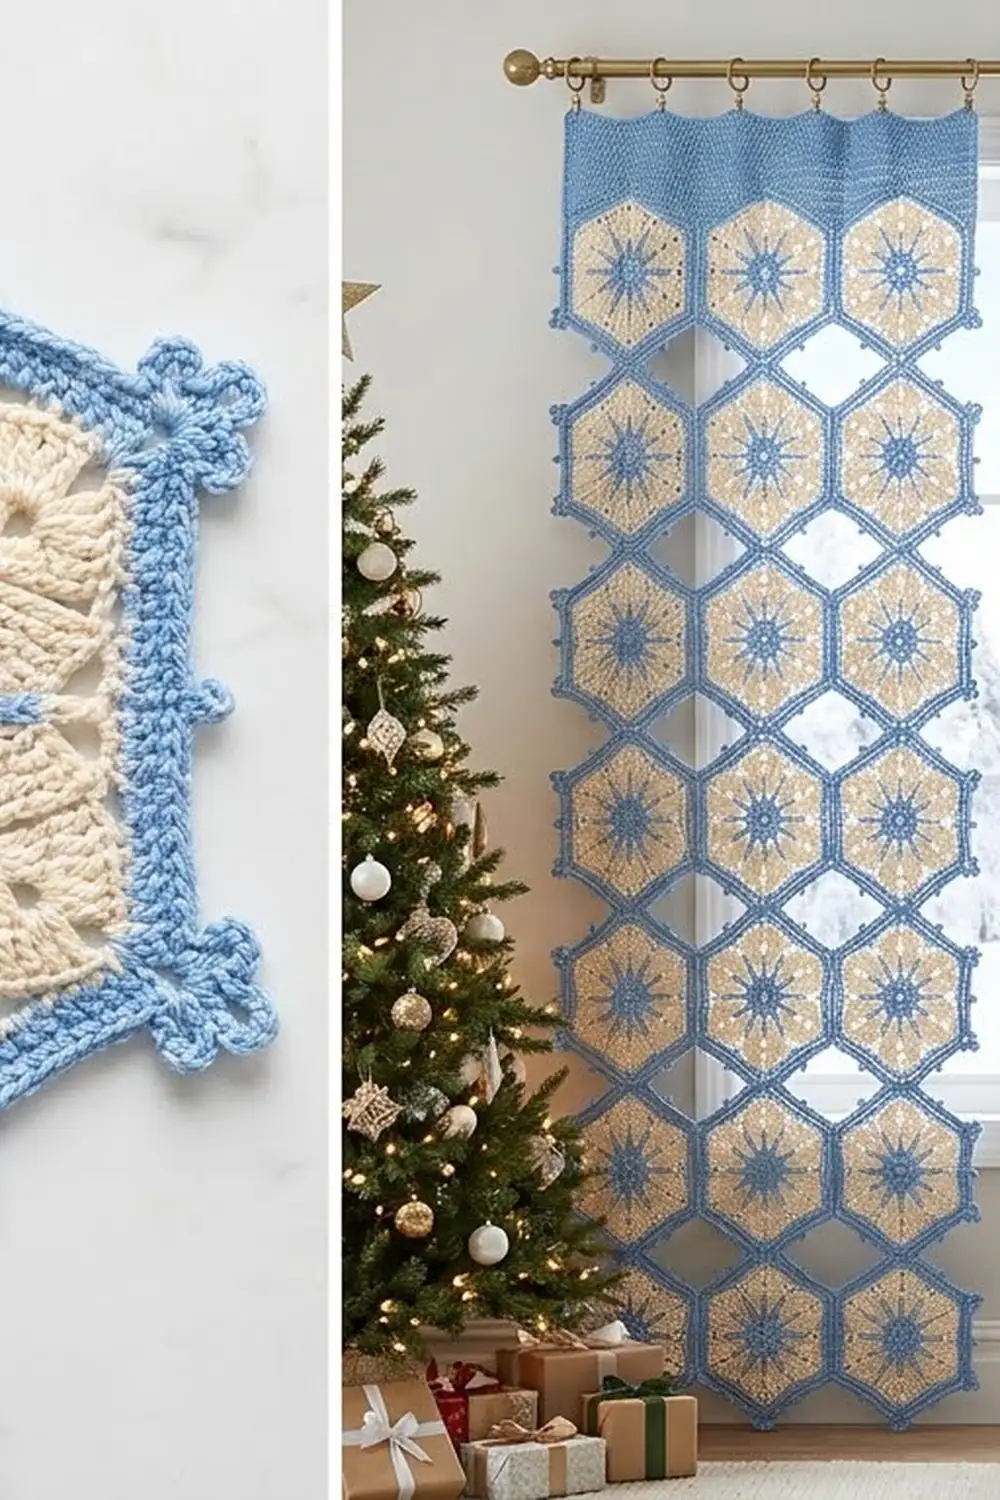
This lacy curtain is made from 50 hexagonal snowflake motifs in powder blue and cream. Each motif has a small blue star at the center, six full cream petals and a blue frame with picot clusters at the corners. When the curtain hangs in a window, light comes through the open spaces and the gaps between the motifs, and the pattern reads like frost on glass.
The colors are kept to two soft shades, so the curtain works for winter decorating and still looks right after the holidays. Cotton gives clear stitch definition and hangs well without stretching out of shape.
This pattern uses US crochet terms. The finished curtain measures 22.5 in (57.2 cm) wide and 60.6 in (153.9 cm) long, including the heading band.
You make each motif in the round and join the motifs as you go on the last round, at the corner clusters and side picots. After all 50 are joined, a graded heading band fills the zigzag along the top and gives you a straight, firm edge for clip rings.
Finished Size and Construction
- Finished size: 22.5 in × 60.6 in (57.2 cm × 153.9 cm)
- Skill level: Intermediate
- Terminology: US
- Yarn weight: DK / light (3), cotton
- Hook: 3.5 mm (E-4)
- Number of pieces: 50 motifs
- Layout: 5 motifs across × 10 motifs down, in straight columns, with a point at the top and bottom of each motif
- Motif size: 4.5 in (11.4 cm) across the flats; 5.2 in (13.2 cm) point to point on the body; 6.0 in (15.2 cm) from trefoil tip to trefoil tip
- Size before border: 22.5 in × 59.6 in (57.2 cm × 151.4 cm)
- Border depth: heading band only, 1.0 in (2.5 cm) above the motif peaks and 2.3 in (5.8 cm) at the valleys
Materials
Use a smooth mercerized or combed cotton in DK weight, about 115 m per 50 g. Lacework needs a yarn that holds its shape, and fuzzy or very soft acrylic will blur the picots.
- Powder blue: 300 g (690 m), 6 balls
- Cream: 200 g (460 m), 4 balls
These amounts include about 15% extra for gauge differences and swatching.
Tools
- 3.5 mm (E-4) crochet hook
- Tapestry needle
- Stitch markers
- Rust-proof pins and blocking mats
- Spray bottle
- Measuring tape
- Curtain rod with 10 to 12 clip rings
Abbreviations (US Terms)
- ch – chain
- sl st – slip stitch
- sc – single crochet
- hdc – half double crochet
- dc – double crochet
- tr – treble crochet
- dtr – double treble crochet (yo 3 times, then work off the loops in pairs)
- sp – space
- st(s) – stitch(es)
- RS – right side
Special stitches
- Picot: ch 3, sl st in the 3rd ch from the hook.
- Joined picot: ch 1, sl st in the matching picot of the finished motif, ch 1, sl st in the base of these chains.
- Trefoil (tref): ch 1 (this is the base ch), then [ch 3, sl st in the base ch] 3 times. This makes three small loops that share one base.
- Joined trefoil loop: in place of one “ch 3, sl st in base ch”, work ch 1, sl st in the matching loop of the finished motif, ch 1, sl st in the base ch.
- Standing dtr: start with a slip knot on the hook, then work a dtr as usual.
Gauge and Checkpoints
Make one complete motif before you start the rest, and block it. Your measurements should match these:
- After Rnd 2: 1.5 in (3.8 cm) across
- After Rnd 4: 3.25 in (8.3 cm) from petal tip to petal tip
- After Rnd 6: 4.5 in (11.4 cm) across the flats and 5.2 in (13.2 cm) point to point on the body
If your motif is more than 0.25 in (0.6 cm) too big, go down to a 3.25 mm hook. If it is too small, go up to a 3.75 mm hook. Small differences add up over 5 columns and 10 rows, so fix gauge now rather than later.
Snowflake Motif
Make 50 motifs. For the 5 top-row motifs, follow the variation given in Rnd 6.
Rnd 1 (blue): Make a magic ring. Ch 3 (counts as dc), 11 dc in the ring, then join with a sl st to the top of the ch-3. (12 dc)
Rnd 2 (blue): Ch 1, sc in the same st, *ch 3, skip 1 dc, sc in the next dc; repeat from * 4 more times, ch 3, skip the last dc, then join to the first sc. Fasten off. (6 sc, 6 ch-3 sps)
The six ch-3 loops form the small blue star.
Rnd 3 (cream): Join cream with a sl st in any ch-3 sp. Ch 3 (counts as dc), then work (dc, ch 2, 2 dc) in the same sp, ch 1. *Work (2 dc, ch 2, 2 dc) in the next ch-3 sp, ch 1; repeat from * 4 more times, then join to the top of the ch-3. (24 dc, 6 ch-2 sps, 6 ch-1 sps)
Each ch-2 opening becomes the eyelet at the base of a petal.
Rnd 4 (cream): Sl st in the next dc and in the ch-2 sp. Ch 3 (counts as dc), then work (2 dc, ch 2, 3 dc) in the same sp. *Skip 2 dc, sc in the ch-1 sp, skip 2 dc, then work (3 dc, ch 2, 3 dc) in the next ch-2 sp; repeat from * 4 more times. Skip 2 dc, sc in the last ch-1 sp, then join. Fasten off. (36 dc, 6 sc, 6 ch-2 petal tips)
The cream stitches wrap around the Rnd 3 chain, so the eyelet stays open underneath. Each 6-dc fan narrows to a pointed tip.
Rnd 5 (blue): Work a standing dtr in any Rnd 4 sc between two petals. *Ch 5, sc in the next petal-tip ch-2 sp, ch 5, dtr in the next sc between petals; repeat from * 4 more times, ch 5, sc in the last petal tip, ch 5, then join to the first dtr. (6 dtr, 6 sc, 12 ch-5 sps)
The dtr stitches are the spokes between the petals, and each one sets a corner position. The ch-5 loops leave the large open spaces between the petals and the frame.
Rnd 6 (blue), standard motif: Ch 1. *Work the corner in the dtr: (sc, ch 2, tref, ch 2, sc). Work 5 sc in the ch-5 sp. Work (sc, picot, sc) in the petal-tip sc. Work 5 sc in the next ch-5 sp. Repeat from * 5 more times, then join to the first sc. Fasten off. (84 sc, 6 trefoils, 6 picots)
Count per side: the second sc of one corner, 5 sc, 2 midpoint sc, 5 sc and the first sc of the next corner, for 14 sc per side, including that side’s 2 corner sc. Six sides × 14 = 84 sc.
Top-row variation: For the 5 motifs in Row 1 of the curtain, work the 12 o’clock corner as (sc, ch 2, sc), with no trefoil. All other corners stay the same. The count does not change: 84 sc.
Turn the motif so that one corner points straight up. That corner is 12 o’clock, and the other corners are at 2, 4, 6, 8 and 10 o’clock. The left and right sides are vertical.
Make All Pieces
- 45 standard motifs: blue for Rnds 1–2 and 5–6, cream for Rnds 3–4
- 5 top-row motifs: same colors, with the 12 o’clock variation in Rnd 6
Each motif uses about 10 m of blue and 7 m of cream.
Layout grid (T = top-row motif, S = standard motif):
ROW 1:  T T T T T
ROW 2:  S S S S S
ROW 3:  S S S S S
ROW 4:  S S S S S
ROW 5:  S S S S S
ROW 6:  S S S S S
ROW 7:  S S S S S
ROW 8:  S S S S S
ROW 9:  S S S S S
ROW 10: S S S S S
All motifs point up and down, and each column sits directly below the one above it.
Joining
Method: Join as you go during Rnd 6. Work Rnds 1–5 of each new motif as usual, then join it to the finished motifs while you work Rnd 6.
Side joins (left and right neighbors): Two motifs that sit side by side share one vertical side, from 2 o’clock to 4 o’clock on the left motif and from 10 o’clock to 8 o’clock on the right motif. Along that side:
- At the first corner, work the trefoil loop that faces along the shared side as a joined trefoil loop.
- At the side midpoint, work (sc, joined picot, sc).
- At the second corner, again join the trefoil loop that faces along the shared side.
That gives 3 joins per shared side. Both motifs still have 14 sc on that side, because joins replace chains and add no stitches.
Vertical joins (motif above): The 12 o’clock point of each new motif meets the 6 o’clock point of the motif above it. Work the middle loop of the 12 o’clock trefoil as a joined trefoil loop. This one join is enough. The slanted sides stay unjoined and leave diamond-shaped gaps.
Order: Work from right to left across each row, from the top row down. Motif 1 has no joins. The other motifs in Row 1 each have one side join. In Rows 2–10, the first motif has one vertical join, and every other motif has one vertical join plus one side join.
Tension: Keep the joining chains at the same tension as the free loops. If you pull them tight, the motifs pucker. If they are loose, the curtain sags at the joins.
Size checkpoint:
- After Row 1: 22.5 in (57.2 cm) wide
- After Row 5: 29.6 in (75.2 cm), measured from the top-row peak to the Row 5 trefoil tips
- After Row 10: 59.6 in (151.4 cm)
Each row adds 6.0 in (15.2 cm).
Border: Heading Band
Only the top gets a border. The side edges are already finished by the vertical motif sides and picots, and the bottom trefoil points hang free, as in the photo.
Border gauge: 28 sts = 4.5 in (11.4 cm), or about 6.2 sts per inch, across one motif’s top.
Starting count: Each top-row motif has two upper sides (10 o’clock to 12 o’clock and 12 o’clock to 2 o’clock) of 14 sc each, which is 28 sts per motif. 5 motifs × 28 = 140 sts. Skip the ch-2 sp at each peak. It is not a stitch and is not counted. The outer corners at each end of the row are part of the first and last motif’s 14-st sides, so they need no extra stitches.
At the four valleys between motifs, fold the free trefoil loops to the back and catch them in the first or last dtr of that half.
Each half-side below runs from the valley corner up to the peak. At every peak the sequence mirrors, so the second half of each motif runs from the peak back down to the next valley.
Row 1 (RS, blue): Join at the outer corner sc of the rightmost motif. Ch 5 (counts as the first dtr). Across each motif:
– Valley to peak: 3 dtr, 3 tr, 3 dc, 3 hdc, 2 sc (14 sts)
– Peak to valley: 2 sc, 3 hdc, 3 dc, 3 tr, 3 dtr (14 sts)
That is 28 sts per motif and 140 sts in total. Turn.
Row 2 (WS): Ch 5 (counts as dtr). Work the same sequence again: dtr over the valleys, sc over the peaks, 1 st in each st. (140 sts) Turn.
Row 3: Ch 4 (counts as tr). Across each motif:
– Valley to peak: 4 tr, 4 dc, 3 hdc, 3 sc
– Peak to valley: 3 sc, 3 hdc, 4 dc, 4 tr
That is 28 sts per motif. (140 sts) Turn.
Row 4: Ch 1, sc in each st across. (140 sc) Turn.
Row 5: Ch 1, sc in each st across. (140 sc) Fasten off.
Why the math works: Each motif peak sits 1.3 in (3.3 cm) above its valley corners. The difference between the tallest and shortest stitch is about 0.5 in in Row 1, 0.5 in in Row 2 and 0.35 in in Row 3. Together that makes up the 1.3 in (3.3 cm) drop, so Row 4 sits level. Every row works 1 stitch in each stitch, so the count stays at 140, and each 14-stitch half matches exactly one 14-stitch motif side.
Final Blocking
- Weave in all ends along the sc frames, never across the open spaces.
- Wet the curtain, gently press out the water in a towel, and do not wring it.
- Lay it flat on blocking mats.
- Pin the heading straight at 22.5 in (57.2 cm) wide.
- Pin each motif’s flats to 4.5 in (11.4 cm) and every trefoil open, working down one column at a time.
- Check that the length is 60.6 in (153.9 cm) and that the diamond gaps are even.
- Let it dry completely before you unpin it.
Final Quality-Control Checklist
- [ ] Every motif has 84 sc, 6 corners and 6 picots in Rnd 6
- [ ] Every petal has a visible eyelet and a pointed tip
- [ ] Each side join has 3 joins: trefoil loop, picot, trefoil loop
- [ ] Each vertical join is in the middle trefoil loops
- [ ] Heading rows count 140 sts
- [ ] Row 4 of the heading is straight and level
- [ ] Finished size is 22.5 in × 60.6 in (57.2 cm × 153.9 cm)
- [ ] No ends show through the lace
Troubleshooting
- Motif cups: Your Rnd 5 chains are too short or tight. Loosen them or add 1 ch per loop, then check the size again.
- Motif ruffles: Your chains are too loose. Use a smaller hook for Rnd 5 only.
- Petals look flat and round: Make sure the ch-2 tip in Rnd 4 is actually worked.
- Heading dips at the valleys: Your dtr stitches are too short. Pull up a taller first loop.
- Heading bulges at the peaks: Tighten your sc there, or work the peak sc of Row 1 as sl sts.
- Curtain leans to one side: You joined a vertical point off-center. Find the joins that missed the middle loop and redo them.
Care
Hand wash in cool water with a mild detergent, then block flat or hang to dry. Avoid tumble drying, because heat and tumbling stretch lace joins.
Final Notes
Here is the full measurement chain:
- Rnd 2 measures 1.5 in (3.8 cm), and Rnd 4 measures 3.25 in (8.3 cm).
- The finished motif has 14 sc per side and is 4.5 in (11.4 cm) across the flats.
- Five motifs make a width of 22.5 in (57.2 cm).
- Ten rows of motifs make a length of 59.6 in (151.4 cm).
- The 140-st heading band adds 1.0 in (2.5 cm), for a final length of 60.6 in (153.9 cm).
If each checkpoint matches, the next one will too. Hang your curtain from clip rings in a bright window.
Happy crocheting!