

This crop top is made of airy butterflies. Each butterfly has a ridged body, curled antennae and four open wings, and all the butterflies are joined through a light chain lattice. The finished piece looks delicate but is quite sturdy, which makes it a good summer layer over a bralette or a tank.
The sample is worked in one color, a soft periwinkle cotton. Because there is only one shade, the stitch texture does the decorating: open teardrops inside the wings, fans of double crochet, and a dense oval body. Small picots along the edges and straps repeat that beaded look.
The pattern uses US crochet terms. The finished body is a tube measuring 35 in (88.9 cm) around and 16 in (40.6 cm) tall with borders. The straps are 13 in (33.0 cm) long.
Construction is simple. You crochet the butterfly body in rounds, then work the wings and antennae out of it. A final frame round squares the motif off to 5 in (12.7 cm). From the second motif on, that frame round also joins it to its neighbors (join-as-you-go). You make three rings of 7 motifs, add a two-round picot border to the top and bottom edges, and attach two straps.
Finished Size and Construction
- Finished size: 35 in (88.9 cm) circumference × 16 in (40.6 cm) tall, plus straps
- Fits: bust approx. 32–34 in (81.3–86.4 cm), with a light lacy stretch
- Skill level: Intermediate
- Terminology: US crochet terms
- Yarn weight: DK (light #3) cotton
- Hook: 3.5 mm (E-4)
- Number of pieces: 21 butterfly motifs + 2 straps
- Layout: 3 rows of 7 motifs, joined into a tube
- Motif size (butterfly only): 4.5 in × 4 in (11.4 × 10.2 cm)
- Motif size (with frame): 5 in × 5 in (12.7 × 12.7 cm)
- Size before border: 35 in (88.9 cm) around × 15 in (38.1 cm) tall
- Border depth: 0.5 in (1.3 cm) at the top and 0.5 in (1.3 cm) at the bottom
Materials
Yarn: Choose a smooth DK cotton or cotton blend with good stitch definition. Mercerized or milk cotton keeps the wing fans crisp. Avoid fuzzy yarns, because they blur the teardrop openings.
- Periwinkle: 175 g, approx. 400 m (437 yd)
This amount includes a margin of roughly 20% over the sample’s actual use. That covers your test motif and any re-joins.
Tools:
- 3.5 mm (E-4) crochet hook
- Tapestry needle
- 8–10 locking stitch markers
- Rust-proof pins and a blocking mat
- Tape measure
- Spray bottle
Abbreviations (US Terms)
- ch – chain
- sl st – slip stitch
- sc – single crochet
- hdc – half double crochet
- dc – double crochet
- BLO – back loop only
- st(s) – stitch(es)
- rnd – round
- sp – space
Special stitch: Picot. Ch 3, then sl st in the 3rd ch from the hook.
Special technique: Loop join. Stop partway through a chain loop and sl st into the matching loop of the finished neighbor motif, then finish the chain count. A joined ch-5 loop is worked as ch 2, sl st in the neighbor’s loop, ch 2. A joined ch-7 corner loop is worked as ch 3, sl st in the neighbor’s corner loop, ch 3.
Gauge and Checkpoints
Make one complete test motif and block it before you start the project. Everything else depends on it.
- After Rnd 2 (body): 0.75 in × 1.5 in (1.9 × 3.8 cm)
- After Rnd 3 (wings): 4.5 in × 4 in (11.4 × 10.2 cm)
- After Rnd 4 (frame), blocked: 5 in × 5 in (12.7 × 12.7 cm)
A blocked motif between 4.75 and 5.25 in (12.1–13.3 cm) is within tolerance.
Too big? Go down to a 3.25 mm hook. Every 0.25 in (0.6 cm) of extra width per motif adds 1.75 in (4.4 cm) to the circumference.
Too small? Go up to a 3.75 mm hook, or loosen your chain loops slightly.
Border gauge: 21 sc = 5 in (12.7 cm) along one motif’s top or bottom edge.
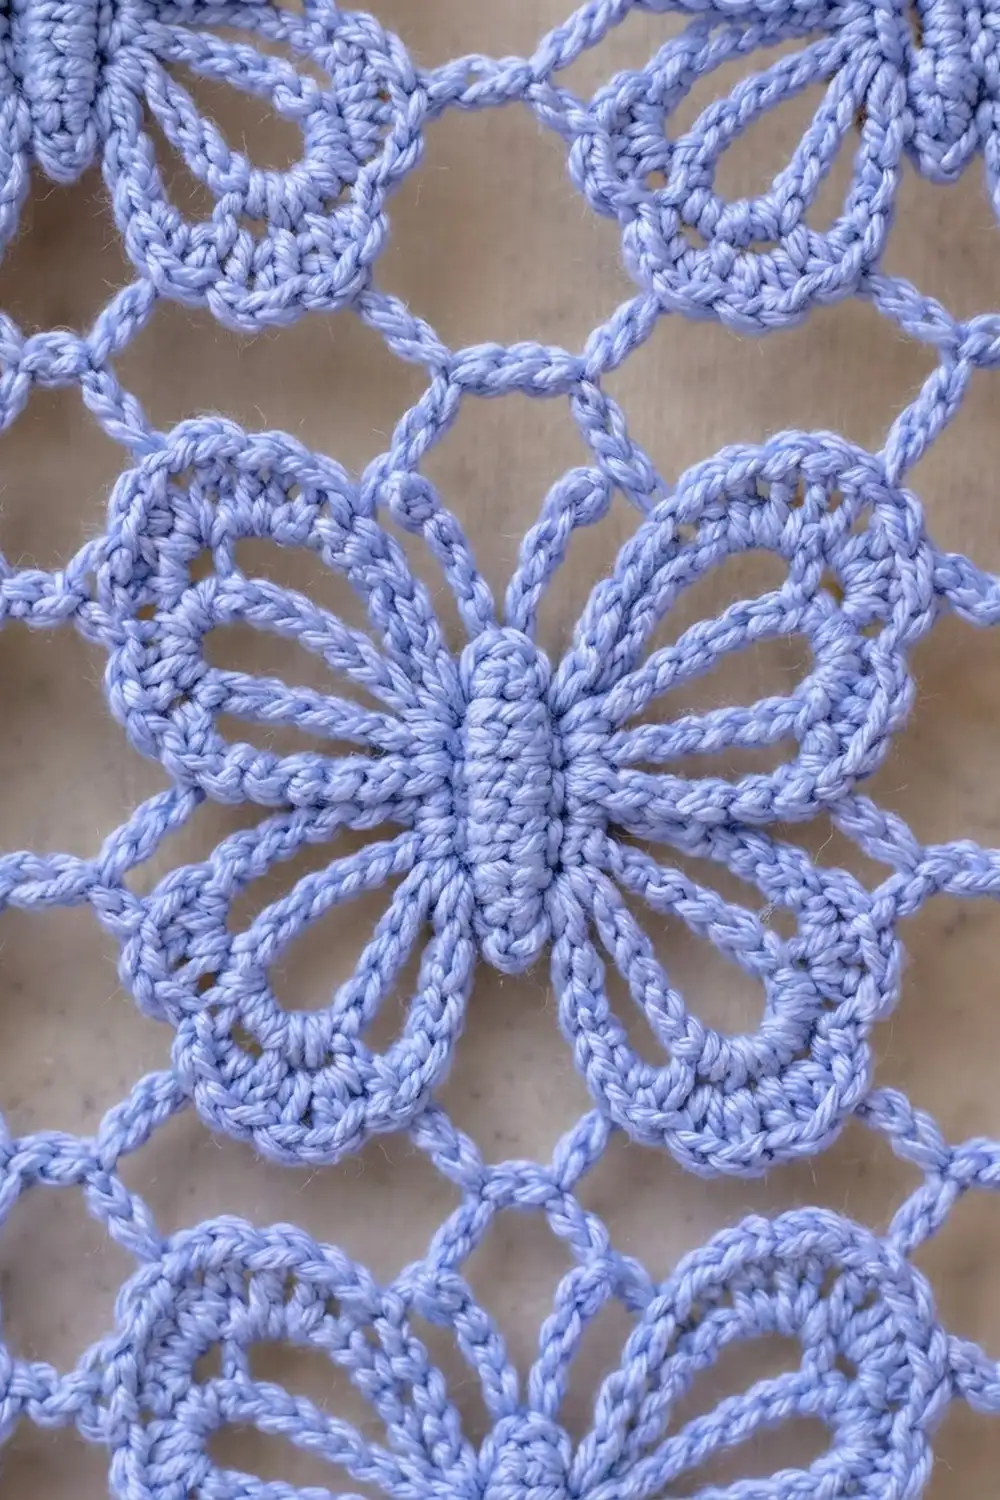
Butterfly Motif (Make 21)
Body
Ch 7.
Rnd 1: Work 2 sc in the 2nd ch from the hook, sc in the next 4 ch, and 4 sc in the last ch. Rotate and work along the other side of the chain: sc in the next 4 ch, then 2 sc in the first ch (the same ch as the first 2 sc). Join with a sl st to the first sc. (16 sc)
Rnd 2: Ch 1, then sc in BLO of each st around and join. (16 sc)
The unused front loops form the horizontal ridges on the body.
Stitch map for Rnd 2:
- Sts 15, 16, 1 and 2 are the tail end.
- Sts 3–6 run up the right side, from tail to head.
- Sts 7–10 are the head.
- Sts 11–14 run down the left side, from head to tail.
Do not fasten off.
Rnd 3: Wings and Antennae
Every wing is worked the same way from one body stitch (st X):
- Sl st in st X, ch the stated number, and sl st in the same st X to form a loop.
- Pass 1: Work the stated stitches into the loop, then sl st in st X.
- Pass 2: Ch 1, turn, sc across the Pass 1 sts as stated, then sl st in st X.
Upper wing: Make a ch-13 loop.
– Pass 1: In the loop work 2 sc, 2 hdc, 15 dc, 2 hdc, 2 sc. (23 sts)
– Pass 2: Sc in the first 4 sts, 2 sc in each of the next 15 dc, sc in the last 4 sts. (38 sc = 23 existing + 15 added)
Lower wing: Make a ch-9 loop.
– Pass 1: In the loop work 2 sc, 1 hdc, 11 dc, 1 hdc, 2 sc. (17 sts)
– Pass 2: Sc in the first 3 sts, 2 sc in each of the next 11 dc, sc in the last 3 sts. (28 sc = 17 existing + 11 added)
Antenna: Ch 9. Work 3 sc in the 2nd ch from the hook to make the knob, then sl st in each of the next 7 ch. Sl st in the body st.
Rnd 3 route:
- Sl st in st 2 and st 3. Work a lower wing from st 3.
- Sl st in st 4 and st 5. Work an upper wing from st 5.
- Sl st in sts 6, 7 and 8. Work an antenna from st 8.
- Sl st in st 9. Work an antenna from st 9.
- Sl st in sts 10, 11 and 12. Work an upper wing from st 12.
- Sl st in sts 13 and 14. Work a lower wing from st 14.
- Sl st in sts 15, 16 and 1.
The wings sit in mirror positions: sts 3 and 14 are each one stitch up from the tail end, and sts 5 and 12 are each one stitch below the head.
The chain loop in each wing stays open as a teardrop, the dc fan spreads around it, and the Pass 2 sc form the outer ridge.
Checkpoint: 4.5 in × 4 in (11.4 × 10.2 cm). Fasten off.
Rnd 4: Square Frame
Counting rule: On every wing, count the Pass 2 sc starting from the end nearest the head.
- Upper wings: UR = upper right, UL = upper left
- Lower wings: LR = lower right, LL = lower left
First motif only (later motifs replace the loops with loop joins; see Joining):
- Join with a sc in UR sc 16 (the outer corner tip).
- Right side: ch 5, sc in UR sc 28; ch 5, sc in LR sc 8; ch 5, sc in LR sc 18.
- Corner: ch 7, sc in the same LR sc 18.
- Bottom side: ch 5, sc in LR sc 24; ch 5 (spanning the tail), sc in LL sc 24; ch 5, sc in LL sc 18.
- Corner: ch 7, sc in the same LL sc 18.
- Left side: ch 5, sc in LL sc 8; ch 5, sc in UL sc 28; ch 5, sc in UL sc 16.
- Corner: ch 7, sc in the same UL sc 16.
- Top side: ch 5, sc in UL sc 8; ch 5 (spanning the head, behind the antennae), sc in UR sc 8; ch 5, sc in UR sc 16.
- Corner: ch 7, sl st in the first sc.
Count: 16 sc, twelve ch-5 loops (3 per side) and four ch-7 corner loops.
Keep the antennae on the front side of the frame chain. Fasten off and weave in the ends.
Checkpoint (blocked): 5 in × 5 in (12.7 × 12.7 cm).
Make All Pieces
- Periwinkle: 21 butterfly motifs (1 complete, the rest joined as you go)
- Straps: 2, made after the border
Layout (P = periwinkle). Motifs A–G run left to right as you face the front, and Motif G joins back to Motif A to close each ring:
ROW 1 (top):    P  P  P  P  P  P  P   (A B C D E F G)
ROW 2:          P  P  P  P  P  P  P   (A B C D E F G)
ROW 3 (bottom): P  P  P  P  P  P  P   (A B C D E F G)
Motif A sits at center front. B is next to it, C and D are at the side, and the back center falls on the seam between D and E.
Joining
Method: Join as you go during Rnd 4.
Stitch-to-stitch logic: Along each shared side, three ch-5 loops meet three ch-5 loops and two corner loops meet two corner loops.
- For each side loop, work ch 2, sl st in the neighbor’s matching ch-5 loop, ch 2.
- For each shared corner, work ch 3, sl st in the neighbor’s ch-7 loop, ch 3.
Joined loops still count as one ch-5 loop or one ch-7 loop, so no stitches are added at seams.
Order:
- Row 1: Join B to A on one side, C to B, and so on through G. Then join G’s free side to A’s free side to close the ring, so G joins on two sides.
- Rows 2 and 3: Each motif joins along its top side to the motif above it and along one side to its neighbor. The last motif of each row joins on three sides.
Four-way corners: Where four corners meet, sl st into the first join’s sl st rather than into the loop. This keeps the junction tight and centered.
Tension: Chain at your normal tension. Tight join chains pull the lattice into puckers, and loose ones make the diamonds sag.
Size checkpoint:
– After Row 1: 35 in (88.9 cm) around × 5 in (12.7 cm) tall
– After Row 3: 35 in (88.9 cm) × 15 in (38.1 cm)
Border
Border gauge: 21 sc = 5 in (12.7 cm).
Per-motif edge count:
- 3 sc in the outer half of the starting corner loop
- 5 sc in each of the 3 ch-5 loops (15 sc)
- 3 sc in the outer half of the ending corner loop
That gives 3 + 15 + 3 = 21 sc per motif. The corners are already included in this count, and at each seam the two corner halves sit side by side.
Top Edge
Rnd 1: Join to the top edge at the corner loop between Motif G and Motif A, at the start of Motif A’s top side. Ch 1. Work 21 sc across each motif’s top edge, then join. (7 × 21 = 147 sc)
Rnd 2: Ch 1. Sc in the next 3 sc, picot, repeat around and join. (147 sc + 49 picots)
Bottom Edge
Work Rnds 1–2 the same way along the bottom side of Row 3, starting at the same seam. (147 sc + 49 picots)
Why the math works: Each motif edge carries exactly 21 sc. Since 21 ÷ 3 = 7, every motif gets exactly 7 picots, and the picot rhythm repeats identically on all 7 motifs with no leftover stitches. At 21 sc per 5 in (12.7 cm), 147 sc measures 35 in (88.9 cm), the same as the motif body, so the edges neither flare nor gather.
Checkpoint: total height 16 in (40.6 cm).
Straps (Make 2)
Ch 61.
Row 1: Sc in the 2nd ch from the hook and in each ch across. (60 sc)
Row 2: Ch 1, turn. Sc in the next 3 sc, picot, repeat across. (60 sc + 20 picots)
Each strap is 13 in (33.0 cm) long.
Placement: Count the stitches of top border Rnd 1, starting from Motif A’s first sc.
- Strap 1 runs from sc 11 of Motif B (stitch 32 of the round) to the seam between Motifs C and D.
- Strap 2 runs from sc 11 of Motif G (stitch 137 of the round) to the seam between Motifs E and F.
The front straps sit 10 in (25.4 cm) apart, and so do the back straps. Try the top on and adjust the strap length before sewing both ends down securely.
Final Blocking
- Wet the finished top thoroughly and press out the water in a towel without wringing.
- Lay the tube flat on the mat with the folds at the sides. It should measure 17.5 in (44.5 cm) wide × 16 in (40.6 cm) tall.
- Pin each motif’s frame square to 5 in (12.7 cm), starting at the four-way junctions.
- Pin each wing’s outer curve so the teardrop opens evenly.
- Shape the antennae into gentle curls and pin the knobbed tips.
- Pin the picot edges straight and the straps flat at 13 in (33.0 cm).
- Mist lightly and let the top dry completely, then flip it and repeat for the back layer if needed.
Final Quality-Control Checklist
- Every motif has 38 sc on each upper wing and 28 sc on each lower wing.
- Every frame has 16 sc, twelve ch-5 loops and four ch-7 loops.
- All 21 motifs are joined, with no skipped loop joins.
- The four-way junctions are centered and tight.
- The top and bottom borders each have 147 sc and 49 picots.
- The circumference is 35 in (88.9 cm) and the height is 16 in (40.6 cm).
- The straps are 13 in (33.0 cm), symmetric front and back.
- All ends are woven in along the solid sc ridges.
Troubleshooting
Wings cup or ruffle. Your Pass 2 tension is too loose, or you added extra increases. Recount to 38 or 28 sc.
Teardrop closes up. Your loop chain is too tight. Chain more loosely or add 1 ch to the loop.
Frame won’t square. Recheck the anchor sc, always counting from the end nearest the head.
Lattice puckers. The join chains are too tight. Rework them more loosely.
Border ruffles. Use 3 sc in each corner half, not 4.
Straps slip off the shoulder. Move the strap attachment points 1 in (2.5 cm) closer to center.
Care
Hand wash cold or machine wash on a delicate cycle in a mesh bag, then reshape and dry flat. Do not hang the top wet, because the lattice will stretch.
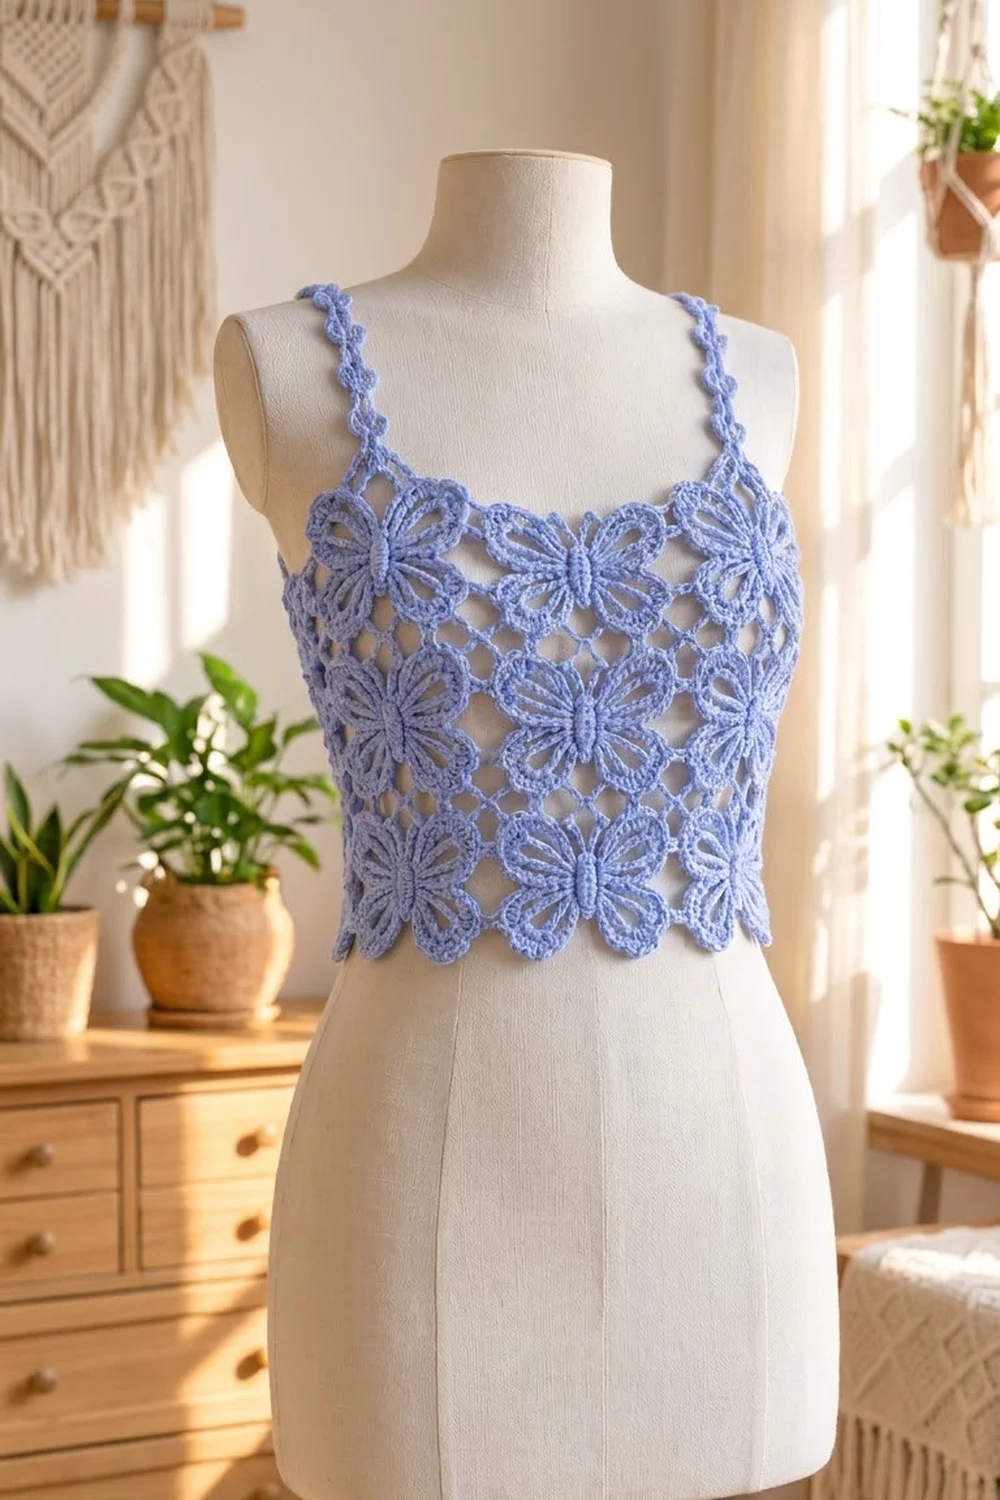
Final Notes
The measurement chain runs like this:
- Body: 0.75 × 1.5 in (1.9 × 3.8 cm)
- Butterfly: 4.5 × 4 in (11.4 × 10.2 cm)
- Framed motif: 5 in (12.7 cm) square
- Each row of 7 motifs: a ring 35 in (88.9 cm) around
- Three rows: 15 in (38.1 cm) tall
- Two 0.5 in (1.3 cm) borders: 16 in (40.6 cm) tall
- Straps: 13 in (33.0 cm)
If your test motif hits 5 in (12.7 cm), everything after it lines up.
Happy crocheting!