

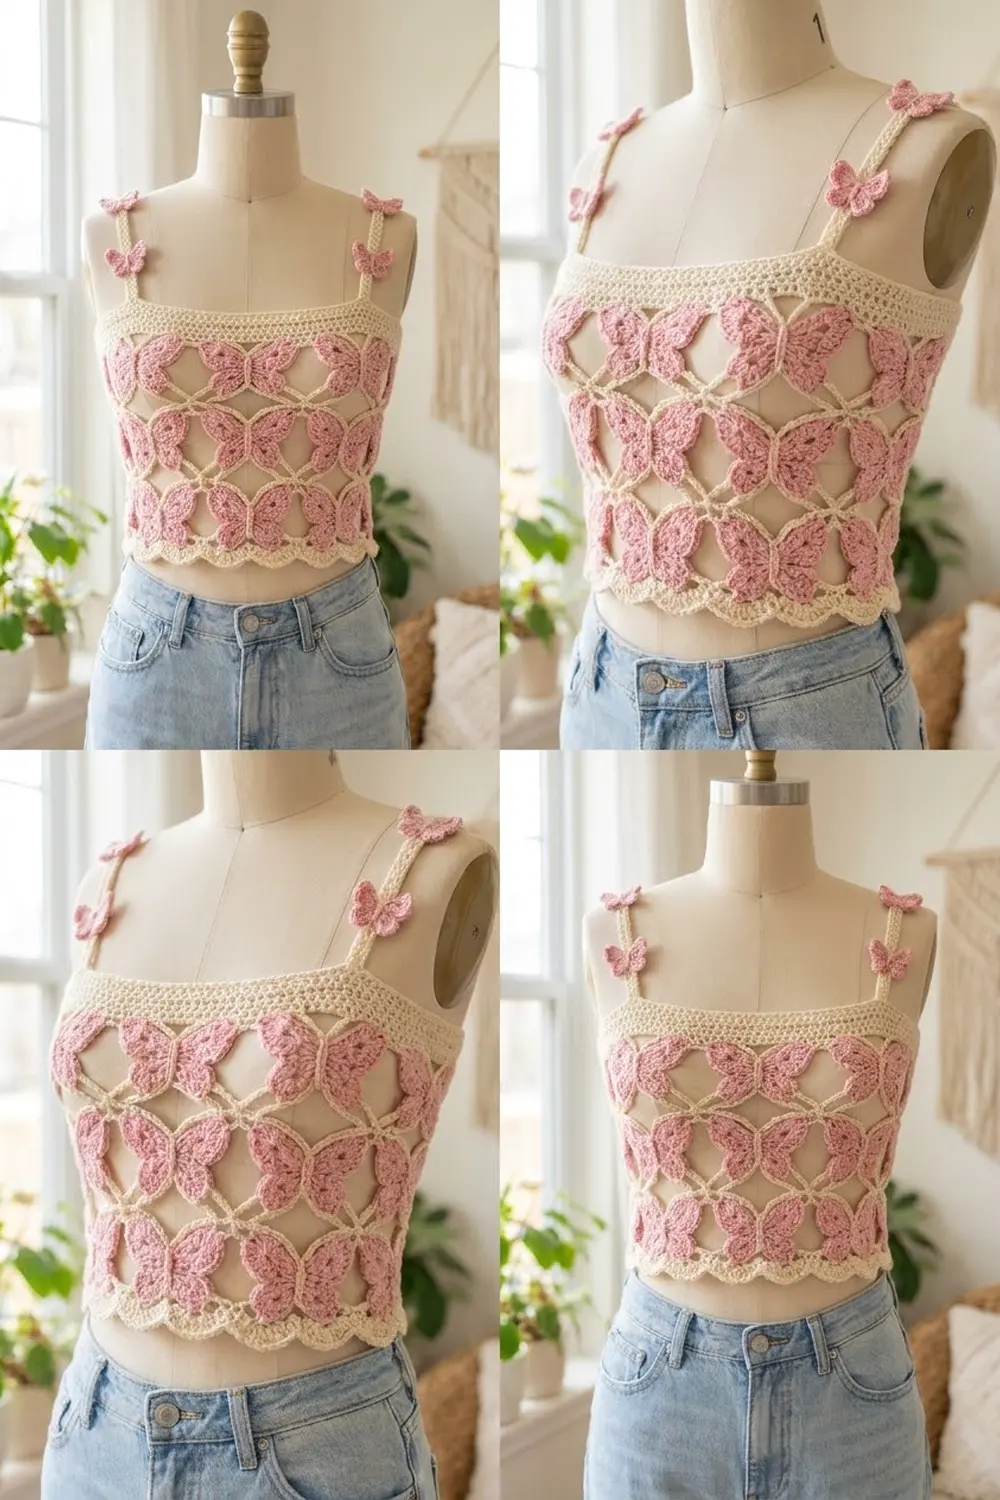
The Blush Flutter Crop Top is a light, airy summer top made from rows of lacy butterflies. Each butterfly has four pastel-pink wings with fanned stitches, a ring of small open holes, and a corded outline. A raised cream body and curled antennae sit on top.
The butterflies are linked by a cream chain lattice that leaves small diamond-shaped openings between them. A cream band finishes the neckline, a scalloped edge finishes the hem, and the straps are decorated with small pink butterflies. The pattern is written in US crochet terms.
The finished top is a tube 36 in (91.4 cm) around and 13.25 in (33.7 cm) long, not counting the straps. It fits a bust of 32–35 in (81.3–88.9 cm).
You’ll make 24 large butterflies and 10 mini butterflies. Each large butterfly gets a cream frame round, and you join the butterflies to each other as you work that frame. After that you add the top and bottom borders, then the straps.
Finished Size and Construction
- Finished size: 36 in (91.4 cm) around × 13.25 in (33.7 cm) long
- Skill level: Intermediate
- Terminology: US crochet terms
- Yarn weight: Sport (#2), cotton or cotton blend
- Hook: 3.0 mm (US C/2–D/3)
- Number of pieces: 24 large butterflies, 10 mini butterflies, 2 straps
- Layout: 8 butterflies around × 3 rows, joined into a tube
- Piece size: butterfly 4 in × 3.5 in (10.2 × 8.9 cm); framed spacing 4.5 in × 4 in (11.4 × 10.2 cm)
- Size before border: 36 in × 12 in (91.4 × 30.5 cm)
- Border depth: top 0.5 in (1.3 cm); bottom 0.75 in (1.9 cm)
Materials
Use a smooth, mercerized or combed cotton so the wing stitches and corded outlines show clearly. Avoid fuzzy yarns, because they blur the open holes.
- Pink (wings, mini butterflies): 150 g / 465 m
- Cream (bodies, antennae, frames, borders, straps): 100 g / 310 m
The quantities above include about 15% extra. They assume a yarn of roughly 155 m per 50 g.
Tools:
– 3.0 mm crochet hook
– Tapestry needle
– Stitch markers (at least 4)
– Scissors
– Measuring tape
– Blocking mats and rust-proof pins
– Spray bottle
Abbreviations (US Terms)
- ch – chain
- sl st – slip stitch
- sc – single crochet
- hdc – half double crochet
- dc – double crochet
- sp – space
- st(s) – stitch(es)
- rep – repeat
Special stitch – reverse sc (rev sc, crab stitch): Work from left to right (left-handers work right to left). Insert the hook into the next stitch to the right, yarn over, pull up a loop, yarn over, and pull through both loops. This makes the corded outline on the wings.
Frame loop: a ch-7 that runs between two anchor sc. In a joined loop, you ch 3, sl st into the 4th ch of the neighbor’s matching loop, then ch 3. A joined loop still counts as 1 loop of 7 positions.
Gauge and Checkpoints
Gauge for the borders is 21 sc = 4.5 in (11.4 cm), which works out to about 4.67 sc per inch. Wing gauge is measured by finished size instead.
Make one complete butterfly before starting the full set. Check it at each stage:
- Upper wing after Rnd 5: 2 in (5.1 cm) across at the widest point.
- Lower wing after Rnd 5: 1.5 in (3.8 cm) across.
- Assembled butterfly: 4 in wide × 3.5 in tall (10.2 × 8.9 cm).
- Two framed and joined butterflies: 9 in (22.9 cm) from the outer corner of one to the outer corner of the other.
Too big? Go down one hook size, to 2.75 mm. Too small? Go up to 3.25 mm. Change the hook rather than the stitch counts, because every border count depends on the frame having exactly 21 sc per butterfly per edge.
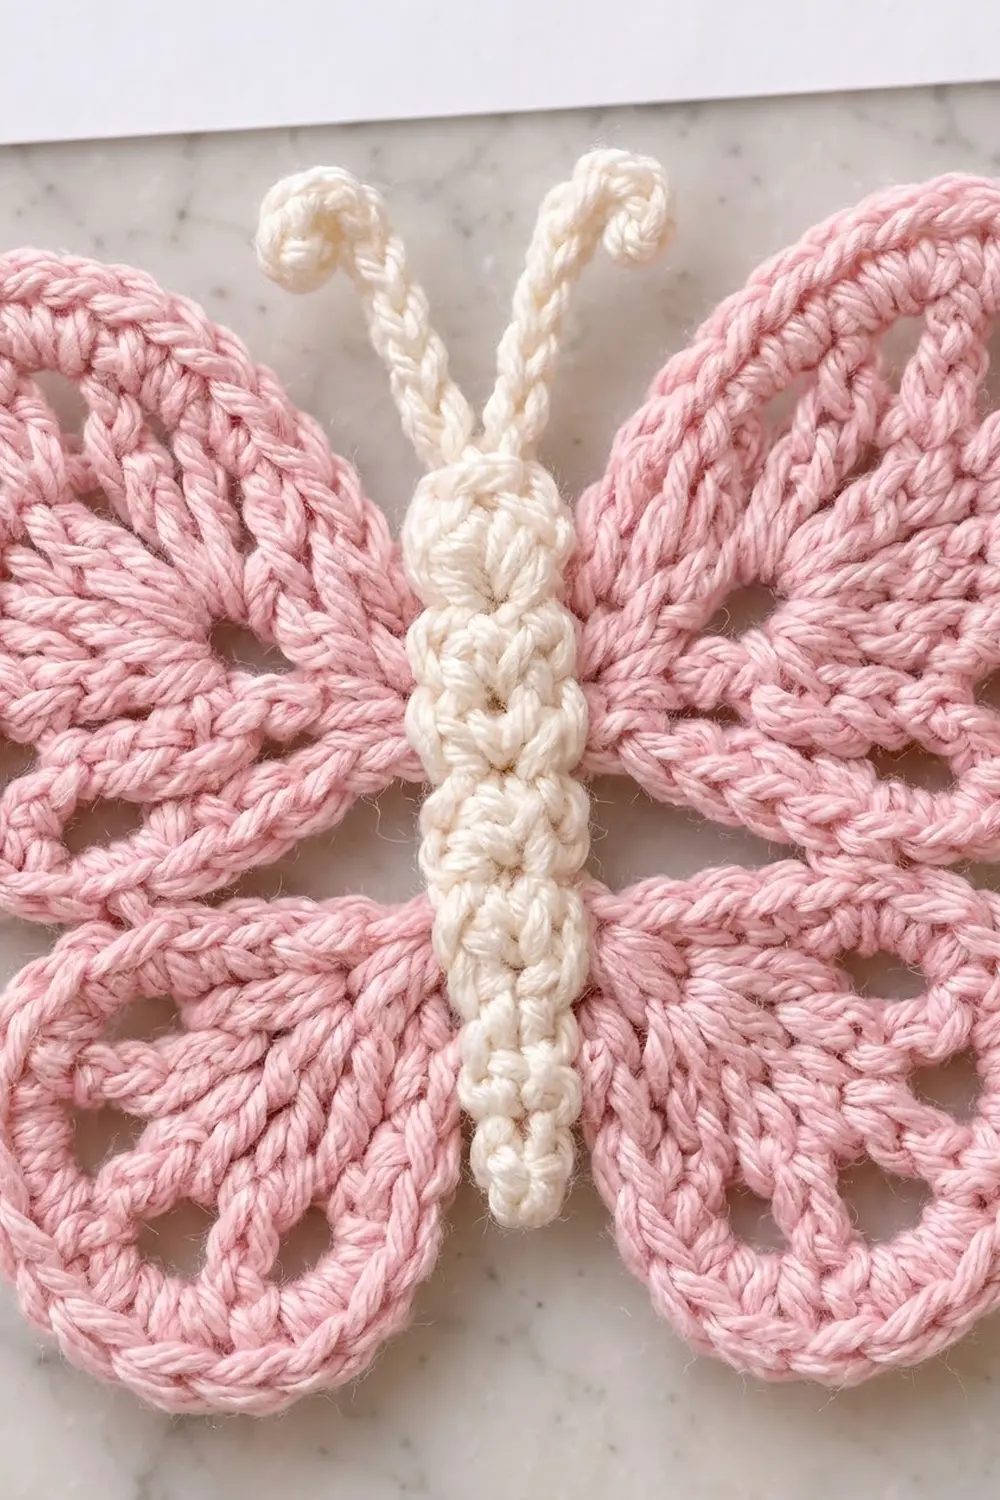
Upper Wing (Pink) – Make 2 per Butterfly
Each wing is a fan worked in rows from a small ring, then outlined in 2 rounds.
Row 1: Ch 4, sl st to the first ch to form a ring. Ch 3 (counts as dc), work 9 dc in the ring. Turn. (10 dc)
Row 2: Ch 3 (counts as dc), dc in the same st, 2 dc in each of the next 8 sts, dc in the last st. Turn. (19 dc) These solid stitches are the fanned rays.
Row 3 (holes): Ch 3 (counts as dc), ch 3, skip 1 st, dc in the next st; rep from * 8 more times. Do not turn. (10 dc, 9 ch-3 sps)* The ch-3 spaces are the open holes near the wing’s edge.
Rnd 4 (outline): Ch 1. Along the curved arc, work 1 sc in each dc and 4 sc in each ch-3 sp (46 sc). Then work 6 sc evenly down the side row ends, 1 sc into the ring at the wing’s base point, and 6 sc evenly up the other side. Join with a sl st to the first sc. (59 sc: 46 + 6 + 1 + 6)
Rnd 5: Ch 1, rev sc in each st around. Join and fasten off, leaving an 8 in (20.3 cm) tail. (59 rev sc)
Lower Wing (Pink) – Make 2 per Butterfly
Row 1: Ch 4, sl st to form a ring. Ch 3 (counts as dc), work 7 dc in the ring. Turn. (8 dc)
Row 2: Ch 3 (counts as dc), dc in the same st, 2 dc in each of the next 6 sts, dc in the last st. Turn. (15 dc)
Row 3: Ch 3 (counts as dc), ch 3, skip 1, dc in the next st; rep from * 6 more times. (8 dc, 7 ch-3 sps)*
Rnd 4: Ch 1. Along the arc, work 1 sc in each dc and 4 sc in each ch-3 sp (36 sc). Then work 6 sc down the side, 1 sc at the base point, and 6 sc up the other side. Join. (49 sc: 36 + 6 + 1 + 6)
Rnd 5: Ch 1, rev sc in each st around. Join and fasten off with a tail. (49 rev sc)
Body and Antennae (Cream)
Body: Ch 11.
Rnd 1: Work 1 sc in the 2nd ch from the hook and 1 sc in each of the next 8 ch, then 3 sc in the last ch. Rotate the piece and work along the opposite side of the chain: 1 sc in each of the next 8 ch, then 2 sc in the same ch as the first sc. Join. (22 sc: 9 + 3 + 8 + 2)
Fasten off, leaving a 12 in (30.5 cm) tail. The body is 2.75 in (7.0 cm) long and lies with its stitches forming a raised, segmented column.
Antennae: Join cream at the top end (head) of the body. Ch 9, then work 3 sc in the 2nd ch from the hook to make the curl. Sl st in each of the remaining 7 ch, then sl st back into the head. Rep once for the second antenna. Fasten off.
Assembling One Butterfly
- Lay the two upper wings with their base points meeting at the center and the curved edges facing up and outward.
- Place the lower wings below them, base points touching the upper wings’ points.
- Lay the body vertically over all four points, with the head level with the tops of the upper wings.
- Using the body tail, whipstitch around the body’s outer edge through the wings. Keep the stitches in the body’s back loops so they don’t show.
Checkpoint: 4 in × 3.5 in (10.2 × 8.9 cm).
Make All Pieces
- Large butterflies: 24 (96 wings in pink; 24 bodies with antennae in cream)
- Mini butterflies: 10 (pink, with cream bodies)
- Straps: 2 (cream)
Layout grid (F = front, B = back; numbers are the order you join them):
ROW 1 (top):    B1 B2 B3 B4 | F5 F6 F7 F8   → wraps to B1
ROW 2:          B9 B10 B11 B12 | F13 F14 F15 F16
ROW 3 (bottom): B17 B18 B19 B20 | F21 F22 F23 F24
All the large butterflies are identical, so you can join them in any order. Just keep every head pointing up.
Joining: Cream Frame, Join-As-You-Go
Each butterfly gets one cream frame round with 12 anchor sc and 12 ch-7 loops, 3 loops per side. The corners are anchors, not loops, so nothing is counted twice.
Anchor positions (clockwise, starting at upper left):
- Top: upper-left corner (the outermost top point of the left upper wing, about arc st 12), the inner top of the left upper wing, the inner top of the right upper wing, and the upper-right corner. The middle top loop passes above the antennae.
- Right: the lowest outer point of the right upper wing, then the highest outer point of the right lower wing, then the lower-right corner (the outermost bottom point of the right lower wing).
- Bottom: the inner bottom of the right lower wing, the inner bottom of the left lower wing, then the lower-left corner. The middle bottom loop passes below the tail.
- Left: mirror the right side, working upward.
Work each anchor sc under the rev sc, into the Rnd 4 stitch.
Butterfly 1: Join cream with an sc at the upper-left corner. Ch 7, sc in the next anchor; rep from * 10 more times, ch 7, sl st to the first sc. (12 anchors, 12 loops)*
Joining a butterfly on the left side:
- When you make its upper-left corner anchor, sl st into the neighbor’s upper-right corner sc.
- Work the top and right sides as normal.
- At the lower-left corner, sl st into the neighbor’s lower-left-facing corner sc (its lower-right corner).
- Work the 3 left-side loops as joined loops, matching the neighbor’s right-side loops from bottom to top.
Rows 2 and 3: Join the top loops to the bottom loops of the butterfly above, matching them from right to left. Join the left side to the left neighbor as described above. Where four corners meet, sl st into the corner join that’s already there.
Closing the tube: Butterflies 8, 16, and 24 also join their right-side loops (and their right corners) to the left side of butterflies 1, 9, and 17.
Tension: Keep each chain loose and even, so the openings form diamonds rather than pulling the wings together. If the joins pucker, make the chains looser rather than adding chains.
Checkpoint: After Row 1 is closed, the tube should measure 36 in (91.4 cm) around. After 3 rows, it should be 12 in (30.5 cm) tall.
Border
Border gauge: 7 sc fill each ch-7 loop, which gives 21 sc per butterfly edge = 4.5 in (11.4 cm).
Top Border (Cream)
Rnd 1: Join at the top loop that starts butterfly 1. Work 7 sc in each top loop around. (3 loops × 7 sc × 8 butterflies = 168 sc) Where two butterflies meet, go straight to the next loop. The corners are already joined, so no stitches are added at the seams.
Place markers in st 1 and st 85 to mark the sides. The back is sts 1–84 and the front is sts 85–168, which is 84 sts each (4 × 21).
Rnds 2–3: Ch 1, sc in each st around. Join. (168 sc each round)
This border measures 0.5 in (1.3 cm).
Bottom Border (Cream)
Rnd 1: Join at the bottom loops. Work 7 sc in each bottom loop around. (168 sc)
Rnd 2 (scallops): Sc in the next st, skip 2 sts, 5 dc in the next st, skip 2 sts, sc in the next st; rep from * 23 more times. Join. (24 scallops; 7 sts consumed and 7 made per repeat; 2 sc + 5 dc = 7 × 24 = 168 sts)*
This border measures 0.75 in (1.9 cm).
Why the math works: Every edge loop holds 7 sc, so each butterfly gives exactly 21 sc. With 8 butterflies, that’s 168. Since 168 ÷ 7 = 24, there’s exactly one scallop per frame loop. Since 168 ÷ 2 = 84, the front and back are equal. Since 84 = 18 + 4 + 40 + 4 + 18, the straps sit symmetrically (see below).
Mini Butterflies (Pink) – Make 10
Make a magic ring.
- Upper wings: (ch 3, 2 dc, ch 3, sl st) in the ring twice.
- Lower wings: (ch 2, 2 hdc, ch 2, sl st) in the ring twice.
Pull the ring tight and fasten off. Wrap cream yarn 4 times around the center to form the body, and tie it off. Each mini butterfly is 1.25 in (3.2 cm) across.
Straps (Cream) – Make 2
Row 1: Ch 61, sc in the 2nd ch from the hook and in each ch across. Turn. (60 sc)
Rows 2–4: Ch 1, sc across. Turn. (60 sc each row)
Each strap is 13 in (33.0 cm) × 0.8 in (2.0 cm).
Placement: On the front, count 18 sts in from the side marker and sew a strap end over the next 4 sts. Skip 40 sts and sew the second strap over the next 4 sts, which leaves 18 sts before the other side. Repeat the same placement on the back.
Sew 5 mini butterflies along each strap, spaced about 2.25 in (5.7 cm) apart.
Final Blocking
- Soak the top in cool water for 10 minutes, then press out the water. Don’t wring it.
- Roll it in a towel to remove the excess water.
- Lay it flat as a doubled tube, 18 in (45.7 cm) wide × 13.25 in (33.7 cm) long.
- Pin the outer edge of each wing into a smooth curve, and open each lattice diamond.
- Pin out the scallops one at a time.
- Pin the antennae curls in place.
- Let it dry completely, then unpin.
Final Quality-Control Checklist
- [ ] Every butterfly has a 59-st upper-wing outline and a 49-st lower-wing outline
- [ ] All heads point toward the top edge
- [ ] Each frame round has 12 anchors and 12 loops
- [ ] The top and bottom borders each have 168 sts
- [ ] There are 24 scallops, one under each frame loop
- [ ] The straps are symmetric (18/4/40/4/18) on the front and back
- [ ] The tube measures 36 in (91.4 cm) around and 13.25 in (33.7 cm) long
- [ ] All ends are woven in through matching colors
Troubleshooting
- The wings cup: You’re working Rnd 4 too tightly. Use a looser tension, or work 5 sc into each end ch-3 sp.
- The holes look closed up: Check that you skipped 1 st on every repeat of Row 3.
- The lattice pulls the wings in: Your chains are too tight. Go up a hook size for the frame round only.
- The border ripples: Make sure you have exactly 7 sc per loop. Extra stitches cause ripples.
- The straps are too long: Undo some of Row 1 and subtract chains in multiples of 5 (about 1 in, or 2.5 cm).
Care
Hand wash the top in cool water with mild soap, then dry it flat and reshape the wings while it’s damp. Don’t tumble dry it.
Final Notes
Here’s the measurement chain from start to finish:
- Upper wing: 2 in (5.1 cm)
- Butterfly: 4 × 3.5 in (10.2 × 8.9 cm)
- Framed spacing: 4.5 × 4 in (11.4 × 10.2 cm)
- Tube: 36 in (91.4 cm) around
- Before border: 12 in (30.5 cm) long
- Bordered: 13.25 in (33.7 cm) long
If the first butterfly matches its checkpoints, every count that follows will fall into place.
Happy crocheting!