

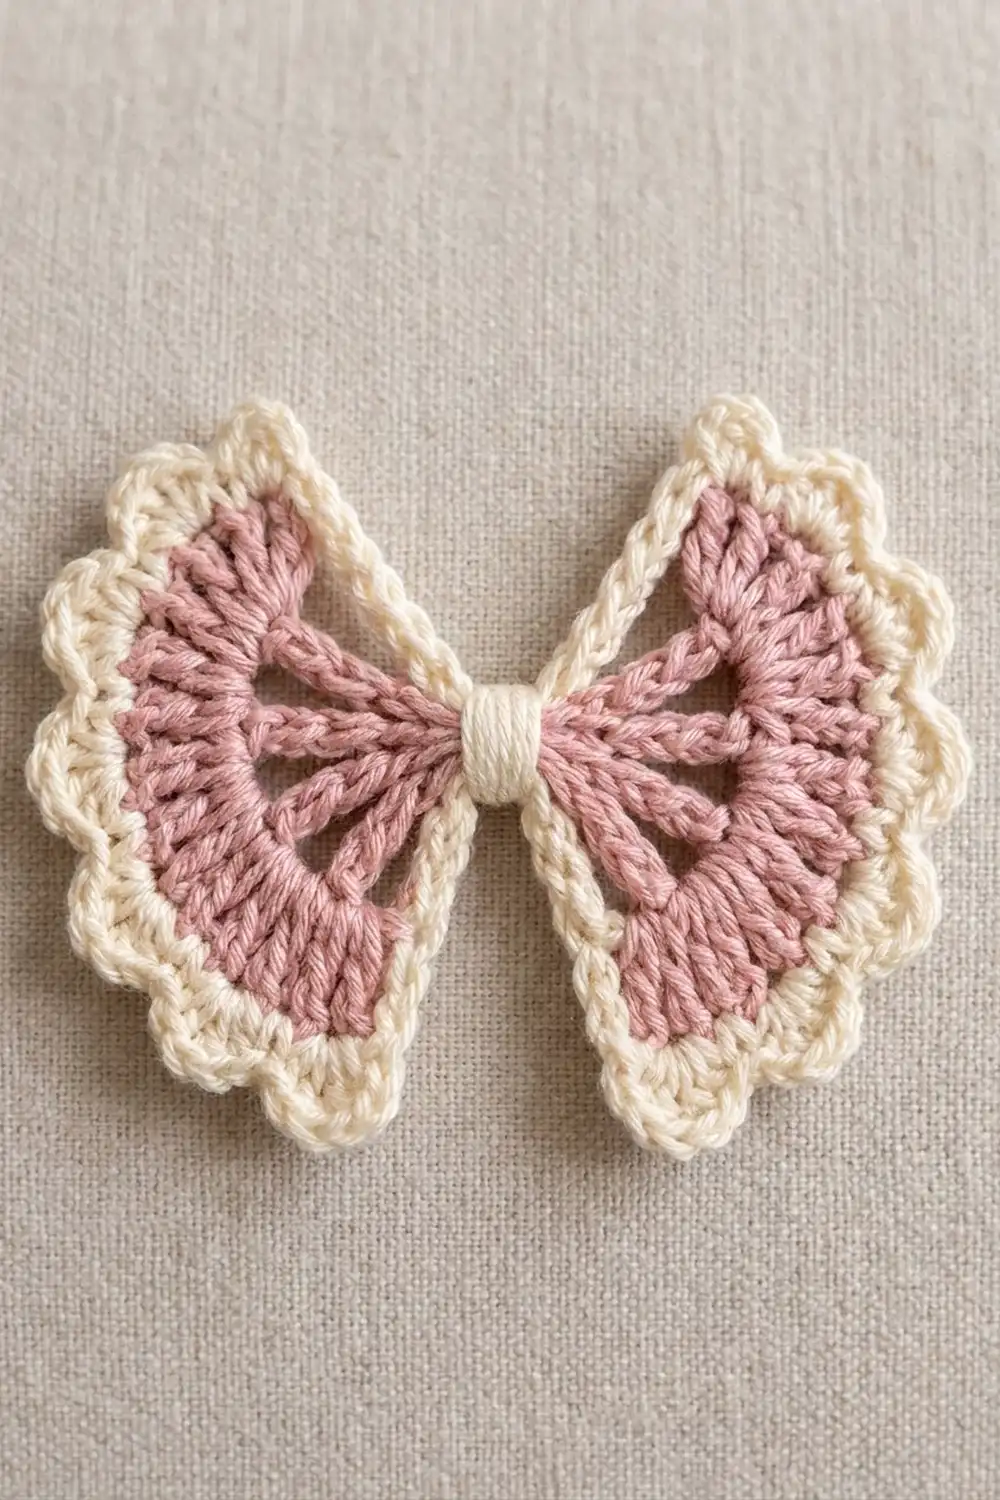
This little bow is soft, pretty and fast to make. Each wing is a blush pink fan of double crochet with a row of open “windows” through the middle. Cream wraps around the center to form the knot.
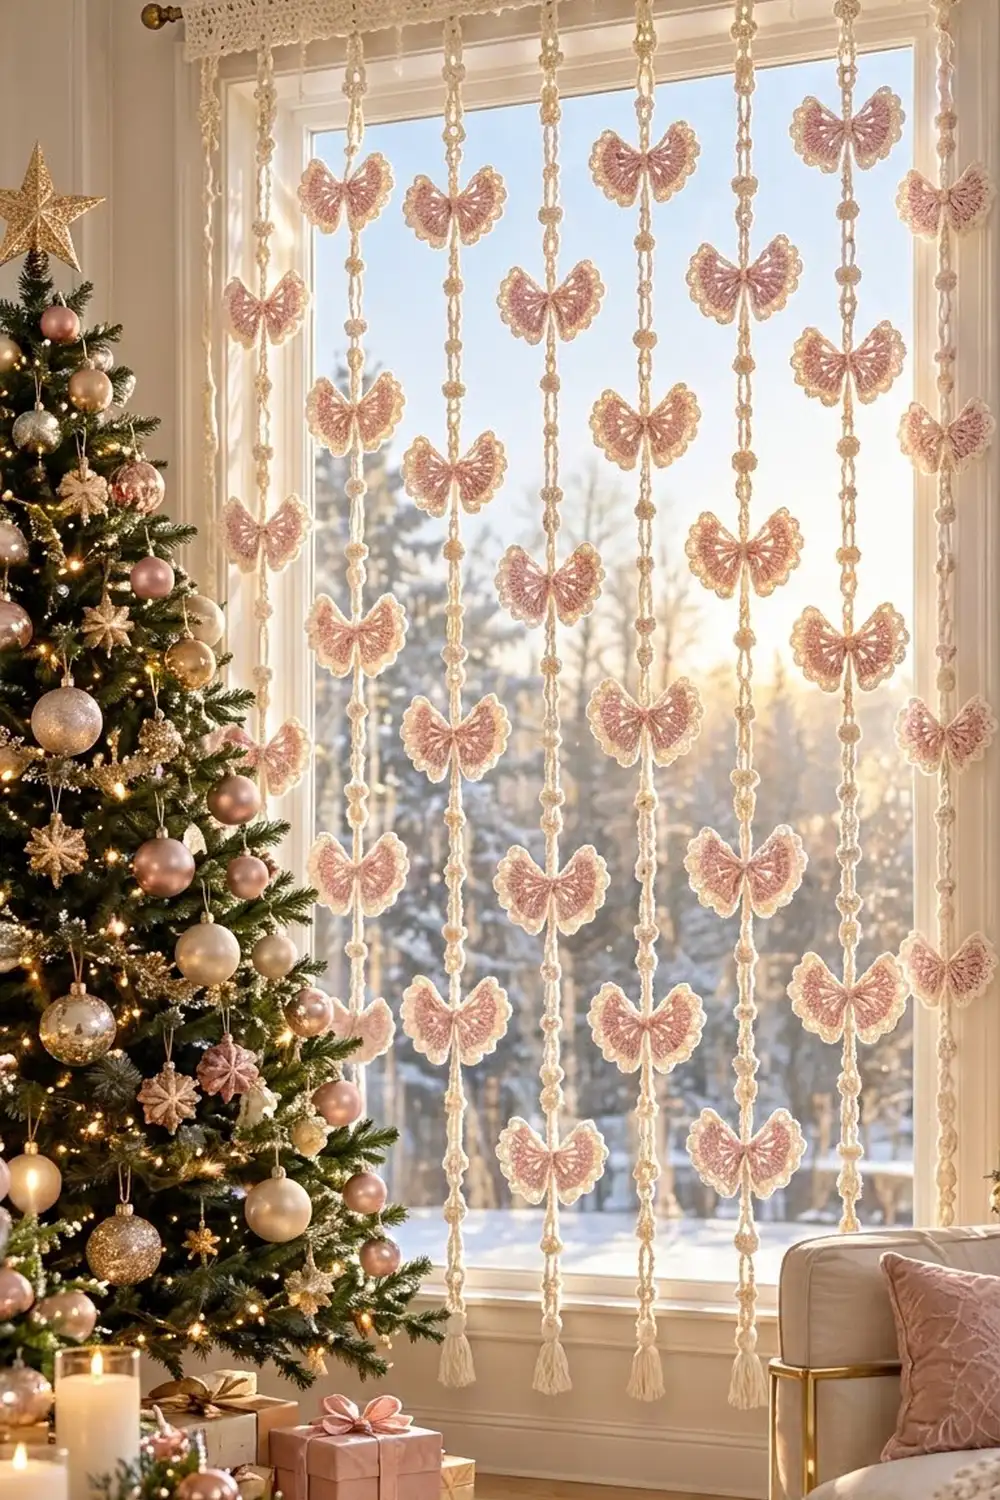
The palette is just two colors: dusty blush pink and warm cream. A scalloped cream edge outlines the whole bow and dips neatly into the top and bottom notches, which gives it a vintage, lacy look. It works well as a gift-wrap topper, an ornament, a hair-clip base or an appliqué.
The pattern uses US crochet terms. The finished bow measures about 6 in (15.2 cm) wide and 5.5 in (14.0 cm) tall.
You work the bow as one piece. Both pink wings grow in turned rows from a single chain ring. A two-round cream border goes around the whole outline, and a cream wrap pinches the center.
Finished Size and Construction
- Finished size: 6 in (15.2 cm) wide × 5.5 in (14.0 cm) tall
- Skill level: Easy+
- Terminology: US crochet terms
- Yarn weight: Worsted (#4)
- Hook: 4.5 mm (US 7)
- Number of pieces: 1 (a single bow motif)
- Layout: Two fan wings sharing one center ring
- Wing length (center to pink edge): 2.5 in (6.4 cm)
- Size before border: 5 in (12.7 cm) wide × 4.5 in (11.4 cm) tall
- Border depth: 0.5 in (1.3 cm)
Materials
Use a smooth worsted-weight cotton or cotton blend so the windows and scallops show crisply. Acrylic also works but has a little more spring. Pick a slightly heathered blush to match the soft look of the original.
- Color A – Blush Pink: 10 g, about 20 m (22 yd)
- Color B – Cream: 10 g, about 20 m (22 yd), including the center wrap
Tools:
– 4.5 mm (US 7) crochet hook
– Tapestry needle
– Scissors
– Stitch marker
– Ruler or tape measure
– Blocking mat and rust-proof pins
– Spray bottle
The yarn amounts include a margin of about 30% for your gauge swatch and weaving in ends.
Abbreviations (US Terms)
- ch – chain
- sl st – slip stitch
- sc – single crochet
- hdc – half double crochet
- dc – double crochet
- st(s) – stitch(es)
- sp – space
- RS / WS – right side / wrong side
- rep – repeat
Special stitch – Scallop: Work (hdc, 3 dc, hdc) all in the same stitch. This makes 5 stitches in one stitch. The hdc at each end keeps the scallop low and rounded.
Gauge and Checkpoints
Your first bow is your gauge test. Measure from the center of the ring straight out to the middle of the wing’s outer edge after each row.
- After Row 1: 0.5 in (1.3 cm)
- After Row 2: 1 in (2.5 cm)
- After Row 3: 1.5 in (3.8 cm)
- After Row 4: 2 in (5.1 cm)
- After Row 5: 2.5 in (6.4 cm). Row 5 is also about 5.75 in (14.6 cm) long when you measure along its curved edge.
- After the border: wing length 3 in (7.6 cm), bow 6 in (15.2 cm) wide
Each dc row adds about 0.5 in (1.3 cm).
If the wing is too big: go down to a 4 mm (US G-6) hook.
If the wing is too small: go up to a 5 mm (US H-8) hook.
If the wing cups: your stitches are too tight compared with your row height. Go up half a hook size.
If the wing ruffles: go down half a hook size.
A difference of up to 0.25 in (0.6 cm) is fine for a single motif.
Pattern: Center Ring and Wing A
With Color A (Blush Pink), ch 4. Join with a sl st to the first ch to form a ring.
You’ll use one half of the ring for Wing A and the other half for Wing B. Place a marker in the ring to show the halfway point.
Row 1 (RS): Ch 3 (counts as dc). Work 4 dc into the ring, using only the first half of the ring. Turn. (5 dc)
Row 2 (WS): Ch 3 (counts as dc), dc in the first st. Work 2 dc in each of the next 3 sts, then dc in the top of the turning ch. Turn. (9 dc)
Row 2 is the solid inner fan.
Row 3 (RS, window row): Ch 6 (counts as dc + ch 3). Skip the next st and dc in the next st. Ch 3, skip the next st, dc in the next st. Rep from * 2 more times. The last dc goes in the top of the turning ch. Turn. (5 dc and 4 ch-3 sps)
The four ch-3 spaces are the open windows. The dc posts between them form the ribs you see radiating from the center.
Row 4 (WS): Ch 3 (counts as dc). Work 3 dc in the next ch-3 sp. Dc in the next dc, 3 dc in the next ch-3 sp. Rep from * 2 more times. Dc in the 3rd ch of the turning ch-6. Turn. (17 dc)
The count works because: 1 turning ch + 3 dc in the first space + 3 × (1 dc + 3 dc) + 1 last dc = 17.
Row 5 (RS): Ch 3 (counts as dc), dc in the next st. 2 dc in the next st, dc in each of the next 3 sts. Rep from * 2 more times. 2 dc in the next st, then dc in each of the last 2 sts. (21 dc)
The four increases sit on the 3rd, 7th, 11th and 15th stitches. That places each end increase 3 stitches in from its edge, so the fan opens evenly.
Fasten off and leave a 6 in (15.2 cm) tail.
Shape check: Wing A should lie flat as a fan that covers a little more than one-third of a circle, about 130°. It should not be a half circle. This narrower angle is what creates the bow’s top and bottom notches.
Pattern: Wing B
Hold the piece with the RS facing you and the empty half of the ring free.
Row 1 (RS): Join Color A with a sl st into the empty half of the ring, right next to the last Row 1 stitch of Wing A. Ch 3 (counts as dc). Work 4 dc into the empty half of the ring. Turn. (5 dc)
The ring now holds 10 dc in total, 5 for each wing.
Rows 2–5: Work exactly as Wing A, Rows 2–5.
Stitch counts by row: 9 dc, then 5 dc and 4 ch-3 sps, then 17 dc, then 21 dc. Fasten off.
Pull the starting tail gently so the ring snugs up. Weave in all pink ends on the WS.
Checkpoint: The two wings now point in opposite directions. The bow measures 5 in (12.7 cm) wide and 4.5 in (11.4 cm) tall, with an open V notch at the top and bottom.
Border
Border gauge: the sc round sits at 4 sc per 1 in (2.5 cm) along the wing edges. The full border adds 0.5 in (1.3 cm) all around.
Round 1 (Color B, Cream): With the RS facing, join Color B with a sl st into the center ring at the top notch, between the two wings.
- Ch 1 and sc in the ring. This is the top notch sc. (1)
- Wing A, top edge: Working outward, work 2 sc in the side of each of Rows 1–5. (10)
- Wing A, outer curve: 2 sc in the first st of Row 5, sc in each of the next 19 sts, 2 sc in the last st. (23)
- Wing A, bottom edge: Working inward, work 2 sc in the side of each of Rows 5–1. (10)
- Bottom notch: sc in the ring. (1)
- Wing B, bottom edge: 10 sc
- Wing B, outer curve: 23 sc
- Wing B, top edge: 10 sc
- Join with a sl st to the first sc.
Total: 88 sc. Each half of the bow has 44 sc: 1 notch sc + 10 + 23 + 10.
Round 2: Ch 1. Sc in the next st, skip the next st, Scallop in the next st, skip the next st. Rep from * around. Join with a sl st to the first sc. (22 scallops)
Why the math works: Each scallop repeat uses 4 stitches. 88 ÷ 4 = 22 scallops, so there are 11 scallops on each wing. The round starts with a sc on the top notch stitch (stitch 1). Every 4th stitch after that is also a sc, and stitch 45 is the bottom notch sc (1 + 44). So both notches get a flat sc valley, and the scallops land evenly on the wing edges. The 2-sc corners in Round 1 give the scallops a little extra room where each wing turns from its straight edge onto its curve.
Fasten off and leave a 4 in (10.2 cm) tail.
Checkpoint: The bow measures 6 in (15.2 cm) wide and 5.5 in (14.0 cm) tall.
Center Wrap
Cut 18 in (45.7 cm) of Color B.
- Pinch the bow across the center ring so that the narrow middle is about 0.5 in (1.3 cm) wide.
- Wrap the yarn tightly around the center, from top notch to bottom notch, 8–10 times. Lay each wrap neatly beside the last.
- Tie the two ends in a firm square knot on the WS.
- Thread the ends under the wraps with a tapestry needle and trim them.
The wrap should fully hide the ring and the two notch sc stitches.
Final Blocking
- Lightly spray the bow with water until it is evenly damp, not soaking.
- Lay it RS up on the blocking mat.
- Pin the outer tip of each wing so the bow is 6 in (15.2 cm) wide.
- Pin the top and bottom of each wing so the bow is 5.5 in (14.0 cm) tall.
- Pin each scallop point so it is round and even. Ease the four windows open on each wing.
- Push the notches into a clean V shape.
- Let the bow dry completely before you unpin it.
Final Quality-Control Checklist
- Each wing has 21 dc in Row 5 and 4 open windows.
- The ring holds 10 dc, 5 for each wing.
- Round 1 has 88 sc, 44 on each half.
- Round 2 has 22 scallops, 11 on each wing.
- Both notches have a sc valley, not a scallop.
- The bow measures 6 in (15.2 cm) × 5.5 in (14.0 cm).
- The center wrap is tight and covers the ring.
- All ends are woven in on the WS.
Troubleshooting
The wings overlap at the center. You used more than half the ring for Wing A. Work exactly 5 dc into each half.
There are no notches; the bow looks like a circle. You may have extra stitches in Row 2 or Row 4. Recount: Row 2 should have 9 dc and Row 4 should have 17 dc.
The windows look closed. Make sure you chain 3, not 2, in Row 3, and block with the windows eased open.
The scallops don’t line up with the notches. Recount Round 1 to make sure there are exactly 44 sc on each half, and start Round 2 on the top notch sc.
The border ruffles along the straight edges. Use 2 sc per row-end, not 3, or go down a hook size for the border only.
The center wrap slips. Wrap tighter and pass the tails through the ring before you knot them.
Care
Hand wash in cool water and press out excess water in a towel. Lay flat to dry and reshape the scallops while the bow is damp.
Final Notes
Here is the measurement chain:
- Each pink row adds 0.5 in (1.3 cm), so each wing reaches 2.5 in (6.4 cm) after Row 5.
- The two wings together make a 5 in (12.7 cm) × 4.5 in (11.4 cm) bow.
- The 0.5 in (1.3 cm) border brings it to 6 in (15.2 cm) × 5.5 in (14.0 cm).
The stitch math follows the same steps: 21 dc on each wing’s outer row becomes 44 sc on each half and 88 sc in total. That divides into 22 scallops, with a sc valley at both notches.
Once one bow measures right, the rest will match.
Happy crocheting!