

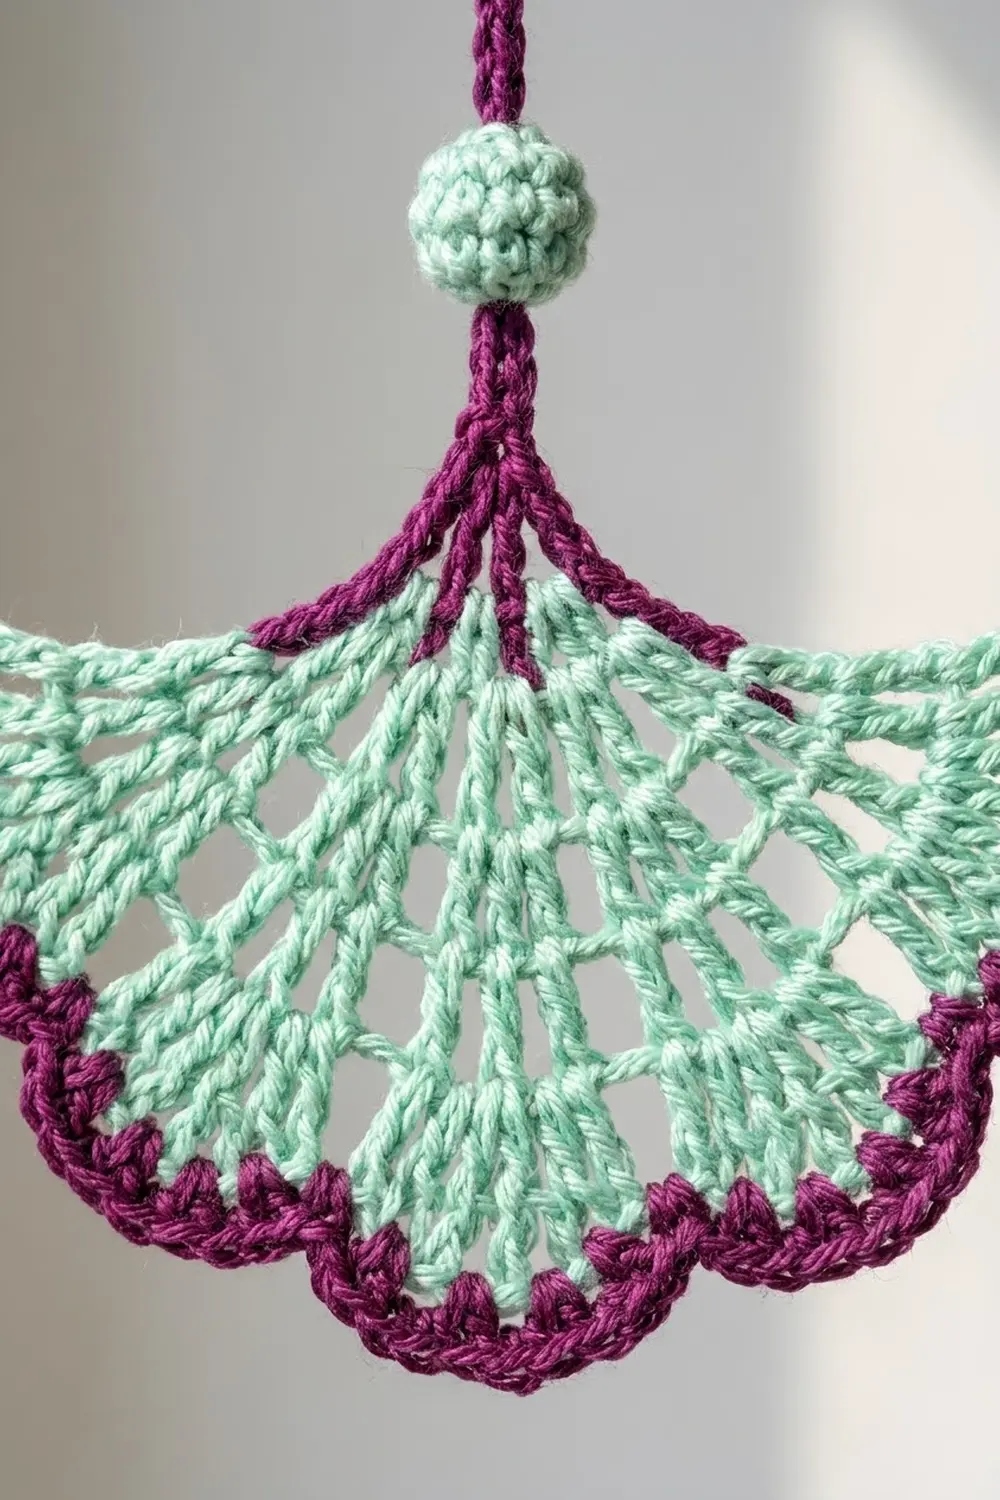
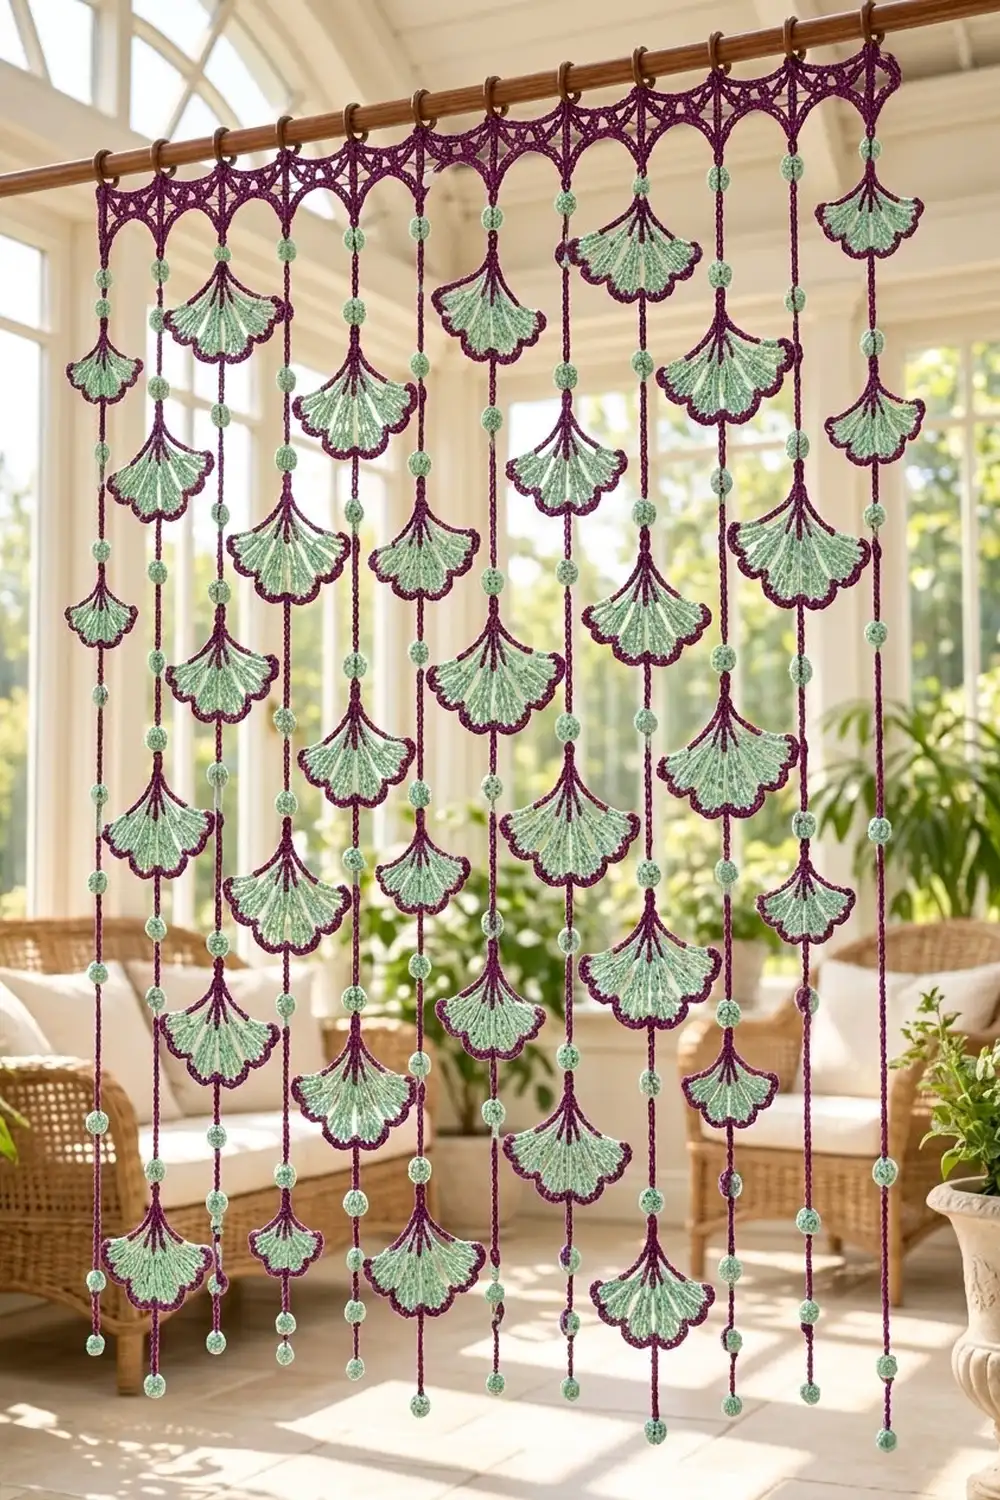
This curtain has columns of small ginkgo fans hanging from a lace header. Each mint fan is worked in open double crochet rows, edged with six plum scallops, and topped with a short stem and a round mint ball. The fans hang stem-up on plum cords. Neighboring cords are offset by half a motif, so the fans interlock as they fall.
The palette is soft mint for the fans and balls, with deep plum for all edging, cords and the header. The plum edge makes each fan read clearly against a bright window.
The pattern uses US crochet terms. The finished curtain is 40 in (101.6 cm) wide. The long strands drop 46.75 in (118.7 cm) from the top of the header, and the short strands drop 43.75 in (111.1 cm).
The construction is modular. You make fan units (fan, stem and ball) and join them into strands from the bottom up, adding each connector cord as part of the fan’s edging round. Then you work the lace header and attach the top of each strand as you go.
Finished Size and Construction
- Finished size: 40 in (101.6 cm) wide × 46.75 in (118.7 cm) at the longest strand
- Skill level: Intermediate
- Terminology: US
- Yarn weight: Sport (#2) mercerized cotton
- Hook: 3.5 mm (E-4)
- Number of pieces: 72 fan units, 11 end balls, 1 header
- Layout: 11 strands, 4 in (10.2 cm) apart. Six long strands of 7 units alternate with five short strands of 6 units.
- Fan unit size: fan 4 in (10.2 cm) wide × 2.5 in (6.4 cm) tall. One full unit repeat is 6 in (15.2 cm).
- Size before header: 40 in (101.6 cm) from the center of strand 1 to the center of strand 11
- Header (border) depth: 2 in (5.1 cm) at the points, 1.25 in (3.2 cm) at the middle of each arch
Materials
Use a smooth mercerized cotton. It gives crisp scallops and holds the fan ribs open. The amounts below assume about 3.1 m per gram (roughly 155 m per 50 g).
- Mint: 200 g (620 m), for 72 fans and 83 balls
- Plum: 150 g (465 m), for edgings, stems, connectors, the header and the ring tabs
Both quantities include a margin of about 25–30%.
Tools:
– 3.5 mm (E-4) hook
– Tapestry needle
– Scissors
– Locking stitch markers
– Small amount of fiberfill or mint yarn scraps for stuffing the balls
– 11 curtain rings, 1.25 in (3.2 cm)
– Blocking mat and rust-proof pins
– Light spray starch (optional)
– Curtain rod
Abbreviations (US Terms)
- ch – chain
- sl st – slip stitch
- sc – single crochet
- hdc – half double crochet
- dc – double crochet
- tr – treble crochet
- dtr – double treble crochet
- sc2tog – single crochet 2 together
- sp – space
- st(s) – stitch(es)
- tch – turning chain
- MR – magic ring
- RS – right side
Special stitch:
Sl-st cord: Chain the stated number, then sl st back along the chain, one sl st in each ch. This makes a firm, slightly thick cord that won’t stretch under the weight of the fans.
Gauge and Checkpoints
Gauge: 20 sc and 24 rows = 4 in (10.2 cm). In a loose chain, 7 ch = 1 in (2.5 cm).
Make one complete fan unit before anything else and check it against these measurements:
- After Row 2: about 2 in (5.1 cm) across the top edge
- After Row 3: about 2.75 in (7.0 cm) across
- After Row 4: about 3.5 in (8.9 cm) across
- After Round 5: 4 in (10.2 cm) wide × 2.5 in (6.4 cm) from the point to the scallop edge
- Ball: 0.75 in (1.9 cm) across
- Stem: 0.75 in (1.9 cm) long
- Connector: 2 in (5.1 cm) long
If your fan is more than 0.25 in (0.6 cm) too big, go down to a 3.25 mm hook. If it is that much too small, go up to a 3.75 mm hook. Strand length depends on the chain cords, so measure a test connector, too.
Fan Unit Pattern
Ball (make 83: 72 for fan units, 11 for strand ends)
With mint, work in continuous rounds.
- Rnd 1: 6 sc in MR. (6 sts)
- Rnd 2: 2 sc in each st around. (12 sts)
- Rnd 3: Sc in each st around. (12 sts)
- Stuff firmly.
- Rnd 4: Sc2tog 6 times. (6 sts)
Fasten off, leaving a 6 in (15.2 cm) tail. Weave the tail through the 6 front loops, pull closed and secure. The closed end is the top of the ball.
Fan (mint, worked in turned rows from the point outward)
- Row 1 (RS): Make a MR. Ch 3 (counts as dc), then work 6 dc in the ring. Pull the ring tight, but not closed flat. Turn. (7 dc)
- Row 2: Ch 4 (counts as dc + ch 1). Then dc in next dc, ch 1 5 times, and dc in the top of the tch. Turn. (7 dc + 6 ch-1 sps = 13 sts)
- Row 3: Ch 5 (counts as dc + ch 2). Then dc in next dc, ch 2 5 times, and dc in the 3rd ch of the tch. Turn. (7 dc + 6 ch-2 sps = 19 sts)
- Row 4: Ch 3 (counts as dc) and dc in the same st. Then ch 3, 2 dc in next dc 6 times, working the last 2 dc into the 3rd ch of the tch. (14 dc in 7 pairs + 6 ch-3 sps = 32 sts)
Fasten off the mint. The seven dc columns become the radiating ribs, and the chain spaces open the fan between them.
Round 5: Plum Edging, Stem and Connector
With RS facing, join plum in the first dc of Row 4. The connector is worked during this round, so check the strand assembly section before your first unit.
- Scallop edge: Sc in each of the first 2 dc. Then 7 dc in the next ch-3 sp, sc in each of the next 2 dc 6 times. This makes 6 shells, and the sc pairs between them form the valleys.
- Connector: On the 3rd repeat, work the first sc of the 4th pair. Then work the connector: ch 14, sl st through the top of the ball below, then sl st back up each of the 14 ch. Work the second sc of the pair. The connector hangs from the exact center of the scallop edge.
- Left side: Rotate to work along the row-ends. Work 2 sc in each row-end of Rows 4, 3, 2 and 1. (8 sc)
- Point and stem: Sc in the MR center. Ch 6, then sl st in the 2nd ch from the hook and in each of the next 4 ch (5 sl sts, the stem). Work 2 more sc in the MR center. (3 sc at the point)
- Right side: Work 2 sc in each row-end of Rows 1, 2, 3 and 4. (8 sc)
- Sl st to the first sc and fasten off.
Round 5 count: The scallop edge has 14 sc, worked 1 per existing dc, plus 42 dc added in the spaces, for 56 sts. Add 8 + 3 + 8 for the sides and point: 75 sts in total. The stem and connector stitches are not counted.
Sew a mint ball’s bottom to the stem tip so the ball sits directly on the stem.
Make All Pieces
Quantities:
- Mint: 72 fans and 83 balls
- Plum: 72 Round 5 edgings with stems and connectors, 11 top cords, 1 header and 11 ring tabs
- Long strands (1, 3, 5, 7, 9, 11): 7 units each, 42 in total
- Short strands (2, 4, 6, 8, 10): 6 units each, 30 in total
Layout grid (F = fan unit, header at top; each grid row equals 3 in, or 7.6 cm, of drop):
Strand:  1  2  3  4  5  6  7  8  9 10 11
Row  1:  F  .  F  .  F  .  F  .  F  .  F
Row  2:  .  F  .  F  .  F  .  F  .  F  .
Row  3:  F  .  F  .  F  .  F  .  F  .  F
Row  4:  .  F  .  F  .  F  .  F  .  F  .
Row  5:  F  .  F  .  F  .  F  .  F  .  F
Row  6:  .  F  .  F  .  F  .  F  .  F  .
Row  7:  F  .  F  .  F  .  F  .  F  .  F
Row  8:  .  F  .  F  .  F  .  F  .  F  .
Row  9:  F  .  F  .  F  .  F  .  F  .  F
Row 10:  .  F  .  F  .  F  .  F  .  F  .
Row 11:  F  .  F  .  F  .  F  .  F  .  F
Row 12:  .  F  .  F  .  F  .  F  .  F  .
Row 13:  F  .  F  .  F  .  F  .  F  .  F
Joining: Strand Assembly
Each strand is built from the bottom up with join-as-you-go connectors.
- Make one end ball.
- Work the lowest fan through Row 4. In its Round 5, sl st the connector through the top of the end ball. Sew this fan’s own ball to its stem.
- Work the next fan up. In its Round 5, join the connector through the top of the ball on the unit below.
- Repeat until the strand has 7 units (long strands) or 6 units (short strands).
- Top cord: Join plum to the top of the highest ball. For long strands, ch 14 (2 in, 5.1 cm). For short strands, ch 35 (5 in, 12.7 cm). Then ch 4 and sl st in the 4th ch from the hook to make a hanging loop. Sl st back down each of the 14 (or 35) ch and fasten off into the ball.
Stitch logic: Each connector is anchored to one center sc pair above and one ball crown below. Each unit therefore hangs straight down the strand’s center line. The sl-st return pass locks the chain, so the cord keeps its length.
Tension: Chain loosely and evenly, at 7 ch per inch. Tight chains shorten the strands and break up the even 3 in (7.6 cm) offset.
Size checkpoint: Hang each strand by its loop with no added weight.
- Long strand: 2 in top cord + 7 × 6 in units + 0.75 in end ball = 44.75 in (113.7 cm)
- Short strand: 5 in top cord + 6 × 6 in units + 0.75 in end ball = 41.75 in (106.0 cm)
The 3 in (7.6 cm) difference in top cords produces the half-unit stagger.
Border: Lace Header
Header gauge: 20 sc = 4 in (10.2 cm). Each arch section is 20 sts wide (4 in, 10.2 cm), so the junction points sit exactly at the strand spacing.
With plum:
- Row 1 (top edge): Ch 202. Sc in the 2nd ch from the hook and in each ch across. Turn. (201 sc)
- Row 2 (mesh): Ch 4 (counts as dc + ch 1). Skip 1 st, then dc in next st, ch 1, skip next st across, ending with dc in the last st. Turn. (101 dc + 100 ch-1 = 201 sts)
- Row 3 (arches): Ch 5 (counts as dtr) for the first junction. Then repeat for each of the 10 sections, working 1 st into each dc and each ch-1 sp:
- Tr, tr, dc, dc, hdc, hdc, sc 7 times, hdc, hdc, dc, dc, tr, tr (19 sts)
- Dtr in the next st (junction)
Turn. (1 + 10 × 20 = 201 sts)
– Row 4 (edge and strand join): Ch 1. Sc in each st across. In each of the 11 junction dtr, work: sc, ch 1, sl st through the hanging loop of the next strand, ch 1, sc.
Row 4 count: 201 sc worked 1 per st, plus 11 extra sc and 33 picot sts (ch 1, sl st, ch 1 at each junction), for 245 sts.
Join the strands in order, alternating long and short, starting and ending with a long strand.
Ring tabs: Join plum at each of the 11 junction sts along the Row 1 top edge. Work 12 sc around a curtain ring and sl st back into the same st. Fasten off.
Why the math works: There are 10 gaps between strands, and each gap is 20 sts, which makes 200 sts. Add 1 shared end st for 201 sts at 5 sts per inch, giving 40 in (101.6 cm). Junctions fall on sts 1, 21, 41 and so on through 201. That is 11 points for 11 strands, and every junction lands on a dc in Row 2 because each one is an odd-numbered st.
Final Blocking
- Wet-block the header. Pin it flat to 40 in × 2 in (101.6 cm × 5.1 cm), pinning each junction point downward to sharpen the arches.
- Lay each strand flat. Pin each fan open to 4 in × 2.5 in (10.2 cm × 6.4 cm), fanning the ribs evenly and opening all 6 shells.
- If you want, mist the fans lightly with spray starch for crisper scallops.
- Let everything dry completely, at least 24 hours.
- Unpin and hang the curtain. Let it hang for one day, then check the strand lengths.
Final Quality-Control Checklist
- Every fan has 7 ribs, 6 shells of 7 dc and plum outlined sides.
- Every connector comes from the center sc pair and measures 2 in (5.1 cm).
- Every ball is 0.75 in (1.9 cm), firm, round and closed tight.
- Long strands are 44.75 in (113.7 cm) and short strands are 41.75 in (106.0 cm).
- The header has 201 sts per row with 11 junctions spaced 4 in (10.2 cm) apart.
- All 11 strands are joined, with long strands at both outer edges.
- All ends are woven in at least 1 in (2.5 cm) and trimmed.
Troubleshooting
- Fan cups instead of lying flat: The ch-3 spaces in Row 4 are too tight. Chain looser or use ch 4.
- Fan ruffles: Work 6 dc per shell instead of 7, or go down a hook size for Round 5.
- Fans tilt sideways: The connector isn’t centered. Re-work it between the 4th sc pair.
- Strands too long: Chains are loose. Re-make the connectors with 13 ch, or block without stretching.
- Header narrower than 40 in (101.6 cm): Tight foundation. Re-chain with a hook one size larger, keeping 202 ch.
- Balls look lumpy: Stuff more evenly and pull the closing tail firmly.
Care
Hand-wash in cool water with mild soap, roll in a towel and lay flat to dry. Re-pin the fans if they lose their shape.
Final Notes
Everything in this curtain builds on gauge: 20 sc to 4 in (10.2 cm) and 7 ch to 1 in (2.5 cm). Each fan grows from 7 to 13 to 19 to 32 stitches, then Round 5 brings it to 75 sts and 4 in (10.2 cm) wide. Each 6 in (15.2 cm) unit repeats 7 or 6 times per strand, and the header’s 201 stitches place 11 strands exactly 4 in (10.2 cm) apart across 40 in (101.6 cm). Check each link in that chain and the curtain will hang straight, staggered and even.
Happy crocheting!