

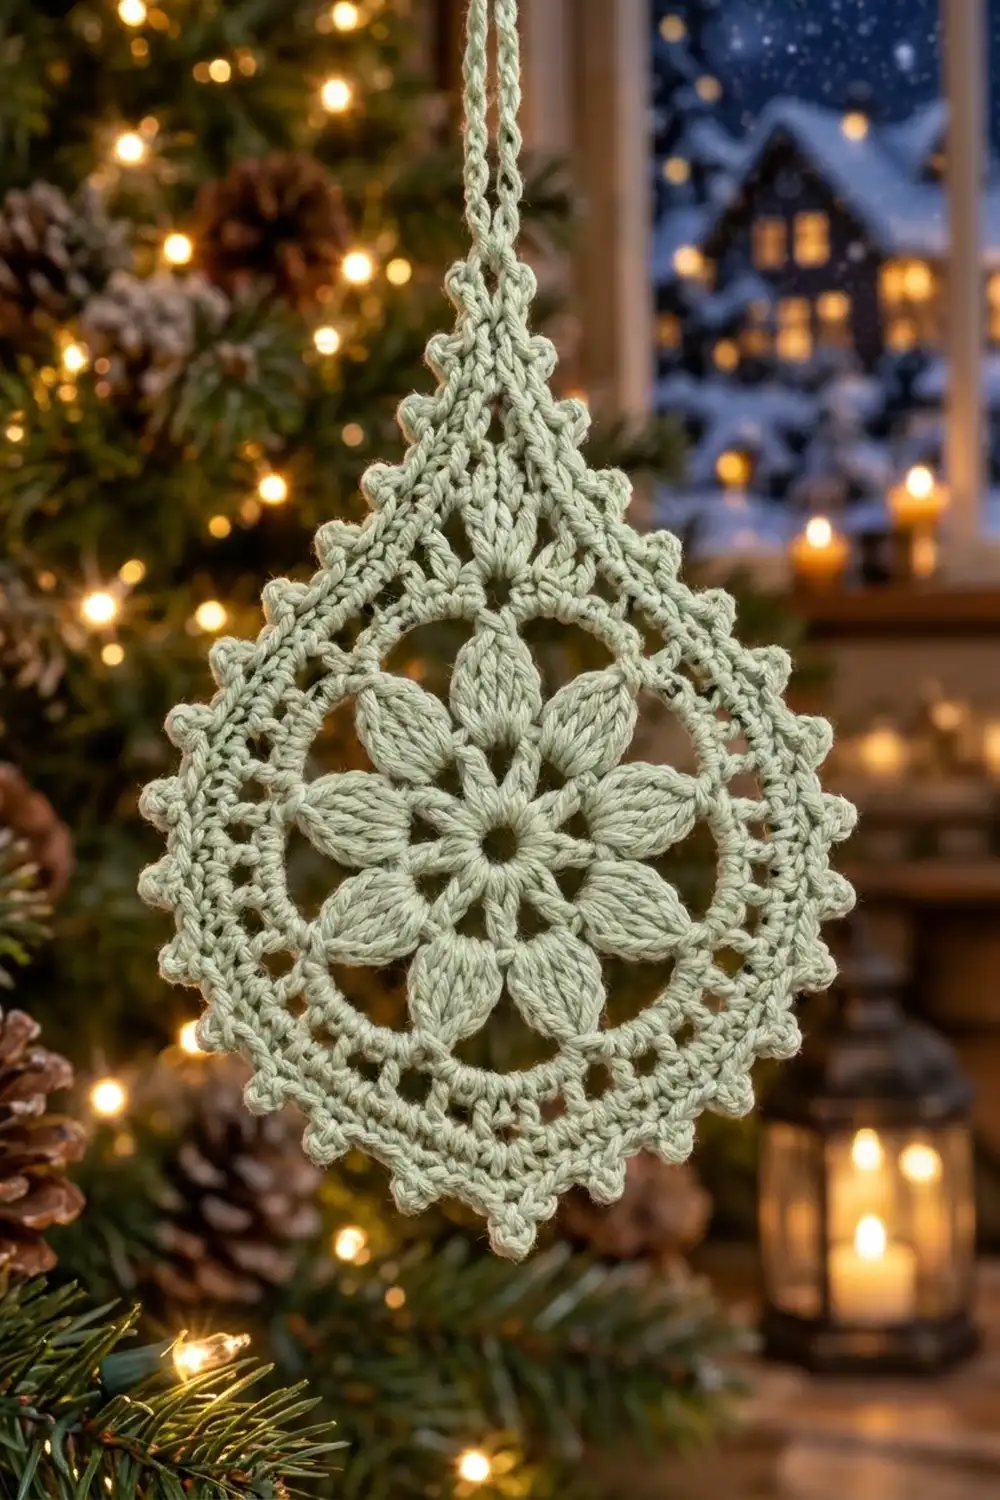
This ornament is a small piece of lace for your tree. A teardrop shape frames an eight-petal flower, an open lattice ring and a soft picot edge, all worked in one calm sage green. It looks delicate but holds its shape well, and it feels a little vintage.
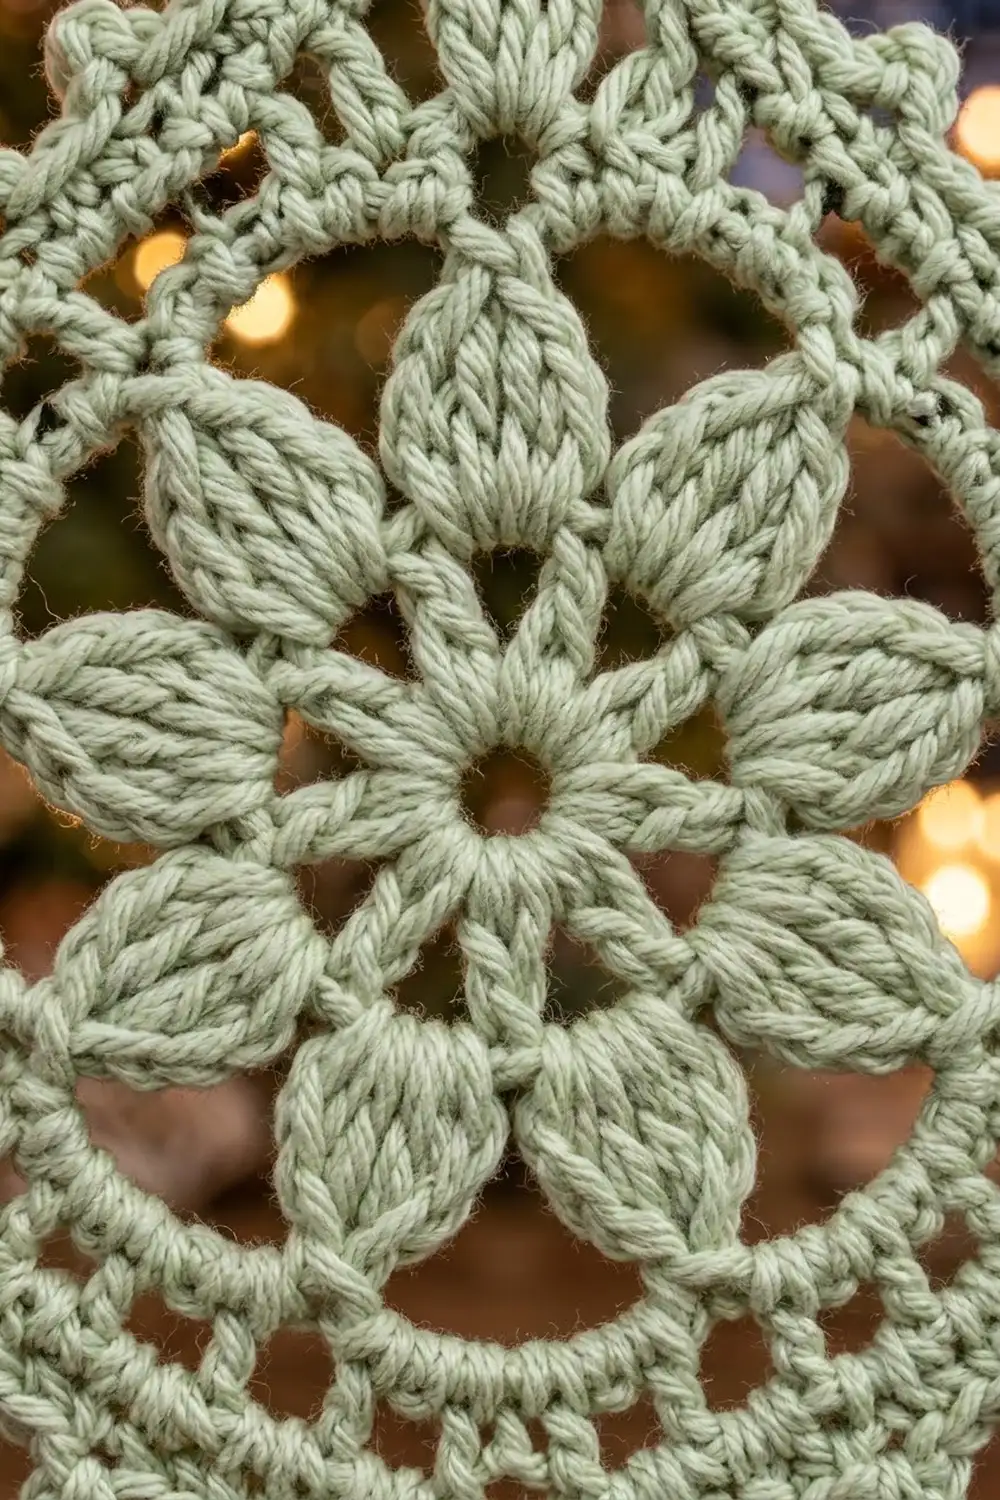
The design uses one color of fingering-weight cotton. The center flower is made of leaf clusters, so each petal has a raised, pointed look. Around the flower are a solid ring, a mesh band and a neat edge. Short rows at the top form the point, and a chain loop hangs from the tip.
The pattern uses US crochet terms. The finished ornament is 3.5 in (8.9 cm) wide and 5.25 in (13.3 cm) tall, plus a 2.5 in (6.4 cm) hanging loop.
Construction is simple. First you crochet a flat circle in six rounds. Then you work six short rows across the top of the circle to build the point. Last, you work a two-round edging around the whole outline and add the loop at the tip. You never fasten off between the rows and the edging.
Finished Size and Construction
- Finished size: 3.5 in (8.9 cm) wide × 5.25 in (13.3 cm) tall, not counting the loop
- Hanging loop: about 2.5 in (6.4 cm) long when folded
- Skill level: Intermediate
- Terminology: US crochet terms
- Yarn weight: Fingering (#1), mercerized cotton
- Hook: 2.75 mm (US C-2)
- Number of pieces: 1
- Layout: One motif: a circle with a pointed short-row section on top
- Circle size after Round 6: 3 in (7.6 cm) across
- Size before border: 3 in (7.6 cm) wide × 4.75 in (12.1 cm) tall
- Border depth: 0.25 in (0.6 cm) on every edge
Materials
Yarn: Use a smooth mercerized cotton in fingering weight. Cotton shows the petal texture clearly and holds a crisp point after blocking. Avoid fuzzy yarns, because they blur the lattice.
- Sage green: 10 g (about 40 m)
Tools:
- 2.75 mm (US C-2) crochet hook
- Tapestry needle
- 2 locking stitch markers
- Rustproof pins and a foam blocking mat
- Spray bottle, plus optional fabric stiffener or spray starch
- Scissors
The yarn amount includes a safety margin. One ornament uses about 5 g (20 m).
Abbreviations (US Terms)
- ch: chain
- sl st: slip stitch
- sc: single crochet
- sc2tog: single crochet 2 together
- dc: double crochet
- dc4tog: double crochet 4 together
- tr: treble crochet
- sp: space
- st(s): stitch(es)
- RS / WS: right side / wrong side
Special stitches
Leaf cluster (lc): Yo twice, insert hook in the indicated st, yo and pull up a loop, (yo, pull through 2 loops) twice. Repeat from * to * 3 more times in the same st (5 loops on hook). Yo and pull through all 5 loops. That makes a 4-tr cluster.
Beginning leaf cluster (beg lc): Ch 3, then work the lc steps 3 times instead of 4 (4 loops on hook). Yo and pull through all loops.
Picot: Ch 3, sl st in the 3rd ch from the hook.
Gauge and Checkpoints
Gauge is not critical for an ornament, but it controls the final size and how flat the piece lies. Make one circle first, measure it at each checkpoint, and only then move on to the top section.
- After Round 1: 0.75 in (1.9 cm) across
- After Round 3: 1.6 in (4.1 cm) across
- After Round 4: 2.1 in (5.3 cm) across
- After Round 5: 2.75 in (7.0 cm) across
- After Round 6: 3 in (7.6 cm) across, lying flat
- After Row 6: 4.75 in (12.1 cm) from the bottom of the circle to the tip
- After the edging: 3.5 in (8.9 cm) × 5.25 in (13.3 cm)
If your circle is too big (over 3.25 in / 8.3 cm after Round 6), go down to a 2.5 mm hook. If it’s too small (under 2.75 in / 7.0 cm), go up to a 3.0 mm hook. If the circle ruffles, try a smaller hook. If it cups, try a larger one. Change hooks before you go on to the rows.
Pattern
Circle
Round 1 (RS): Make a magic ring. Ch 3 (counts as dc), work 15 dc in the ring. Pull the ring closed, leaving a small center hole. Join with a sl st to the top of the beg ch-3. (16 dc)
Round 2: Beg lc in the same st as the join, ch 3, skip next st. Lc in next st, ch 3, skip next st. Repeat from * 6 more times. Join with a sl st to the top of the beg lc. (8 leaf clusters, 8 ch-3 sps)
Each petal uses 2 sts of Round 1: one for the cluster and one skipped under the chain. 8 × 2 = 16, so the round lines up with Round 1.
Round 3: Ch 1, sc in the top of the same cluster, ch 4. Sc in the top of the next lc, ch 4. Repeat from * 6 more times. Join with a sl st to the first sc. (8 sc, 8 ch-4 sps)
The ch-4 arches pull the petal tips outward so the flower opens flat.
Round 4 (conversion round): Ch 3 (counts as dc), 5 dc in the next ch-4 sp. Dc in the next sc, 5 dc in the next ch-4 sp. Repeat from * 6 more times. Join with a sl st to the top of the beg ch-3.
Count: 8 dc (1 per sc) + 40 dc (5 per space × 8 spaces) = 48 dc.
This is the solid ring that frames the flower.
Round 5: Ch 5 (counts as dc + ch 2), skip next st. Dc in next st, ch 2, skip next st. Repeat from * 22 more times. Join with a sl st to the 3rd ch of the beg ch-5. (24 dc, 24 ch-2 sps)
This is the lattice band. Each repeat uses 2 sts, and 24 × 2 = 48.
Round 6 (conversion round): Ch 1, sc in the same st as the join, 2 sc in the next ch-2 sp. Sc in the next dc, 2 sc in the next ch-2 sp. Repeat from * 22 more times. Join with a sl st to the first sc. Fasten off.
Count: 24 sc (1 per dc) + 48 sc (2 per space × 24 spaces) = 72 sc.
Check that the circle measures 3 in (7.6 cm) across and lies flat.
Teardrop Point (Short Rows)
Lay the circle RS up and choose any sc as the top center. Count 12 sts to the right and mark that st as st 1. Count 12 sts to the left of center and mark that st as st 25. The top section uses these 25 sts, about one third of the circle.
In every row below, chain spaces count as stitches. Each row skips 2 sts at both ends, so the point narrows by 4 sts per row.
Row 1 (RS): Join yarn with a sl st in st 1. Ch 3 (counts as dc), dc in each of the next 24 sts. (25 dc)
Row 2 (WS, mesh): Turn. Sl st in each of the first 3 sts. Ch 3 (counts as the first dc, sitting in st 3). Ch 1, skip next st, dc in next st. Repeat from * 9 more times. Leave the last 2 sts unworked. (21 sts: 11 dc + 10 ch-1 sps)
Row 3 (RS, solid): Turn. Sl st in each of the first 3 sts. Ch 3 (counts as dc), then dc in each of the next 16 sts, working into each ch-1 sp as a st. Leave the last 2 sts unworked. (17 dc)
Row 4 (WS, mesh): Turn. Sl st in each of the first 3 sts, ch 3 (counts as dc). Ch 1, skip next st, dc in next st. Repeat from * 5 more times. Leave the last 2 sts unworked. (13 sts: 7 dc + 6 ch-1 sps)
Row 5 (RS, solid): Turn. Sl st in each of the first 3 sts, ch 3 (counts as dc), dc in each of the next 8 sts. Leave the last 2 sts unworked. (9 dc)
Row 6 (WS, tip): Turn. Sl st in each of the first 3 sts, ch 2 (does not count), dc4tog over the next 4 sts. Leave the last 2 sts unworked. (1 st, the tip)
Do not fasten off. The mesh rows carry the lattice from the circle up into the point. The solid rows keep the shoulders firm.
Border
Border gauge: about 7.5 sc per 1 in (2.5 cm) along the outline. This matches the sc density of Round 6, so the edging lies flat without ruffling or pulling in.
The edging covers three zones:
- Circle arc: the 47 sts of Round 6 that the rows didn’t use (72 − 25 = 47)
- Each slanted side of the point: row ends plus the stepped sts left at the end of each row
- The tip: one st
Edging Round 1 (RS)
Ch 1, turn so the RS faces you. Sc in the top of the dc4tog. This is the tip sc; mark it.
Down the first side: 1 sc in the side of Row 6, then for each of Rows 5, 4, 3, 2 and 1, work sc2tog over that row’s 2 unworked step sts, then 2 sc in the side of the row. On the slip-stitch side, work the sc2tog into the sts that hold the slip stitches.
Side count: 1 + (1 + 2) × 5 = 16 sc.
Around the circle: sc in each of the 47 unworked Round 6 sts. (47 sc)
Up the second side: for each of Rows 1, 2, 3, 4 and 5, work 2 sc in the side of the row, then sc2tog over that row’s 2 step sts. Finish with 1 sc in the side of Row 6. (16 sc)
Join with a sl st to the tip sc.
Round total: 1 + 16 + 47 + 16 = 80 sc.
Edging Round 2 (Picots and Loop)
Ch 1. In the tip sc work (sc, ch 50, sl st), which makes the hanging loop.
Next: sc in the next st, picot. Sc in each of the next 3 sts, picot. Repeat from * 25 more times. Join with a sl st to the first sc. Fasten off.
Count: 80 sc and 27 picots, plus the loop.
Why the math works: After the tip, 79 sts remain. The opening sc covers 1, and 26 repeats of 3 cover 78. 1 + 78 = 79. The picots fall on sts 1, 4, 7 … 79, counting from the tip. Because 80 − 1 = 79 and the spacing is 3, every picot has a mirror partner on the other side. One picot lands exactly at the bottom center (st 40), and two picots flank the loop.
Each edging round adds about 0.125 in (0.3 cm), for the full 0.25 in (0.6 cm) border depth.
Final Blocking
- Weave in all ends along the WS of the solid rounds, never through the lattice.
- Soak the ornament in cool water for 10 minutes, then press it gently in a towel. Don’t wring it.
- Pin it to the mat RS up. Pin the tip first, then the bottom center picot, 4.75 in (12.1 cm) apart along the body line. With the edging, the full height should be 5.25 in (13.3 cm).
- Pin the circle so it is 3.5 in (8.9 cm) across at its widest point, edging included.
- Pin each of the 8 petals outward so the leaf points look sharp.
- Pin every picot outward one at a time so they form neat points.
- Straighten the two slanted sides so they run in smooth lines from the circle to the tip.
- For a stiff ornament, mist it with fabric stiffener or starch.
- Let it dry completely, at least 12 hours, before unpinning.
Final Quality-Control Checklist
- Round counts are correct: 16, 8 clusters, 8 sc, 48, 24 dc, 72
- Row counts are correct: 25, 21, 17, 13, 9, 1
- The circle lies flat at 3 in (7.6 cm) before the edging
- Both slanted sides have 16 sc and look like mirror images
- Edging Round 1 has 80 sc, and Edging Round 2 has 27 picots
- A picot sits at the bottom center, and the loop is at the exact tip
- Finished size is 3.5 in (8.9 cm) × 5.25 in (13.3 cm)
- The center hole is closed small and the ends are secure
Troubleshooting
The petals lean or twist: Make sure each cluster goes in a st with one skipped st between clusters. Pull the cluster’s final loop snug.
The circle ruffles after Round 5: Your ch-2 spaces are too loose. Work them tighter or use a smaller hook.
The circle cups after Round 6: Your sc are too tight. Loosen up a little or go up a hook size for Round 6 only.
The point leans to one side: You probably sl st’d across 2 sts instead of 3 at the start of a row. Count the stitches in each row before turning.
The sides look jagged: Use sc2tog across each step. Blocking with pins along a straight line smooths out the rest.
The picots look uneven: Count the 3 sc between picots each time. Pin each picot during blocking.
The loop twists: Before blocking, sl st back along the chain for a firmer cord, or block the loop flat.
Care
Hand wash in cool water with mild soap, press out the water in a towel, and dry flat with pins. Store flat or hanging between layers of tissue so the picots stay crisp.
Final Notes
Here is the measurement chain:
- The circle grows from 0.75 in (1.9 cm) to 3 in (7.6 cm) across over six rounds, ending at 72 sc.
- Twenty-five of those stitches carry six short rows (25, 21, 17, 13, 9, 1) up to a point 4.75 in (12.1 cm) from the bottom.
- An 80-stitch edging (47 on the arc, 16 per side, 1 at the tip) with 27 symmetrical picots adds 0.25 in (0.6 cm) all around.
The result is a 3.5 in (8.9 cm) × 5.25 in (13.3 cm) ornament. Check your counts at each checkpoint, block it with care, and it will hang neatly on your tree every season.
Happy crocheting!