

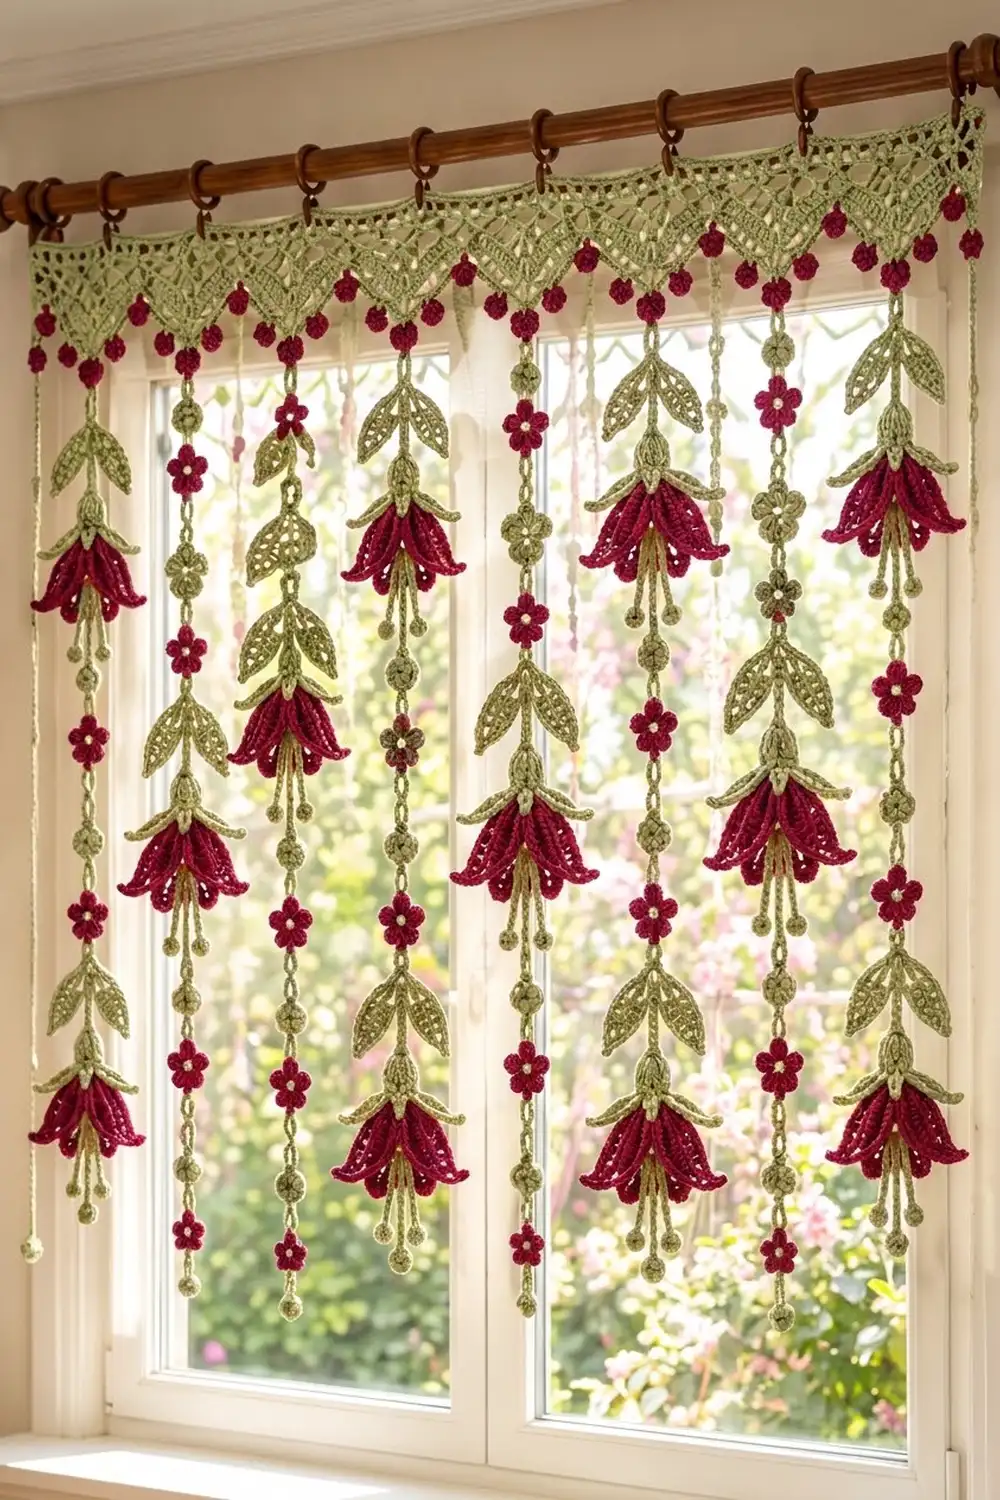
The Fuchsia Rain Curtain is a lace window hanging. A sage-green valance with pointed lace triangles runs across the top, and fifteen strands hang below it. Eight strands carry burgundy fuchsia bells with leaf pairs. The seven strands between them carry tiny burgundy flowers and round sage beads.
The palette uses three colors: soft sage green for the lace, leaves, calyxes and cords, deep burgundy for the bells, berry trim and small flowers, and a bit of cream for the flower centers. The look is cottage-garden and romantic, and it works well in a kitchen or sunny breakfast-nook window.
This pattern uses US crochet terms. The finished curtain is 32 in (81.3 cm) wide and drops about 32.5 in (82.6 cm) from the top of the header to the lowest stamen.
Construction is modular. You crochet eight mesh triangles, join them with the first row of a four-row header, then work the cords straight off the valance. The fuchsias, leaves and small flowers are made separately and sewn onto the cords.
Finished Size and Construction
- Finished size: 32 in (81.3 cm) wide x about 32.5 in (82.6 cm) long
- Skill level: Intermediate
- Terminology: US crochet terms
- Yarn weight: Super fine / fingering (#1) mercerized cotton
- Hook: 2.5 mm
- Number of pieces: 8 triangles, 24 fuchsias, 24 stamen clusters, 48 leaves, 49 small flowers; 15 cords worked onto the valance
- Layout: 8 triangles in one row; 8 fuchsia strands at the points, 7 flower strands at the seams
- Piece size (triangle): 4 in (10.2 cm) across the top x 3.25 in (8.3 cm) deep
- Size before border: 32 in (81.3 cm) x 3.25 in (8.3 cm)
- Border (header) depth: 1.1 in (2.8 cm)
Materials
Choose a mercerized cotton of about 170 m per 50 g. It shows lace clearly, holds a petal shape and doesn’t sag much when it hangs.
- Sage green: 150 g (510 m)
- Burgundy: 110 g (374 m)
- Cream: 5 g (17 m)
These quantities include a margin of about 15%.
Tools: 2.5 mm hook, tapestry needle, 10 stitch markers, measuring tape, scissors, rust-proof pins, blocking mat, spray bottle, 9 clip curtain rings and a curtain rod.
Abbreviations (US Terms)
- ch chain
- sl st slip stitch
- sc single crochet
- hdc half double crochet
- dc double crochet
- tr treble crochet
- dc3tog double crochet 3 together
- FPdc front post double crochet
- BLO / FLO back loop only / front loop only
- sp space; st(s) stitch(es); pm place marker; RS / WS right / wrong side
Bobble: (Yo, insert hook in st, yo, pull up a loop, yo, pull through 2 loops) 4 times in the same st, yo, pull through all 5 loops. Push it to the RS.
Chain bead: Ch 3, work a bobble in the 3rd ch from hook, ch 1 to lock. Then keep chaining.
Gauge and Checkpoints
- 25 sc and 26 sc rows = 4 in (10.2 cm)
- 10 dc rows = 4 in (10.2 cm), so each mesh row is 0.4 in (1.0 cm)
- 9 ch = 1 in (2.5 cm)
Make one complete triangle first and treat it as your gauge swatch.
- After Row 1: 4 in (10.2 cm) wide
- After Row 8: about 2.95 in (7.5 cm) deep
- After the berry trim: 3.25 in (8.3 cm) deep, with flat sides
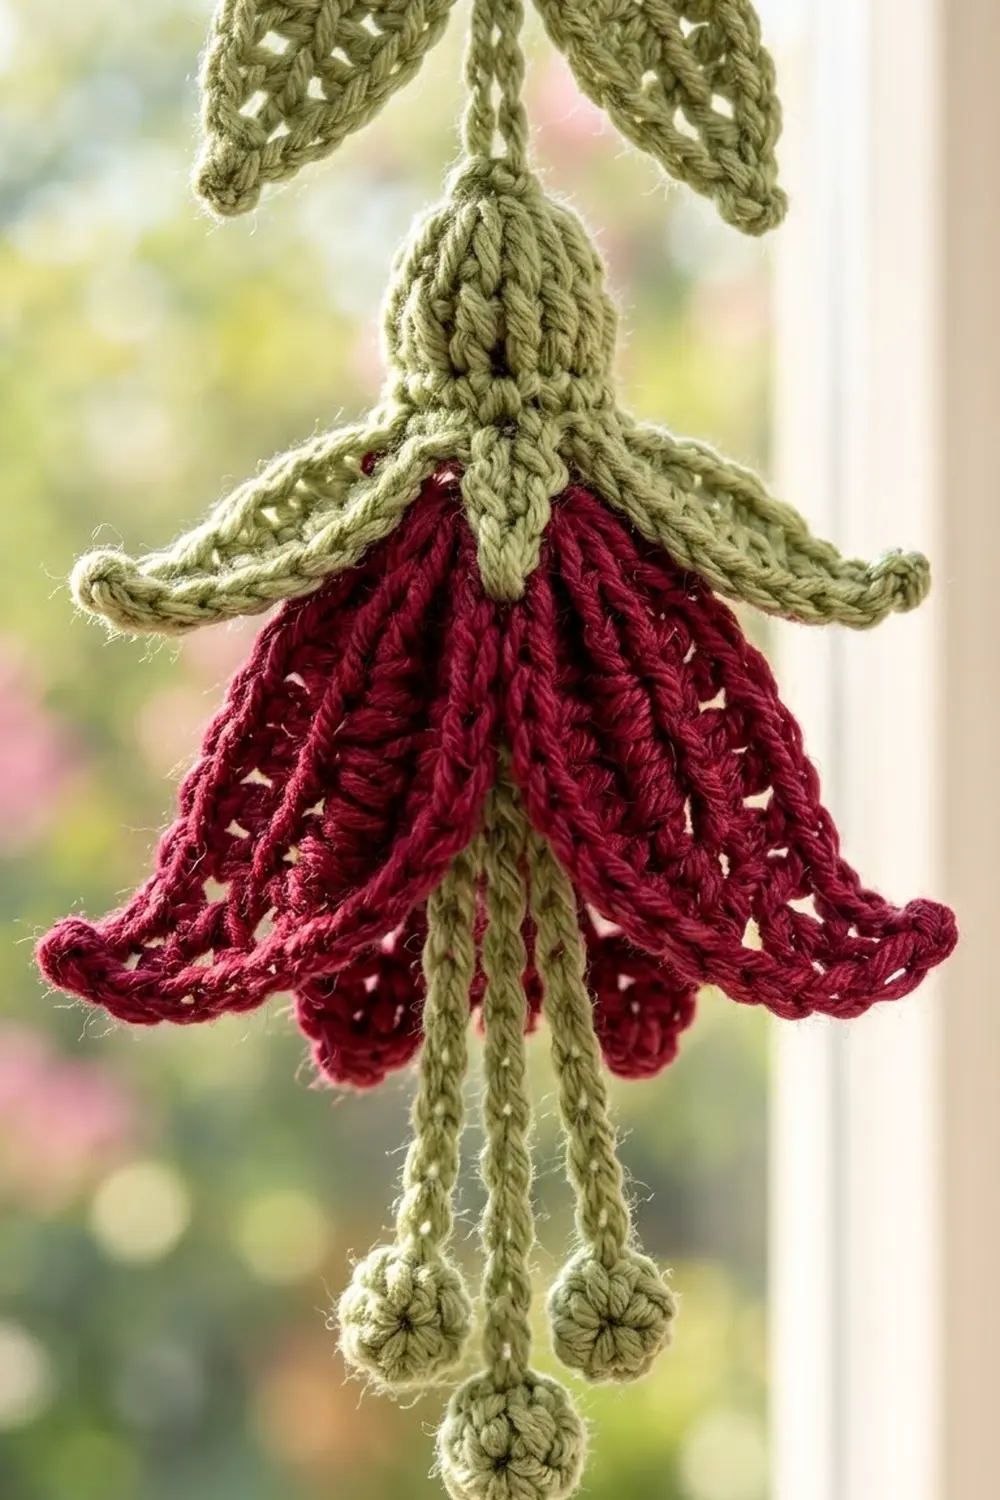
- Fuchsia: after Rnd 2 the calyx is about 0.6 in (1.5 cm) across; the finished bell is about 2.25 in (5.7 cm) tall and 2.5 in (6.4 cm) across the petals
If Row 1 comes out wider than 4 in (10.2 cm), go down to a 2.25 mm hook. If it’s narrower, go up to a 2.75 mm hook. Getting the triangle width right matters most, because eight of them set the full 32 in (81.3 cm) width.
Lace Triangle (make 8)
Worked in rows from the top edge down to the point, with sage.
Row 1 (RS): Ch 26, sc in 2nd ch from hook and in each ch across. Turn. (25 sc)
Row 2: Ch 4 (counts as dc + ch 1), sk next sc, dc in next sc, ch 1, sk next sc, dc in next sc across. Turn. (13 dc + 12 ch-1 sps = 25 sts)
Row 3: Sl st in first dc, next ch-1 sp and next dc. Ch 4 (counts as dc + ch 1), dc in next dc, ch 1, dc in next dc until 2 dc remain. Leave the last ch-1 sp and dc unworked. Turn. (11 dc + 10 sps = 21 sts)
Rows 4–7 repeat Row 3, so each row loses one mesh at each end:
- Row 4: 9 dc + 8 sps = 17 sts
- Row 5: 7 dc + 6 sps = 13 sts
- Row 6: 5 dc + 4 sps = 9 sts
- Row 7: 3 dc + 2 sps = 5 sts
Row 8: Turn. Ch 2 (does not count), dc3tog over the 3 dc, skipping the sps. (1 st, the point.) Fasten off.
Edging (sage): With RS facing, join at the top right corner. Work 1 sc in the Row 1 row-end, then 3 sc in each row-end of Rows 2–8 (21 sc). That gives 22 sc for this side. Work (sc, ch 2, sc) in the top of the dc3tog. Work 3 sc in each row-end of Rows 8–2 (21 sc), then 1 sc in the Row 1 row-end, for 22 sc. Fasten off. (46 sc + 1 ch-2 sp)
Why 3 sc per row-end? Each mesh row steps in 0.32 in (0.8 cm) and down 0.4 in (1.0 cm). The slanted edge per row is about 0.51 in (1.3 cm), which matches 3 sc at gauge.
Berry trim (burgundy): With RS facing, join with a sl st in the first sc at the top right corner.
- Side 1 (23 sts including the point sc): Sl st in the same sc and the next 2 sc, bobble in next sc, sl st in next 3 sc 5 times.
- Point: Bobble in the ch-2 sp.
- Side 2 (23 sts): Sl st in next 3 sc, bobble in next sc 5 times, sl st in last 3 sc.
Fasten off. (11 bobbles, set symmetrically.)
Fuchsia (make 24)
Calyx (sage):
- Rnd 1: Magic ring, ch 1, 6 sc in ring, join. (6)
- Rnd 2: Ch 1, 2 sc in each st, join. (12)
- Rnd 3: Ch 1, sc in each st, join. (12)
- Rnd 4 (sepals, BLO of Rnd 3): Sl st in BLO of the first st. Ch 7, sc in 2nd ch from hook, hdc in next ch, dc in next 2 ch, tr in next 2 ch, sk next 2 sts, sl st in BLO of next st 4 times. The last sl st lands in the first st. (4 pointed sepals) Fasten off.
Corolla (burgundy, worked downward into the free FLO of Rnd 3):
- Rnd B1: Join in any front loop. Ch 3 (counts as dc), dc in same loop, 2 dc in each remaining loop, join. (24)
- Rnd B2: Ch 3, FPdc around next st, dc in next st, FPdc around next st 11 times, join. (12 dc + 12 FPdc = 24)
- Rnd B3: Ch 3, dc in same st, FPdc around next st, 2 dc in next st, FPdc around next st 11 times, join. (24 dc + 12 FPdc = 36)
- Rnd B4 (petals): Ch 1. Sc in next st, hdc in next st, dc in next st, tr in next st, (tr, ch 3, tr) in next st, tr in next st, dc in next st, hdc in next st, sc in next st 4 times, join. (40 sts + 4 ch-3 points; 4 flared petals)
Fasten off and leave a 10 in (25.4 cm) sage tail at the calyx top.
Stamen Cluster (make 24)
With sage, make a slip knot.
- Ch 28, bobble in 4th ch from hook, sl st in next 24 ch.
- Ch 34, bobble in 4th ch from hook, sl st in next 30 ch.
- Ch 28, bobble in 4th ch from hook, sl st in next 24 ch.
Fasten off with an 8 in (20.3 cm) tail. Pass the tail up through the center of the bell and sew it under Rnd 1. The stamens should hang 1–1.5 in (2.5–3.8 cm) below the petals.
Leaf (make 48)
With sage, ch 9.
- Sc in 2nd ch from hook, hdc in next ch, dc in next 3 ch, hdc in next ch, sc in next ch (7 sts).
- Work 3 sc in the last ch to round the base.
- Rotate and work along the other side of the chain: sc, hdc, dc in next 3, hdc, sc (7 sts).
- Sl st in the skipped ch, ch 2, sl st in 2nd ch from hook to make the tip.
(17 sts + tip; 1.25 in / 3.2 cm long) Leave a tail at the base.
Small Flower (make 49)
With burgundy:
- Rnd 1: Magic ring, ch 1, 10 sc, join. (10)
- Rnd 2: (Ch 2, dc, ch 2, sl st) in next st, sl st in next st 5 times. (5 petals)
Fasten off. With cream, make a French knot in the center. (0.75 in / 1.9 cm across)
Hanging Strands (work after the header)
Fuchsia strand (8): With RS facing, join sage in the ch-2 sp behind a point bobble. Ch 216 for 24 in (61.0 cm). Sl st in the back bump of each ch back up the cord (216 sl st), sl st into the point, and fasten off.
Measuring down from the point, pm at 3 in (7.6 cm), 13 in (33.0 cm) and 23 in (58.4 cm) for the leaf pairs. Pm at 4 in (10.2 cm), 14 in (35.6 cm) and 24 in (61.0 cm), the cord end, for the calyx tops.
Flower strand (7): At each seam, join sage through the two corner sts where the triangles meet. Ch 18. Work a chain bead, ch 18, pm in last ch for a flower, ch 18 7 times. Work a final chain bead and fasten off. (270 ch = 30 in / 76.2 cm; about 31.5 in / 80.0 cm with the 8 beads)
Flowers sit every 4 in (10.2 cm), with a bead 2 in (5.1 cm) on either side.
Sewing on: Sew 2 leaves at each leaf marker with the bases on the cord and the tips angled up and out. Sew each calyx top to its marker so the bell hangs straight down. Sew one flower at each flower marker.
Make All Pieces
- Sage: 8 triangles with edging, 24 calyxes, 24 stamen clusters, 48 leaves, 8 fuchsia cords, 7 flower cords with 56 beads
- Burgundy: 8 berry trims (88 bobbles), 24 corollas, 49 small flowers
- Cream: 49 French knots
|<------------ header: 200 sts = 32 in (81.3 cm) ------------>|
 \T1/ \T2/ \T3/ \T4/ \T5/ \T6/ \T7/ \T8/
  F  b  F  b  F  b  F  b  F  b  F  b  F  b  F
F = fuchsia strand at a point (8)   b = flower strand at a seam (7)
Joining
The triangles are joined by working the first header row across all of them.
With the RS facing and the foundation edges on top, join sage at the right corner of Triangle 1. Ch 1, then sc in each of its 25 free foundation loops. Go straight into the first free loop of Triangle 2 without chaining and work 25 sc. Continue across all 8 triangles. (8 x 25 = 200 sc)
No stitches are added or skipped at the seams. Each corner sc just sits next to its neighbor. Tack the touching Row 1 row-ends together with 2 whipstitches.
Keep the tension relaxed, and don’t pull the work tight as you cross a seam. Checkpoint: the row measures 32 in (81.3 cm) laid flat.
Border (Header)
The header uses the same gauge as the triangles: 25 sts = 4 in (10.2 cm).
- Row 1: The joining row. (200 sc)
- Row 2: Turn. Ch 3 (counts as dc), dc in each st across. (200 dc)
- Row 3: Repeat Row 2. (200 dc)
- Row 4: Turn. Ch 1, sc in each st across. (200 sc) Fasten off.
The header has no corners, so every row keeps the full 200 sts. The two short ends are just row-ends, with nothing added there.
Why the math works: 200 sts ÷ 6.25 sts per in = 32 in (81.3 cm). Seams fall every 25 sts, or 4 in (10.2 cm). Clip one ring at each end and one at each of the 7 seams, for 9 rings spaced 4 in (10.2 cm) apart.
Depth: 2 sc rows (0.3 in / 0.8 cm) + 2 dc rows (0.8 in / 2.0 cm) = 1.1 in (2.8 cm). With the triangles, the valance is 4.35 in (11.0 cm) deep.
Final Blocking
- Pin the valance flat to 32 in x 4.35 in (81.3 cm x 11.0 cm), with a pin at every triangle point.
- Mist it until damp, then let it dry completely.
- Stuff each fuchsia bell with tissue. Pinch the petal tips outward and mist them.
- Hang the curtain and mist the cords lightly. Let them dry straight, with nothing weighting them.
Final Quality-Control Checklist
- [ ] Header is 200 sts per row and 32 in (81.3 cm) wide
- [ ] All 8 triangles are 3.25 in (8.3 cm) deep, with 11 bobbles each
- [ ] 8 fuchsia strands at 24 in (61.0 cm) and 7 flower strands at about 31.5 in (80.0 cm)
- [ ] Every fuchsia has 4 sepals, 4 petals and a stamen cluster
- [ ] All tails are woven in and the flower centers are secure
Troubleshooting
- Triangle sides cup: Check that you worked 3 sc per mesh row-end.
- Sides ruffle: Go down a hook size for the edging only.
- Header wider than 32 in (81.3 cm): Count again for 200 sts, then redo it with a tighter tension.
- Petals curl inward: Re-block over tissue.
- Fuchsia cords stretch: Rework the sl st return a little firmer.
- Bobbles sit on the WS: Push them through to the front before blocking.
- Strands twist: Mist the cords and let them dry hanging.
Care
Hand wash in cool water with mild soap. Press out the water in a towel, then reshape and dry flat or hanging.
Final Notes
The measurement chain is short. One triangle is 25 sts, or 4 in (10.2 cm). Eight triangles make a 200-st header that measures 32 in (81.3 cm). The 24 in (61.0 cm) fuchsia cords and 30 in (76.2 cm) flower cords bring the drop to about 32.5 in (82.6 cm). If you check the first triangle, everything after it will line up.
Happy crocheting!