

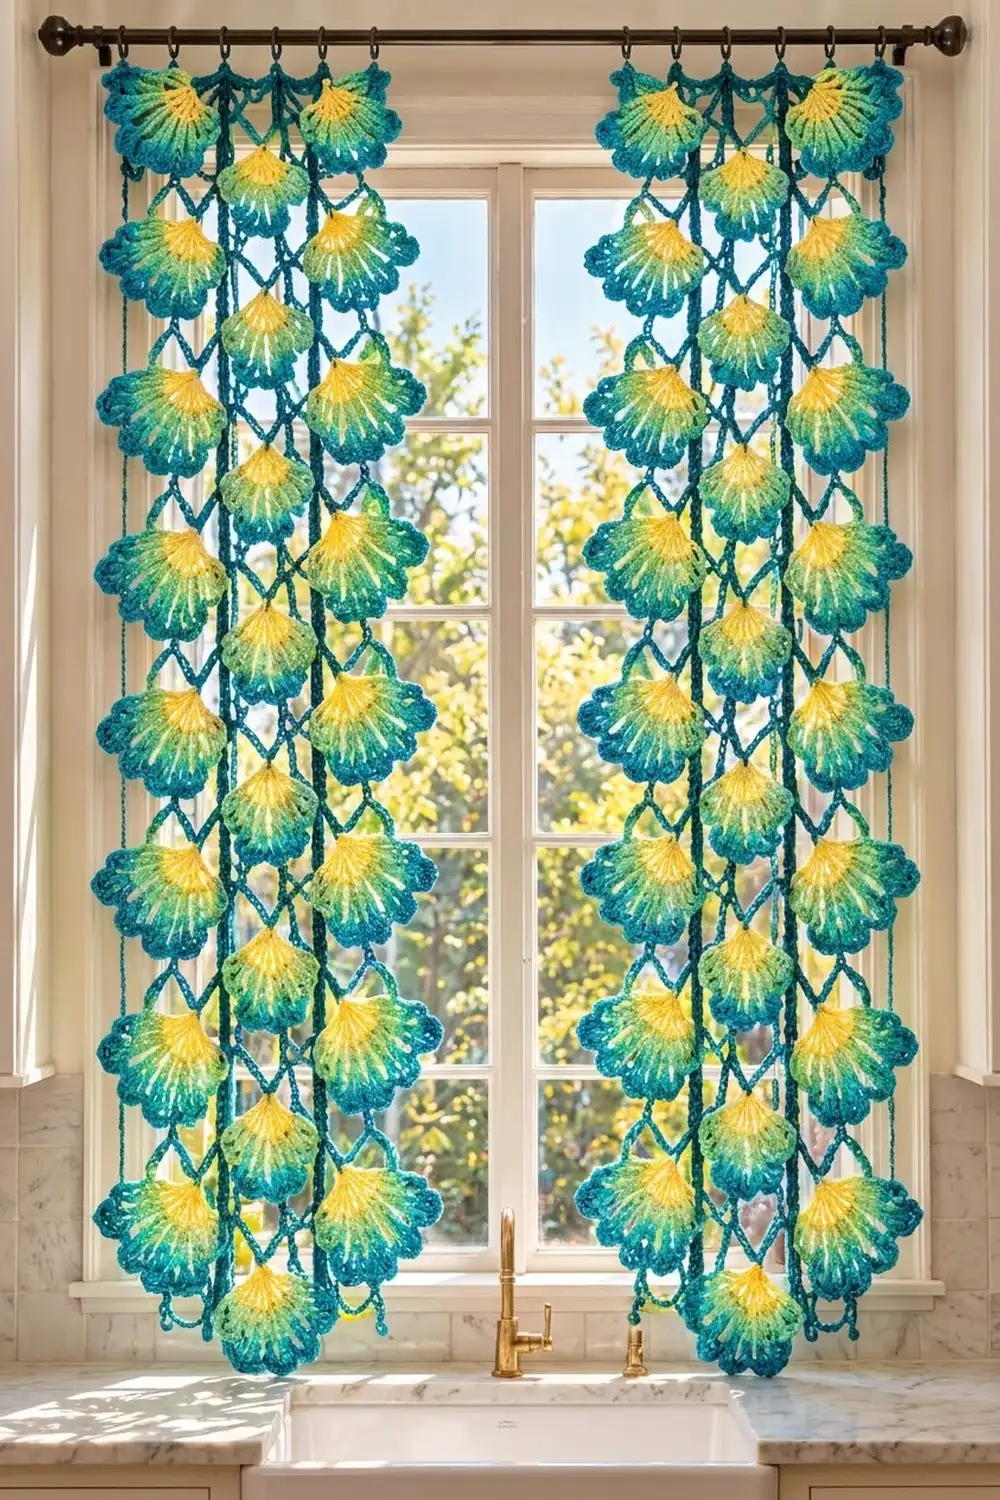
These curtain panels are made from small ginkgo-style fan motifs that hang in staggered columns along deep teal chain strands. Diagonal chains between the strands form a light diamond lattice, so the panels filter sunlight without blocking the view.
Each fan shades from sunny yellow at the base through lime green and aqua to a deep teal scalloped edge. The look is cheerful and botanical, and the colors work well in a kitchen or sunroom window.
The pattern uses US crochet terms. Each finished panel is 14.25 in (36.2 cm) wide at the header and 57 in (144.8 cm) long, not counting the hanging tabs. The pattern makes two panels.
Here is the construction in short. First you crochet 52 identical fan motifs in rows from a small ring. Then you hang them on chain strands as you crochet each strand, and work a diagonal chain lattice between the strands. A narrow single crochet header with rod tabs finishes the top.
Finished Size and Construction
- Finished panel size: 14.25 in (36.2 cm) wide x 57 in (144.8 cm) long, plus tabs
- Skill level: Intermediate
- Terminology: US crochet terms
- Yarn weight: DK (weight 3) cotton or cotton blend
- Hook: 4.0 mm (G-6)
- Number of pieces: 52 fan motifs (26 per panel) + 2 headers
- Layout per panel: 3 vertical strands; the outer strands hold 9 motifs each and the center strand holds 8, offset by half a step
- Motif size: 5 in (12.7 cm) wide x 3 in (7.6 cm) tall for the fan; 4 in (10.2 cm) tall including the stem
- Size before header: strands and lattice measure 56 in (142.2 cm) long
- Header depth: about 1 in (2.5 cm), with tabs rising about 1.2 in (3.0 cm) above it
Materials
Use a smooth, mercerized DK cotton. It shows the spokes clearly, holds the scallops crisp, and doesn’t stretch as much as acrylic when the panels hang. Quantities assume about 105 m per 50 g ball.
- Color A – Sunny Yellow: 50 g / 105 m
- Color B – Lime Green: 50 g / 105 m
- Color C – Aqua: 50 g / 105 m
- Color D – Deep Teal: 200 g / 420 m (motif edges, strands, lattice, headers)
Tools:
- 4.0 mm (G-6) crochet hook
- Tapestry needle
- Stitch markers
- Tape measure
- Rustproof pins and a blocking surface
- Spray bottle
All quantities include a safety margin of about 30–50 percent. Real use is roughly 68 m each of A and B, 73 m of C, and 280 m of D.
Abbreviations (US Terms)
- ch – chain
- sl st – slip stitch
- sc – single crochet
- hdc – half double crochet
- dc – double crochet
- tr – treble crochet
- sk – skip
- sp – space
- st(s) – stitch(es)
- RS / WS – right side / wrong side
Special stitches
- Scallop: (hdc, 5 dc, hdc) all in the same ch-3 sp. That’s 7 sts.
- Picot: ch 3, sl st in 3rd ch from hook.
- Center scallop: (hdc, 2 dc, tr, picot, tr, 2 dc, hdc) all in the same ch-3 sp. That’s 8 sts plus 1 picot.
Gauge and Checkpoints
Chain gauge: 5 ch = 1 in (2.5 cm), worked in D.
Header gauge: 16 sc and 18 rows = 4 in (10.2 cm).
Make one motif first and measure it before you make the rest. The checkpoints:
- After Row 2: the fan measures 2.5 in (6.4 cm) across.
- After Row 4: the fan measures 4 in (10.2 cm) across.
- After Row 5 and edging: the fan measures 5 in (12.7 cm) wide x 3 in (7.6 cm) tall, and the stem adds 1 in (2.5 cm).
If your motif is more than 0.25 in (0.6 cm) too big, go down 0.5 mm in hook size. If it’s too small, go up 0.5 mm. The motif size sets the strand spacing, so don’t skip this test.
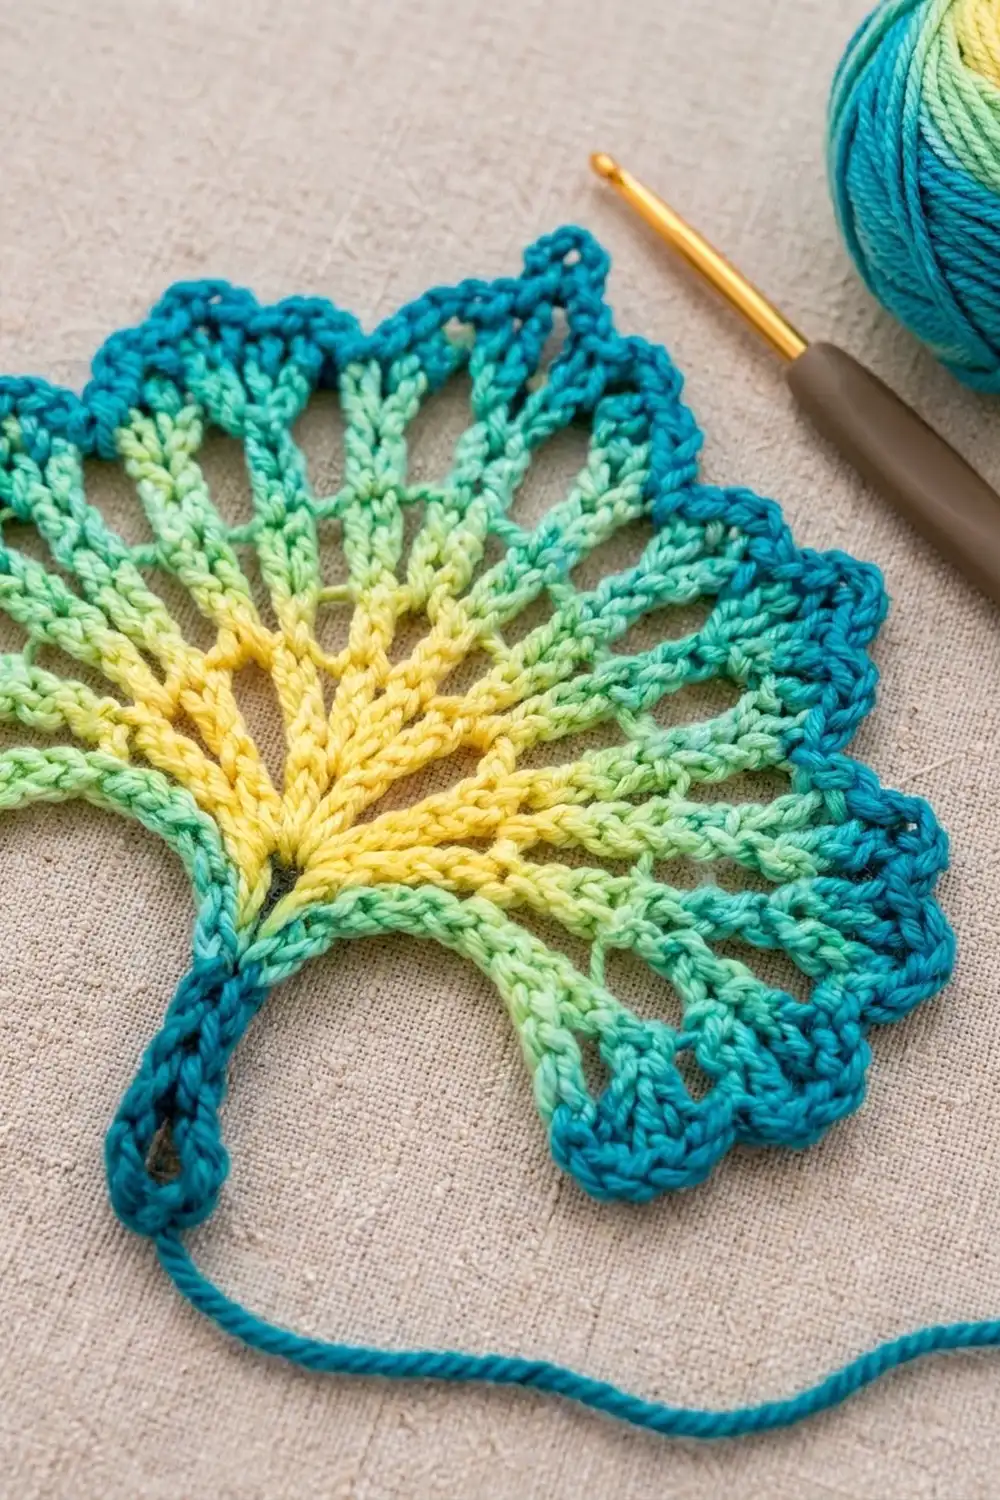
Fan Motif (make 52)
The motif is worked in rows. Row 1 is the RS.
Ring: With A, ch 4, sl st in first ch to form a ring.
Row 1 (RS, A): Ch 3 (counts as dc), 7 dc in ring. Turn. (8 dc)
These 8 sts set up the 8 spokes of the fan.
Row 2 (WS, A): Ch 4 (counts as dc + ch 1). Dc in next dc, ch 1; rep from * 5 more times. Dc in top of turning ch, changing to B in this last dc. Fasten off A. Turn. (8 dc, 1 per existing st, + 7 ch-1 sps)*
Row 3 (RS, B): Ch 3 (counts as dc), dc in same st. Ch 2, sk ch-1 sp, 2 dc in next dc; rep from * 6 more times, working the last 2 dc in the 3rd ch of the turning ch. Change to C in the last dc. Fasten off B. Turn. (16 dc in 8 pairs, 7 ch-2 sps)*
Each spoke now doubles into a pair of dc.
Row 4 (WS, C): Ch 3 (counts as dc), dc in next dc. Ch 3, sk ch-2 sp, dc in next 2 dc; rep from * 6 more times, working the last dc in the top of the turning ch. (16 dc, 7 ch-3 sps)*
Fasten off C. Turn.
Row 5 (RS, D, scallop edge): Join D in the first st. Ch 1, sc in same st and next dc.
- Work a scallop in the next ch-3 sp, then sc in the next 2 dc. Repeat 2 more times.
- Work a center scallop in the next ch-3 sp, then sc in the next 2 dc.
- Work a scallop in the next ch-3 sp, then sc in the next 2 dc. Repeat 2 more times.
(66 sts + 1 picot = 16 sc, 1 per existing dc, + 50 scallop sts. That is 6 scallops x 7 sts + 8 center sts.)
This gives the 7 rounded scallops, and the taller center scallop forms the pointed tip. Don’t fasten off.
Side edging and stem (D): Rotate the work to go down the side of the fan.
- Work 2 sc in each of the 4 row ends, down to the ring. (8 sc)
- Stem: Ch 10, sl st in 6th ch from hook to form the loop, then sl st in each of the next 4 ch back to the ring.
- Work 2 sc in each of the 4 row ends up the other side. (8 sc)
- Sl st in the first sc of Row 5.
Fasten off and weave in the ends. You now have a 5-ch hanging loop on a 5-ch stem, about 1 in (2.5 cm) long.
Make All Pieces
Make 52 motifs in total. Each motif uses about 1.3 m of A, 1.3 m of B, 1.4 m of C, and 3.8 m of D.
To work faster, make the motifs in batches. Work Rows 1–2 on ten motifs, then Row 3 on all ten, and so on. You’ll change colors less often, and the batch will look more even.
Layout for one panel (L = left strand, C = center strand, R = right strand). Each line is a 3 in (7.6 cm) drop.
Header (57 sc)
L  .  R     motif 1 (L, R)
.  C  .     motif 1 (C)
L  .  R     motif 2
.  C  .     motif 2
L  .  R     motif 3
.  C  .     motif 3
L  .  R     motif 4
.  C  .     motif 4
L  .  R     motif 5
.  C  .     motif 5
L  .  R     motif 6
.  C  .     motif 6
L  .  R     motif 7
.  C  .     motif 7
L  .  R     motif 8
.  C  .     motif 8
L  .  R     motif 9
Per panel that is 9 + 8 + 9 = 26 motifs, so you need 52 for the pair.
Joining
Make the header first (see the Header section) so the strands have something to hang from. Work all joining in D.
Strand logic: Each motif hangs fan-up. The strand passes through the center picot at the top of the fan and the stem loop at the bottom. The picot-to-loop distance is 20 ch, which is 4 in (10.2 cm), the same as the motif height. The gap below each motif is 10 ch, which is 2 in (5.1 cm). That gives a step of 30 ch, or 6 in (15.2 cm).
Outer strands (make 2 per panel):
- Join D in the free loop of the foundation ch below header st 11 (or st 47 for the right strand). Ch 10.
- Sl st through a motif’s picot. Ch 20. Sl st through the same motif’s stem loop. Ch 10. Repeat 8 more times.
- Fasten off. (280 ch = 56 in / 142.2 cm)
Center strand:
- Join D below header st 29. Ch 25.
- Work the same repeat as the outer strands 8 times.
- Ch 15 and fasten off. (25 + 240 + 15 = 280 ch)
The extra 15 ch at the top offsets the center column by 3 in (7.6 cm). That lets each center fan nestle between the outer fans.
Lattice: The strands are 4.5 in (11.4 cm) apart, and each lattice point sits 3 in (7.6 cm) lower than the one before. The diagonal between them is 5.4 in (13.7 cm), which is 27 ch.
- Join D at the first stem-loop point of the left strand.
- Ch 27, then sl st around the center strand at its next stem-loop point. Ch 27, then sl st around the left strand at its next stem-loop point.
- Repeat the zigzag to the last left motif. (16 diagonals)
- Repeat steps 1–3 between the center and right strands. (16 diagonals)
Tension: Keep every chain at gauge. A loose lattice sags, and a tight one puckers the strands. Lay the panel flat while you work the lattice, and count each diagonal twice before you slip stitch.
Size checkpoint: Lay the panel flat. The fans should span about 14 in (35.6 cm) across, and the strands should measure 56 in (142.2 cm) below the header.
Header
The header is the top border of each panel and holds the rod tabs. Use the header gauge: 16 sc = 4 in (10.2 cm).
Row 1: With D, ch 58. Sc in 2nd ch from hook and in each ch across. Turn. (57 sc)
Rows 2–4: Ch 1, sc in each sc across. Turn. (57 sc)
Row 5 (tabs): Ch 1, sc in first 2 sc. Ch 14, sk 2 sc, sc in next 15 sc; rep from * 2 more times. Ch 14, sk 2 sc, sc in last 2 sc. Turn. (49 sc + 4 ch-14 loops)*
Row 6: Ch 1. Sc in each sc, and work 16 sc in each ch-14 loop. (49 + 64 = 113 sc)
Fasten off.
Why the math works: The header width is 57 sts:
- a 10 st margin
- the left strand st (st 11)
- 17 sts
- the center strand st (st 29)
- 17 sts
- the right strand st (st 47)
- a 10 st margin
That’s 10 + 1 + 17 + 1 + 17 + 1 + 10 = 57. With 18 sts between strand points, the strands sit 4.5 in (11.4 cm) apart. The 2.5 in (6.4 cm) margins match half a fan width, so the outer fans line up with the header edges.
In Row 5, 2 + 3 x (2 + 15) + 2 + 2 = 57, so every header stitch is used. Working 16 sc into each 14-ch loop gives the tab a little ease so it slides over rods up to 0.75 in (1.9 cm) thick.
Final Blocking
- Lay one panel flat on a large clean surface, such as a bed or a floor covered with towels.
- Straighten the three strands so they’re parallel and 4.5 in (11.4 cm) apart.
- Pin each fan open to 5 in (12.7 cm) wide, and pin out each scallop and the center picot.
- Check that each diagonal lattice chain is straight but not stretched.
- Mist everything evenly with water until it’s damp.
- Let it dry completely, then unpin.
- Repeat for the second panel.
Final Quality-Control Checklist
- 26 motifs per panel, with yellow, lime, aqua, and teal in the correct rows
- Each fan has 7 scallops and a picot point at the center
- All stems and loops are secure, with no twisted loops
- 280 ch per strand, measuring 56 in (142.2 cm)
- 16 diagonals on each side of the center strand, each 27 ch
- Header has 57 sc and 4 even tabs
- All ends woven in at least 1 in (2.5 cm) and trimmed
Troubleshooting
- Fan cups upward: Your spaces are too tight. Work ch 4 instead of ch 3 in Row 4, and add 1 dc to each regular scallop.
- Fan ruffles: Go down a hook size, or work ch 1 instead of ch 2 in Row 3.
- Strands hang longer than 56 in (142.2 cm): Your chains are loose. Re-check the 5 ch = 1 in (2.5 cm) gauge, or use a smaller hook for the chains only.
- Lattice sags: Remove 1–2 ch from each diagonal.
- Motifs flip or twist: Make sure you joined through both the picot and the stem loop.
- Header waves: Go down 0.5 mm for the header rows.
Care
Hand wash the panels in cool water with a mild detergent. Roll them in a towel to remove water, then lay them flat to dry before rehanging.
Final Notes
The measurement chain runs like this:
- The motif is 5 in (12.7 cm) wide and 4 in (10.2 cm) tall with its stem.
- The 30-ch step makes a 6 in (15.2 cm) repeat on each strand.
- The strands are 280 ch, or 56 in (142.2 cm).
- The strands sit 4.5 in (11.4 cm) apart with 27-ch diagonals between them.
- The 57-st header is 14.25 in (36.2 cm) wide.
If you check the measurements at each stage, both panels will match and hang straight in your window.
Happy crocheting!