

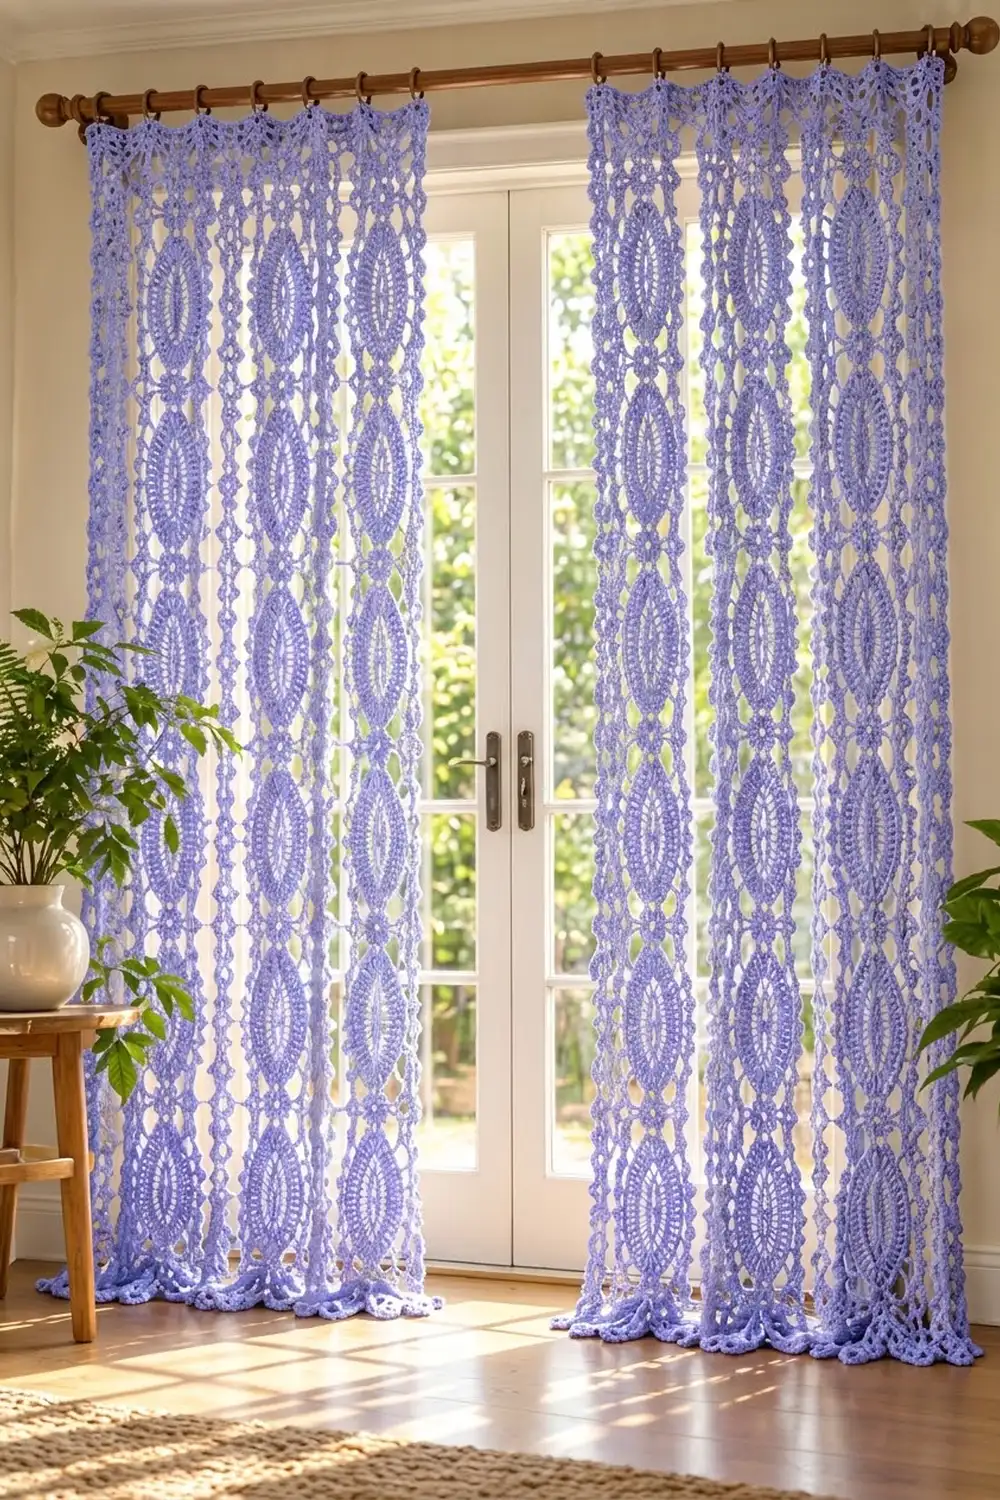
This lace curtain is made from tall, pointed oval motifs. Each one has an almond-shaped opening in the center, rings of radiating stitches and a scalloped picot edge, with a three-petal fan at both tips. When you join the motifs into columns, the petal tips meet like little flowers. Light coming through the window shows off the shapes.
The sample uses one color: a soft periwinkle lavender-blue in mercerized cotton thread. It has a crisp, vintage look that also suits modern rooms. The pattern uses US crochet terms throughout.
One finished panel measures 18 in (45.7 cm) wide and 80.75 in (205.1 cm) long, including the heading. Each motif measures 4.5 in (11.4 cm) wide and 10 in (25.4 cm) long. To dress a window like the one in the photo, make two panels.
You crochet each motif in the round, starting from a chain ring. The motifs are joined as you go in the last round, 4 across and 8 down. A short straight heading band across the top finishes each panel. The sides and bottom keep their natural scallops.
Finished Size and Construction
- Finished panel size: 18 in (45.7 cm) wide × 80.75 in (205.1 cm) long
- Skill level: Intermediate
- Terminology: US crochet terms
- Yarn weight: Size 3 mercerized cotton thread (#1 super fine / fingering)
- Hook: 2.75 mm (C-2)
- Number of pieces: 32 motifs per panel (64 for a pair)
- Layout: 4 columns × 8 motifs per panel
- Motif size: 4.5 in (11.4 cm) × 10 in (25.4 cm)
- Size before border: 18 in (45.7 cm) × 80 in (203.2 cm)
- Border depth: heading band, 0.75 in (1.9 cm) above the petal tips, top edge only
Materials
Yarn: Use a smooth, mercerized cotton thread. It gives clear stitch definition, holds its shape when blocked and won’t stretch much while hanging. Avoid fuzzy or very stretchy fibers, because long panels can grow under their own weight.
- Periwinkle: 240 g (about 720 m) per panel, or 480 g (about 1,440 m) for a pair
These amounts allow about 6 g (18 m) per motif plus about 10 g (30 m) for each heading. They also include a margin for swatching and joining.
Tools:
– 2.75 mm (C-2) crochet hook
– Tapestry needle
– Stitch markers
– Rust-proof pins and blocking mats
– Spray bottle
– Tape measure
– 7 curtain clip rings per panel
Abbreviations (US Terms)
- ch – chain
- sl st – slip stitch
- sc – single crochet
- hdc – half double crochet
- dc – double crochet
- tr – treble crochet
- dtr – double treble crochet
- sp – space
- st(s) – stitch(es)
- RS – right side
Special stitches:
– Picot: Ch 3, sl st in the 3rd ch from the hook.
– Joining picot: Ch 1, sl st in the matching picot of the neighbor motif, ch 1, sl st in the first ch of this picot.
Gauge and Checkpoints
Before you start the panel, make one complete motif and block it. It should measure 4.5 in (11.4 cm) × 10 in (25.4 cm).
Measure the motif lying flat and unstretched at each checkpoint:
- After Rnd 1: The ring, flattened, is 4.25 in (10.8 cm) long.
- After Rnd 3: 3 in (7.6 cm) wide × 6 in (15.2 cm) long.
- After Rnd 4: 3.5 in (8.9 cm) wide × 7 in (17.8 cm) long.
- After Rnd 6: 4.5 in (11.4 cm) × 10 in (25.4 cm).
Heading gauge: 24 sc = 4 in (10.2 cm).
If your motif is too big, go down 0.25 mm in hook size. If it is too small, go up 0.25 mm. If only the length is off, check your tr height in Rnd 2, because tall loose trebles stretch the oval lengthwise. Size errors add up fast: an error of just 0.25 in (0.6 cm) per motif becomes 2 in (5.1 cm) over the 8 motifs in a column.
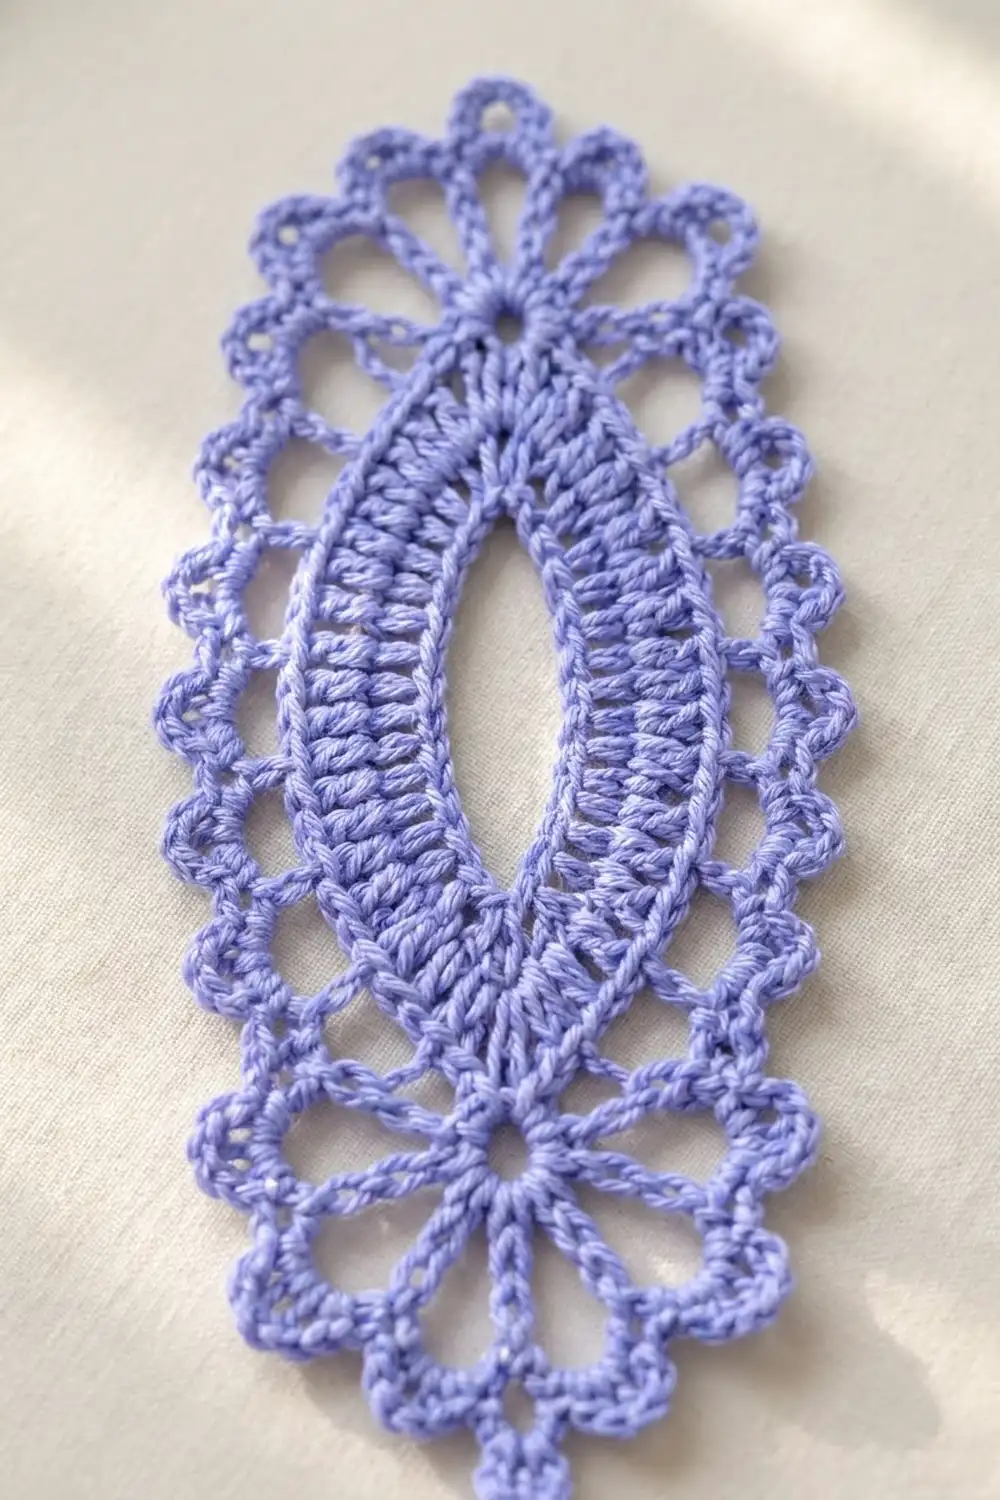
Oval Motif
Rnd 1 forms the central opening. It’s worked into a ring of chains, so the chains stay open as an almond-shaped hole.
Rnd 1: Ch 48 and sl st in the first ch to form a ring, taking care not to twist it. Ch 1, then sc in each ch around. Sl st in the first sc to join. (48 sc)
Flatten the ring. Place a marker in st 1 (Tip A) and another in st 25 (Tip B). Each long side has 23 sts between the tips.
Rnd 2 (graduated ring): Ch 3 (counts as dc), ch 3, dc in the same st (this is Tip A).
- Side 1: Hdc in next 3 sts, dc in next 4 sts, tr in next 9 sts, dc in next 4 sts, hdc in next 3 sts.
- Tip B: (Dc, ch 3, dc) in the marked st 25.
- Side 2: Work the same as Side 1.
Sl st in the 3rd ch of the beginning ch-3 to join. (50 sts: 4 tip dc + 46 side sts; 2 ch-3 tip sps)
The trebles in the middle of each side push the outline out, so the outside edge becomes a pointed oval.
Rnd 3 (solid band): Sl st in the next ch-3 sp. Ch 3 (counts as dc), then work (dc, ch 3, 2 dc) in the same sp.
- Side: Dc in next 8 sts, [dc in next tr, 2 dc in next tr] 4 times, dc in next tr, dc in next 8 sts.
- Tip B: (2 dc, ch 3, 2 dc) in the ch-3 sp.
- Second side: Repeat the side.
Sl st in the top of the beginning ch-3 to join. (66 dc: 29 per side + 4 per tip; 2 ch-3 tip sps)
Counted between the tip spaces, each side now has 33 dc (2 + 29 + 2).
Rnd 4 (ladder ring): Sl st in the next dc and into the ch-3 sp. Ch 3 (counts as dc), then work (ch 5, dc) in the same sp.
- Side: [Ch 2, skip next st, dc in next st] 16 times, then ch 2 and skip the last st.
- Tip B: (Dc, ch 5, dc) in the ch-3 sp.
- Second side: Repeat the side.
Sl st in the 3rd ch of the beginning ch-3 to join. (36 dc: 16 per side + 4 at tips; 34 ch-2 sps, 17 per side; 2 ch-5 tip loops)
Rnd 5 (loops and petal bases): Sl st into the ch-5 tip loop. Ch 1, then work (sc, [ch 6, sc] 3 times) in the same loop. This makes 3 petal loops.
- Side: [Ch 5, skip next ch-2 sp, sc in next ch-2 sp] 8 times, then ch 5 and skip the last ch-2 sp.
- Tip B: (Sc, [ch 6, sc] 3 times) in the ch-5 loop.
- Second side: Repeat the side.
Sl st in the first sc to join. (24 sc; 18 ch-5 loops, 9 per side; 6 ch-6 petal loops, 3 per tip)
Each side skips its first and last ch-2 sp, so the loops sit evenly between the tips.
Rnd 6 (scallops): Sl st into the first ch-6 loop and ch 1. Then work as follows, skipping all the sc:
- In each ch-6 petal loop: (2 sc, hdc, 2 dc, picot, 2 dc, hdc, 2 sc)
- In each ch-5 side loop: (2 sc, hdc, dc, picot, dc, hdc, 2 sc)
Sl st in the first sc to join, then fasten off. (204 sts: 6 petals × 10 + 18 scallops × 8; 24 picots)
Work order in Rnd 6: Tip A petals 1–3, then Side 1 scallops 1–9, Tip B petals, then Side 2 scallops 1–9. Hold the motif with Tip A at the top. Side 1 then runs down the left side and Side 2 runs up the right side. The middle scallop on each side is always scallop 5.
Weave in the ends securely along the solid Rnd 3 band.
Make All Pieces
Make 32 motifs in Periwinkle for each panel, or 64 for a pair. Complete the first motif fully. Make every other motif through Rnd 5, then join it to its neighbors as you work Rnd 6.
Panel layout (Tip A at the top in every motif):
Row 1:  [A1] [B1] [C1] [D1]   <- heading goes here
Row 2:  [A2] [B2] [C2] [D2]
Row 3:  [A3] [B3] [C3] [D3]
Row 4:  [A4] [B4] [C4] [D4]
Row 5:  [A5] [B5] [C5] [D5]
Row 6:  [A6] [B6] [C6] [D6]
Row 7:  [A7] [B7] [C7] [D7]
Row 8:  [A8] [B8] [C8] [D8]   <- scalloped bottom edge
Work the motifs row by row, left to right: A1, B1, C1, D1, then A2, and so on.
Joining
Method: Join as you go in Rnd 6, replacing a plain picot with a joining picot wherever two motifs meet. Tip A and Side 1 are worked first in Rnd 6, so all of a new motif’s joins come at the start of its last round.
Top joins (vertical): Join all 3 Tip A petals to the 3 Tip B petals of the motif directly above. Match each petal to the one it faces: outer to outer and center to center. This joins the columns tip to tip, so each meeting point reads as a small flower.
Side joins (horizontal): Join Side 1 scallops 4, 5 and 6 to the left neighbor’s Side 2 scallops 6, 5 and 4. Side 2 is numbered from the bottom up, so the matching pairs are 4 to 6, 5 to 5 and 6 to 4. The middle scallops always meet. Scallops 1–3 and 7–9 stay free, which leaves the open diamonds between columns.
Count check: Each panel has 84 petal joins (4 columns × 7 seams × 3) and 72 side joins (3 seams × 8 rows × 3).
Tension: Keep the ch 1 on each side of a joining picot the same size as a normal picot. If your joins are tight, the columns will pucker. If they are loose, the panel will sag sideways.
Size checkpoint: After Row 2, the panel should measure 18 in (45.7 cm) wide and 20 in (50.8 cm) long. The finished panel before the border measures 18 in (45.7 cm) × 80 in (203.2 cm).
Border (Top Heading)
The heading is worked across the top edge only. It bridges the dips between the Row 1 tips and gives the clip rings a straight band to grip.
Border gauge: 24 sc = 4 in (10.2 cm), which is 6 sc per inch (2.5 cm).
Row 1 (bridge row): With the RS facing, join the yarn with a sl st in the picot of Side 2 scallop 9 on motif D1, at the top right edge. Ch 5 (counts as dtr).
- Across D1: Ch 5, sc in the nearest petal picot, ch 6, sc in the center petal picot, ch 6, sc in the far petal picot, ch 5, dtr in the picot of Side 1 scallop 1.
- Across C1, B1 and A1: Dtr in the picot of Side 2 scallop 9, ch 5, sc in the nearest petal picot, ch 6, sc in the center petal picot, ch 6, sc in the far petal picot, ch 5, dtr in the picot of Side 1 scallop 1.
Per motif: 2 dtr + 3 sc + 22 ch = 27 sts. Nothing is added at the seams: one motif’s last dtr is followed straight away by the next motif’s first dtr. (108 sts: 4 motifs × 27)
Row 2: Ch 1 (does not count as a st) and turn. Sc in each dtr, sc and ch across. (108 sc)
Row 3: Ch 3 (counts as dc) and turn. Dc in each st across. (108 dc)
Row 4: Ch 1 and turn. Sc in each st across. (108 sc) Fasten off.
Why the math works: Each motif is 4.5 in (11.4 cm) wide, and 4.5 × 6 sc per inch = 27 sts. Four motifs × 27 = 108 sts, and 108 ÷ 6 = 18 in (45.7 cm). That matches the joined width exactly, so the heading lies flat without ruffling or pulling.
Clip placement: Place the clips at sts 1, 19, 37, 55, 73, 91 and 108. That’s every 18 sts, or 3 in (7.6 cm), with the last clip at the edge.
Final Blocking
- Weave in all remaining ends.
- Soak the panel in cool water for 15 minutes, then press out the water in a towel. Don’t wring it.
- Pin out one section of 2 rows (8 motifs) at a time on blocking mats. Aim for 18 in (45.7 cm) wide and 10 in (25.4 cm) per motif row.
- Pin every Rnd 6 picot so the scallops and petals open fully.
- Pin the almond opening of each motif into a clean point at both ends.
- Pin the heading straight, so it measures 18 in (45.7 cm) across.
- Let each section dry completely before you move on to the next one.
- Measure the full panel. It should be 18 in (45.7 cm) × 80.75 in (205.1 cm).
Final Quality-Control Checklist
- Every motif measures 4.5 in (11.4 cm) × 10 in (25.4 cm).
- The central openings are almond-shaped and point toward the tips.
- Every motif has 24 picots: 6 petals and 18 side scallops.
- Each vertical seam has 3 petal joins, and each side seam has 3 scallop joins.
- The heading has 108 sts in every row.
- The panel measures 18 in (45.7 cm) × 80.75 in (205.1 cm).
- All ends are woven into solid areas and trimmed.
Troubleshooting
- The oval looks round: Your Rnd 2 trebles are too short. Pull the loops up to full height and recheck the Rnd 1 length.
- The tips cup forward: Your Rnd 5 petal chains are too tight. Try working the chains with a hook one size larger.
- The sides ripple: Your Rnd 3 increases are too loose. Go down a hook size for Rnd 3 only.
- The heading flares: Recount Row 1 to 27 sts per motif and tighten your chains.
- The panel grows while hanging: Re-block it, and check that the thread is mercerized cotton.
Care
Hand wash in cool water with mild soap, then lay the panel flat or pin it to dry. Don’t tumble dry. If needed, press lightly from the wrong side under a cloth.
Final Notes
The measurement chain keeps the panel square from start to finish. A ring 4.25 in (10.8 cm) long grows to a 4.5 in (11.4 cm) × 10 in (25.4 cm) motif. Four motifs across and eight down give 18 in (45.7 cm) × 80 in (203.2 cm), and the 108-stitch heading brings the finished panel to 80.75 in (205.1 cm). If each checkpoint matches, the last measurement will too. To make the panel wider, add columns in 27-stitch steps. To make it longer, add rows of motifs in 10 in (25.4 cm) steps.
Happy crocheting!